EOS (Blockchain)
Table of Contents
1. EOS 简介
EOS 是采用 DPOS (Delegated Proof of Stake)共识算法的区块链项目,它具有比以太坊更快的交易处理速度。EOS 架构如图 1 所示。其中 nodeos 是 EOS 节点主程序, cleos 是客户端程序, keosd 是 wallet 管理程序。一般地,我们不用显式地启动 keosd ,在执行 cleos 时会自动启动它。
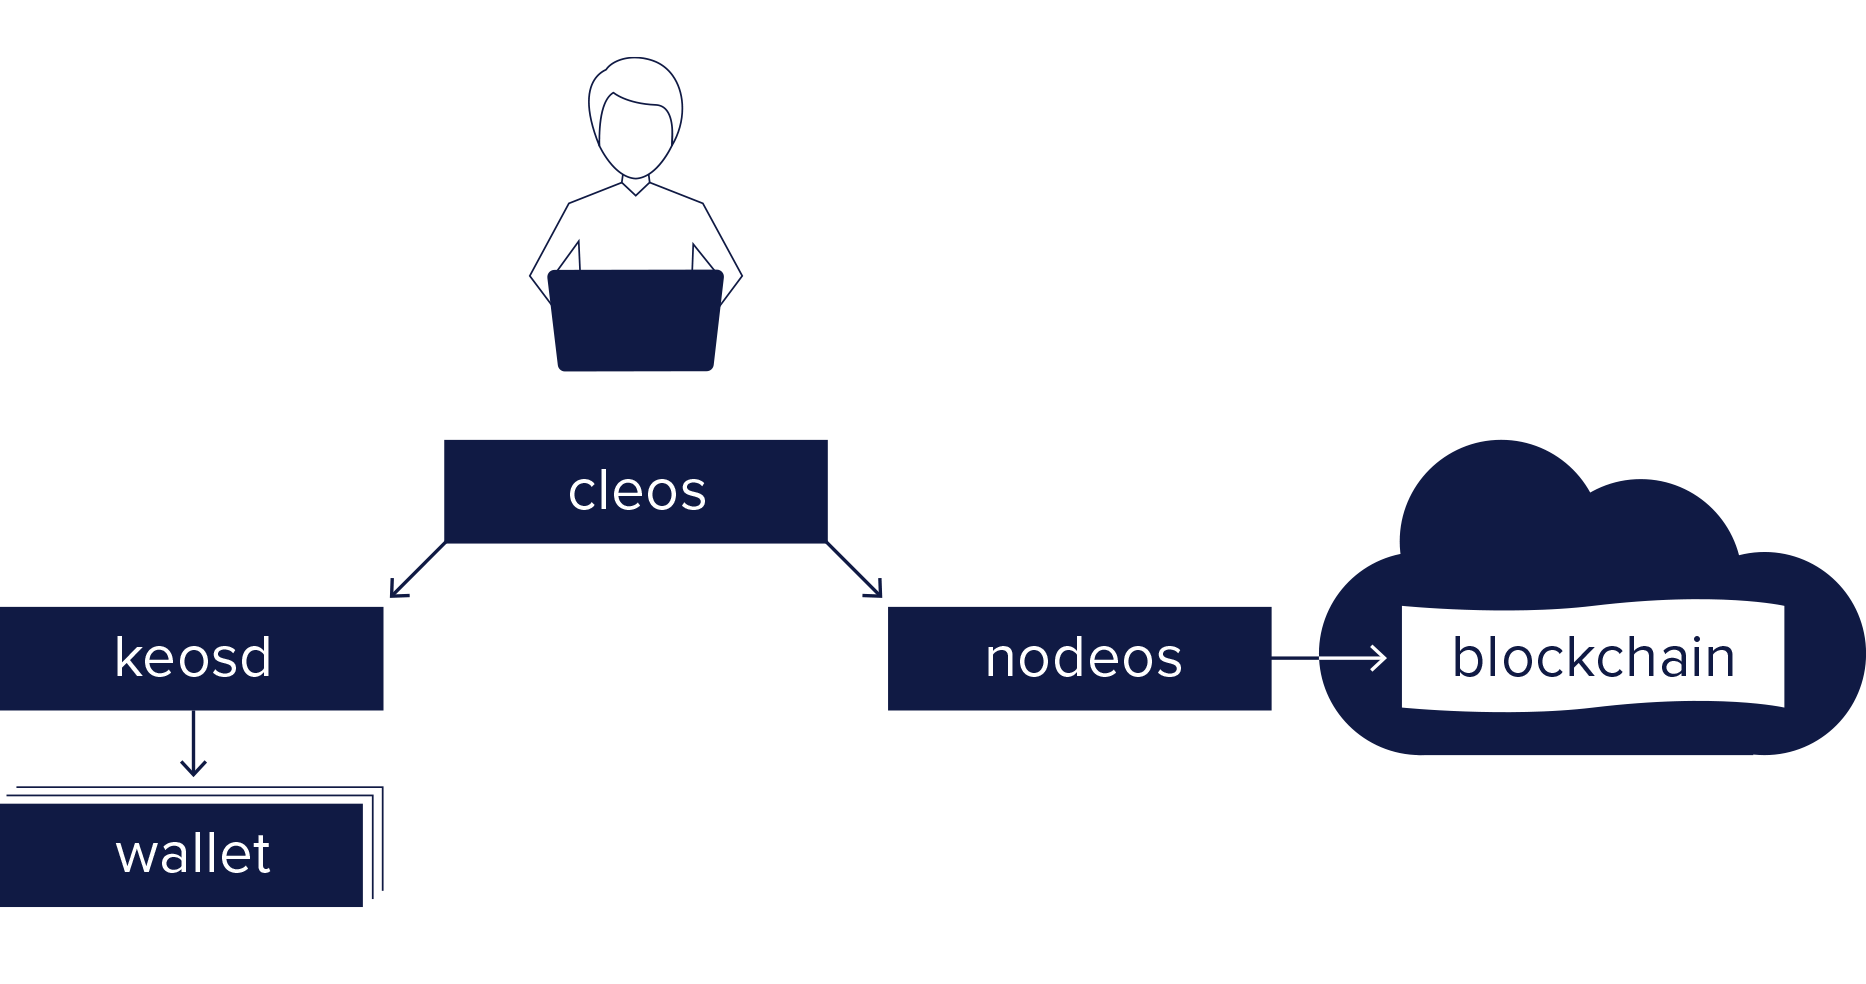
Figure 1: EOS Architecture
1.1. Wallet 和 Account
图 2 演示了 EOS 网络中 Wallet 和 Account 的关系。
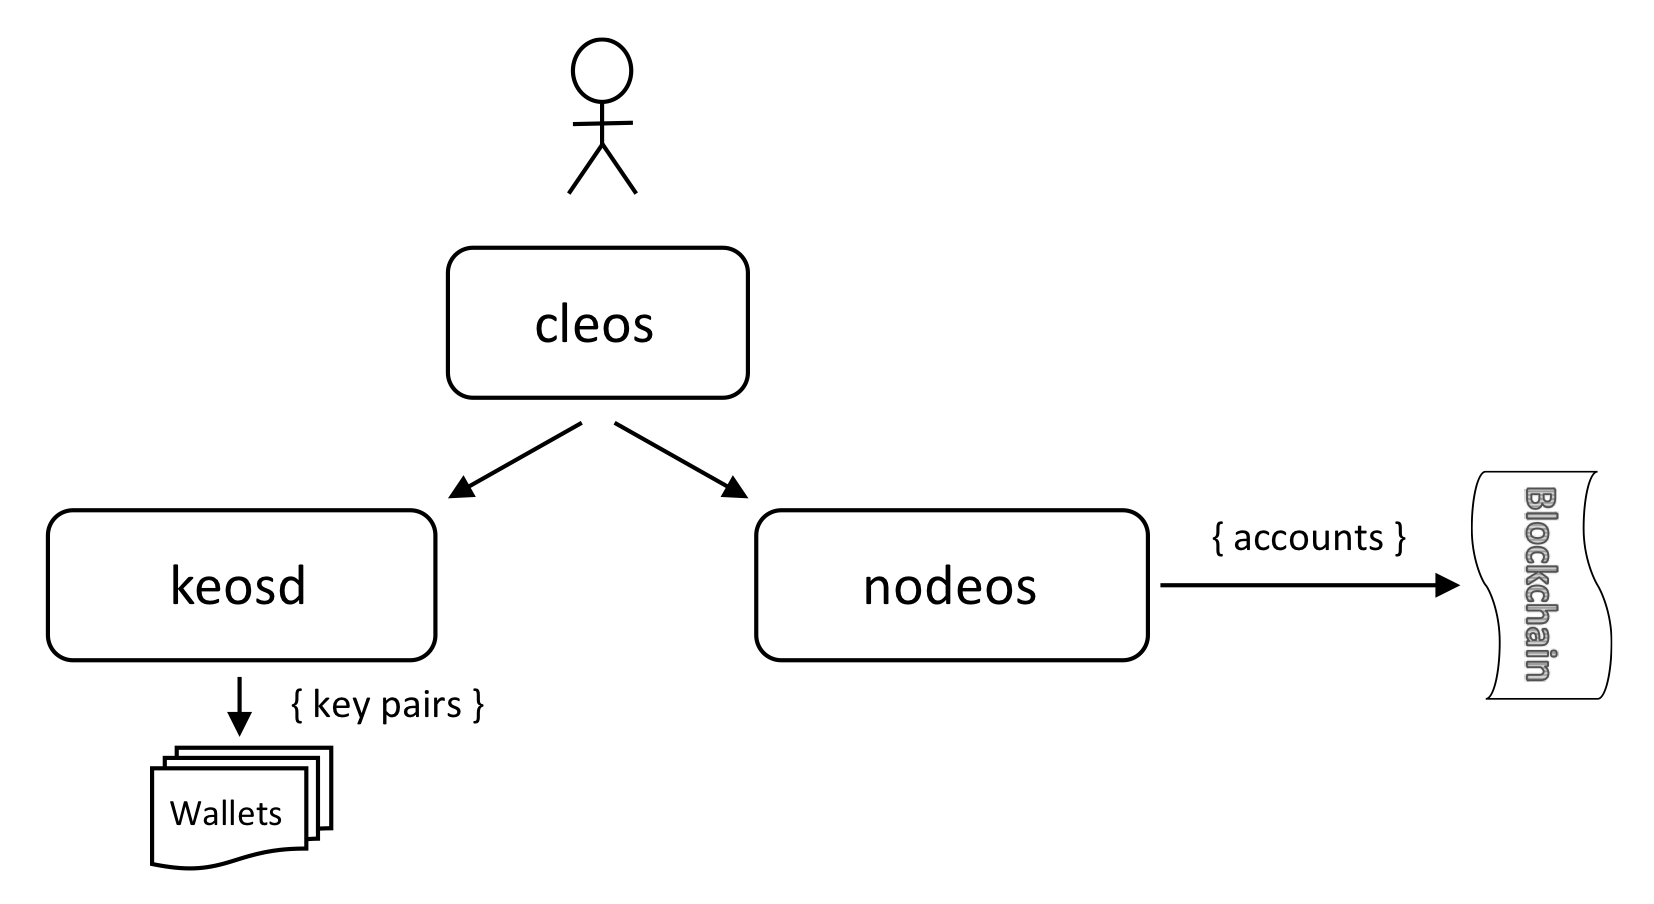
Figure 2: EOSIO Accounts and Wallets Conceptual Overview
Wallet 仅仅是管理密钥对的工具。Account 是身份的标识,提交 Transaction 时需要 Account 签名。
参考:https://developers.eos.io/eosio-nodeos/docs/learn-about-wallets-keys-and-accounts-with-cleos
1.2. Transaction 和 Action
An action represents a single operation, whereas a transaction is a collection of one or more actions. Transaction with multiple actions, these actions must all succeed or the transaction will fail.
下面 Transaction 中包含了一个 Action:
{
  "expiration": "2018-04-01T15:20:44",
  "region": 0,
  "ref_block_num": 42580,
  "ref_block_prefix": 3987474256,
  "net_usage_words": 21,
  "kcpu_usage": 1000,
  "delay_sec": 0,
  "context_free_actions": [],
  "actions": [{
      "account": "eosio.token",
      "name": "issue",
      "authorization": [{
          "actor": "eosio",
          "permission": "active"
        }
      ],
      "data": "00000000007015d640420f000000000004454f5300000000046d656d6f"
    }
  ],
  "signatures": [
    ""
  ],
  "context_free_data": []
}
2. EOS 开发环境搭建
2.1. 编译和安装
第一步,从 github 获取源码:
$ git clone  https://github.com/EOSIO/eos.git --depth=1 --branch=v1.8.6   # 使用tag v1.8.6的代码
$ git submodule update --init --recursive
第二步,编译源码:
$ cd eos/scripts/
$ ./eosio_build.sh            # 等待时间可能比较长
......
 _______  _______  _______ _________ _______
(  ____ \(  ___  )(  ____   __   __ (  ___  )
| (    \/| (   ) || (    \/   ) (   | (   ) |
| (__    | |   | || (_____    | |   | |   | |
|  __)   | |   | |(_____  )   | |   | |   | |
| (      | |   | |      ) |   | |   | |   | |
| (____/\| (___) |/\____) |___) (___| (___) |
(_______/(_______)\_______)\_______/(_______)
=============================================
EOSIO has been successfully built. 0:17:3
You can now install using: /home/cig01/eos/scripts/eosio_install.sh
Uninstall with: /home/cig01/eos/scripts/eosio_uninstall.sh

If you wish to perform tests to ensure functional code:
cd /home/cig01/eos/scripts/../build &&  make test

EOSIO website: https://eos.io
EOSIO Telegram channel: https://t.me/EOSProject
EOSIO resources: https://eos.io/resources/
EOSIO Stack Exchange: https://eosio.stackexchange.com
$ cd ..
编译结束后,会生成 nodeos,cleos,keosd 等可执行程序,它们的所在位置为:
./build/programs/nodeos/nodeos  # 节点主程序
./build/programs/cleos/cleos    # client程序
./build/programs/keosd/keosd    # wallet管理程序
第三步,安装可执行程序和头文件等到系统目录,默认为目录/usr/local/eosio(如果不想安装到这个目录,则编译时可以通过 -i 指定到其它位置,如 ./eosio_build.sh -i /path/to/installing/dir )。注:如果只是运行 nodeos 节点进行简单测试,可以不进行安装;如果你想编译测试智能合约,则需要进行安装。具体安装步骤是进入到 build 目录中,运行:
$ cd build
$ sudo make install
安装结束后,为方便命名,可设置 PATH 变量:
$ export PATH=$PATH:/usr/local/eosio/bin
2.2. 单节点测试网络(启动 nodeos)
执行下面命令可启动单节点测试网络:
$ nodeos -e -p eosio --plugin eosio::chain_api_plugin --plugin eosio::history_api_plugin
成功运行后,每隔 0.5 秒钟会产生一个块(不管有没有可打包的 transaction)。默认数据会保存在目录 ~/.local/share/eosio/nodeos/data/ 中,通过 nodeos 的选项 --data-dir 可以定制数据保存目录。
2.2.1. nodeos 配置文件
在 Linux 中,nodeos 的配置文件位于 ~/.local/share/eosio/nodeos/config/config.ini ;在 Mac 中,配置文件位于 ~/Library/Application Support/eosio/nodeos/config/config.ini 。
Linux 中的实例如下:
$ find ~/.local/share/eosio/nodeos/
/home/cig01/.local/share/eosio/nodeos/
/home/cig01/.local/share/eosio/nodeos/config
/home/cig01/.local/share/eosio/nodeos/config/config.ini
/home/cig01/.local/share/eosio/nodeos/data
/home/cig01/.local/share/eosio/nodeos/data/state
/home/cig01/.local/share/eosio/nodeos/data/state/shared_memory.bin
/home/cig01/.local/share/eosio/nodeos/data/state/shared_memory.meta
/home/cig01/.local/share/eosio/nodeos/data/blocks
/home/cig01/.local/share/eosio/nodeos/data/blocks/blocks.index
/home/cig01/.local/share/eosio/nodeos/data/blocks/reversible
/home/cig01/.local/share/eosio/nodeos/data/blocks/reversible/shared_memory.bin
/home/cig01/.local/share/eosio/nodeos/data/blocks/reversible/shared_memory.meta
/home/cig01/.local/share/eosio/nodeos/data/blocks/blocks.log
3. cleos
cleos 是一个客户端程序,它的角色如图 1 所示。
cleos 完整文档可参考:https://developers.eos.io/eosio-cleos/reference
3.1. 钱包相关命令
钱包是管理密钥的工具。
创建钱包(会自动启动 keosd):
$ cleos wallet create
"/usr/local/eosio/bin/keosd" launched
Creating wallet: default
Save password to use in the future to unlock this wallet.
Without password imported keys will not be retrievable.
"PW5JJDnHX5ajEfrBmwidji9cpbaYh9JN8JAnE8SxTeDc73V6u9tvV"
默认的钱包名为 default,通过 -n WALLET_NAME 可指定其它名字的钱包。如,创建名为 periwinkle 的钱包:
$ cleos wallet create -n periwinkle
Creating wallet: periwinkle
Save password to use in the future to unlock this wallet.
Without password imported keys will not be retrievable.
"PW5KkTgLU53zCvZng7ptLR73rLN9ofJFx5urkTWjUqRWU8ni9CtsD"
默认地,钱包文件保存在目录 ~/eosio-wallet/ 中,如:
$ ls ~/eosio-wallet/
config.ini      default.wallet       periwinkle.wallet
使用钱包中的密钥前,先需要解锁钱包(重启 keosd,或者长时间不操作会自动加锁钱包):
$ cleos wallet unlock
"/usr/local/eosio/bin/keosd" launched
password:           # 请输入运行cleos wallet create时返回的密码
在钱包中创建密钥对:
$ cleos create key --to-console
Private key: 5KChC47MwVhNCsQqVUdWESjpaKZetNyMPpKMikB83ckvmm9B2AU
Public key: EOS55fqTdFiSvubp97jJcDBU7Jc9Gtpf4J1HyBDBd8Z4vx7gBRJAw
导入密钥对到钱包:
$ $ cleos wallet import
"/usr/local/eosio/bin/keosd" launched
private key:               # 按提示输入私钥(公钥可由私钥产生),即可导入密钥对
列出钱包中所有的公钥:
$ cleos wallet keys
[
  "EOS6AqYRP7iYUxkHSU1mSz9DKaywgt9XtqwdR4NYyph16xzyQYF3A",
  "EOS76WktMRzjXp7EDaXeX37woLH9kyQfQ3f1SnzpQ9jDXcELJhhrm",
  "EOS8awUxnuP7BDNmS2u2NSV61pRSPpW6cfcj7xARcWvm7KiTL36jP"
]
列出钱包中所有的密钥对(包含公钥和私钥):
$ cleos wallet private_keys
password: [[
    "EOS6AqYRP7iYUxkHSU1mSz9DKaywgt9XtqwdR4NYyph16xzyQYF3A",
    "5KFnccJuuCas3Qkx2H6tpLMjZkuQgwACmwMspdCrVFefWRUUojh"
  ],[
    "EOS76WktMRzjXp7EDaXeX37woLH9kyQfQ3f1SnzpQ9jDXcELJhhrm",
    "5JohomNquqUiX6Ue6qqXevy3u3qSLXX8KokicBNFdSMNdG9Aepi"
  ],[
    "EOS8awUxnuP7BDNmS2u2NSV61pRSPpW6cfcj7xARcWvm7KiTL36jP",
    "5HtN3Vy2gfmebN7uCU9mcN3VPNNNTE28vinUP11wR93T8S5Kn7j"
  ]
]
EOS 没有采用比特币的 UTXO 方案,EOS 支持账号的概念,在创建账号时需要指定关联的密码对。
注:自建测试网络的内置用户 eosio 关联的密钥对为:
### 用户eosio关联的密钥对:
Private key: 5KQwrPbwdL6PhXujxW37FSSQZ1JiwsST4cqQzDeyXtP79zkvFD3
Public key: EOS6MRyAjQq8ud7hVNYcfnVPJqcVpscN5So8BhtHuGYqET5GDW5CV
这是在 nodeos 的配置文件 config.ini 中指定的,你可以在该文件中找到下面配置:
signature-provider = EOS6MRyAjQq8ud7hVNYcfnVPJqcVpscN5So8BhtHuGYqET5GDW5CV=KEY:5KQwrPbwdL6PhXujxW37FSSQZ1JiwsST4cqQzDeyXtP79zkvFD3
3.2. account 相关命令
3.2.1. 创建 account
在没有启用资源限制的测试环境中,可以使用命令 cleos create account CREATOR NEW_ACCOUNT_NAME OWNERKEY [ACTIVEKEY] 可以创建用户。如:创建新用户 eosio.token:
$ cleos create account eosio eosio.token EOS55fqTdFiSvubp97jJcDBU7Jc9Gtpf4J1HyBDBd8Z4vx7gBRJAw
如果环境启用了资源限制,请使用 cleos system newaccount 创建用户。
3.2.2. 查询 account 余额等信息
使用命令 cleos get account ACCOUNT 可以查看指定帐号的信息。如:
$ cleos get account account1
permissions:
     owner     1:    1 EOS6CMipgbEp2TF7Z4MWYrVqXn1rBX4Nk7sXaw6K1MPXECLwK6i1x
        active     1:    1 EOS6CMipgbEp2TF7Z4MWYrVqXn1rBX4Nk7sXaw6K1MPXECLwK6i1x
memory:
     quota:     65.14 MiB    used:     2.926 KiB

net bandwidth:
     delegated:  100000.0000 SYS           (total staked delegated to account from others)
     used:                 0 bytes
     available:        164.8 TiB
     limit:            164.8 TiB

cpu bandwidth:
     delegated:  100000.0000 SYS           (total staked delegated to account from others)
     used:                 0 us
     available:         9600 hr
     limit:             9600 hr

SYS balances:
     liquid:          700.0000 SYS
     staked:            0.0000 SYS
     unstaking:         0.0000 SYS
     total:           700.0000 SYS
说明:自己搭建的测试网络,其系统币的默认名称以前叫 EOS,现在改为了名称 SYS(注:在编译时可以通过参数来定制这个名称,如 ./eosio_build.sh -s XYZ 就可以把系统币符号改为 XYZ)。
使用命令 cleos get currency balance CONTRACT ACCOUNT SYMBOL 可以查询相关符号的余额。如:
$ cleos get currency balance eosio.token account1 SYS
700.0000 SYS
3.2.3. account 之间转账
从 eosio 转账 20 个 SYS 给 account1:
$ cleos push action eosio.token transfer '["eosio", "account1", "20.0000 SYS", "transfer test"]' -p eosio@active
又如,从 account1 转账 7 个 SYS 给 account2:
$ cleos push action eosio.token transfer '["account1", "account2", "7.0000 SYS", "transfer test"]' -p account1@active
3.3. 查询 block 等信息
使用 cleos get info 可查询 blockchain 的基本信息。下面是查询 EOS Jungle Testnet 的基本信息的例子:
$ cleos -u 'http://193.93.219.219:8888' get info
{
  "server_version": "4f4e5c22",
  "chain_id": "038f4b0fc8ff18a4f0842a8f0564611f6e96e8535901dd45e43ac8691a1c4dca",
  "head_block_num": 9032041,
  "last_irreversible_block_num": 9031710,
  "last_irreversible_block_id": "0089d01e16fdaa1bde1c8b00efc00f7c1783a032a067b150f6f07e9989152893",
  "head_block_id": "0089d169efbc73b5493cde0ce692e864b2ed92ca7a0da8964f2a6775e903faa9",
  "head_block_time": "2018-08-10T01:38:41.500",
  "head_block_producer": "blockgenesys",
  "virtual_block_cpu_limit": 200000000,
  "virtual_block_net_limit": 1048576000,
  "block_cpu_limit": 199900,
  "block_net_limit": 1048576
}
注:“http://193.93.219.219:8888” 是 EOS Jungle Testnet 某个节点的地址,如果连接不上,可以去 https://github.com/CryptoLions/EOS-Jungle-Testnet 换个其它地址再尝试。
使用 cleos -u get block BLOCK_NUM 可查询 block 信息。下面是查询 block 77 基本信息的例子:
$ cleos -u 'http://193.93.219.219:8888' get block 77
{
  "timestamp": "2018-06-09T00:56:19.000",
  "producer": "eosio",
  "confirmed": 0,
  "previous": "0000004c7c005b5286672836d0d97bb20f6f8e61f81a21241ecadb37b4ab308e",
  "transaction_mroot": "839e12e70837963752a66d8069782dc94d3d48e7ffe880f9b000691d69da7860",
  "action_mroot": "24e2e36df4ce97d5eb8e0afa95c9c5d7169b383d16c8793057ef8b85ddaf209e",
  "schedule_version": 0,
  "new_producers": null,
  "header_extensions": [],
  "producer_signature": "SIG_K1_KjASC9kPqmSwEQvYcYHFmd7uAiGYhYxHuG7vu5ZrHauUUxMJXMwt2UdxnNL9tt216Kvsd3wNRnfGbt2cxdTUPmVvmYAGSi",
  "transactions": [{
      "status": "executed",
      "cpu_usage_us": 6919,
      "net_usage_words": 45,
      "trx": {
        "id": "5f4d127a46609284230cd0f6534be6aa581c28435118c0412f522da592c38354",
        "signatures": [
          "SIG_K1_Jvd8N8m4hKnF65KwRcPGRdFPZnAJFL9VFsxRygwEp8bdAFZjdx57jtPe6kDTcvufQNNJmcmjnNLBqh6ottgnFtsaEMThJz"
        ],
        "compression": "none",
        "packed_context_free_data": "",
        "context_free_data": [],
        "packed_trx": "7a261b5b4a0054aabee40000000100408c7a02ea3055000000000085269d00081ff2f6fb2a6e0500030000000000ea305500409e9a2264b89a010000000000ea305500000000a8ed3232660000000000ea3055801d56533199896a01000000010002a70ee5f4d7bea559be2fb7ec7bc2422af0009847af6e4e8db3dec402ebe54e4b0100000001000000010002a70ee5f4d7bea559be2fb7ec7bc2422af0009847af6e4e8db3dec402ebe54e4b010000000000000000ea305500b0cafe4873bd3e010000000000ea305500000000a8ed3232140000000000ea3055801d56533199896a002000000000000000ea305500003f2a1ba6a24a010000000000ea305500000000a8ed3232310000000000ea3055801d56533199896aca29bf000000000004454f5300000000cb29bf000000000004454f53000000000100",
        "transaction": {
          "expiration": "2018-06-09T00:59:38",
          "ref_block_num": 74,
          "ref_block_prefix": 3837700692,
          "max_net_usage_words": 0,
          "max_cpu_usage_ms": 0,
          "delay_sec": 0,
          "context_free_actions": [{
              "account": "eosio.null",
              "name": "nonce",
              "authorization": [],
              "data": "1ff2f6fb2a6e0500"
            }
          ],
          "actions": [{
              "account": "eosio",
              "name": "newaccount",
              "authorization": [{
                  "actor": "eosio",
                  "permission": "active"
                }
              ],
              "data": {
                "creator": "eosio",
                "name": "he4tmgenesis",
                "owner": {
                  "threshold": 1,
                  "keys": [{
                      "key": "EOS6A4dZ778YzVZWLo1Tu3GopAyUGSWGHpocfTnZNqVzRQZaNSDN4",
                      "weight": 1
                    }
                  ],
                  "accounts": [],
                  "waits": []
                },
......
......
  "block_extensions": [],
  "id": "0000004df662cd11b55d479e15882170b82b65bab6fbee31d202f0d78203d4aa",
  "block_num": 77,
  "ref_block_prefix": 2655477173
}
4. RPC API
nodeos 节点对外提供 RPC API 服务(需要启用相应的插件),客户端程序 cleos 本质上就是使用这些 API。
比如,查询链基本信息的命令 cleos -u 'http://193.93.219.219:8888' get info 相当于:
$ curl --request POST  --url http://193.93.219.219:8888/v1/chain/get_info
{
    "server_version": "4f4e5c22",
    "chain_id": "038f4b0fc8ff18a4f0842a8f0564611f6e96e8535901dd45e43ac8691a1c4dca",
    "head_block_num": 9035429,
    "last_irreversible_block_num": 9035110,
    "last_irreversible_block_id": "0089dd66a024a65ca18583ce4480877487b062e5c574c42729def083b0403b20",
    "head_block_id": "0089dea57bb3917bbe59fd3a98c5d4bc1c4e71452067d0c420bc8eb1d75e3a51",
    "head_block_time": "2018-08-10T02:12:36.500",
    "head_block_producer": "eosdacserval",
    "virtual_block_cpu_limit": 200000000,
    "virtual_block_net_limit": 1048576000,
    "block_cpu_limit": 199900,
    "block_net_limit": 1048576
}
又如,查询账号 tester555555 余额的命令 cleos -u 'http://193.93.219.219:8888' get currency balance eosio.token tester555555 EOS 相当于:
$ curl -d '{"code":"eosio.token", "account":"tester555555", "symbol":"EOS"}' --request POST --url 'http://193.93.219.219:8888/v1/chain/get_currency_balance'
["29979.0000 EOS"]
完整 RPC API 可参考:
https://developers.eos.io/eosio-nodeos/reference
4.1. EOS 主网公开的 API Endpoints
每个 block producer 都在其主页上公开了一个 bp.json 文件,这个文件里面包含了 API Endpoints 的信息。如 http://bp.eosnewyork.io/bp.json 中包含的下面内容:
...
      "api_endpoint": "http://api.eosnewyork.io",
      "ssl_endpoint": "https://api.eosnewyork.io"
...
我们可以使用直接使用上面的 API Endpoint 进行测试,如:
$ curl -X POST https://api.eosnewyork.io/v1/chain/get_info |python -m json.tool
  % Total    % Received % Xferd  Average Speed   Time    Time     Time  Current
                                 Dload  Upload   Total   Spent    Left  Speed
100   587  100   587    0     0    879      0 --:--:-- --:--:-- --:--:--   878
{
    "block_cpu_limit": 198250,
    "block_net_limit": 1048384,
    "chain_id": "aca376f206b8fc25a6ed44dbdc66547c36c6c33e3a119ffbeaef943642f0e906",
    "head_block_id": "018cb6c1109bba6d2a836cf7338f448b219652480d2c7f55cc863761ab416cd5",
    "head_block_num": 25999041,
    "head_block_producer": "teamgreymass",
    "head_block_time": "2018-11-09T07:24:27.500",
    "last_irreversible_block_id": "018cb576b914c25e75093a634d35998410ea3fb0cf4672b038fce3d4d3970197",
    "last_irreversible_block_num": 25998710,
    "server_version": "1e9ca55c",
    "server_version_string": "v1.3.2",
    "virtual_block_cpu_limit": 5470140,
    "virtual_block_net_limit": 1048576000
}
5. 启用资源限制测试环境
前面介绍的环境都是资源不受限制的测试环境,你可以随便地提交很多 transaction,不用担心资源不够。
一旦将智能合约 eosio.system 绑定到 eosio 账号上,就会启动资源限制的环境。具体过程可参考:EOS BIOS Boot Sequence
5.1. 创建用户
在资源限制环境中,创建账户可以使用命令 cleos system newaccount ,如:
$ cleos system newaccount --stake-net "100000.0000 SYS" --stake-cpu "100000.0000 SYS" --buy-ram "1000.0000 SYS" eosio myaccount EOS81dKQdGU5pLgZQArVv1wTRApthkCmaQQ2uxURDtMYRMvfNWNKE EOS81dKQdGU5pLgZQArVv1wTRApthkCmaQQ2uxURDtMYRMvfNWNKE
5.2. 购买 ram
使用 cleos system buyram 可以购买 ram,如:
$ cleos -u 'http://193.93.219.219:8888' system buyram tester555555 tester555555 "11 EOS"
6. Tips
6.1. MongoDB 插件的支持
首先启动 MongoDB 数据库,然后在启动 nodeos 时加上下面参数:
--plugin eosio::mongo_db_plugin --mongodb-uri 'mongodb://localhost:27017/EOSdata' --replay-blockchain
这样,可以使历史交易数据同步到 MongoDB 的 EOSdata 数据库中了。
参考:https://developers.eos.io/eosio-nodeos/docs/mongo_db_plugin
6.2. MySQL 插件的支持
MySQL 插件已经从 eos 源码中去除了,你可以从 https://github.com/asiniscalchi/eosio_sql_plugin 单独下载源码,进行编译安装。
启动 MySQL 数据库,然后在启动 nodeos 时加上下面参数:
--plugin eosio::sql_db_plugin --sql_db-uri="mysql://db=eos user=root host=127.0.0.1 password=123456" --replay-blockchain
这样,可以使历史交易数据同步到 MySQL 的 eos 数据库中了。
6.3. 输出更多 debug 信息
要输出更多 debug 信息,可以在启动 nodeos 时指定 --verbose-http-errors 。
要在显示智能合约中的print输出,请启动nodeos时指定参数 --contracts-console ,或者在配置文件config.ini中指定 contracts-console = true