How to Deploy Different Contracts at the Same Address
Table of Contents
1. 问题介绍
在以太坊中,智能合约 Contract1 部署到链上后,得到地址 Addr1,我们知道在智能合约 Contract1 中调用 SELFDESTRUCT(注:SELFDESTRUCT 目前已经标记为 deprecated 了)可以销毁智能合约 Contract1。请问:地址 Addr1 上的智能合约 Contract1 销毁以后,我们还可以在地址 Addr1 上部署另一个智能合约 Contract2 吗?答案是肯定的,本文将介绍两种方法。
1.1. CREATE 和 CREATE2
在进入本文主题之前,我们先介绍一些背景知识。
以太坊上有两种方式可以创建智能合约:CREATE 和 CREATE2。
CREATE 部署的智能合约,其地址计算公式为:
keccak256(rlp_encode(sender, nonce))[12:]
其中 sender 可以是 EOA,也可以是智能合约。
- 当 sender 是 EOA 帐户时,调用 RPC eth_sendTransaction(指定
to为 null,data为合约的 init code)可部署智能合约。 - 当 sender 是智能合约时,在 Solidity 中使用关键字
new可部署智能合约,如new Contract1(),这种方式部署的合约会按照 CREATE 的规范得出地址。
CREATE2 部署的智能合约,其地址计算公式为:
keccak256(0xff ++ deployer_addr ++ salt ++ keccak256(init_code))[12:]
如果在智能合约中使用 new 关键字部署另一智能合约时指定了 salt 选项(不指定 salt 选项时是按照 CREATE 规则得到新地址),则部署的新合约会按照 CREATE2 的规范来得出新地址。比如 new Contract1{salt: salt}() 。
1.1.1. init code 和 runtime bytecode
在合约部署时,会涉及到两种 bytecode:
- init code (creation bytecode)。比如 RPC eth_sendTransaction 的 data 字段就是 init code;CREATE2 的参数中也有 init code;
- runtime bytecode (deployed bytecode)。合约部署时会运行 init code,而 init code 的结果就是 runtime bytecode。使用 EXTCODECOPY 可以复制合约的 runtime bytecode。
2. 方法一:CREATE(重置 nonce 为 1)
前面介绍过,使用 CREATE 部署合约,合约的地址只和 sender 和 nonce 值有关:
- 如果 sender 是 EOA 地址,那么 EOA 的 nonce 值是自增的,这样使用同一个 sender 每次部署合约时所使用的 nonce 值都会不一样,所以 EOA 地址没有办法使用 CREATE 部署合约到一个以前存在的地址中。
- 如果 sender 是智能合约地址(记为 deployer),它的 nonce 值也是自增的(EIP161 规定了从 1 开始自增),但是 deployer 合约本身可以被销毁(SELFDESTRUCT), deployer 合约销毁后,它的 nonce 值会被重置为 1, 我们可以使用 CREATE2 重新部署同一个 deployer 合约(合约相同,地址也相同)。这样,每次 deployer 被重新部署时,在 deployer 合约中通过 CREATE 部署的第一个合约,由于 nonce 值每次都是 1,所以其地址一定都相同。
举例来说,如果下面的 Contract10/Contract11/Contract12/Contract20/Contract21/Contract22 都是由 deployer 合约使用 CREATE 部署,则 Contract10/Contract11/Contract12 地址分别会和 Contract20/Contract21/Contract22 地址相同。
deployer
    Contract10             # nonce=1, addr(Contract10) = keccak256(rlp_encode(deployer_addr, nonce=1))[12:]
    Contract11             # nonce=2, addr(Contract11) = keccak256(rlp_encode(deployer_addr, nonce=2))[12:]
    Contract12             # nonce=3, addr(Contract12) = keccak256(rlp_encode(deployer_addr, nonce=3))[12:]
deployer (reset nonce to 1)
    Contract20             # nonce=1, addr(Contract20) = keccak256(rlp_encode(deployer_addr, nonce=1))[12:]
    Contract21             # nonce=2, addr(Contract21) = keccak256(rlp_encode(deployer_addr, nonce=2))[12:]
    Contract22             # nonce=3, addr(Contract22) = keccak256(rlp_encode(deployer_addr, nonce=3))[12:]
下面例子演示了如何利用重置 nonce 的方式来实现“部署一个不同合约到被销毁的合约地址上”:
// SPDX-License-Identifier: MIT

contract DeployerDeployer {
    event Log(address addr);

    function deploy() external {
        bytes32 salt = keccak256(abi.encode(uint(123)));
        address addr = address(new Deployer{salt: salt}()); // 这是 CREATE2 方式,部署出来的地址和 deployer_addr(即 DeployerDeployer 地址), salt, init_code 有关
        emit Log(addr);
    }
}

contract Deployer {
    event Log(address addr);

    function deployContract1() external {
        address addr = address(new Contract1());   // 部署出来的地址和 deployer_addr 和 nonce 有关
        emit Log(addr);
    }

    function deployContract2() external {
        address addr = address(new Contract2());   // 部署出来的地址和 deployer_addr 和 nonce 有关
        emit Log(addr);
    }

    function kill() external {
        selfdestruct(payable(address(0)));
    }
}

contract Contract1 {
    function f1() public pure returns (uint) {
        return 1;
    }

    function kill() external {
        selfdestruct(payable(address(0)));
    }
}

contract Contract2 {
    function f2() public pure returns (uint) {
        return 2;
    }

    function kill() external {
        selfdestruct(payable(address(0)));
    }
}
测试步骤:
- 部署 DeployerDeployer 合约;
- 调用 DeployerDeployer 合约的 deploy 方法来部署 Deployer 合约,记部署后的 Deployer 合约的地址为 AddrD;
- 调用 Deployer 合约的 deployContract1 方法来部署 Contract1 合约,记部署后 Contract1 合约的地址为 Addr1;
- 调用 Deployer 合约的 kill 方法来销毁 Deployer 合约,目的是重置 Deployer 合约的 nonce 值为 1;
- 调用 Contract1 合约的 kill 方法来销毁 Contract1 合约,目的清掉 Addr1 上的合约 Contract1;
- 调用 DeployerDeployer 合约的 deploy 方法来重新部署 Deployer 合约,部署后的 Deployer 合约的地址一定为 AddrD;因为 Deployer 合约是使用 CREATE2 来部署的,salt 是写死的,两次部署 Deployer 合约时没有变。
- 调用 Deployer 合约的 deployContract2 方法来部署 Contrac2 合约,部署后 Contrac2 合约的地址也一定为 Addr1。因为 Contrac2 合约是使用 CREATE 来部署的,deployer_addr 没有变(和部署 Contract1 时一样,都是同一个 Deployer 来部署的),而 nonce 也没有变(都是 1)。
2.1. 重置 nonce 值总结
前面介绍的过程可以总结为图 1 所示。
Figure 1: 利用重置 nonce 值部署不同合约到相同地址上(合约 Contract1 和 Contract2 不同,但它们地址相同)
2.2. 黑客攻击 Tornado Cash DAO
2023 年 05 月 21 日,黑客利用前面介绍的这种重置 nonce 值的方式成功攻击了 Tornado Cash DAO,一个 DAO 提案主要有提交/投票/执行三个过程。黑客的攻击思路是:提交提案时使用是的 Contract1,而当提案被投票通过后,在执行提案之前把 Contract1 销毁了,黑客部署了另一个恶意合约 Contract2 到提案所在地址(即之前的 Contract1 地址)上,这样执行提案相当于执行 Contract2 中代码了。这里有个简单的 POC:https://solidity-by-example.org/hacks/deploy-different-contracts-same-address/
3. 方法二:CREATE2(Metamorphic Contract Pattern)
利用 Metamorphic Contract Pattern 可以实现一个地址上部署不同的合约。
Metamorphic Contract 的基本原理是: 使用 CREATE2 部署合约,init code 不变(这样可以保证 CREATE2 产生的地址不变),但这个 init code 在不同时期执行会产生不同的 runtime bytecode。
3.1. Metamorphic 合约实例
//SPDX-License-Identifier: MIT

pragma solidity 0.8.1;

contract Factory {
    mapping (address => address) _implementations;

    event Deployed(address _addr);

    function deploy(uint salt, bytes calldata bytecode) public {

        bytes memory implInitCode = bytecode;

        // assign the initialization code for the metamorphic contract.
        bytes memory metamorphicCode  = (
          hex"5860208158601c335a63aaf10f428752fa158151803b80938091923cf3"
        );

        // determine the address of the metamorphic contract.
        address metamorphicContractAddress = _getMetamorphicContractAddress(salt, metamorphicCode);

        // declare a variable for the address of the implementation contract.
        address implementationContract;

        // load implementation init code and length, then deploy via CREATE.
        /* solhint-disable no-inline-assembly */
        assembly {
          let encoded_data := add(0x20, implInitCode) // load initialization code.
          let encoded_size := mload(implInitCode)     // load init code's length.
          implementationContract := create(       // call CREATE with 3 arguments.
            0,                                    // do not forward any endowment.
            encoded_data,                         // pass in initialization code.
            encoded_size                          // pass in init code's length.
          )
        } /* solhint-enable no-inline-assembly */

        //first we deploy the code we want to deploy on a separate address
        // store the implementation to be retrieved by the metamorphic contract.
        _implementations[metamorphicContractAddress] = implementationContract;

        address addr;
        assembly {
            let encoded_data := add(0x20, metamorphicCode) // load initialization code.
            let encoded_size := mload(metamorphicCode)     // load init code's length.
            addr := create2(0, encoded_data, encoded_size, salt)
        }

        require(
          addr == metamorphicContractAddress,
          "Failed to deploy the new metamorphic contract."
        );
        emit Deployed(addr);
    }

    /**
    * @dev Internal view function for calculating a metamorphic contract address
    * given a particular salt.
    */
    function _getMetamorphicContractAddress(
        uint256 salt,
        bytes memory metamorphicCode
        ) internal view returns (address) {

        // determine the address of the metamorphic contract.
        return address(
          uint160(                      // downcast to match the address type.
            uint256(                    // convert to uint to truncate upper digits.
              keccak256(                // compute the CREATE2 hash using 4 inputs.
                abi.encodePacked(       // pack all inputs to the hash together.
                  hex"ff",              // start with 0xff to distinguish from RLP.
                  address(this),        // this contract will be the caller.
                  salt,                 // pass in the supplied salt value.
                  keccak256(
                      abi.encodePacked(
                        metamorphicCode
                      )
                    )     // the init code hash.
                )
              )
            )
          )
        );
    }

    // getImplementation() 的函数 selector 为 0xaaf10f42,它会被代码 5860208158601c335a63aaf10f428752fa158151803b80938091923cf3 所调用
    function getImplementation() external view returns (address implementation) {
        return _implementations[msg.sender];
    }

}

contract Test1 {
    uint public myUint;

    function setUint(uint _myUint) public {
        myUint = _myUint;
    }

    function killme() public {
        selfdestruct(payable(msg.sender));
    }
}

contract Test2 {
    uint public myUint;

    function setUint(uint _myUint) public {
        myUint = 2*_myUint;
    }

    function killme() public {
        selfdestruct(payable(msg.sender));
    }

}
下面是使用步骤:
- 部署 Factory 合约;
- 调用 Factory 合约的 deploy 方法部署 Test1,deploy 的第 1 个参数设置为 salt=1(不一定是 1,和第 4 步时使用的 salt 值一样就行),第 2 个参数设置为 bytecode=Test1's bytecode; deploy 的主要逻辑是:先使用 CREATE 部署 deploy 的第 2 个参数传入的 bytecode(比如这次就是 Test1 的 bytecode),然后把部署后的地址写入到状态变量 _implementations 中,最后调用 CREATE2 完成部署(指定的 init code 固定为 0x5860208158601c335a63aaf10f428752fa158151803b80938091923cf3),CREATE2 部署后的地址就是最终 Test1 的部署地址。 从 deploy 方法执行时发出的 event Deployed 中可以得到 Test1 的部署地址;
- 调用 Test1 的 killme 方法,可以销毁 Test1 合约;
- 调用 Factory 合约的 deploy 方法部署 Test2,deploy 的第 1 个参数设置为 salt=1,第 2 个参数设置为 bytecode=Test2's bytecode;从 deploy 方法执行时发出的 event Deployed 中可以得到 Test2 的部署地址;
- 我们可以验证两次调用 deploy 方法时,从 event Deployed 中得到的地址相同。也就是说 Test1 和 Test2 尽管逻辑不同,但它们的地址却相同。
读者可能有个疑问,在第 2 步和第 4 步中使用 CREATE2 来部署合约时,所使用的 init code 是相同的(即上面代码中的 0x5860208158601c335a63aaf10f428752fa158151803b80938091923cf3)。为什么这个 init code 即可生成 Test1 的 runtime code,又可生成 Test2 的 runtime code 呢?下一节将介绍。
3.2. init code(metamorphicCode)
Init code 0x5860208158601c335a63aaf10f428752fa158151803b80938091923cf3(共 29 字节)的每个字节的具体说明可以参考:https://etherscan.io/address/0x00000000e82eb0431756271f0d00cfb143685e7b#code
为了说明方便,下面摘录如下:
/**
   * @dev In the constructor, set up the initialization code for metamorphic
   * contracts as well as the keccak256 hash of the given initialization code.
   * @param transientContractInitializationCode bytes The initialization code
   * that will be used to deploy any transient contracts, which will deploy any
   * metamorphic contracts that require the use of a constructor.
   *
   * Metamorphic contract initialization code (29 bytes):
   *
   *       0x5860208158601c335a63aaf10f428752fa158151803b80938091923cf3
   *
   * Description:
   *
   * pc|op|name         | [stack]                                | <memory>
   *
   * ** set the first stack item to zero - used later **
   * 00 58 getpc          [0]                                       <>
   *
   * ** set second stack item to 32, length of word returned from staticcall **
   * 01 60 push1
   * 02 20 outsize        [0, 32]                                   <>
   *
   * ** set third stack item to 0, position of word returned from staticcall **
   * 03 81 dup2           [0, 32, 0]                                <>
   *
   * ** set fourth stack item to 4, length of selector given to staticcall **
   * 04 58 getpc          [0, 32, 0, 4]                             <>
   *
   * ** set fifth stack item to 28, position of selector given to staticcall **
   * 05 60 push1
   * 06 1c inpos          [0, 32, 0, 4, 28]                         <>
   *
   * ** set the sixth stack item to msg.sender, target address for staticcall **
   * 07 33 caller         [0, 32, 0, 4, 28, caller]                 <>
   *
   * ** set the seventh stack item to msg.gas, gas to forward for staticcall **
   * 08 5a gas            [0, 32, 0, 4, 28, caller, gas]            <>
   *
   * ** set the eighth stack item to selector, "what" to store via mstore **
   * 09 63 push4
   * 10 aaf10f42 selector [0, 32, 0, 4, 28, caller, gas, 0xaaf10f42]    <>
   *
   * ** set the ninth stack item to 0, "where" to store via mstore ***
   * 11 87 dup8           [0, 32, 0, 4, 28, caller, gas, 0xaaf10f42, 0] <>
   *
   * ** call mstore, consume 8 and 9 from the stack, place selector in memory **
   * 12 52 mstore         [0, 32, 0, 4, 0, caller, gas]             <0xaaf10f42>
   *
   * ** call staticcall, consume items 2 through 7, place address in memory **
   * 13 fa staticcall     [0, 1 (if successful)]                    <address>
   *
   * ** flip success bit in second stack item to set to 0 **
   * 14 15 iszero         [0, 0]                                    <address>
   *
   * ** push a third 0 to the stack, position of address in memory **
   * 15 81 dup2           [0, 0, 0]                                 <address>
   *
   * ** place address from position in memory onto third stack item **
   * 16 51 mload          [0, 0, address]                           <>
   *
   * ** place address to fourth stack item for extcodesize to consume **
   * 17 80 dup1           [0, 0, address, address]                  <>
   *
   * ** get extcodesize on fourth stack item for extcodecopy **
   * 18 3b extcodesize    [0, 0, address, size]                     <>
   *
   * ** dup and swap size for use by return at end of init code **
   * 19 80 dup1           [0, 0, address, size, size]               <>
   * 20 93 swap4          [size, 0, address, size, 0]               <>
   *
   * ** push code position 0 to stack and reorder stack items for extcodecopy **
   * 21 80 dup1           [size, 0, address, size, 0, 0]            <>
   * 22 91 swap2          [size, 0, address, 0, 0, size]            <>
   * 23 92 swap3          [size, 0, size, 0, 0, address]            <>
   *
   * ** call extcodecopy, consume four items, clone runtime code to memory **
   * 24 3c extcodecopy    [size, 0]                                 <code>
   *
   * ** return to deploy final code in memory **
   * 25 f3 return         []                                        *deployed!*
   *
   *
   * Transient contract initialization code derived from TransientContract.sol.
   */
总结一下它的主要逻辑:
- 调用 msg.sender 中的方法 getImplementation()(它对应的函数 selector 为 0xaaf10f42)可得到一个地址,记为 Impl 合约;
- 利用 extcodecopy 把 Impl 合约的 runtime bytecode 复制到 memory 中,这样作为 CREATE2 部署合约的 runtime bytecode。
如果 init code 0x5860208158601c335a63aaf10f428752fa158151803b80938091923cf3 中调用 getImplementation() 时得到的地址不一样,那么 extcodecopy 复制的 runtime bytecode 就不一样。这就是相同 init code 可部署出不同的 runtime bytecode 的关键。
3.3. Metamorphic Contract 总结
Metamorphic Contract 的总结如图 2 所示(摘自:https://a16zcrypto.com/posts/article/metamorphic-smart-contract-detector-tool )。
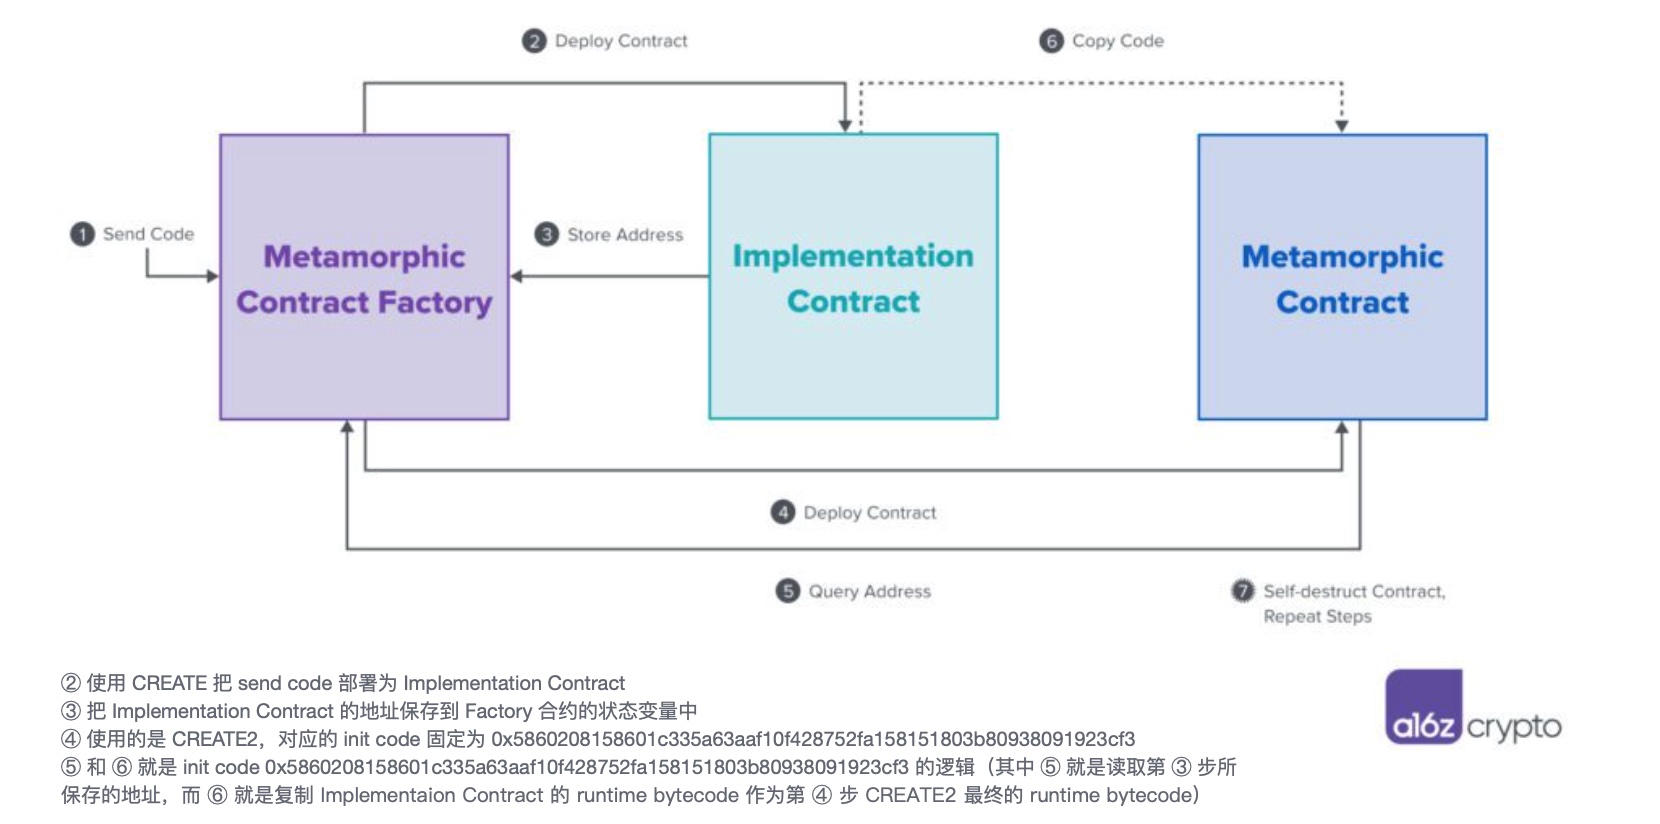
Figure 2: Metamorphic Contract 总结
两次部署(第一次部署完,调用 selfdestruct 后再进行第二次部署)时,由于使用的 init code 相同都是 0x5860208158601c335a63aaf10f428752fa158151803b80938091923cf3,所以 CREATE2 得到的地址一样(当然也要求两次部署时的 deployer_addr 和 salt 都一样,不过这很容易满足);两次部署时,③ 保存的地址不一样,从而 ⑤ 所得到的地址不一样,从而 ⑥ 复制的 runtime bytecode 不一样,从而 CREATE2 所部署合约的 runtime code 不一样。
4. 参考
- https://eips.ethereum.org/EIPS/eip-1014
- https://eips.ethereum.org/EIPS/eip-161
- https://solidity-by-example.org/hacks/deploy-different-contracts-same-address/
- https://github.com/0age/metamorphic
- https://ethereum-blockchain-developer.com/110-upgrade-smart-contracts/12-metamorphosis-create2/
- https://a16zcrypto.com/posts/article/metamorphic-smart-contract-detector-tool