Concurrency in Java
Table of Contents
- 1. Java 并发简介
- 2. 线程基本知识
- 3. 线程同步
- 4. 阻塞队列(Blocking Queue)
- 5. Liveness
- 6. Callable, Future, FutureTask
- 7. Executors(可方便构建“线程池”)
- 8. Synchronizers(用于线程同步的辅助类,优先用它们同步线程)
- 9. Atomic Variables and Nonblocking Synchronization
1. Java 并发简介
并发是同时运行多个任务的能力。这里主要讨论在 Java 中如何使用多线程来实现并发。
本文主要参考:
The Java™ Tutorials > Essential Classes > Concurrency
Java 核心技术 卷 I 基础知识(原书第 9 版),第 14 章 多线程
2. 线程基本知识
2.1. 创建线程
一般地,下面两种方法可创建一个 Java 线程。
方法一:实现 Runnable 接口。它的写法有很多,如:
public class HelloRunnable implements Runnable {  // 直接实现Runnable接口

  public void run() {
    System.out.println("Hello from a thread!");
  }

  public static void main(String args[]) {
    Thread thread = new Thread(new HelloRunnable());
    thread.start();
  }
}
也可以这样:
public class HelloRunnable {
  public static void main(String[] args) {
    Thread thread = new Thread(new Runnable() {
      @Override
      public void run() {
        System.out.println("Hello from a thread!");
      }
    });
    thread.start();
  }
}
还可以用 Lambda Expressions:
public class HelloRunnable {
  public static void main(String[] args) {
    Thread thread = new Thread(() -> {   // 这是Lambda Expressions
      System.out.println("Hello from a thread!");
    });
    thread.start();
  }
}
方法二:扩展 Thread 类,重载其 run 方法:
public class HelloThread extends Thread {

  public void run() {
    System.out.println("Hello from a thread!");
  }

  public static void main(String args[]) {
    Thread thread = new HelloThread();
    thread.start();
  }
}
参考:
Defining and Starting a Thread: https://docs.oracle.com/javase/tutorial/essential/concurrency/runthread.html
2.1.1. main 结束不会导致其他线程提前退出(所有“non-daemon”线程结束后 JVM 才结束)
在 Java 中,线程有“non-daemon”线程和“daemon”线程之分。默认地,用户创建的线程为“non-daemon”线程,但可以通过 setDaemon()来改变。JVM 创建的一些线程(比如 GC 线程)是“daemon”线程。
JVM 在满足下面两个情况之一时退出:(1)方法 System.exit()被调用;(2)所有“non-daemon”线程结束。
When a Java Virtual Machine starts up, there is usually a single non-daemon thread (which typically calls the method named main of some designated class). The Java Virtual Machine continues to execute threads until either of the following occurs:
- The exit method of class Runtime has been called and the security manager has permitted the exit operation to take place.
- All threads that are not daemon threads have died, either by returning from the call to the run method or by throwing an exception that propagates beyond the run method.
摘自:http://docs.oracle.com/javase/8/docs/api/java/lang/Thread.html
下面是一个测试实例。
// 如果没有其他同步的需求,你不需要在main中使用thread1.join()来等待子线程结束。当所有“non-daemon”线程结束后JVM才会结束。
public class ThreadTest implements Runnable {

    public void run() {
        try {
            Thread.sleep(10000);
        } catch (InterruptedException e) {
            e.printStackTrace();
        }
        System.out.println("New thread end!");
    }

    public static void main(String args[]) throws InterruptedException {
        Thread thread1 = new Thread(new ThreadTest());
        thread1.start();

        System.out.println("Main thread end!");
    }
}
上面程序会输出:
Main thread end!
New thread end!
在上面 Java 实例中,main 线程很快会结束,但这不会导致正在执行的 thread1 结束(你会看到子线程总输出“New thread end!”)。
这点和 C/C++中不一样的,如下面 C++程序中,main 结束会导致子线程退出(子线程打印的“New thread end!”不会输出):
// file test.cpp.
// g++ -std=c++11 -pthread test.cpp -o test
#include <iostream>
#include <thread>

void hello() {
  std::this_thread::sleep_for(std::chrono::seconds(10));
  std::cout<<"New thread end!\n";
}

int main() {
  std::thread t(hello);

  std::cout<<"Main thread end!\n";     // main结束会导致子线程退出,可以使用t.join()显式地等待子线程。
}
2.2. 线程的 6 个状态
A thread can be in one of the following states:
- NEW
- A thread that has not yet started is in this state.
- RUNNABLE
- A thread executing in the Java virtual machine is in this state. (处于 RUNABLE 状态的线程可能正在执行,也可能正在等待 CPU 为它分配执行时间)
- BLOCKED
- A thread that is blocked waiting for a monitor lock is in this state.
- WAITING
- A thread that is waiting indefinitely for another thread to perform a particular action is in this state. (处于 WAITING 状态的线程会一直等待,直到其他线程唤醒它,比如 Process 类的 waitFor()方法会使当前线程进入 WAITING 状态)
- TIMED_WAITING
- A thread that is waiting for another thread to perform an action for up to a specified waiting time is in this state. (过指定的一段时间后,会由系统自动唤醒,比如 Process 类的 waitFor(long timeout, TimeUnit unit)方法会使当前线程进入 TIMED_WAITING 状态)
- TERMINATED
- A thread that has exited is in this state.
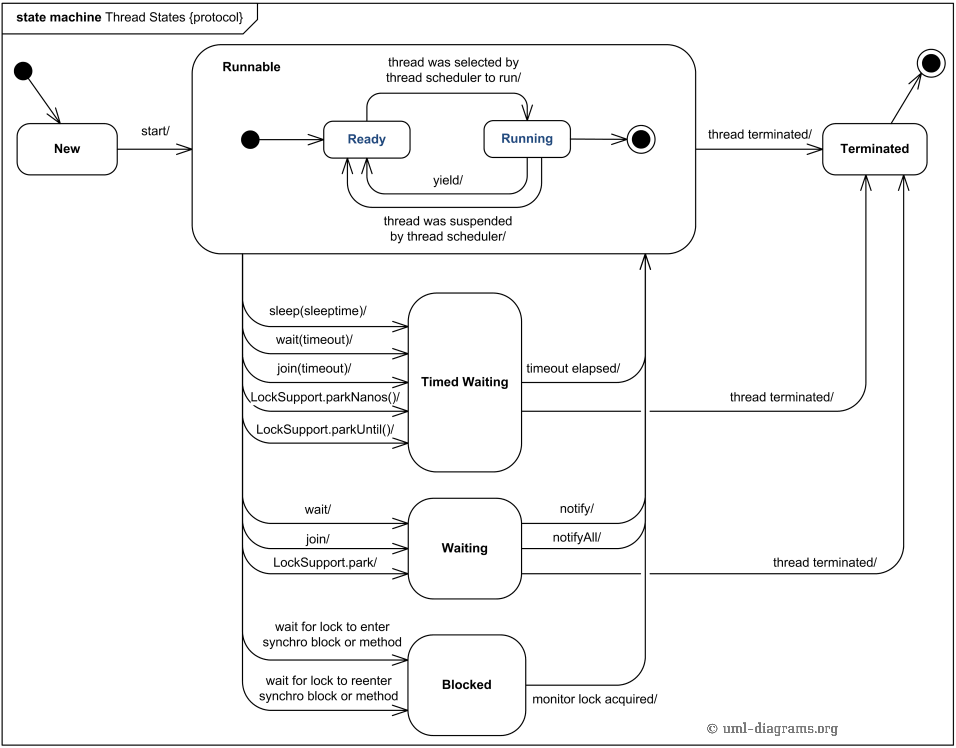
Figure 1: Java 线程状态转换图
参考:
https://docs.oracle.com/javase/7/docs/api/java/lang/Thread.State.html
http://www.uml-diagrams.org/examples/java-6-thread-state-machine-diagram-example.html
2.2.1. BLOCKED VS. WATING
In the BLOCKED state, a thread is about to enter a synchronized block, but there is another thread currently running inside a synchronized block on the same object. The first thread must then wait for the second thread to exit its block.
In the WAITING state, a thread is waiting for a signal from another thread. This happens typically by calling Object.wait(), or Thread.join(). The thread will then remain in this state until another thread calls Object.notify().
3. 线程同步
3.1. Intrinsic Lock(synchronized 关键字)
Java 从语言角度实现了 Monitor ,可以认为 Java 中每一个对象都有一个内部的锁(Intrinsic Lock)。
3.1.1. synchronized 修饰方法
用 synchronized 修饰方法,相当于用“对象的内部锁”保护整个方法,这样该方法同时只能有一个线程进入。
用 synchronized 修饰方法的用法如下:
public synchronized void method() {
  // somethings
}
相当于下面用 synchronized 修饰代码块:
public void method() {
  synchronized(this) {
    // somethings
  }
}
显然,如果一个类有多个 synchronized 修饰的方法,那么同时只能有一个线程进入这些方法中的一个。
参考:http://stackoverflow.com/questions/3160023/do-two-synchronized-methods-execute-simultaneously
3.1.2. synchronized 修饰代码块
用 synchronized 修饰代码块的用法如下:
synchronized(obj1) {
  // somethings (critical section)
}
当线程进入上面代码块中时,会获得“对象 obj1 的内部锁”,这样同时只有一个线程进入 synchronized 修饰的代码块中。
synchronized 修饰代码块可以提供细粒度的并行控制。如:
public class MsLunch {
    private long c1 = 0;
    private long c2 = 0;
    private Object lock1 = new Object();
    private Object lock2 = new Object();

    public void inc1() {
        synchronized(lock1) {
            c1++;
        }
    }

    public void inc2() {
        synchronized(lock2) {
            c2++;
        }
    }
}
参考:https://docs.oracle.com/javase/tutorial/essential/concurrency/locksync.html
3.1.3. wait, notify, notifyAll(附阻塞队列的简单实现)
| method | 说明 |
|---|---|
| wait | 使当前线程进入等待状态(该方法只能在 synchronized 方法或代码块中调用),且会释放对应的 Intrinsic Lock |
| notify | 随机唤醒一个在该对象上调用 wait 方法的线程(只能在 synchronized 方法或代码块中调用) |
| notifyAll | 唤醒所有在该对象上调用 wait 方法的线程(只能在 synchronized 方法或代码块中调用) |
synchronized/wait/notify 的简单实例:
public class BlockingQueue<T> {

    private Queue<T> queue = new LinkedList<T>();
    private int capacity;

    public BlockingQueue(int capacity) {
        this.capacity = capacity;
    }

    public synchronized void put(T element) throws InterruptedException {
        while(queue.size() == capacity) {
            wait();
        }

        queue.add(element);
        notify(); // notifyAll() for multiple producer/consumer threads
    }

    public synchronized T take() throws InterruptedException {
        while(queue.isEmpty()) {
            wait();
        }

        T item = queue.remove();
        notify(); // notifyAll() for multiple producer/consumer threads
        return item;
    }
}
参考:
http://stackoverflow.com/questions/2536692/a-simple-scenario-using-wait-and-notify-in-java
https://docs.oracle.com/javase/7/docs/api/java/lang/Object.html
3.2. ReentrantLock
一般地,Intrinsic Lock(即使用 synchronized 关键字)可以满足大部分对锁的需求。
和 Intrinsic Lock 相比,ReentrantLock(在 Java SE 5.0 中引入)的功能更加丰富,比如:(1) ReentrantLock 支持 tryLock()操作;(2)ReentrantLock 支持“公平锁”。
用 ReentrantLock 保护代码块的基本结构如下:
private ReentrantLock myLock = new ReentrantLock();

public void fun1() {
    // some code
    myLock.lock();
    try {
        // critical section.
    } finally {
        myLock.unlock();         // 千万不要忘记unlock()。放入finally子句中,有异常抛出时也会执行unlock()。
    }
    // some code
}
上面结构确保任何时刻只有一个线程进入临界区。一旦一个线程得到了锁对象,其他任何线程都无法通过 lock 语句。当其他线程调用 lock 时,它们被阻塞,直到第一个线程释放锁对象。
说明 1:ReentrantLock 从其“名字”上看,叫“可重入锁”(注:Intrinsic Lock 也是可重入锁,“可重入锁”比“不可重入锁”更加安全)。“可重入锁”的意思是同一个线程可以重复地获得已经持有的锁。锁保持一个“持有计数”来跟踪对 lock 方法的嵌套调用。线程在每一次调用 lock 都要调用 unlock 来释放锁。所以, 被一个可重入锁保护的代码可以调用另一个使用相同锁的方法。
说明 2:pthread 的互斥锁默认为“不可重入的”(如果线程获得了锁,当这个线程再次获得同一个锁时会死锁),不过可以通过设置 PTHREAD_MUTEX_RECURSIVE 来使其变为可重入锁,详情可参考 man pthread_mutexattr_init 。
3.3. ReentrantReadWriteLock(读/写锁)
如果对数据进行“读”操作的线程远多于对其进行“写”操作的线程时,读/写锁可以提供更好的并发性。
下面是使用读/写锁的必要步骤:
1. Construct a ReentrantReadWriteLock object:
    private ReentrantReadWriteLock rwl = new ReentrantReadWriteLock();

2. Extract the read and write locks:
    private Lock readLock = rwl.readLock();          // 多个读操作可以共用一个“读锁”,“读锁”会排斥写操作。
    private Lock writeLock = rwl.writeLock();        // “写锁”会排斥其他的读操作和写操作。

3. Use the read lock in all accessors:
    public double getTotalBalance()
    {
    readLock.lock();
    try { . . . }
    finally { readLock.unlock(); }
    }

4. Use the write lock in all mutators:
    public void transfer(. . .)
    {
    writeLock.lock();
    try { . . . }
    finally { writeLock.unlock(); }
    }
3.4. StampedLock(Java 8 中引入)
Java 8 中引入了 StampedLock ,提供了 writeLock() 和 readLock() 方法,可以用来代替 ReentrantReadWriteLock。除此外, StampedLock 提供了 tryOptimisticRead() 方法,用它可实现“乐观读”,当读操作多于写操作时(这往往是真实的场景),可以得到比 ReentrantReadWriteLock 更好的性能。
参考:Phaser And StampedLock Concurrency Synchronizers, by Dr Heinz M. Kabutz
3.4.1. tryOptimisticRead 应用实例:实现乐观读
用 tryOptimisticRead 实现乐观读的基本过程为:先尝试读,读完检查有没有写操作发生,如果有则获取悲观锁(读锁)并重新读。 其代码片断如下:
long stamp = lock.tryOptimisticRead(); /* 通过tryOptimisticRead得到一个票据,不会阻塞 */

// 在这里把需要用到的那些变量一一读取到对应的本地变量(如var1, var2, ...)中。

if(! lock.validate(stamp)){            /* 验证票据的有效性,若无效则不能使用var1, var2, ... */
    long stamp = lock.readLock();      /* 当票据无效时,使用readLock获得读锁,再重新读取 */
    try {
        // 重新把需要用到的那些变量一一读取到对应的本地变量(如var1, var2, ...)中。
    } finally {
        lock.unlock(stamp);
    }
}

// 这里可以安全地使用本地变量var1, var2, ...,它们肯定是系统中某时刻一致的数据。
注 1:当排它锁(写锁)已经被其它线程占有时, lock.tryOptimisticRead() 会返回 0。
注 2: lock.validate(stamp) 在下面两种情况下会返回为 false:(1)stamp 为 0;(2)获得 stamp 和调用 lock.validate(stamp) 的时间间隔内,排它锁(写锁)被其它线程获得。
注 3:如果系统中读操作远大于写操作(这往往是真实的场景),则排它锁(写锁)很少被占有,这样上面代码中的 lock.validate(stamp) 绝大部分时候都会返回 true, 则上面代码中基本上不会用到锁(读锁),这样可以大大提升性能。 但是,如果系统中写操作非常多, lock.validate(stamp) 经常返回 false,则 StampedLock 对提升性能帮忙不大。
下面是 tryOptimisticRead() 的应用实例。
import java.util.concurrent.locks.StampedLock;

class Point {
    private double x, y;
    private final StampedLock sl = new StampedLock();

    void move(double deltaX, double deltaY) {
        long stamp = sl.writeLock();
        try {
            x += deltaX;
            y += deltaY;
        } finally {
            sl.unlock(stamp);
        }
    }

    /* 计算到原点的距离。下面版本是“悲观读”(和使用ReentrantReadWriteLock类似) */
    double distanceFromOriginPessimisticVersion() {
        long stamp = sl.readLock();
        try {
            double currentX = x, currentY = y;
            return Math.sqrt(currentX * currentX + currentY * currentY);
        } finally {
            sl.unlock(stamp);
        }
    }

    /* 计算到原点的距离。下面是利用tryOptimisticRead实现的“乐观读”版本 */
    double distanceFromOrigin() {
        long stamp = sl.tryOptimisticRead();
        double currentX = x, currentY = y;
        if (!sl.validate(stamp)) {
            stamp = sl.readLock();
            try {
                currentX = x;
                currentY = y;
            } finally {
                sl.unlock(stamp);
            }
        }
        return Math.sqrt(currentX * currentX + currentY * currentY);
    }
}
上面代码中, distanceFromOriginPessimisticVersion() 是一种悲观用法,而 distanceFromOrigin() 则是乐观用法。当读操作远大于写操作时, distanceFromOrigin() 可获得更好的性能。
3.4.2. StampedLock 是不可重入的
StampedLock 是不可重入的。
StampedLocks are designed for use as internal utilities in the development of thread-safe components. Their use relies on knowledge of the internal properties of the data, objects, and methods they are protecting. They are not reentrant, so locked bodies should not call other unknown methods that may try to re-acquire locks (although you may pass a stamp to other methods that can use or convert it).
3.5. volatile 字段
volatile 仅能提供“很弱的”同步。相关知识点,请参考 Java 内存模型。
3.5.1. Double-Checked Locking using Volatile
// Works under JDK5 and later. This does not work under JDK4 and earlier.
class Foo {
      private volatile Helper helper = null;
      public Helper getHelper() {
          if (helper == null) {
              synchronized(this) {
                  if (helper == null)
                      helper = new Helper();
              }
          }
          return helper;
      }
}
参考:http://www.cs.umd.edu/~pugh/java/memoryModel/DoubleCheckedLocking.html
4. 阻塞队列(Blocking Queue)
对于许多线程问题,可以通过使用一个或多个队列以优雅且安全的方式将其形式化。生产者线程向队列插入元素,消费者线程则取出它们。使用队列,可以安全地从一个线程向另一个线程传递数据。
阻塞队列(BlockingQueue)扩展了 Queue,增加了可阻塞的插入(put)和获取(take)操作。如果队列是空的,一个获取(take)操作会一直阻塞直到队列中存在可用元素;如果队列是满的(对于有界队列),插入(put)操作会一直阻塞直到队列中存在可用空间。阻塞队列在生产者——消费者设计中非常有用。 在节 3.1.3 中有阻塞队列的一个基本实现。
The java.util.concurrent package has the following implementations of the BlockingQueue interface:
- ArrayBlockingQueue
- DelayQueue
- LinkedBlockingDeque
- LinkedBlockingQueue
- LinkedTransferQueue
- PriorityBlockingQueue
- SynchronousQueue
参考:
JAVA 并发编程实践,5.3 阻塞队列和生产者—消费者模式
Java 核心技术 卷 I 基础知识(原书第 9 版),14.6 阻塞队列
4.1. 阻塞队列实例:寻找目录及其所有子目录中包含某关键字的文件
下面是一个实例展示了如何使用阻塞队列来控制一组线程。程序在一个目录及它的所有子目录中搜索所有文件,打印出包含指定关键字的行。
import java.io.File;
import java.io.FileInputStream;
import java.io.IOException;
import java.util.concurrent.ArrayBlockingQueue;
import java.util.concurrent.BlockingQueue;
import java.util.Scanner;

/**
 * @version 1.01 2012-01-26
 * @author Cay Horstmann
 */
public class BlockingQueueTest
{
  public static void main(String[] args)
  {
    Scanner in = new Scanner(System.in);
    System.out.print("Enter base directory (e.g. /usr/local/jdk1.6.0/src): ");
    String directory = in.nextLine();
    System.out.print("Enter keyword (e.g. volatile): ");
    String keyword = in.nextLine();

    final int FILE_QUEUE_SIZE = 10;
    final int SEARCH_THREADS = 100;

    BlockingQueue<File> queue = new
      ArrayBlockingQueue<>(FILE_QUEUE_SIZE);

    FileEnumerationTask enumerator = new
      FileEnumerationTask(queue, new File(directory));
    new Thread(enumerator).start();
    for (int i = 1; i <= SEARCH_THREADS; i++)
      new Thread(new SearchTask(queue, keyword)).start();
  }
}

/**
 * This task enumerates all files in a directory and its subdirectories.
 */
class FileEnumerationTask implements Runnable
{
  public static File DUMMY = new File("");
  private BlockingQueue<File> queue;
  private File startingDirectory;

  /**
   * Constructs a FileEnumerationTask.
   * @param queue the blocking queue to which the enumerated files are added
   * @param startingDirectory the directory in which to start the enumeration
   */
  public FileEnumerationTask(BlockingQueue<File> queue, File startingDirectory)
  {
    this.queue = queue;
    this.startingDirectory = startingDirectory;
  }

  public void run()
  {
    try {
      enumerate(startingDirectory);
      queue.put(DUMMY);
    } catch (InterruptedException e) {
    }
  }

  /**
   * Recursively enumerates all files in a given directory and its subdirectories.
   * @param directory the directory in which to start
   */
  public void enumerate(File directory) throws InterruptedException
  {
    File[] files = directory.listFiles();
    for (File file : files) {
      if (file.isDirectory()) enumerate(file);
      else queue.put(file);
    }
  }
}
/**
 * This task searches files for a given keyword.
 */
class SearchTask implements Runnable
{
  private BlockingQueue<File> queue;
  private String keyword;

  /**
   * Constructs a SearchTask.
   * @param queue the queue from which to take files
   * @param keyword the keyword to look for
   */
  public SearchTask(BlockingQueue<File> queue, String keyword)
  {
    this.queue = queue;
    this.keyword = keyword;
  }

  public void run()
  {
    try {
      boolean done = false;
      while (!done) {
        File file = queue.take();
        if (file == FileEnumerationTask.DUMMY) {
            queue.put(file);
            done = true;
        } else search(file);
      }
    } catch (IOException e) {
      e.printStackTrace();
    } catch (InterruptedException e) {
    }
  }

  /**
   * Searches a file for a given keyword and prints all matching lines.
   * @param file the file to search
   */
  public void search(File file) throws IOException
  {
    Scanner in = new Scanner(new FileInputStream(file));
    int lineNumber = 0;
    while (in.hasNextLine()) {
      lineNumber++;
      String line = in.nextLine();
      if (line.contains(keyword))
        System.out.printf("%s:%d:%s%n", file.getPath(), lineNumber, line);
    }
    in.close();
  }
}
在上面程序中,生产者线程枚举在所在子目录下的所有文件并把它们放到一个阻塞队列中。同时启动了大量搜索线程。每个搜索线程从队列中取出一个文件,打开它,打印所有包含该关键字的行,然后取出下一个文件。在这个程序中我们使用了一个小技巧在工作结束后终止这个应用程序:为了发出完成信号,生产者线程放置一个虚拟对象(DUMMY)到队列中(这就像行李传送带上放一个写着“最后一个包”的虚拟包)。当搜索线程取到这个虚拟对象时,将其放回并终止。
注意:这里不需要显式的线程同步。在这个应用程序中,我们使用阻塞队列作为一种同步机制。
5. Liveness
5.1. 死锁(deadlock)
死锁是指两个或两个以上的线程在执行过程中,因争夺资源而造成的一种互相等待的现象。
5.2. 饥饿(Starvation)与活锁(Livelock)
饥饿(Starvation)描述了一个线程由于得不到足够的资源而不能执行程序的现象。 当共享资源由一个“贪婪”的线程长时间占用时,其它线程可能出现“饥饿”。 例如,假设一个对象有一个同步的方法,需要很长时间才能返回。如果一个线程经常执行这个方法,其他需要同样访问这个资源的线程就有可能出现阻塞的情况。
活锁(Livelock)是指线程 1 可以使用资源,但它很礼貌,让其他线程先使用资源;而线程 2 也可以使用资源,但它也很礼貌,也让其他线程先使用资源。这样你让我,我让你,最后两个线程都无法使用资源。例如,马路中间有条小桥,只能容纳一辆车经过,桥两头开来两辆车 A 和 B,A 比较礼貌,示意 B 先过,B也比较礼貌,示意 A 先过,结果两人一直谦让谁也过不去。
参考:
Java - Thread Livelock: http://www.logicbig.com/tutorials/core-java-tutorial/java-multi-threading/thread-livelock/
Starvation and Livelock: http://docs.oracle.com/javase/tutorial/essential/concurrency/starvelive.html
《现代操作系统(原书第 3 版)》,6.7.3 活锁,6.7.4 饥饿
6. Callable, Future, FutureTask
我们知道,Runnable 封装一个异步运行的任务,可以把它想象为一个没有参数、没有返回值的异步方法。
Callable 与 Runnable 类似,但 Callable 有返回值。 Callable 接口是一个参数化的类型,只有一个方法 call,如下所示:
public interface Callable<V>
{
    V call() throws Exception;
}
类型参数是返回值的类型。如 Callable<Integer>表示“一个最终返回 Integer 对象的异步计算”。Callable 常和 Future 一起使用。
Future 保存着异步计算的结果(可以理解为 Future 是一个“占位符”,计算完成后的结果会保存在 Future 中)。 Java 中 Future 接口如下,它有 5 个方法:
public interface Future<V> {
    V get() throws InterruptedException, ExecutionException;
    V get(long timeout, TimeUnit unit)
        throws InterruptedException, ExecutionException, TimeoutException;
    boolean cancel(boolean mayInterruptIfRunning);
    boolean isCancelled();
    boolean isDone();
}
| Future<V>接口中的方法 | 方法说明 |
|---|---|
| V get() | Waits if necessary for the computation to complete, and then retrieves its result. |
| V get(long timeout, TimeUnit unit) | Waits if necessary for at most the given time for the computation to complete, and then retrieves its result, if available. |
| boolean cancel(boolean mayInterruptIfRunning) | Attempts to cancel execution of this task. |
| boolean isCancelled() | Returns true if this task was cancelled before it completed normally. |
| boolean isDone() | Returns true if this task completed. |
调用 Future 接口中无参数的 get 方法会阻塞当前线程,直到计算完成。
6.1. FutureTask
FutureTask 包装器将 Callable 转换成 Future 和 Runnable,它同时实现二者的接口。 这样,我们可以方便地指定一个 Callable 对象给新线程了(我们知道“用 new Thread 创建线程时,只能指定 Runnable 对象”,有了 FutureTask 包装器,就可以指定 Callable 对象给新线程;后文将说明如何使用线程池,由于线程池可以直接提交 Callable 对象,所以使用线程池时一般不需要 FutureTask 包装器)。
FutureTask 使用方法大致如下:
Callable<Integer> myComputation = . . .;
FutureTask<Integer> task = new FutureTask<Integer>(myComputation);
Thread t = new Thread(task);         // it's a Runnable
t.start();
...
Integer result = task.get();         // it's a Future
6.2. 实例:计算目录及其所有子目录中包含某关键字的文件个数
下面例子将计算目录及其所有子目录中包含某关键字的文件个数。
import java.io.*;
import java.util.*;
import java.util.concurrent.*;
/**
 * @version 1.01 2012-01-26
 * @author Cay Horstmann
 */
public class FutureTest
{
  public static void main(String[] args)
  {
    Scanner in = new Scanner(System.in);
    System.out.print("Enter base directory (e.g. /usr/local/jdk5.0/src): ");
    String directory = in.nextLine();
    System.out.print("Enter keyword (e.g. volatile): ");
    String keyword = in.nextLine();

    MatchCounter counter = new MatchCounter(new File(directory), keyword);
    FutureTask<Integer> task = new FutureTask<>(counter);
    Thread t = new Thread(task);
    t.start();
    try {
      System.out.println(task.get() + " matching files.");
    } catch (ExecutionException e) {
      e.printStackTrace();
    } catch (InterruptedException e) {
    }
  }
}

/**
 * This task counts the files in a directory and its subdirectories that contain a given keyword.
 */
class MatchCounter implements Callable<Integer>
{
  private File directory;
  private String keyword;
  private int count;

  /**
   * Constructs a MatchCounter.
   * @param directory the directory in which to start the search
   * @param keyword the keyword to look for
   */
  public MatchCounter(File directory, String keyword)
  {
    this.directory = directory;
    this.keyword = keyword;
  }

  public Integer call()
  {
    count = 0;
    try {
      File[] files = directory.listFiles();
      List<Future<Integer>> results = new ArrayList<>();

      for (File file : files)
        if (file.isDirectory()) {
          // 对于每一个子目录,产生一个新的MatchCounter并为它启动一个线程。
          MatchCounter counter = new MatchCounter(file, keyword);
          FutureTask<Integer> task = new FutureTask<>(counter);
          results.add(task);
          Thread t = new Thread(task);
          t.start();
        } else {
          if (search(file)) count++;
        }

      for (Future<Integer> result : results)
        try {
          count += result.get();         // 每一次对get的调用都会发生阻塞直到对应的call返回,结果可获得为止。
                                         // 当然线程是并行运行的,因此,很可能在大致相同的时刻所有结果都可获得。
        } catch (ExecutionException e) {
          e.printStackTrace();
        }
    } catch (InterruptedException e) {
    }
    return count;
  }

  /**
   * Searches a file for a given keyword.
   * @param file the file to search
   * @return true if the keyword is contained in the file
   */
  public boolean search(File file)
  {
    try {
      Scanner in = new Scanner(file);
      boolean found = false;
      while (!found && in.hasNextLine()) {
        String line = in.nextLine();
        if (line.contains(keyword)) found = true;
      }
      in.close();
      return found;
    } catch (IOException e) {
      return false;
    }
  }
}
说明:这个实例不是很好,因为它为每个目录产生一个线程,这样可能产生大量的生命期很短的线程。可以用“线程池”来避免大量生命期很短的线程,后文将介绍如何用“线程池”实现和这个实现相同的功能。
6.3. Futures and promises
Futures and promises are pretty similar concepts, the difference is that a future is a read-only container for a result that does not yet exist, while a promise can be written (normally only once). The Java 8 CompletableFuture can be thought of as promises.
参考:http://stackoverflow.com/questions/14541975/difference-between-future-and-promise
6.4. CompletableFuture(Java 8 中引入)
6.4.1. 为什么需要 CompletableFuture
Future 是在 Java 5 中引入的类,用来描述一个异步计算的结果。你可以调用 isDone() 方法来检查计算是否完成,或者使用 get() 阻塞调用线程,直到计算完成并返回结果。不过,这两种获取 Future 结果的方式都不优雅,前一种属于“轮询”,后一种会“阻塞”。轮询的方式会消耗 CPU 资源,而阻塞的方式和我们的异步编程的初衷相违背。难道不能用观察者模式当计算结果完成后通知监听者来进行下一步处理?
很多语言,比如 Node.js 采用回调方式实现异步编程。一些 Java 库也实现了相应的观察者模式使得 Future 计算结果完成后自动进行下一步处理,如 Google guava 提供 ListenableFuture 以及辅助类 Futures 等,下面介绍 Google guava 中这两个类的使用:
import java.util.concurrent.Callable;
import java.util.concurrent.ExecutionException;
import java.util.concurrent.Executors;
import java.util.concurrent.TimeUnit;

import com.google.common.util.concurrent.FutureCallback;
import com.google.common.util.concurrent.Futures;
import com.google.common.util.concurrent.ListenableFuture;
import com.google.common.util.concurrent.ListeningExecutorService;
import com.google.common.util.concurrent.MoreExecutors;

// Test with Google guava 24.0
public class ListenableFutureTest {

    public static void main(String[] args) throws InterruptedException {
        // ExecutorService返回普通的Future,ListeningExecutorService才能返回ListenableFuture
        // 通过MoreExecutors.listeningDecorator可以将ExecutorService转换为ListeningExecutorService
        ListeningExecutorService pool = MoreExecutors.listeningDecorator(Executors.newFixedThreadPool(10));

        final ListenableFuture<Integer> listenableFuture = pool.submit(new Callable<Integer>() {
            @Override
            public Integer call() throws Exception {
                TimeUnit.SECONDS.sleep(3);          // 模拟耗时的任务
                return 100;
            }
        });

        // // 方式一:使用ListenableFuture的addListener方法
        // listenableFuture.addListener(new Runnable() {
        //     @Override
        //     public void run() {                   // 当listenableFuture结束后会调用它
        //         try {
        //             System.out.println("Get listenable future's result: " + listenableFuture.get());
        //         } catch (InterruptedException e) {
        //             e.printStackTrace();
        //         } catch (ExecutionException e) {
        //             e.printStackTrace();
        //         }
        //     }
        // }, MoreExecutors.directExecutor());

        // 方式二(代码更清晰,推荐):使用Futures.addCallback
        Futures.addCallback(listenableFuture, new FutureCallback<Integer>() {
            @Override
            public void onSuccess(Integer result) { // 当listenableFuture成功时,会调用它
                System.out.println("Get listenable future's result: " + result);
            }

            @Override
            public void onFailure(Throwable t) {    // 当listenableFuture失败时,会调用它
                t.printStackTrace();
            }
        }, MoreExecutors.directExecutor());

        pool.shutdown();
    }
}
运行上面程序,会输出:
Get listenable future's result: 100
6.4.2. CompletableFuture 基本实例
在 Java 8 中引入了 CompletableFuture ,包含了 Google guava 中类 ListenableFuture 的功能(还包含一些其他功能)。这样,不用第三方库也能编写优雅的异步执行代码了。
下面是 CompletableFuture 简单实例:
import java.util.concurrent.CompletableFuture;
import java.util.concurrent.ExecutionException;
import java.util.concurrent.TimeUnit;

public class CompletableFutureTest {

    private static int myTask() {
        try {
            TimeUnit.SECONDS.sleep(3);           // 模拟耗时的任务
        } catch (InterruptedException e) {
            e.printStackTrace();
        }
        return 100;
    }

    public static void main(String[] args) throws InterruptedException, ExecutionException {

        CompletableFuture<Integer> completableFuture = CompletableFuture.supplyAsync(() -> myTask());
        CompletableFuture<Integer> f = completableFuture.thenApply(i -> i * 2).thenApply(i -> i + 1);

        System.out.println("Get final result: " + f.get());   // Get final result: 201
    }

}
注 1:当 completableFuture 完成后,才会执行 completableFuture.thenApply 中参数指定的方法(这个过程类似于注册回调函数)。
注 2: thenApply 会返回 CompletableFuture 对象, thenApply 可以连用(上面例子中有两个 thenApply 连用)。
除方法 thenApply 外,还有其它一些方法也可实现当 completableFuture 完成后执行相关动作的功能。如表 3 所示。
| 方法 | 参数 | 参数助记 | 说明 |
|---|---|---|---|
| thenApply | Function<? super T, ? extends U> | T -> U | Apply a function to the result |
| thenCompose | Function<? super T, ? extends CompletionStage<U>> | T -> CompletableFuture<U> | Invoke the function on the result and execute the returned future. |
| handle | BiFunction<? super T, Throwable, ? extends U> | (T, Throwable) -> U | Process the result or error. |
| thenAccept | Consumer<? super T> | T -> void | Like thenApply, but with void result. |
| whenComplete | BiConsumer<? super T, ? super Throwable> | (T, Throwable) -> void | Like handle, but with void result. |
| thenRun | Runnable | Runnable | Execute the Runnable with void result. |
注:表 3 中每个方法都存在 Async 版本(如 thenApply 存在 Async 版本 thenApplyAsync(Function<? super T,? extends U> fn, Executor executor) ),不过没有把它们展示在此表中。
6.4.3. CompletableFuture: Combine Multiple Futures
CompletableFuture 中提供了一些方法可以组合多个 futures,如 CompletableFuture.allOf 会得到一个组合的 future,当所有的 futures 都完成后,这个组合的 future 才会完成。如:
import java.util.concurrent.CompletableFuture;
import java.util.concurrent.ExecutionException;
import java.util.concurrent.TimeUnit;

public class CompletableFutureTest {

    private static int myTask() {
        try {
            TimeUnit.SECONDS.sleep(3);             // 模拟耗时的任务
        } catch (InterruptedException e) {
            e.printStackTrace();
        }
        return 100;
    }

    public static void main(String[] args) throws InterruptedException, ExecutionException {

        CompletableFuture<Integer> completableFuture1 = CompletableFuture.supplyAsync(() -> myTask());
        CompletableFuture<Integer> completableFuture2 = CompletableFuture.supplyAsync(() -> myTask());
        CompletableFuture<Integer> completableFuture3 = CompletableFuture.supplyAsync(() -> myTask());

        CompletableFuture<Void> combinedFuture =
               CompletableFuture.allOf(completableFuture1, completableFuture2, completableFuture3);

        combinedFuture.get();     // 当3个CompletableFuture都结束后,才会返回

        Integer sum = completableFuture1.get() + completableFuture2.get() + completableFuture3.get();
        System.out.println("Get final result: " + sum);   // Get final result: 300
    }

}
CompletableFuture 还提供了其它一些组合多个 future 的方式,如表 4 所示。
| 方法 | 参数助记 | 说明 |
|---|---|---|
| thenCombine | CompletableFuture<U>, (T, U) -> V | Execute both and combine the results with the given function. |
| thenAcceptBoth | CompletableFuture<U>, (T, U) -> void | Like thenCombine, but with void result. |
| runAfterBoth | CompletableFuture<?>, Runnable | Execute the runnable after both complete. |
| applyToEither | CompletableFuture<T>, T -> V | When a result is available from one or the other, pass it to the given function. |
| acceptEither | CompletableFuture<T>, T -> void | Like applyToEither, but with void result. |
| runAfterEither | CompletableFuture<?>, Runnable | Execute the runnable after one or the other completes. |
| static allOf | CompletableFuture<?>... | Complete with void result after all given futures complete. |
| static anyOf | CompletableFuture<?>... | Complete with void result after any of the given futures completes. |
7. Executors(可方便构建“线程池”)
构建新的线程需要一定的代价,如果程序中创建大量的生命期很短的线程,应该使用线程池。 一个线程池中包含许多准备运行的空闲线程。将 Runnable 对象交给线程池,就会有一个线程调用 run 方法。当 run 方法退出时,线程不会死亡,而是在线程池中准备为下一个请求提供服务。
执行器(Executor)类有许多静态工厂方法用来构建线程池,如表 5 所示。
| Method | Description |
|---|---|
| ExecutorService newCachedThreadPool() | 必要时创建新线程,空闲线程会被保留 60 秒 |
| ExecutorService newFixedThreadPool(int threads) | 该池包含固定数量的线程,空闲线程会一直被保留 |
| ExecutorService newSingleThreadExecutor() | 只有一个线程的“池”,该线程顺序执行每一个提交的任务 |
| ScheduledExecutorService newScheduledThreadPool(int threads) | 用于预定执行而构造的固定线程池,是 java.util.Timer 的替代 |
| ScheduledExecutorService newSingleThreadScheduledExecutor() | 用于预定执行而构建的单线程“池” |
7.1. 线程池
通过 newCachedThreadPool/newFixedThreadPool/newSingleThreadExecutor 创建了线程池后,可以用下面的 submit 方法之一将一个 Runnable 对象或者 Callable 对象提交给 ExecutorService:
// 使用submit方法可向线程池提交任务,线程池会在方便的时候尽早地安排线程来执行提交的任务。
Future<?> submit(Runnable task)            // 对返回的Future对象调用get方法时,会在完成的时候简单地返回null
Future<T> submit(Runnable task, T result)  // 对返回的Future对象调用get方法时,会在完成的时候返回result
Future<T> submit(Callable<T> task)         // 对返回的Future对象调用get方法时,会在完成的时候返回Callable对象的call方法的返回值
该线程池会在方便的时候尽早地执行提交的任务。调用 submit 时,会得到一个 Future 对象,可用来查询该任务的状态。
当不再需要提交任务时,可以调用 shutdown 来关闭线程池。被关闭的线程池不再接受新的任务,当所有任务都完成后,线程池中线程会死亡。另一种方法是调用 shutdownNow ,它会取消尚未开始的所有任务并试图中断正在运行的线程。
说明:用 newScheduledThreadPool/newSingleThreadScheduledExecutor 创建的线程池,通过调用 schedule 等方法可以在预定时间执行任务。
7.1.1. 线程池核心类 ThreadPoolExecutor
java.uitl.concurrent.ThreadPoolExecutor 类是线程池中最核心的类(后方将介绍,newCachedThreadPool/newFixedThreadPool/newSingleThreadExecutor 等创建线程池的方法其实都是调用的 ThreadPoolExecutor 来实现的)。前面介绍过,我们使用表 5 中的方法即可方便地创建线程池,一般无需直接使用 ThreadPoolExecutor 类来创建线程池。不过,为了更好地理解线程池,有必要了解一下 ThreadPoolExecutor 类。
ThreadPoolExecutor 提供了四个构造函数:
public ThreadPoolExecutor(int corePoolSize,
                          int maximumPoolSize,
                          long keepAliveTime,
                          TimeUnit unit,
                          BlockingQueue<Runnable> workQueue) {
    this(corePoolSize, maximumPoolSize, keepAliveTime, unit, workQueue,
         Executors.defaultThreadFactory(), defaultHandler);
}

public ThreadPoolExecutor(int corePoolSize,
                          int maximumPoolSize,
                          long keepAliveTime,
                          TimeUnit unit,
                          BlockingQueue<Runnable> workQueue,
                          ThreadFactory threadFactory) {
    this(corePoolSize, maximumPoolSize, keepAliveTime, unit, workQueue,
         threadFactory, defaultHandler);
}

public ThreadPoolExecutor(int corePoolSize,
                          int maximumPoolSize,
                          long keepAliveTime,
                          TimeUnit unit,
                          BlockingQueue<Runnable> workQueue,
                          RejectedExecutionHandler handler) {
    this(corePoolSize, maximumPoolSize, keepAliveTime, unit, workQueue,
         Executors.defaultThreadFactory(), handler);
}

public ThreadPoolExecutor(int corePoolSize,
                          int maximumPoolSize,
                          long keepAliveTime,
                          TimeUnit unit,
                          BlockingQueue<Runnable> workQueue,
                          ThreadFactory threadFactory,
                          RejectedExecutionHandler handler) {
    if (corePoolSize < 0 ||
        maximumPoolSize <= 0 ||
        maximumPoolSize < corePoolSize ||
        keepAliveTime < 0)
        throw new IllegalArgumentException();
    if (workQueue == null || threadFactory == null || handler == null)
        throw new NullPointerException();
    this.corePoolSize = corePoolSize;
    this.maximumPoolSize = maximumPoolSize;
    this.workQueue = workQueue;
    this.keepAliveTime = unit.toNanos(keepAliveTime);
    this.threadFactory = threadFactory;
    this.handler = handler;
}
可以发现,前三个构造函数都是调用最后一个构造函数来实现的。ThreadPoolExecutor 构造函数的参数说明:
- corePoolSize:核心池的大小。在创建了线程池后,默认情况下,线程池中并没有任何线程,而是等待有任务到来才创建线程去执行任务,除非调用了 prestartAllCoreThreads()或者 prestartCoreThread()方法,从这 2 个方法的名字就可以看出,是预创建线程的意思,即在没有任务到来之前就创建 corePoolSize 个线程或者一个线程。默认情况下,在创建了线程池后,线程池中的线程数为 0,当有任务来之后,就会创建一个线程去执行任务,当线程池中的线程数目达到 corePoolSize 后,就会把到达的任务放到缓存队列当中;
- maximumPoolSize:线程池最大线程数,它表示在线程池中最多能创建多少个线程;
- keepAliveTime:表示线程没有任务执行时最多保持多久时间会终止。默认情况下,只有当线程池中的线程数大于 corePoolSize 时,keepAliveTime 才会起作用,直到线程池中的线程数不大于 corePoolSize,即当线程池中的线程数大于 corePoolSize 时,如果一个线程空闲的时间达到 keepAliveTime,则会终止,直到线程池中的线程数不超过 corePoolSize。但是如果调用了 allowCoreThreadTimeOut(true)方法,在线程池中的线程数不大于 corePoolSize 时,keepAliveTime 参数也会起作用,直到线程池中的线程数为 0;
- unit:参数 keepAliveTime 的时间单位;
- workQueue:一个阻塞队列,用来存储等待执行的任务;
- threadFactory:执行程序创建新线程时使用的工厂;
- handler - 由于超出线程范围和队列容量而使执行被阻塞时所使用的处理程序。
说明:newCachedThreadPool/newFixedThreadPool/newSingleThreadExecutor 等创建线程池的方法其实都是调用的 ThreadPoolExecutor 来实现的。如:
// source code of newFixedThreadPool
public static ExecutorService newFixedThreadPool(int nThreads) {
    return new ThreadPoolExecutor(nThreads, nThreads,
                                  0L, TimeUnit.MILLISECONDS,
                                  new LinkedBlockingQueue<Runnable>());
}

// source code of newCachedThreadPool
public static ExecutorService newCachedThreadPool() {
    return new ThreadPoolExecutor(0, Integer.MAX_VALUE,
                                  60L, TimeUnit.SECONDS,
                                  new SynchronousQueue<Runnable>());
}
7.1.1.1. 获取线程池的基本属性
下面是获取线程池的基本属性的例子:
// file ThreadPoolAttrTest.java
import java.util.concurrent.ExecutorService;
import java.util.concurrent.Executors;
import java.util.concurrent.ThreadPoolExecutor;

public class ThreadPoolAttrTest {

    public static void main(String[] args) {

        ExecutorService executor = Executors.newFixedThreadPool(3);
        ThreadPoolExecutor tpe = (ThreadPoolExecutor) executor;

        // 线程池中当前线程的数量
        System.out.println("PoolSize\t:" + tpe.getPoolSize());
        // 线程池中,保持激活的最小work数量,默认为
        System.out.println("CorePoolSize\t:" + tpe.getCorePoolSize());
        // 在线程池中同时出现的,最大线程数量
        System.out.println("LargestPoolSize\t:" + tpe.getLargestPoolSize());
        // 线程池允许的最大线程数量
        System.out.println("MaximumPoolSize\t:" + tpe.getMaximumPoolSize());
        // 对已提交的一个大概的任务数量
        System.out.println("TaskCount\t:" + tpe.getTaskCount());
        // 正在执行的任务数量
        System.out.println("ActiveCount\t:" + tpe.getActiveCount());
        // 执行完的任务数量
        System.out.println("CompletedTaskCount\t:" + tpe.getCompletedTaskCount());
        // 等待的任务数,处于等待执行的任务,会被放在队列当中
        System.out.println("Queue Size\t:" + tpe.getQueue().size());

    }
}
测试上面程序,输出:
PoolSize	:0
CorePoolSize	:3
LargestPoolSize	:0
MaximumPoolSize	:3
TaskCount	:0
ActiveCount	:0
CompletedTaskCount	:0
Queue Size	:0
7.2. Callable, Future, Executor 的用法举例
下面是一个 Callable, Future, Executor 的用法举例。
import java.util.ArrayList;
import java.util.List;
import java.util.concurrent.Callable;
import java.util.concurrent.ExecutionException;
import java.util.concurrent.ExecutorService;
import java.util.concurrent.Executors;
import java.util.concurrent.Future;

public class MyCallable implements Callable<String> {

    @Override
    public String call() throws Exception {
        // 实现业务逻辑,这里简单地返回线程名字
        Thread.sleep(1000);
        return Thread.currentThread().getName();
    }

    public static void main(String args[]) {
        ExecutorService executor = Executors.newFixedThreadPool(3);   // 创建包含3个线程的线程池。

        List<Future<String>> list = new ArrayList<Future<String>>();

        // Create MyCallable instance
        Callable<String> callable = new MyCallable();
        for(int i=0; i< 10; i++) {
            Future<String> future = executor.submit(callable);        // 向线程池提交任务。
            list.add(future);            // 把future保存到列表中,以便后面引用。
        }

        for(Future<String> fut : list) {
            try {
                // print the return value of Future, notice the output delay in console
                // because Future.get() waits for task to get completed
                String ret = fut.get();   // fut.get()会阻塞直到对应call方法返回,且call方法的返回值就是get()返回值。
                System.out.println(ret);
            } catch (InterruptedException | ExecutionException e) {
                e.printStackTrace();
            }
        }

        executor.shutdown();
    }
}
上面程序的测试输出如下(你可能得到不一样的结果):
pool-1-thread-1
pool-1-thread-2
pool-1-thread-3
pool-1-thread-1
pool-1-thread-3
pool-1-thread-2
pool-1-thread-2
pool-1-thread-1
pool-1-thread-3
pool-1-thread-3
7.3. 线程池实例:计算目录及其所有子目录中包含某关键字的文件个数
这个例子和前面介绍的例子功能相同(即计算目录及其所有子目录中包含某关键字的文件个数),只是用线程池实现。
import java.io.*;
import java.util.*;
import java.util.concurrent.*;

/**
 * @version 1.01 2012-01-26
 * @author Cay Horstmann
 */
public class ThreadPoolTest
{
  public static void main(String[] args) throws Exception
  {
    Scanner in = new Scanner(System.in);
    System.out.print("Enter base directory (e.g. /usr/local/jdk5.0/src): ");
    String directory = in.nextLine();
    System.out.print("Enter keyword (e.g. volatile): ");
    String keyword = in.nextLine();

    ExecutorService pool = Executors.newCachedThreadPool();
    MatchCounter counter = new MatchCounter(new File(directory), keyword, pool);
    Future<Integer> result = pool.submit(counter);

    try {
      System.out.println(result.get() + " matching files.");
    } catch (ExecutionException e) {
      e.printStackTrace();
    } catch (InterruptedException e) {
    }
    pool.shutdown();

    int largestPoolSize = ((ThreadPoolExecutor) pool).getLargestPoolSize();
    System.out.println("largest pool size=" + largestPoolSize);
  }
}

/**
 * This task counts the files in a directory and its subdirectories that contain a given keyword.
 */
class MatchCounter implements Callable<Integer>
{
  private File directory;
  private String keyword;
  private ExecutorService pool;
  private int count;

  /**
   * Constructs a MatchCounter.
   * @param directory the directory in which to start the search
   * @param keyword the keyword to look for
   * @param pool the thread pool for submitting subtasks
   */
  public MatchCounter(File directory, String keyword, ExecutorService pool)
  {
    this.directory = directory;
    this.keyword = keyword;
    this.pool = pool;
  }

  public Integer call()
  {
    count = 0;
    try {
      File[] files = directory.listFiles();
      List<Future<Integer>> results = new ArrayList<>();

      for (File file : files) {
        if (file.isDirectory()) {
          MatchCounter counter = new MatchCounter(file, keyword, pool);
          Future<Integer> result = pool.submit(counter);
          results.add(result);
        }
        else {
          if (search(file)) count++;
        }
      }

      for (Future<Integer> result : results) {
        try {
          count += result.get();
        } catch (ExecutionException e) {
          e.printStackTrace();
        }
      }
    }
    catch (InterruptedException e) {
    }
    return count;
  }

  /**
   * Searches a file for a given keyword.
   * @param file the file to search
   * @return true if the keyword is contained in the file
   */
  public boolean search(File file)
  {
    try {
      Scanner in = new Scanner(file);
      boolean found = false;
      while (!found && in.hasNextLine()) {
        String line = in.nextLine();
        if (line.contains(keyword)) found = true;
      }
      in.close();
      return found;
    } catch (IOException e) {
      return false;
    }
  }
}
7.4. Fork/Join 框架
The fork/join framework is an implementation of the ExecutorService interface that helps you take advantage of multiple processors. It is designed for work that can be broken into smaller pieces recursively. The goal is to use all the available processing power to enhance the performance of your application.
Fork/Join 是 Java 7 中提供的一个用于并行执行任务的框架,它是一个“把大任务分割成若干个小任务,最终汇总每个小任务结果后得到大任务结果”的框架。
下面是使用 Fork/Join 框架的基本步骤:
第一步,定义一个 ForkJoinTask(它是 Future 接口的一个实现,同时还增加了其它的方法)任务,它提供在任务中执行 fork()和 join()操作的机制,通常情况下我们不需要直接继承 ForkJoinTask 类,而只需要继承它的子类,Fork/Join 框架提供了以下两个常用子类:(1) RecursiveAction:用于没有返回结果的任务(即不关心任务的返回值);(2) RecursiveTask:用于有返回结果的任务。
在定义自己的 ForkJoinTask 时,你需要实现 compute()方法,它用来定义如何分割以及合并任务。一般地,compute()方法的实现类似于下面的伪代码:
if (my portion of the work is small enough)
  do the work directly
else
  split my work into two pieces                   // fork 步骤
  invoke the two pieces and wait for the results  // join 步骤
第二步,通过 ForkJoinPool(它是 ExecutorService 接口的一个实现)提交前面定义的任务即可。ForkJoinPool 中有三种方法来提交 ForkJoinTask 任务:
public void execute(ForkJoinTask<?> task)                // 提交任务(异步地)。
public <T> T invoke(ForkJoinTask<T> task)                // 执行任务,且等待执行完成。返回任务的compute()方法的返回值。
public <T> ForkJoinTask<T> submit(ForkJoinTask<T> task)  // 提交任务(异步地)。返回ForkJoinTask,在返回的ForkJoinTask上调用get()方法可等待任务结束并得到任务的compute()方法的返回值。
参考:
Oracle Fork/Join Tutorial
Fork and Join: Java Can Excel at Painless Parallel Programming Too!
7.4.1. Fork/Join 简单实例:计算连续自然数之和
连续自然数之和的计算有现成的解析公式,这里仅是演示 Fork/Join 框架的基本使用。
import java.util.concurrent.ExecutionException;
import java.util.concurrent.ForkJoinPool;
import java.util.concurrent.RecursiveTask;

public class CalcTask extends RecursiveTask<Long> {

    private static final long THRESHOLD = 100;
    private long start;
    private long end;

    public CalcTask(long start, long end) {
        this.start = start;
        this.end = end;
    }

    @Override
    protected Long compute() {
        long sum = 0;
        if ((end - start) < THRESHOLD) {
            // 如果任务比较小,则直接计算。
            for (long i = start; i <= end; i++) {
                sum += i;
            }
        } else {
            long middle = (start + end) / 2;
            CalcTask leftTask = new CalcTask(start, middle);
            CalcTask rightTask = new CalcTask(middle + 1, end);

            // 分割为两个子任务。
            leftTask.fork();
            rightTask.fork();

            // 等待子任务执行完成,并得到子任务的结果。
            long leftResult = leftTask.join();     // 对某个子任务执行join。当前线程无法继续了(因为要等待子任务的结果),
                                                   // 当前线程保存了主任务相关信息后,就能抽身为其他任务提供服务了,
                                                   // 一旦所依赖的子任务解决了,主任务就可以接着往下走。
            long rigthResult = rightTask.join();

            // 合并子任务的结果。
            sum = leftResult + rigthResult;
        }
        return sum;
    }

    public static void main(String[] args) throws InterruptedException, ExecutionException {
        ForkJoinPool forkJoinPool = new ForkJoinPool();          // or: ForkJoinPool forkJoinPool = ForkJoinPool.commonPool();  // need Java 8
        Long sum = forkJoinPool.invoke(new CalcTask(0, 1000));   // or: Long sum = forkJoinPool.submit(new CalcTask(0, 1000)).get();
        System.out.print(sum);     // 会输出500500
    }
}
7.4.1.1. “计算连续自然数之和”的普通 ExecutorService 实现
对于上面的“计算连续自然数之和”这个例子,不使用 Fork/Join,使用普通的 ExecutorService 也可以实现。代码如下:
import java.util.*;
import java.util.concurrent.*;
import java.util.Arrays;

public class Sums implements Callable<Long> {

    private final long start;
    private final long end;

    Sums(long start, long end) {
        this.start = start;
        this.end = end;
    }

    @Override
    public Long call() {
        long sum = 0;
        for (long i = start; i <= end; i++) {
            sum = sum + i;
        }
        return sum;
    }

    public static void main(String[] args) throws Exception {

        ExecutorService executor = Executors.newFixedThreadPool(4);
        List<Future<Long>> results = executor.invokeAll(Arrays.asList(new Sums(0, 200),
                new Sums(201, 400),
                new Sums(401, 600),
                new Sums(601, 800),
                new Sums(801, 1000)));   // 分为5个子任务
        executor.shutdown();

        long sum = 0;
        for (Future<Long> result : results) {
            sum += result.get();
        }
        System.out.println(sum);    // 会输出500500
    }
}
7.4.2. Fork/Join 比普通 ExecutorService 的好处在于——它采用了 Work stealing 算法,可充分利用线程资源
我们先简单地回顾一下普通的 ExecutorService 模型(普通的线程池模型)的工作方式。
以银行的工作模式为例,假设银行的一个员工同时只能为一个顾客提供服务,顾客比较多时可能需要排队等候。而且,银行员工非常地有耐心,他永远不会要正在享受服务的顾客离开,即使正在享受服务的顾客在等待其他事情发生时,银行员工也会一直等待这个顾客。如图 2 所示。
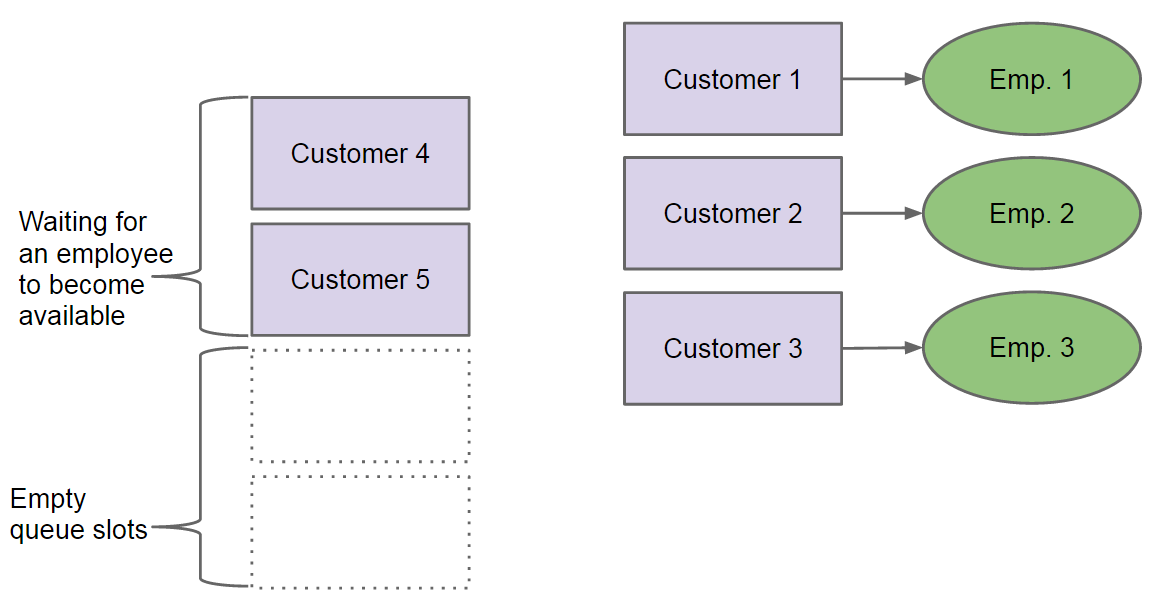
Figure 2: Customers waiting for their turn
如果我们用普通的 ExecutorService 模型(普通的线程池模型)来表示图 2 所示模型的话,可以对应地表示为图 3 所示。
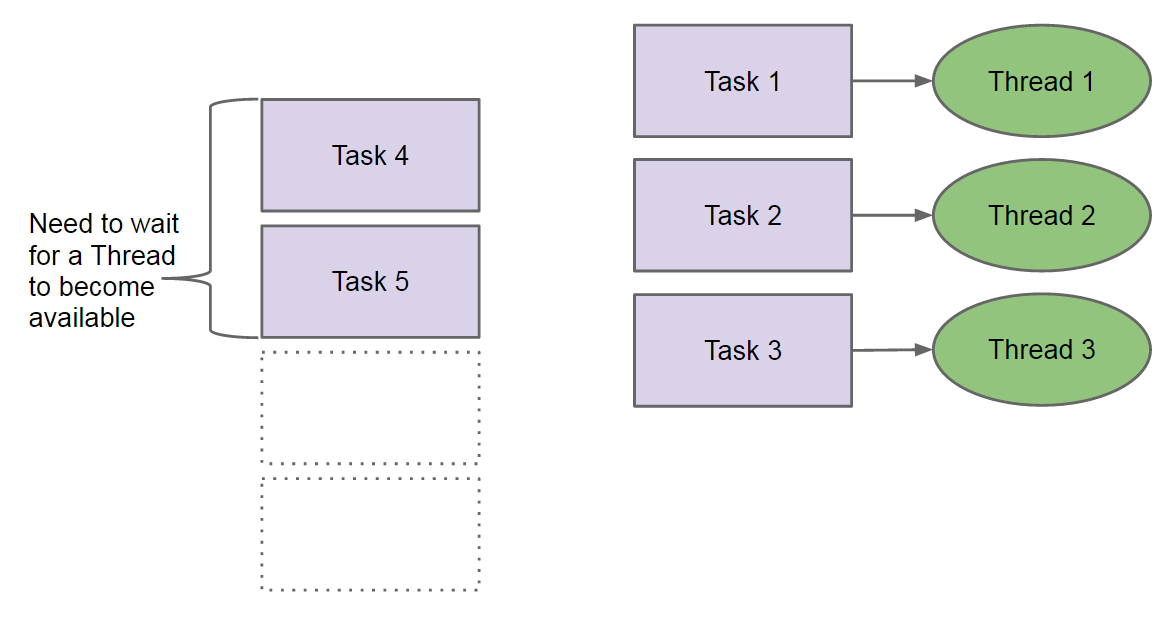
Figure 3: 普通 ExecutorService 模型的 Threads and Tasks
现成考虑一个稍微复杂的情况。Empolyee 1 正在给 Customer 1 提供服务,但是 Customer 1 需要从 Customer 6 中得到一些信息。这时,Customer 1 叫 Customer 6 来银行,Customer 6 排队等待空闲的银行员工给它提供服务。如图 4 所示。
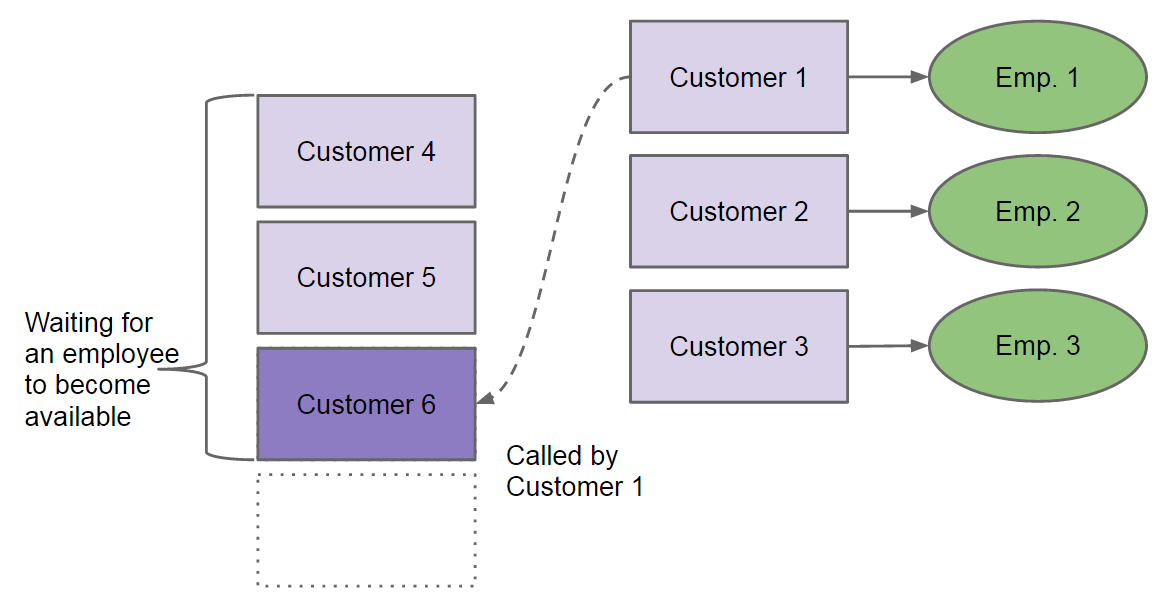
Figure 4: Old Customer waiting for New Customer
前面提到过,银行员工是非常地有耐心的,所以 Empolyee 1 一直被 Customer 1 占用着,直到 Customer 6 被其它银行员工服务过,Customer 1 才能得到 Customer 6 的相应信息,Empolyee 1 才有机会完成对 Customer 1 的服务。 显然,这种工作方式有如下明显的缺点:如果全部的员工都在给客户提供服务,且所有客户都在等待其它事件发生,这时,银行员工将一直被占用着,无法给其它新客户提供服务,出现了死锁!比如,前面例子中,又假设 Customer 2 需要从 Customer 7 中得到一些信息,Customer 3 需要从 Customer 8 中得到一些信息,这时,Empolyee 1/2/3 分别被 Customer 1/2/3 占用着,而 Customer 6/7/8 一直不会被服务到,从而 Customer 1/2/3 的服务永远不会结束,出现了死锁。如果增加银行员工数量,也仅仅是减少了死锁发生的可能,不能彻底解决问题。
上面的死锁场景在一些递归算法中是很常见的,比如求解汉诺塔问题或者递归地遍历树结构(如求目录的总大小)。下面是一个死锁的例子:
// 这是一个使用 ExecutorService 处理不当导致死锁的例子!
import java.util.concurrent.Callable;
import java.util.concurrent.ExecutionException;
import java.util.concurrent.ExecutorService;
import java.util.concurrent.Executors;
import java.util.concurrent.Future;

public class SumTask implements Callable<Long> {

    private static final long THRESHOLD = 100;
    private ExecutorService pool;

    private final long start;
    private final long end;

    SumTask(long start, long end, ExecutorService pool) {
        this.start = start;
        this.end = end;
        this.pool = pool;
    }

    @Override
    public Long call() {
        long sum = 0;
        if ((end - start) < THRESHOLD) {
            for (long i = start; i <= end; i++) {
                sum = sum + i;
            }
        } else {
            long middle = (start + end) / 2;
            SumTask leftTask = new SumTask(start, middle, pool);
            SumTask rightTask = new SumTask(middle + 1, end, pool);

            Future<Long> leftResult = pool.submit(leftTask);
            Future<Long> rigthResult = pool.submit(rightTask);

            try {
                sum = leftResult.get() + rigthResult.get();       // 当前线程会一直等待,直到 leftTask 和 rightTask 计算完成!
            } catch (InterruptedException e) {
                e.printStackTrace();
            } catch (ExecutionException e) {
                e.printStackTrace();
            }
        }
        return sum;
    }

    public static void main(String[] args) throws Exception {

        ExecutorService executor = Executors.newFixedThreadPool(4);
        Future<Long> result = executor.submit(new SumTask(0, 1000, executor));

        long sum = result.get();     // 这个例子中线程数(为4)太少,会死锁!!!
                                     // 把线程数设为较大数(比如20)后,在这个例子中不会死锁。
                                     // 但没有彻底解决问题,当任务量更大时(如计算0到1000000000000之和)还可能死锁。

        System.out.println(sum);

        executor.shutdown();
    }
}
参考:
Java Fork Join Example by Albert Attard
New and Improved CLR 4 Thread Pool Engine
7.4.2.1. Fork/Join 框架的任务窃取(Work stealing)算法
前面介绍过,传统 ExecutorService 模型有个重要的缺点:当一个任务依赖于其它子任务时,当前线程无法为其它新任务提供服务,会一直等待直到所依赖的子任务被执行完。
Fork/Join 框架采用了任务窃取(Work stealing)算法,目的是为了解决普通 ExecutorService 模型中线程被任务(任务在等待子任务的执行结果)长期占用的问题。
Fork/Join 的线程池模型如图 5 所示。

Figure 5: Threads and their Queues(Started tasks 中用来存放“已经开始但是依赖于子任务的结果而无法继续执行”的任务)
每个线程都有它自己的任务队列(还有一个全局的任务队列没有画出来)。假设 Thread 1 正在执行 Task 1,而 Task 1 可分为两个子任务 Task 2 和 Task 3。即 Task 1 的主要代码逻辑为:
Task2.fork();                 // 执行这个fork()时,会把 Task 2 加入到线程自己的任务队列LIFO中
Task3.fork();                 // 执行这个fork()时,会把 Task 3 加入到线程自己的任务队列LIFO中

task2Result = Task2.join();   // 执行这个join()时,会把 Task 1 加入到Started tasks中。这时当前线程抽身出来了,可执行其它任务了
task3Result = Task3.join();

......
上面过程如图 6 所示。
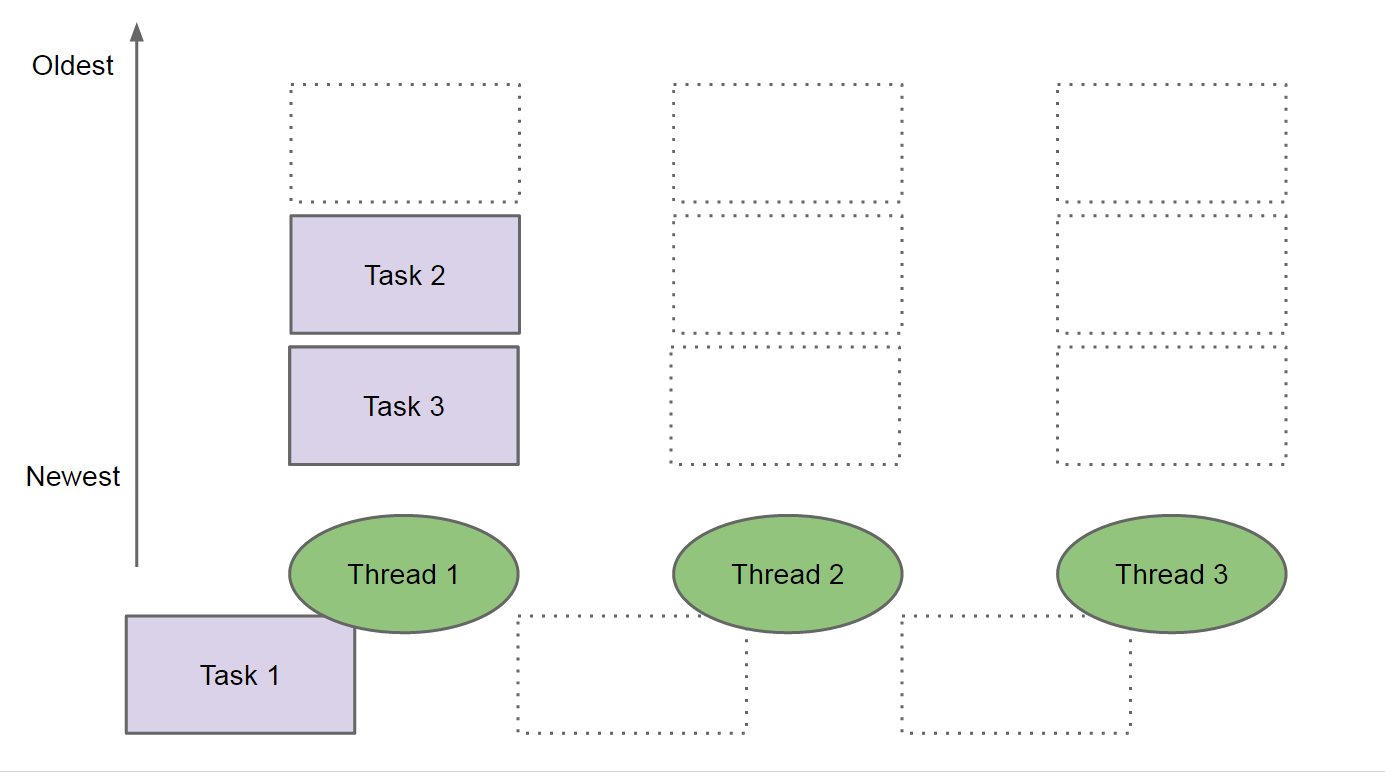
Figure 6: Add subtasks Task 2 and Task 3
Thread 1 空闲出来后,在自己的 LIFO 任务队列中找到最新的任务(这个例子中是 Task 3),开始执行它。其它空闲线程(如 Thread 2)可以从比较忙的线程(如 Thread 1)的任务队列中“窃取”最旧的任务(比如从 Thread 1 的任务队列把 Task 2“窃取”过来自己执行。这就是任务窃取(Work stealing)算法的基本过程。如图 7 所示。
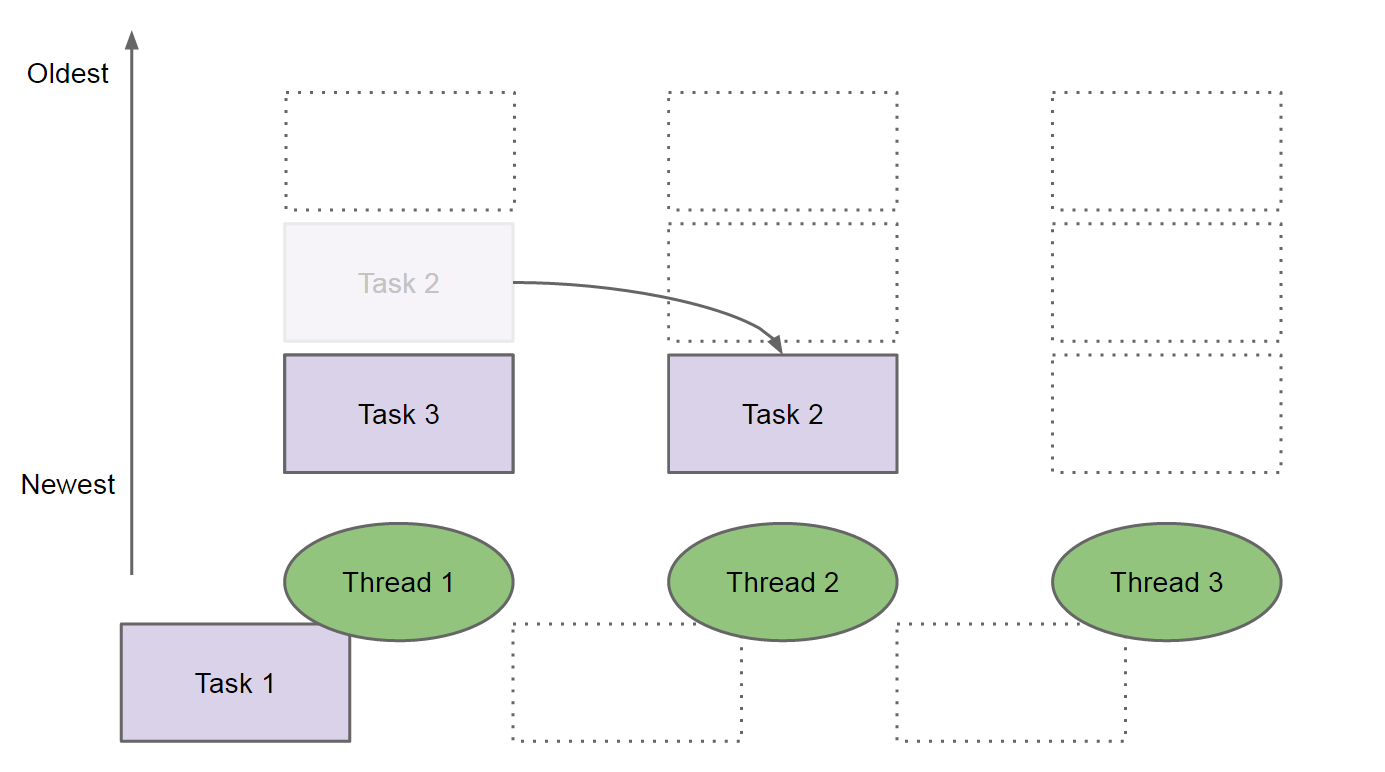
Figure 7: Thread 2 steals Task 2
说明:线程自己的任务队列一般设计为 LIFO 队列(后进先出双端队列),且自己执行 LIFO 中最新的任务,别人窃取执行 LIFO 中最旧的任务。根据局部性原理(principle of locality),这样做可以获得更好的性能。
8. Synchronizers(用于线程同步的辅助类,优先用它们同步线程)
java.util.concurrent 中提供了一些类用来帮助人们管理相互合作的多个线程,参见表 6。 如果你发现的表 6 中有你想要实现的行为模式,你应该直接使用它们,而不要使用锁(如 Intrinsic Lock,ReentrantLock 等等)来“重新”实现(即不要重复造轮子)。
| 类 | 它能做什么 | 备注 |
|---|---|---|
| CyclicBarrier | 允许线程集等待直到指定数目的线程到达一个公共屏障 | |
| CountDownLatch | 允许线程集等待直到计数器减为 0 | |
| Phaser | 和 CyclicBarrier, CountDownLatch 类似,但灵活性更高 | Java SE 7 中引入 |
| Exchanger | 允许两个线程在要交换的对象准备好时交换对象 | |
| Semaphore | 允许线程集等待直到被允许继续运行为止 | |
| SynchronousQueue | 允许一个线程把对象交给另一个线程 | 它是 BlockingQueue 接口的一种实现 |
8.1. CountDownLatch(倒计时门栓)
一个倒计时门栓让一个线程集等待直到计数变为 0。倒计时门栓是一次性的,一旦计数为 0,就不能再重用了。调用 countDownLatch.countDown()可以减少门栓的一个计数;调用 countDownLatch.await()时线程会等待,直到 countDownLatch 中的计数到 0 之后就会恢复执行。
下面是使用两个倒计时门栓用作线程同步的一个实例(摘自:https://docs.oracle.com/javase/8/docs/api/java/util/concurrent/CountDownLatch.html ):
Here is a pair of classes in which a group of worker threads use two countdown latches:
- The first is a start signal that prevents any worker from proceeding until the driver is ready for them to proceed;
- The second is a completion signal that allows the driver to wait until all workers have completed.
import java.util.concurrent.CountDownLatch;

class Driver {
    private static final int N = 10;

    public static void main(String args[]) throws InterruptedException {
        CountDownLatch startSignal = new CountDownLatch(1);
        CountDownLatch doneSignal = new CountDownLatch(N);

        for (int i = 0; i < N; ++i) // create and start threads
            new Thread(new Worker(startSignal, doneSignal)).start();

        doSomethingElse1();       // don't let run yet
        startSignal.countDown();  // let all threads proceed
        doSomethingElse2();
        doneSignal.await();       // wait for all to finish
        doSomethingElse3();
    }

    private static void doSomethingElse1() {  }
    private static void doSomethingElse2() {  }
    private static void doSomethingElse3() {  }
}

class Worker implements Runnable {
    private final CountDownLatch startSignal;
    private final CountDownLatch doneSignal;

    Worker(CountDownLatch startSignal, CountDownLatch doneSignal) {
        this.startSignal = startSignal;
        this.doneSignal = doneSignal;
    }

    public void run() {
        try {
            startSignal.await();        // 阻止线程运行,直到倒计时门栓startSignal的计数为零时,才会恢复运行。
            doWork();
            doneSignal.countDown();
        } catch (InterruptedException ex) {
        }
    }

    void doWork() {  }
}
8.2. CyclicBarrier(循环屏障)
CyclicBarrier 是一个同步辅助类,它可以使一组线程互相等待,直到到达某个公共屏障点(common barrier point)后又开始运行。
下面是如何使用它的一些细节。首先,构造一个循环屏障,并给出参与的线程数:
CyclicBarrier barrier = new CyclicBarrier(nthreads);
每一个线程完成一些准备工作后,在循环屏障上调用 await:
public void run() {
  doWork();
  barrier.await();
  // ...
}
这样当所有线程都准备完毕(调用 await 后),才又开始运行。
8.2.1. CyclicBarrier 实例:几个运动员都准备好后一起开始跑步
import java.util.Random;
import java.util.concurrent.BrokenBarrierException;
import java.util.concurrent.CyclicBarrier;

/**
 * Java Program to demonstrate how to use CyclicBarrier, Its used when number
 * of threads needs to wait for each other before starting again.
 */
public class CyclicBarrierTest {
    public static void main(String args[]) throws InterruptedException, BrokenBarrierException {
        CyclicBarrier barrier = new CyclicBarrier(4);

        Player first = new Player(barrier, "Player1");
        Player second = new Player(barrier, "Player2");
        Player third = new Player(barrier, "Player3");
        Player fourth = new Player(barrier, "Player4");

        first.start();
        second.start();
        third.start();
        fourth.start();
    }
}

class Player extends Thread {
    private CyclicBarrier barrier;

    public Player(CyclicBarrier barrier, String name) {
        super(name);
        this.barrier = barrier;
    }

    @Override
    public void run() {
        try {
            Thread.sleep(1000 * (new Random()).nextInt(8));
            System.out.println(Thread.currentThread().getName() + " is ready.");
            barrier.await();             // 在所有参与者(线程)都已经在此 barrier 上调用 await 方法之前,将一直等待。
        } catch (InterruptedException | BrokenBarrierException e) {
            e.printStackTrace();
        }

        // 所有的线程调用barrier.await后,才会执行到这里。
        System.out.println(Thread.currentThread().getName() + " has started running.");
        // Other code.
    }
}
运行上面程序,其输出为:
Player1 is ready.
Player4 is ready.
Player2 is ready.
Player3 is ready.
Player3 has started running.
Player1 has started running.
Player4 has started running.
Player2 has started running.
你得到的输出可能会不一样,但一定是所有 Player 都准备好后,才又开始运行。
8.3. Exchanger(交换器)
Exchanger 类允许在 2 个线程间定义同步点,当 2 个线程到达这个点,他们相互交换数据类型,使用第一个线程的数据类型变成第二个的,然后第二个线程的数据类型变成第一个的。
具体来说, 当线程 A 调用 Exchange 对象的 exchange()方法后,它会陷入阻塞状态,直到线程 B 也调用了 exchange()方法,然后以线程安全的方式交换数据,之后线程 A 和 B 继续运行。
下面是 Exchanger 的一个实例(摘自:http://www.javacodex.com/Concurrency/Exchanger-Example ):
import java.util.concurrent.*;

public class ExchangerExample {

    public static void main(String[] args) {

        Exchanger<String> exchanger = new Exchanger<String>();

        Thread t1 = new MyThread(exchanger, "I like coffee.");
        Thread t2 = new MyThread(exchanger, "I like tea");
        t1.start();
        t2.start();
    }
}

class MyThread extends Thread {

    Exchanger<String> exchanger;
    String message;

    MyThread(Exchanger<String> exchanger, String message) {
        this.exchanger = exchanger;
        this.message = message;
    }

    public void run() {
        try {
            System.out.println(this.getName() + " message: " + message);

            // exchange messages
            message = exchanger.exchange(message);

            System.out.println(this.getName() + " message: " + message);
        } catch (Exception e) {
        }
    }
}
运行上面程序的输出(你可能得到顺序不一样的输出)为:
Thread-1 message: I like tea
Thread-0 message: I like coffee.
Thread-0 message: I like tea
Thread-1 message: I like coffee.
9. Atomic Variables and Nonblocking Synchronization
参考:
Java Concurrency in Practice, Chapter 15. Atomic Variables and Nonblocking Synchronization
9.1. 原子变量
原子变量(Atomic Variables)和 volatile 变量有相同的“happens-before”原则,也就是说对一个原子变量的“写操作”会“先行发生”于后面对这个原子变量的“读操作”。原子变量和 volatile 变量相比的优点在于原子变量支持原子操作(比如 AtomicInteger 类有原子的 compareAndSet 等方法),而 volatile 变量不能直接提供类似 compareAndSet 方法的原子性保证。
一般来说,原子变量比锁要更加轻量级。原子变量是实现高性能并发,非阻塞同步的基本工具。
下面是不使用原子变量实现多线程安全的计数器:
// 多线程安全计数器
class SynchronizedCounter {
    private int c = 0;

    public synchronized void increment() {
        c++;
    }

    public synchronized void decrement() {
        c--;
    }

    public synchronized int value() {
        return c;
    }
}
用原子变量实现的多线程安全计数器:
// 用原子变量实现的多线程安全计数器
import java.util.concurrent.atomic.AtomicInteger;

class AtomicCounter {
    private AtomicInteger c = new AtomicInteger(0);

    public void increment() {
        c.incrementAndGet();
    }

    public void decrement() {
        c.decrementAndGet();
    }

    public int value() {
        return c.get();
    }
}
9.2. 非阻塞同步(乐观的并发策略)
互斥同步(Mutual Exclusion&Synchronization)是常见的一种并发正确性保障手段。同步是指在多个线程并发访问共享数据时,保证共享数据在同一个时刻只被一个(或者是一些,使用信号量的时候)线程使用。而互斥是实现同步的一种手段,临界区(Critical Section)、互斥量(Mutex)和信号量(Semaphore)都是主要的互斥实现方式。因此,在这 4 个字里面,互斥是因,同步是果;互斥是方法,同步是目的。
互斥同步最主要的问题就是进行线程阻塞和唤醒所带来的性能问题,因此这种同步也称为阻塞同步(Blocking Synchronization)。从处理问题的方式上说, 互斥同步属于一种悲观的并发策略 , 总是认为只要不去做正确的同步措施(例如加锁),那就肯定会出现问题,无论共享数据是否真的会出现竞争,它都要进行加锁(这里讨论的是概念模型,实际上虚拟机会优化掉很大一部分不必要的加锁)、用户态核心态转换、维护锁计数器和检查是否有被阻塞的线程需要唤醒等操作。随着硬件指令集的发展,我们有了另外一个选择:基于冲突检测的乐观并发策略,通俗地说,就是先进行操作,如果没有其他线程争用共享数据,那操作就成功了; 如果共享数据有争用,产生了冲突,那就再采取其他的补偿措施(最常见的补偿措施就是不断地重试,直到成功为止),这种乐观的并发策略的许多实现都不需要把线程挂起,因此这种同步操作称为非阻塞同步(Non-Blocking Synchronization)。
为什么说使用乐观并发策略需要“硬件指令集的发展”才能进行呢? 因为我们需要操作和冲突检测这两个步骤具备原子性,靠什么来保证呢?如果这里再使用互斥同步来保证就失去意义了,所以我们只能靠硬件来完成这件事情,硬件保证一个从语义上看起来需要多次操作的行为只通过一条处理器指令就能完成,这类指令常用的有:
- 测试并设置(Test-and-Set)。
- 获取并增加(Fetch-and-Increment)。
- 交换(Swap)。
- 比较并交换(Compare-and-Swap,下文称 CAS)。
- 加载链接/条件存储(Load-Linked/Store-Conditional,下文称 LL/SC)。
其中,前面的 3 条是 20 世纪就已经存在于大多数指令集之中的处理器指令,后面的两条是现代处理器新增的,而且这两条指令的目的和功能是类似的。在 IA64、x86 指令集中有 cmpxchg 指令完成 CAS 功能,在 sparc-TSO 也有 casa 指令实现,而在 ARM 和 PowerPC 架构下,则需要使用一对 ldrex/strex 指令来完成 LL/SC 的功能。
参考:深入理解 Java 虚拟机——JVM 高级特性与最佳实践(第 2 版),13.2.2 线程安全的实现方法
9.2.1. Compare and Swap (CAS)
CAS 指令需要有 3 个操作数,分别是内存位置(在 Java 中可以简单理解为变量的内存地址,用 V 表示)、旧的预期值(用 A 表示)和新值(用 B 表示)。CAS 指令执行时,当且仅当 V 符合旧预期值 A 时,处理器用新值 B 更新 V 的值,否则它就不执行更新,但是无论是否更新了 V 的值,都会返回 V 的旧值,上述的处理过程是一个原子操作。
在 JDK 1.5 之后,Java 程序中才可以使用 CAS 操作,该操作由 sun.misc.Unsafe 类里面的 compareAndSwapInt()和 compareAndSwapLong()等几个方法包装提供,虚拟机在内部对这些方法做了特殊处理,即时编译出来的结果就是一条平台相关的处理器 CAS 指令,没有方法调用的过程,或者可以认为是无条件内联进去了,这种被虚拟机特殊处理的方法称为固有函数(Intrinsics),类似的固有函数还有 Math.sin()等。
下面是 CAS 的一个模拟实现:
public class SimulatedCAS {
    private int value;

    public synchronized int get() { return value; }

    public synchronized int compareAndSwap(int expectedValue, int newValue) {
        int oldValue = value;
        if (oldValue == expectedValue)
            value = newValue;
        return oldValue;
    }

    // compareAndSet和compareAndSwap类似,不过compareAndSet返回boolean值,
    // 以表明是否进行了更新操作
    public synchronized boolean compareAndSet(int expectedValue, int newValue) {
         return (expectedValue == compareAndSwap(expectedValue, newValue));
    }
}
9.2.2. ABA 问题
CAS 操作存在一个逻辑漏洞:如果一个变量 V 初次读取的时候是 A 值,并且在准备赋值的时候检查到它仍然为 A 值,那我们就可以认为它的值没有被其它线程修改过吗?如果在这段时间内它的值曾经被改成了 B,后来又被改回了 A,那么 CAS 操作会误认为它从来没有被修改过。这个漏洞就是 CAS 操作的“ABA”问题。
ABA 问题在很多情况下是无关紧要的,不影响并发的正确性,可以忽略它。
如果 ABA 问题确实会导致错误的形为,我们可以采用下面的思路来解决: 不是测试更新一个变量,而是同时更新“两个变量”:“值”和“值对应的版本号”。 即使这个值由 A 变成 B,然后又变为 A,但其版本号必然发生了变化。
Java 中,AtomicStampedReference 以及 AtomicMarkableReference 支持在两个变量上执行原子的条件更新,它们可以解决 ABA 问题。
9.2.3. Lock-free algorithm, non-blocking algorithm
An algorithm is called non-blocking if failure or suspension of any thread cannot cause failure or suspension of another thread; an algorithm is called lock-free if, at each step, some thread can make progress. Algorithms that use CAS exclusively for coordination between threads can, if constructed correctly, be both non-blocking and lock-free.
摘自: Java Concurrency in Practice, Chapter 15. Atomic Variables and Nonblocking Synchronization
很多时候,名称“Lock-free algorithm”和“Non-blocking algorithm”是从不同的角度描述同一个东西,即不直接使用锁,使用 CAS 操作来实现的算法。
9.2.3.1. 实例:Lock-free Stack
下面是 Non-blocking Stack(或者称为 Lock-free Stack)的一个实现:
import java.util.concurrent.atomic.AtomicReference;

public class ConcurrentStack <E> {
    AtomicReference<Node<E>> top = new AtomicReference<Node<E>>();

    public void push(E item) {
        Node<E> newHead = new Node<E>(item);
        Node<E> oldHead;
        do {
            oldHead = top.get();
            newHead.next = oldHead;
        } while (!top.compareAndSet(oldHead, newHead));
    }

    public E pop() {
        Node<E> oldHead;
        Node<E> newHead;
        do {
            oldHead = top.get();
            if (oldHead == null)
                return null;
            newHead = oldHead.next;
        } while (!top.compareAndSet(oldHead, newHead));
        return oldHead.item;
    }

    private static class Node <E> {
        public final E item;
        public Node<E> next;

        public Node(E item) {
            this.item = item;
        }
    }
}
9.3. 实例:用锁和原子变量分别实现线程安全的 PRNG
伪随机数生成器(Pseudorandom Number Generator, PRNG)是确定的,完成由 seed 值决定, 相同的 seed 值总可以得到相同的随机数序列。
由于每次都生成相同的序列,所以 PRNG 一定是有状态的(它需要保存上一个产生的随机数,从而才知道下一个应该产生哪个伪随机数,从而每次重新运行可得到相同的序列)。
在 Java 中,已经实现了 PRNG(Random 类的方法 nextInt),下面是一个使用例子:
import java.util.Random;

public class RandomTest {
    public static void main(String args[]) {

        // create random object
        long seed = 12345;
        Random randomno = new Random(seed);

        // check next int value
        for (int i = 0; i < 5; i++) {
            System.out.println("Next int value: " + randomno.nextInt(10000));
        }
    }
}
上面例子,由于 seed 值是不变的,所以它的每次输出结果都会是一样的。通过测试可知,它的输出总是:
Next int value: 6251
Next int value: 9080
Next int value: 8241
Next int value: 8828
Next int value: 55
如何实现产生下一个伪随机数的方法 nextInt() 呢?最流行的算法是线性同余法,具体算法可参考:《计算机程序设计艺术——第 2 卷 半数值算法(第 3 版),第 3 章随机数,3.2 节生成一致随机数》。本文的重点不是产生随机序列的具体算法,而是如何让它变得线程安全(即实现“线程安全”的 nextInt)。
9.3.1. 加锁实现 nextInt 的线程安全性
要保证 nextInt 是线程安全性,最直接的办法当然是加锁了,如:
import java.util.concurrent.locks.Lock;
import java.util.concurrent.locks.ReentrantLock;

public class ReentrantLockPseudoRandom {
    private final Lock lock = new ReentrantLock(false);
    private int seed;

    ReentrantLockPseudoRandom(int seed) {
        this.seed = seed;
    }

    // 使用加锁来实现nextInt的线程安全性
    public int nextInt(int n) {
        lock.lock();
        try {
            int oldSeed = seed;
            seed = calculateNext(oldSeed);
            int remainder = oldSeed % n;
            return remainder > 0 ? remainder : remainder + n;
        } finally {
            lock.unlock();
        }
    }

    // 由上一个随机数产生下一个随机数
    // 下面的实现是不严谨的,你应该使用“线性同余法”!
    // 注:Java中Random类的方法nextInt使用的是线性同余法
    private int calculateNext(int prev) {
        int current = prev;
        current ^= prev << 6;
        current ^= current >>> 21;
        current ^= (current << 7);
        return current;
    }
}
9.3.2. 原子变量实现 nextInt 的线程安全性(性能更好)
除了使用锁来实现 nextInt 的线程安全性外,我们还可以使用原子变量来实现 nextInt 的线程安全性(Java 中 Random 类的方法 nextInt 就是使用原子变量来保证线程安全性的)。如:
import java.util.concurrent.atomic.AtomicInteger;

public class AtomicPseudoRandom {
    private AtomicInteger seed;

    AtomicPseudoRandom(int seed) {
        this.seed = new AtomicInteger(seed);
    }

    // 使用原子变量实现nextInt的线程安全性
    // Java中Random类的方法nextInt就是使用原子变量来保证线程安全性的!
    public int nextInt(int n) {
        while (true) {
            int s = seed.get();
            int nextSeed = calculateNext(s);
            if (seed.compareAndSet(s, nextSeed)) {
                int remainder = s % n;
                return remainder > 0 ? remainder : remainder + n;
            }
        }
    }

    // 由上一个随机数产生下一个随机数
    // 下面的实现是不严谨的,你应该使用“线性同余法”!
    // 注:Java中Random类的方法nextInt使用的是线性同余法
    private int calculateNext(int prev) {
        int current = prev;
        current ^= prev << 6;
        current ^= current >>> 21;
        current ^= (current << 7);
        return current;
    }
}
使用原子变量实现的nextInt比使用锁实现的版本其性能要更好。