Java NIO
Table of Contents
1. Java NIO
Java 1.4 中引入了 Java New I/O (NIO),其目的在于提高 I/O 处理速度。这样,Java 程序员可以实现高速 I/O 而无需编写自定义的本机代码。NIO 可将最耗时的 I/O 操作(即填充和提取缓冲区)转移到了操作系统,因而可以极大地提高速度。
本文主要参考:Java NIO, by Ron Hitchens
1.1. I/O 基本概念(操作系统层面)
必须掌握操作系统层面的处理细节,才能更好地理解 NIO 模型。
1.1.1. 缓冲区
缓冲区,以及缓冲区如何工作,是所有 I/O 的基础。所谓“输入/输出”讲的无非就是把数据移进或移出缓冲区。
进程执行 I/O 操作,归结起来,也就是向操作系统发出请求,让它要么把缓冲区里的数据排干,要么用数据把缓冲区填满。图 1 简单描述了数据从外部磁盘向运行中的进程的内存区域移动的过程。进程使用 read()系统调用,要求其缓冲区被填满。内核随即向磁盘控制硬件发出命令,要求其从磁盘读取数据。磁盘控制器把数据直接写入内核内存缓冲区,这一步通过 DMA 完成,无需主 CPU 协助。一旦磁盘控制器把缓冲区装满,内核即把数据从内核空间的临时缓冲区拷贝到进程执行 read()调用时指定的缓冲区。
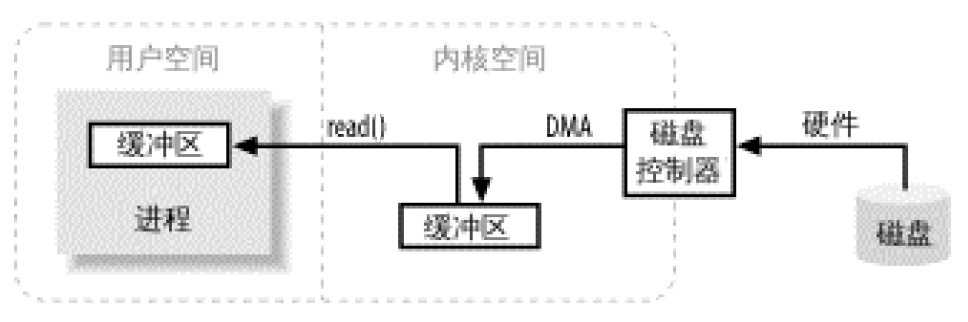
Figure 1: Simplified I/O Buffer Handling
看了图 1 ,您可能会觉得,把数据从内核空间拷贝到用户空间似乎有些多余。为什么不直接让磁盘控制器把数据送到用户空间的缓冲区呢?这样做有几个问题。首先,硬件通常不能直接访问用户空间。其次,像磁盘这样基于块存储的硬件设备操作的是固定大小的数据块,而用户进程请求的可能是任意大小的或非对齐的数据块。在数据往来于用户空间与存储设备的过程中,内核负责数据的分解、再组合工作,因此充当着中间人的角色。
1.1.2. 虚拟内存
所有现代操作系统都使用虚拟内存。虚拟内存意为使用虚假(或虚拟)地址取代物理(硬件 RAM)内存地址。这样做好处颇多,总结起来主要有:
- 一个以上的虚拟地址可指向同一个物理内存地址。
- 虚拟内存空间可大于实际可用的硬件内存。
前一节提到,设备控制器不能通过 DMA 直接存储到用户空间,但通过利用上面提到的第一项,则可以达到相同效果。把内核空间地址与用户空间的虚拟地址映射到同一个物理地址,这样,DMA 硬件(只能访问物理内存地址)就可以填充对内核与用户空间进程同时可见的缓冲区,如图 2 所示。
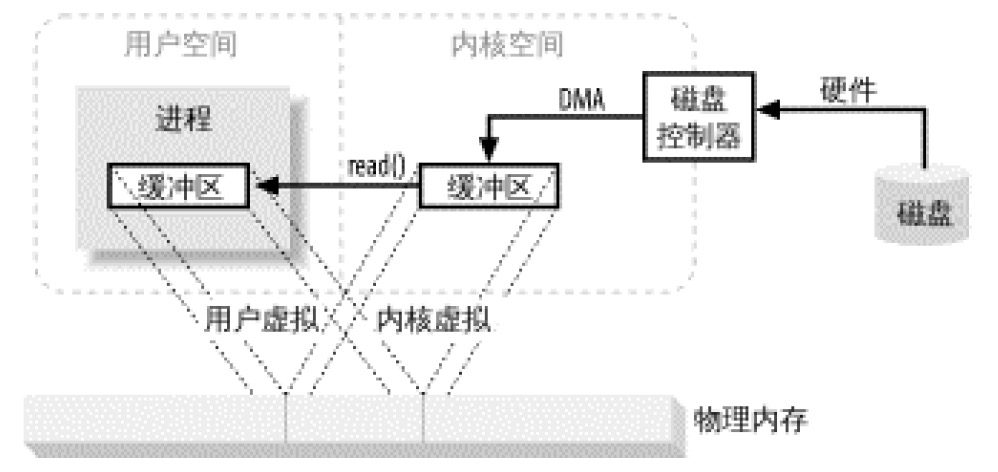
Figure 2: Multiply mapped memory space
这样真是太好了,省去了内核与用户空间的往来拷贝,但前提条件是,内核与用户缓冲区必须使用相同的页对齐,缓冲区的大小还必须是磁盘控制器块大小(通常为 512 字节磁盘扇区)的倍数。操作系统把内存地址空间划分为页,即固定大小的字节组。内存页的大小总是磁盘块大小的倍数,通常为 2 次幂(这样可简化寻址操作)。典型的内存页为 1,024、2,048 和 4,096 字节。虚拟和物理内存页的大小总是相同的。
1.1.3. 文件 I/O
文件 I/O 属文件系统范畴,文件系统与磁盘迥然不同。磁盘把数据存在扇区上,通常一个扇区 512 字节。磁盘属硬件设备,对何谓文件一无所知,它只是提供了一系列数据存取接口。在这点上,磁盘扇区与内存页颇有相似之处:都是统一大小,都可作为大的数组被访问。
文件系统是更高层次的抽象,是安排、解释磁盘(或其他随机存取块设备)数据的一种独特方式。您所写代码几乎无一例外地要与文件系统打交道,而不是直接与磁盘打交道。文件系统定义了文件名、路径、文件、文件属性等抽象概念。
1.1.3.1. 内存映射文件
传统的文件 I/O 是通过用户进程发布 read()和 write()系统调用来传输数据的。为了在内核空间的文件系统页与用户空间的内存区之间移动数据,一次以上的拷贝操作几乎总是免不了的。
大多数操作系统都支持的特殊类型的 I/O 操作,允许用户进程最大限度地利用面向页的系统 I/O 特性,并完全摒弃缓冲区拷贝。这就是内存映射 I/O,如图 3 所示。
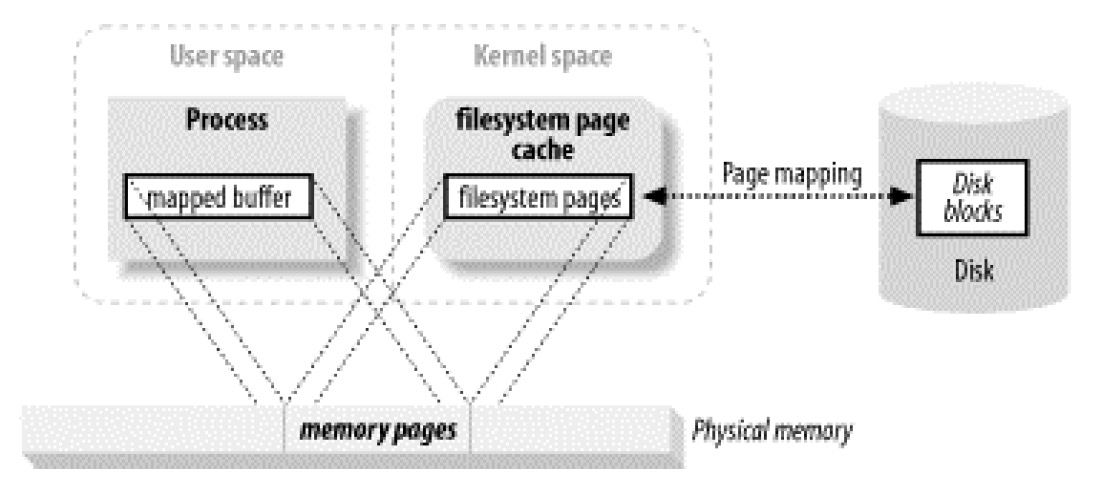
Figure 3: User memory mapped to filesystem pages
内存映射 I/O 使用文件系统建立从用户空间直到可用文件系统页的虚拟内存映射(通过 mmap 系统调用)。这样做有下面好处:
- 用户进程把文件数据当作内存,所以无需调用 read()或 write()系统调用。
- 当用户进程碰触到映射内存空间,页错误会自动产生,从而将文件数据从磁盘读进内存。如果用户修改了映射内存空间,相关页会自动标记为脏,随后刷新到磁盘,文件得到更新。
2. Java NIO 核心组件之一:缓冲区
一个 Buffer 对象是固定数量的数据的容器。 其作用是一个存储器,或者分段运输区,在这里数据可被存储并在之后用于检索。图 4 是 Buffer 的类层次图。
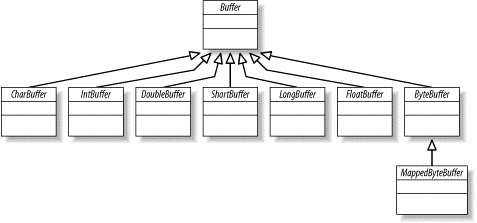
Figure 4: The Buffer family tree
2.1. 缓冲区四个属性
所有的缓冲区都具有四个属性来提供关于其所包含的数据元素的信息。它们是:
- 容量(Capacity)
- 缓冲区能够容纳的数据元素的最大数量。这一容量在缓冲区创建时被设定,并且永远不能被改变。
- 上界(Limit)
- 缓冲区的第一个不能被读或写的元素。
- 位置(Position)
- 下一个要被读或写的元素的索引。位置会自动由相应的 get()和 put()函数更新。
- 标记(Mark)
- 一个备忘位置。调用 mark()来设定 mark=postion。调用 reset()设定 position=mark。标记在设定前是未定义的(undefined)。
这四个属性之间总是遵循以下关系:0 <= mark <= position <= limit <= capacity
图 5 展示了一个新创建的容量为 10 的 ByteBuffer 逻辑视图。
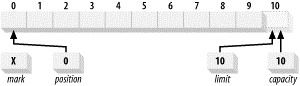
Figure 5: A newly created ByteBuffer
图 6 是在新建缓冲区上执行 5 次 put()操作后的逻辑视图。
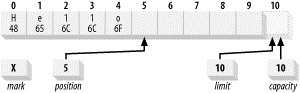
Figure 6: Buffer after five put()s
2.2. 缓冲区 API
Buffer 类部分方法的签名如下:
package java.nio;

public abstract class Buffer {
    // This is a partial API listing
    public final int capacity();
    public final int position();
    public final Buffer position (int newPositio);
    public final int limit();
    public final Buffer limit (int newLimit);
    public final Buffer mark();
    public final Buffer reset();
    public final Buffer clear();
    public final Buffer flip();
    public final Buffer rewind();
    public final int remaining();
    public final boolean hasRemaining();
    public abstract boolean isReadOnly();
    public abstract boolean isDirect();
}
上面的 Buffer API 并没有包括 get()或 put()函数。不过每一个 Buffer 子类都有这两个函数,由于它们所采用的参数类型,以及它们返回的数据类型,对每个子类(Buffer 的子类有 ByteBuffer, CharBuffer, DoubleBuffer, FloatBuffer, IntBuffer, LongBuffer, ShortBuffer)来说都是唯一的,所以它们不能在顶层 Buffer 类中被抽象地声明。
2.2.1. 分配 Buffer(allocate)
要获取一个 Buffer 对象,我们首先需要分配内存空间。每个类型的 Buffer 都有一个 allocate()方法。我们可以通过这个方法分配 Buffer。如:
import java.nio.ByteBuffer;

public abstract class BufferTest {

    public static void main(String[] args) {

        ByteBuffer buf = ByteBuffer.allocate(16);

        buf.put((byte) 'A');
        buf.put((byte) 'B');
        buf.put((byte) 'C');

        System.out.println(buf.get(0));      // 输出65
        System.out.println(buf.get(1));      // 输出66
        System.out.println(buf.get(2));      // 输出67

        System.out.println(buf.position());  // 输出3
        System.out.println(buf.limit());     // 输出16
        System.out.println(buf.capacity());  // 输出16
    }
}
2.2.2. 翻转(flip)
当 Buffer 已经写结束了,我们想把 Buffer 内容全部读取出来,怎么做呢?在设置好 limit 和 position 后,多次调用 get()方法即可实现。如:
import java.nio.ByteBuffer;

public abstract class BufferTest {

    public static void main(String[] args) {

        ByteBuffer buf = ByteBuffer.allocate(16);

        buf.put((byte) 'A');
        buf.put((byte) 'B');
        buf.put((byte) 'C');

        buf.limit(buf.position());     //将limit设置为当前位置
        buf.position(0);               //将position重置为0

        while (buf.hasRemaining()) {
            System.out.println(buf.get());   // 依次按行输出65 66 67
        }

        System.out.println(buf.position());  // 输出3
        System.out.println(buf.limit());     // 输出16
        System.out.println(buf.capacity());  // 输出16
    }
}
其中,上面代码中的下面两行
// 下面两行代码可以用buf.flip();代替。
buf.limit(buf.position());
buf.position(0);
就是函数 flip()实现的功能(除此外 flip()还会将 mark 清除)。flip()的源码为:
public final Buffer flip() {
    limit = position;
    position = 0;
    mark = -1;
    return this;
}
flip()函数将一个能够继续添加数据元素的“填充状态”的缓冲区翻转成一个准备读出元素的“释放状态”。 也就是说 ByteBuffer 无法同时支持读写,函数 flip()可以把它从“写模式”切换为“读模式”。
假设图 7 是对 Buffer 进行写操作结束后的状态,那么此时调用 flip()方法后,Buffer 的状态会如图 8 所示。
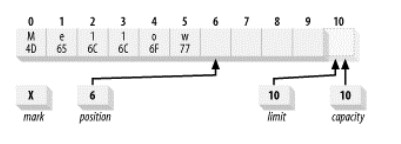
Figure 7: Buffer 的当前状态

Figure 8: Buffer 执行完 flip()后的状态
2.2.3. 倒带(rewind)
rewind()函数与 flip()相似,但不影响 limit 属性。它只是将 position 设回 0。您可以使用 rewind()后退,重读已经被翻转的缓冲区中的数据。
rewind()方法的源码:
public final Buffer rewind() {
    position = 0;
    mark = -1;
    return this;
}
2.2.4. Direct vs. non-direct buffers
一个 Buffer(下面以 ByteBuffer 为例)要么是 Non-Direct 的(分配在 Heap 上,由 jvm 负责管理),要么是 Direct 的。使用方法 isDirect() 可以测试 Buffer 是否为 Direct 的。
2.2.4.1. Non-direct buffer
使用方法 ByteBuffer.allocate() 得到的 ByteBuffer 是 Non-direct 的。
2.2.4.2. Direct buffer
使用方法 ByteBuffer.allocateDirect() 得到的 ByteBuffer 是 Direct 的。jvm 可以保证在 gc 时不会移动它,不过 jvm 没有提供释放它的方法,大胆猜测当它没有引用时 jvm 可能释放它。 ByteBuffer.allocateDirect() 的官方建议使用场景:“It is recommended that direct buffers be allocated primarily for large, long-lived buffers that are subject to the underlying system's native I/O operations.”
使用方法 FileChannel.map() 可得到 MappedByteBuffer(底层使用系统调用 mmap 来实现),它也是 Direct 的。
3. Java NIO 核心组件之二:通道
A channel represents an open connection to an entity such as a hardware device, a file, a network socket, or a program component that is capable of performing one or more distinct I/O operations, for example reading or writing.
Channel 用于在字节缓冲区和位于通道另一侧的实体(通常是一个文件或套接字)之间有效地传输数据。 多数情况下,通道与操作系统的文件描述符有着一对一的关系。虽然通道比文件描述符更广义,但您将经常使用到的多数通道都是连接到打开的文件描述符的。The channel classes provide the abstraction needed to maintain platform independence but still model the native I/O capabilities of modern operating systems.
Channels always read to, or write from, a Buffer. 如图 9 所示。

Figure 9: Channels read data into Buffers, and Buffers write data into Channels
NIO 中的 Channel 的主要实现有:
- FileChannel
- DatagramChannel
- SocketChannel
- ServerSocketChannel
3.1. FileChannel
一个 FileChannel 对象可以在一个打开的 RandomAccessFile、FileInputStream 或 FileOutputStream 对象上调用 getChannel()方法来获取;或者通过 FileChannel 的 open()方法来获取。
下面是分别使用 FileInputStream 读取文件和使用 NIO 读取文件的实例:
import java.io.BufferedInputStream;
import java.io.FileInputStream;
import java.io.IOException;
import java.io.InputStream;
import java.nio.ByteBuffer;
import java.nio.channels.FileChannel;
import java.nio.file.Path;
import java.nio.file.Paths;

public abstract class ChannelTest {

    public static void main(String[] args) {
        String filePath = "/Users/cig01/1.txt";
        System.out.println("Using FileInputStream");
        method1(filePath);
        System.out.println("Using NIO");
        method2(filePath);
    }

    /* 使用FileInputStream读取文件 */
    public static void method1(String filePath) {
        InputStream in = null;
        try {
            in = new BufferedInputStream(new FileInputStream(filePath));

            byte[] buf = new byte[8];    // 这里仅为演示,一般会使用更大的数组。

            int bytesRead = in.read(buf);
            while (bytesRead != -1) {
                for (int i = 0; i < bytesRead; i++) {
                    System.out.print((char) buf[i]);
                }
                bytesRead = in.read(buf);
            }
        } catch (IOException e) {
            e.printStackTrace();
        } finally {
            try {
                if (in != null) {
                    in.close();
                }
            } catch (IOException e) {
                e.printStackTrace();
            }
        }
    }

    /* 使用NIO读取文件 */
    public static void method2(String filePath) {
        FileChannel fileChannel = null;
        try {
            Path path = Paths.get(filePath);
            fileChannel =  FileChannel.open(path);

            ByteBuffer buf = ByteBuffer.allocate(8);  // 这里仅为演示,一般会使用更大的buffer。

            int bytesRead = fileChannel.read(buf);    // 从channel中读数据

            while (bytesRead != -1) {
                System.out.println("Number of bytes read: " + bytesRead);

                buf.flip();

                System.out.print("Buffer contents: ");

                while (buf.hasRemaining()) {
                    System.out.print((char) buf.get());
                }

                System.out.println();

                buf.clear();
                bytesRead = fileChannel.read(buf);    // 从channel中读数据
            }
        } catch (IOException e) {
            e.printStackTrace();
        } finally {
            try {
                if (fileChannel != null) {
                    fileChannel.close();
                }
            } catch (IOException e) {
                e.printStackTrace();
            }
        }
    }
}
假设文件"/Users/cig01/1.txt"的内容为:1234567890(加一个换行符),则上面代码的输出为:
Using FileInputStream
1234567890
Using NIO
Number of bytes read: 8
Buffer contents: 12345678
Number of bytes read: 3
Buffer contents: 90
3.2. 零拷贝
考虑从文件中读出数据并将数据传输到网络上的场景(很多应用都有这样的场景,比如静态 web 服务器、ftp 服务器等)。
使用传统方法实现这个功能,你需要使用下面函数:
File.read(fileDesc, buf, len);
Socket.send(socket, buf, len);
数据从文件移动到套接字的过程如图 10 所示。

Figure 10: Traditional data copying approach
从图 10 中可知,使用传统方法时一共有 4 次数据拷贝过程:2次 DMA 拷贝(无需 CPU 参与,速度很快),两次需要 CPU 参与的拷贝(比 DMA 拷贝要慢)。
3.2.1. transferTo()
在上面例子中,我们发现两次 CPU 拷贝(即图中第 2 次和第 3 次拷贝)是多余的。应用程序只是起到缓存数据并将其传回到套接字的作用而已,别无他用。数据可以直接从读取缓冲区传输到套接字缓冲区。
FileChannel 类中的方法 transferTo()可以实现这个操作,它将数据从文件通道传输到了另一可写通道(这个例子中可以为 SocketChannel)。
public void transferTo(long position, long count, WritableByteChannel target);
使用 transferTo()时,数据的移动过程如图 11 所示。
Figure 11: 一次 CPU 拷贝
图 11 中有一次 CPU 拷贝和两次 DMA 拷贝,和图 10 相比,减少了一次 CPU 拷贝。
注 1:在 Unix/Linux 中,transferTo()是使用系统调用 sendfile 实现的。
注 2:使用 transferTo(),除了减少了 CPU 拷贝次数,还减少了 context switching 的次数。
注 3:最后一次 CPU 拷贝可以省略吗?答案是肯定的(不过它需要硬件及驱动程序的支持)。 我们把缓冲区描述符(而不是数据本身)传到 Socket 缓冲区,再把数据长度传过去,这样 DMA 控制器就可以直接将缓存中的数据打包发送到网络中,而无需先拷贝到 Socket 缓冲区。这称为收集拷贝功能(Gather Operation)。 如图 12 所示。
注 4:如果硬件及驱动程序支持 Gather Operation,方法 transferTo()会自动使用这个特性,对 Java 应用程序来说是透明的。
Figure 12: 消除了所有 CPU 拷贝(需要硬件及驱动程序的支持),所以称为“零拷贝”
参考:
Efficient data transfer through zero copy
浅析Linux中的零拷贝技术
4. Java NIO 核心组件之三:选择器
A selector (java.nio.channels.Selector and subclasses) provides a mechanism for waiting on channels and recognizing when one or more become available for data transfer.
Java 的 selector 表达的概念和 Unix 中的 select 系统调用类似。在实现层面上,Java 使用 epoll(Linux 2.6 以前会使用 poll)或者 kqueues(FreeBsd, MacOS)等来实现 selector。
5. 异步 I/O
Java 1.7 中增加了 AsynchronousChannel ,这种类型的 Channel 支持异步 I/O 操作。再利用 java.util.concurrent.Future 或者 java.nio.channels.CompletionHandler 可以实现异步 I/O。下面将分别介绍它们。
5.1. 异步 I/O 实例:使用 AsynchronousChannel 和 Future
下面使用 AsynchronousChannel 和 Future 读取文件内容的实例:
import static java.nio.file.StandardOpenOption.READ;

import java.io.IOException;
import java.nio.ByteBuffer;
import java.nio.channels.AsynchronousFileChannel;
import java.nio.charset.Charset;
import java.nio.file.Path;
import java.nio.file.Paths;
import java.util.concurrent.Future;

public class TestAsyncChannelAndFuture {
    public static void main(String[] args) throws Exception {
        Path path = Paths.get("/Users/cig01/test/file1");

        try (AsynchronousFileChannel afc = AsynchronousFileChannel.open(path, READ)) {
            int fileSize = (int) afc.size();
            ByteBuffer dataBuffer = ByteBuffer.allocate(fileSize);

            Future<Integer> result = afc.read(dataBuffer, 0);

            int readBytes = result.get();
            // 当读取结束后result.get()才返回,调用get()前使用result.isDone()可测试是否结束

            System.out.format("%s bytes read from %s%n", readBytes, path);

            System.out.format("Read data is:%n");
            byte[] byteData = dataBuffer.array();
            Charset cs = Charset.forName("UTF-8");
            String data = new String(byteData, cs);
            System.out.println(data);
        } catch (IOException ex) {
            ex.printStackTrace();
        }
    }
}
假设文件“/Users/cig01/test/file1”的内容为“abcxyz”(最后有换行符),则上面程序的输出如下:
7 bytes read from /Users/cig01/test/file1
Read data is:
abcxyz
5.2. 异步 I/O 实例:使用 AsynchronousChannel 和 CompletionHandler
下面使用 AsynchronousChannel 和 CompletionHandler 读取文件内容的实例:
import static java.nio.file.StandardOpenOption.READ;

import java.io.IOException;
import java.nio.ByteBuffer;
import java.nio.channels.AsynchronousFileChannel;
import java.nio.channels.CompletionHandler;
import java.nio.charset.Charset;
import java.nio.file.Path;
import java.nio.file.Paths;

public class TestAsyncChannelAndCompletionHandler {
    public static void main(String[] args) throws Exception {
        Path path = Paths.get("/Users/cig01/test/file1");
        AsynchronousFileChannel afc = AsynchronousFileChannel.open(path, READ);
        ReadHandler handler = new ReadHandler();
        int fileSize = (int) afc.size();
        ByteBuffer dataBuffer = ByteBuffer.allocate(fileSize);

        Attachment attach = new Attachment();
        attach.asyncChannel = afc;
        attach.buffer = dataBuffer;
        attach.path = path;

        afc.read(dataBuffer, 0, attach, handler);

        System.out.println("Sleeping for 5 seconds...");
        Thread.sleep(5000);  // 等待读取完成,否则进程会提前退出
    }
}

class Attachment {
    public Path path;
    public ByteBuffer buffer;
    public AsynchronousFileChannel asyncChannel;
}

class ReadHandler implements CompletionHandler<Integer, Attachment> {
    @Override
    public void completed(Integer result, Attachment attach) {
        System.out.format("%s bytes read from %s%n", result, attach.path);
        System.out.format("Read data is:%n");
        byte[] byteData = attach.buffer.array();
        Charset cs = Charset.forName("UTF-8");
        String data = new String(byteData, cs);
        System.out.println(data);
        try {
            // Close the channel
            attach.asyncChannel.close();
        } catch (IOException e) {
            e.printStackTrace();
        }
    }

    @Override
    public void failed(Throwable e, Attachment attach) {
        System.out.format("Read operation on %s file failed." + "The error is: %s%n", attach.path, e.getMessage());
        try {
            // Close the channel
            attach.asyncChannel.close();
        } catch (IOException e1) {
            e1.printStackTrace();
        }
    }
}
假设文件“/Users/cig01/test/file1”的内容为“abcxyz”(最后有换行符),则上面程序的输出如下:
Sleeping for 5 seconds...
7 bytes read from /Users/cig01/test/file1
Read data is:
abcxyz