Assembly (i386, x86_64)
Table of Contents
- 1. Assembly Language
- 2. 汇编程序基本结构和实例
- 3. The IA-32 Registers
- 4. The AMD64 Registers
- 5. Moving Data
- 6. Branches and Loops
- 7. Using Numbers
- 8. Basic Math Functions
- 9. Using Strings
- 10. Using Functions
- 11. The Stack
- 12. SIMD (Single Instruction Multiple Data)
- 13. Tips
1. Assembly Language
An assembly language is a low-level programming language for a computer, or other programmable device, in which there is a very strong correspondence between the language and the architecture's machine code instructions.
汇编语言和它的硬件平台及汇编器紧密相关,本文的内容主要参考书籍《Professional Assembly Language》,仅描述 x86 平台和 GNU assembler。
参考:
Professional Assembly Language: http://blog.hit.edu.cn/jsx/upload/AT%EF%BC%86TAssemblyLanguage.pdf
Computer Systems: A Programmer's Perspective, 2nd. Chapter 3 Machine-Level Representation of Programs
x86 Assembly Language Reference Manual, Chapter 3 Instruction Set Mapping: https://docs.oracle.com/cd/E26502_01/html/E28388/enmzx.html
Gentle Introduction to x86-64 Assembly: http://www.x86-64.org/documentation/assembly.html
GNU Assembler User Guide: https://sourceware.org/binutils/docs-2.25/as/index.html
x86 Assembly Guide: http://www.cs.virginia.edu/~evans/cs216/guides/x86.html
x86 instruction listings: https://en.wikipedia.org/wiki/X86_instruction_listings
Intel® 64 and IA-32 Architectures Software Developer Manuals: http://www.intel.com/content/www/us/en/processors/architectures-software-developer-manuals.html
AMD's Developer Guides, Manuals & ISA Documents: http://developer.amd.com/resources/documentation-articles/developer-guides-manuals/
1.1. Intel Processors
Intel 部分处理器及主要特性如表 1 所示。
| 处理器 | 发布年份 | 主要特性 |
|---|---|---|
| 8086 | 1978 | 16 位处理器 |
| i386 | 1985 | 32 位处理器,增加了 flat addressing model |
| i486 | 1989 | 将浮点单元集成到处理器芯片上,指令集无明显改变 |
| Pentium | 1993 | 改善性能,不过只对指令集增加了小的扩展 |
| PentiumPro | 1995 | 引入全新的处理器设计(P6 微体系结构)。增加一类条件传送(conditional move)指令 |
| Pentium II | 1997 | 引入了 MMX |
| Pentium III | 1999 | 引入了 SSE,这是一类处理整数或浮点数向量的指令 |
| Pentium 4 | 2000 | 扩展 SSE 到 SSE2,增加了新的数据类型(如双精度浮点数)。引入了 NetBurst 微体系结构。 |
| Pentium 4E | 2004 | 增加超线程。增加 EM64T(即 x86-64) |
| Core 2 | 2006 | 回归到类似于 P6 的微体系结构(Core 微体系结构)。Intel 的第一个多核处理器。但不支持超线程。 |
| Core i7 | 2008 | 既支持超线程,又是多核。 |
Intel 微体系结构变迁:P6 -> NetBurst -> Core
参考:
https://en.wikipedia.org/wiki/List_of_Intel_microprocessors
https://en.wikipedia.org/wiki/List_of_Intel_CPU_microarchitectures
https://en.wikipedia.org/wiki/List_of_AMD_CPU_microarchitectures
2. 汇编程序基本结构和实例
2.1. 汇编程序中的三种基本元素
An assembly language program consists of three components that are used to define the program operations:
- Opcode mnemonics
- Data definition
- Directives
2.1.1. Opcode mnemonics
The core of an assembly language program is the instruction codes used to create the program. To help facilitate writing the instruction codes, assemblers equate mnemonic words with instruction code functions.
For example, the instruction code sample:
55
89 E5
83 EC 08
C7 45 FC 01 00 00 00
83 EC 0C
6A 00
E8 D1 FE FF FF
can be written in assembly language as follows:
push %ebp
mov %esp, %ebp
sub $0x8, %esp
movl $0x1, -4(%ebp)
sub $0xc, %esp
push $0x0
call 8048348
2.1.1.1. IA-32 Instruction Code Format
The IA-32 instruction code format consists of four main parts:
❑ Optional instruction prefix
❑ Operational code (opcode)
❑ Optional modifier
❑ Optional data element
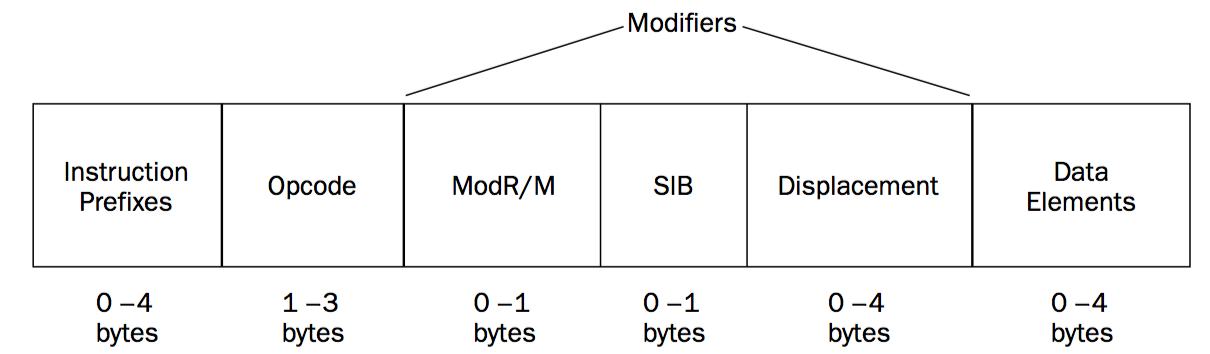
Figure 1: Layout of the IA-32 instruction code format
2.1.2. Data definition
Besides the instruction codes, most programs also require data elements to be used to hold variable and constant data values that are used throughout the program.
一般地,汇编语言中有两种方法来存储和获取数据:使用内存和使用栈。
2.1.2.1. Using memory(定义变量)
Defining variables in assembly language consists of two parts:
- A label that points to a memory location
- A data type and default value for the memory bytes
It would look like the following:
testvalue:
    .long 150
message:
    .ascii "This is a test message"
pi:
    .float 3.14159
要引用变量,使用定义变量时的 Label 即可。如果在 Label 前面加个美元符号,则表示变量的地址。
如:
movl testvalue, %ebx
addl $10, %ebx
movl %ebx, testvalue
2.1.2.2. Using the stack
The stack is a special memory area usually reserved for passing data elements between functions in the program. It can also be used for temporarily storing and retrieving data elements.
A pointer (called the stack pointer) is used to point to the next memory location in the stack to put or take data.
2.1.3. Directives(以点号开头)
Assemblers reserve special keywords (i.e. directives) for instructing the assembler how to perform special functions as the mnemonics are converted to instruction codes.
Directives are preceded by a period to set them apart from labels.
Many different directives are used to help make the programmer’s job of creating instruction codes easier. Some modern assemblers have lists of directives that can rival many high-level language features, such as while loops, and if-then statements!
参考:
GNU Assembler Directives: https://sourceware.org/binutils/docs-2.25/as/Pseudo-Ops.html
2.2. 汇编程序的基本结构
The assembly language program consists of defined sections, each of which has a different purpose.
The three most commonly used sections are as follows:
- A data section
- The data section is used to declare the memory region where data elements are stored for the program. This section cannot be expanded after the data elements are declared, and it remains static throughout the program.
- A bss section
- The bss section is also a static memory section. It contains buffers for data to be declared later in the program. What makes this section special is that the buffer memory area is zero-filled.
- A text section
- The text section is the area in memory where the instruction code is stored. Again, this area is fixed, in that it contains only the instruction codes that are declared in the assembly language program.
2.2.1. Layout of Assembly Language
The GNU assembler declares sections using the .section declarative statement. The .section statement takes a single argument, the type of section it is declaring.
The assembly language template should look something like this:
.section .data
    < initialized data here>
.section .bss
    < uninitialized data here>
.section .text
.globl _start
_start:
    <instruction code goes here>
说明 1:
The _start label is used to indicate the instruction from which the program should start running.
如果不想使用 _start 作为默认的起始执行地址,则需要使用链接器的-e 参数来指定特定的起始执行地址。
说明 2:
Besides declaring the starting label in the application, you also need to make the entry point available for external applications. This is done with the .globl directive.
The .globl directive declares program labels that are accessible from external programs. If you are writing a bunch of utilities that are being used by external assembly or C language programs, each function section label should be declared with a .globl directive.
2.3. 汇编程序实例 (hello world, 64-bit Linux)
下面是汇编程序版的 hello world,仅在 64-bit Linux 平台下运行。
# ------------------------------------------------------------------------------
# Writes "Hello, World" to the console using only system calls.
# Runs on 64-bit Linux only.
#
# To assemble and run:
#     as -o hello.o hello.s && ld -o hello hello.o && ./a.out
# or
#     gcc -c hello.s && ld hello.o && ./a.out
# or
#     gcc -nostdlib hello.s && ./a.out
# ------------------------------------------------------------------------------

.section .data
message:
    .ascii  "Hello, world\n"

.section .text
.globl _start
_start:
    # write(1, message, 13)
    mov     $1, %rax                # system call 1 is write
    mov     $1, %rdi                # file handle 1 is stdout
    mov     $message, %rsi          # address of string to output
    mov     $13, %rdx               # number of bytes
    syscall                         # invoke operating system to do the write

    # exit(0)
    mov     $60, %rax               # system call 60 is exit
    xor     %rdi, %rdi              # we want return code 0
    syscall                         # invoke operating system to exit
说明:
- To make a system call in 64-bit Linux, place the system call number in rax, then its arguments, in order, in rdi, rsi, rdx, r10, r8, and r9, then invoke
syscall. - Some system calls return information, usually in rax. A value in the range between -4095 and -1 indicates an error, it is -errno.
- The system call destroys rcx and r11 but others registers are saved across the system call.
- Full details are in Section A.2.1 of the AMD64 ABI.
2.4. Label _start 和 Label main
前面例子中的 hello world 程序不能直接用 gcc -o hello hello.s 完成编译(增加选项-nostdlib 可以正常编译),会提示类似下面的错误:
$ gcc -o hello hello.s
/usr/lib/gcc/x86_64-linux-gnu/4.9/../../../x86_64-linux-gnu/crt1.o: In function `_start':
/build/glibc-Ir_s5K/glibc-2.19/csu/../sysdeps/x86_64/start.S:118: undefined reference to `main'
collect2: error: ld returned 1 exit status
原因是:GNU linker looks for the _start label to determine the beginning of the program, while gcc looks for the main label.
把程序中所有的 Label _start 修改为 Label main 后,就可以直接用 gcc -o hello hello.s 完成编译。
3. The IA-32 Registers
Intel IA-32 处理器提供了下面 8 组寄存器(除段寄存器为 16 位外,其它 7 组都为 32 位寄存器):
- 通用寄存器(EAX、EBX、ECX、EDX、ESP、EBP、ESI、EDI)
- 段寄存器(CS、SS、DS、ES、FS、GS)
- 标志寄存器(EFLAGS)
- 指令指针寄存器(EIP)
- 系统表寄存器(GDTR、IDTR、LDTR、TR)
- 控制寄存器(CR0、CR1、CR2、CR3、CR4)
- 调试寄存器(DR0、DR1、DR2、DR3、DR4、DR5、DR6、DR7)
- 测试寄存器(TR0、TR1、TR2、TR3、TR4、TR5、TR6、TR7)
对于应用级编程了解前面 4 组寄存器就够了;对于系统级编程,还将接触后面几组寄存器。
本文重点介绍前面 4 组寄存器。
参考:
80386 的寄存器组成:http://hengch.blog.163.com/blog/static/107800672009029104144323/
Intel® 64 and IA-32 Architectures Software Developer Manuals, Volume 1: Basic Architecture, 3.4 Basic Program Execution Registers
3.1. General-Purpose Registers
The general-purpose registers are used to temporarily store data as it is processed on the processor.
| 通用 Register | 常见用途 |
|---|---|
| EAX | Accumulator for operands and results data |
| EBX | Pointer to data in the data memory segment |
| ECX | Counter for string and loop operations |
| EDX | I/O pointer |
| EDI | Data pointer for destination of string operations |
| ESI | Data pointer for source of string operations |
| ESP | Stack pointer (in the SS segment) |
| EBP | Pointer to data on the stack (in the SS segment) |
参考:
Intel® 64 and IA-32 Architectures Software Developer Manuals, Volume 1: Basic Architecture, 3.4.1 General-Purpose Registers
3.2. Segment Registers
The segment registers are used specifically for referencing memory locations.
The segment registers (CS, DS, SS, ES, FS, and GS) hold 16-bit segment selectors. A segment selector is a special pointer that identifies a segment in memory.
When writing application code, programmers generally create segment selectors with assembler directives and symbols. The assembler and other tools then create the actual segment selector values associated with these directives and symbols. If writing system code, programmers may need to create segment selectors directly.
How segment registers are used depends on the type (i.e. flat or segmented) of memory management model that the operating system is using.
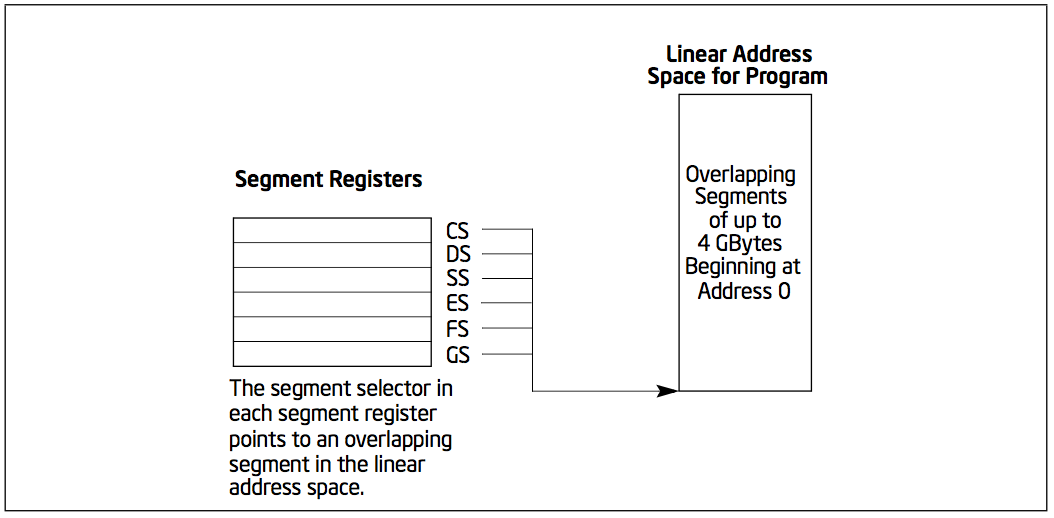
Figure 2: Use of Segment Registers for Flat Memory Model
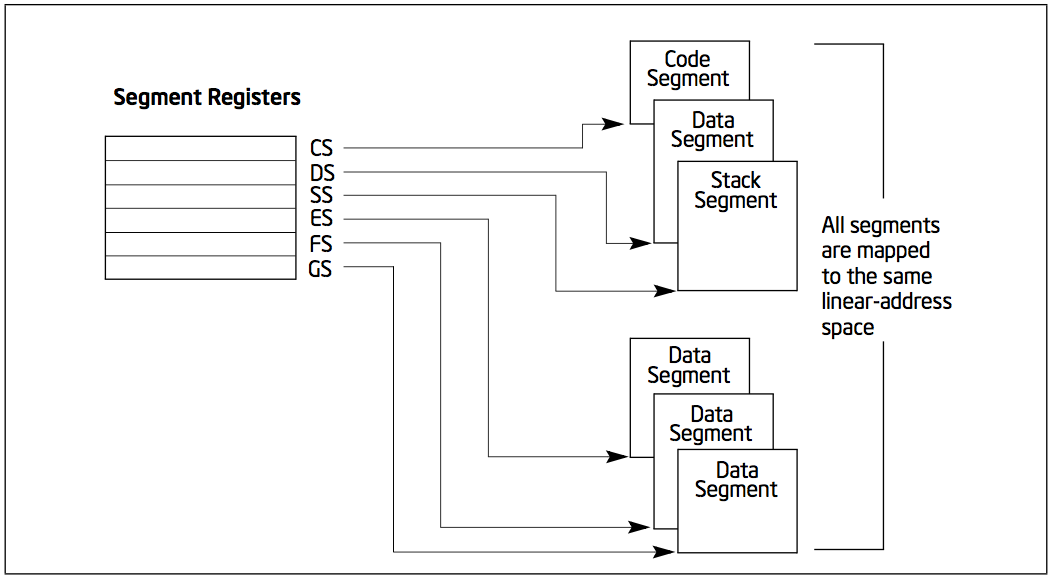
Figure 3: Use of Segment Registers in Segmented Memory Model
参考:
Intel® 64 and IA-32 Architectures Software Developer Manuals, Volume 1: Basic Architecture, 3.4.2 Segment Registers
3.3. EFLAGS Register
The 32-bit EFLAGS register contains a group of status flags, a control flag, and a group of system flags.
There are no instructions that allow the whole register to be examined or modified directly.
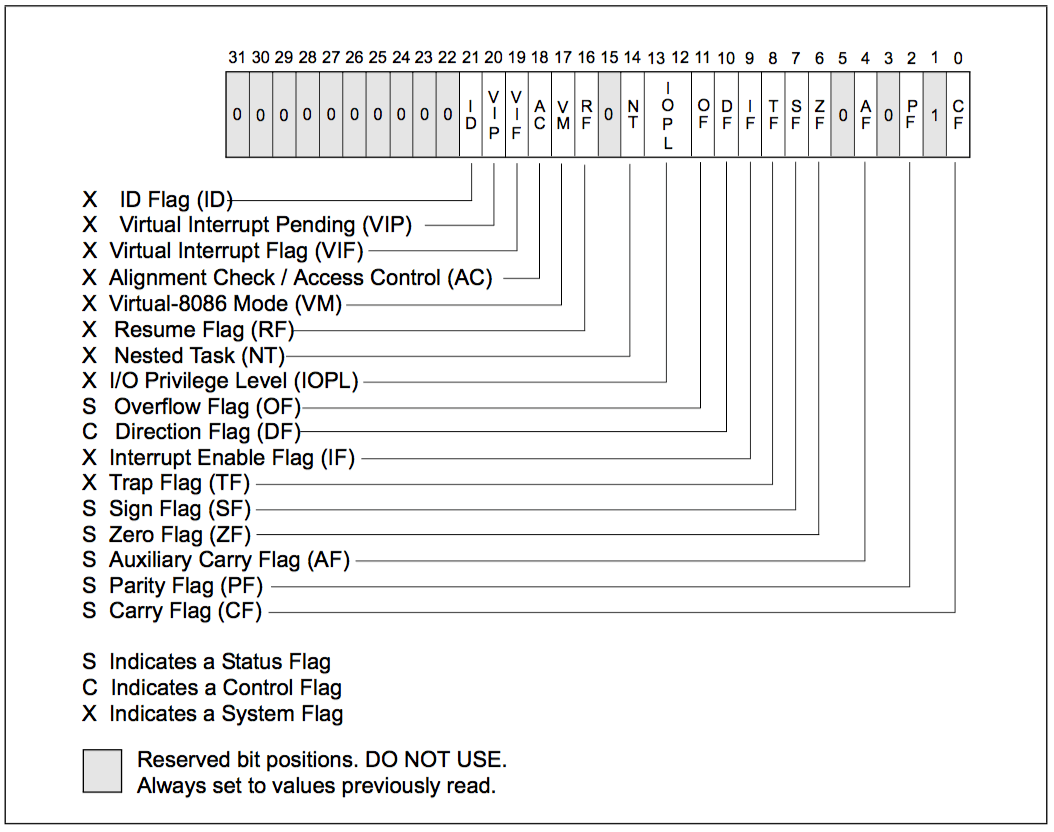
Figure 4: EFLAGS Register
参考:
Intel® 64 and IA-32 Architectures Software Developer Manuals, Volume 1: Basic Architecture, 3.4.3 EFLAGS Register
3.3.1. 哪些指令会改变 EFLAGS?
参考:
Intel® 64 and IA-32 Architectures Software Developer Manuals, Volume 1: Basic Architecture, Appendix A EFLAGS Cross-Reference
Intel® 64 and IA-32 Architectures Software Developer Manuals, Volume 1: Basic Architecture, Appendix B EFLAGS Condition Codes
3.4. Instruction Pointer (EIP)
The instruction pointer (EIP) register contains the offset in the current code segment for the next instruction to be executed. It is advanced from one instruction boundary to the next in straight-line code or it is moved ahead or backwards by a number of instructions when executing JMP, Jcc, CALL, RET, and IRET instructions.
4. The AMD64 Registers
Opteron is the first processor which supported the AMD64 instruction set architecture (known generically as x86-64). It was released on April 22, 2003.
Figure 5 shows an overview of the AMD64 registers used in general-purpose application programming.
When naming registers, if reference is made to multiple register widths, a lower-case r notation is used. For example, the notation rAX refers to the 16-bit AX, 32-bit EAX, or 64-bit RAX register, depending on an instruction’s effective operand size.
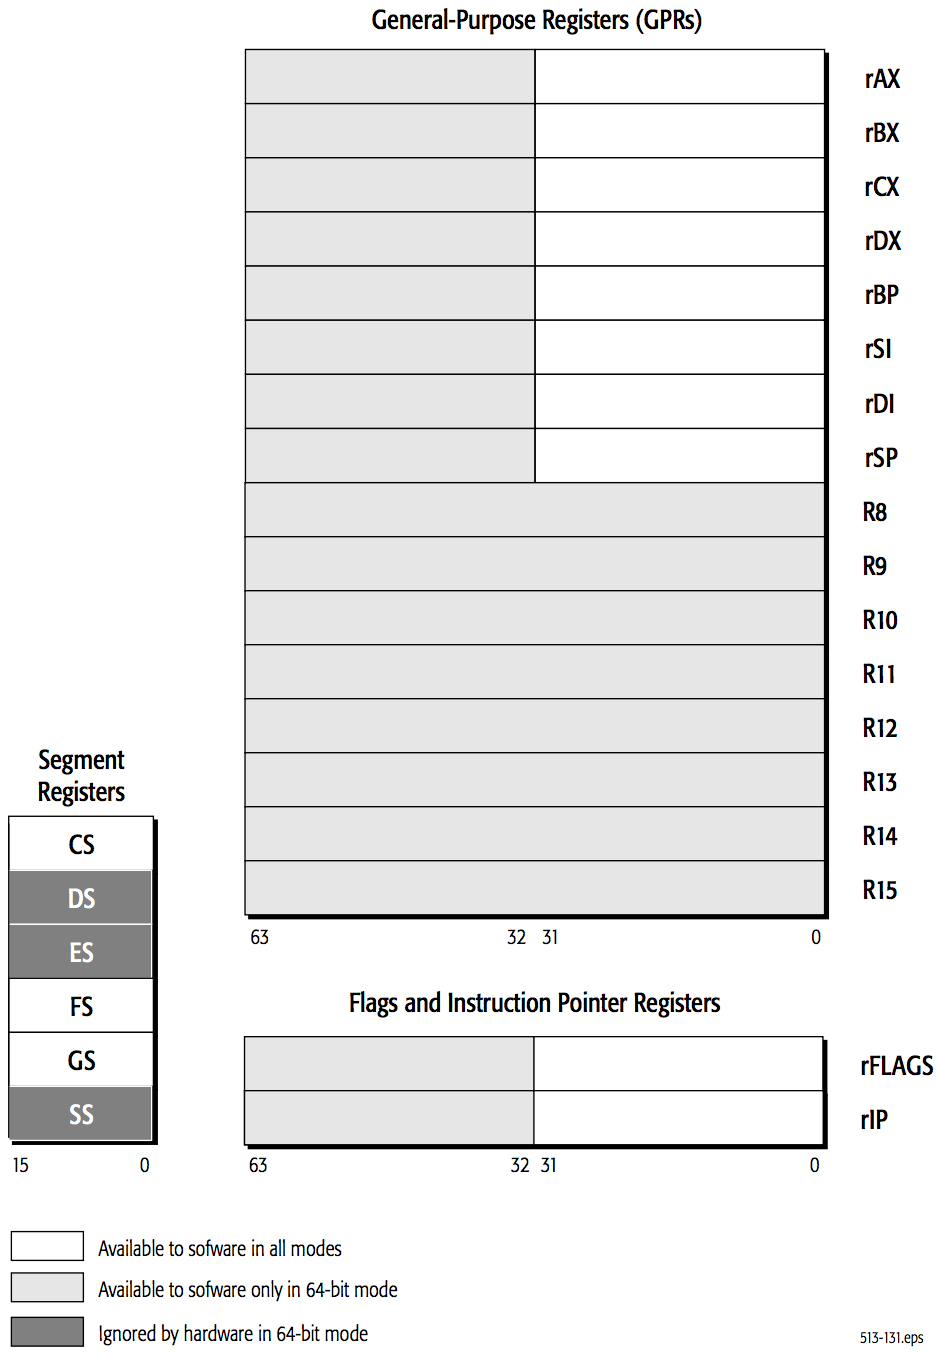
Figure 5: General-Purpose Programming AMD64 Registers
In legacy and compatibility modes, all of the legacy x86 registers are available.
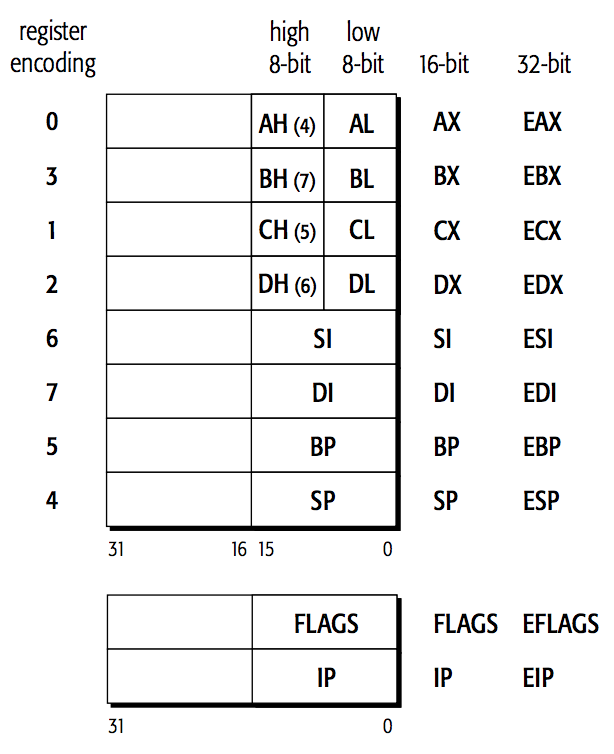
Figure 6: General Registers in Legacy and Compatibility Modes
参考:
AMD64 Architecture Programmer’s Manual Volume 1: Application Programming, 3.1 Registers
4.1. Segment Registers
Segment registers hold the selectors used to access memory segments.
In 64-bit mode, only the CS, FS, and GS segments are recognized by the processor. For references to the DS, ES, or SS segments in 64-bit mode, the processor assumes that the base for each of these segments is zero, neither their segment limit nor attributes are checked.
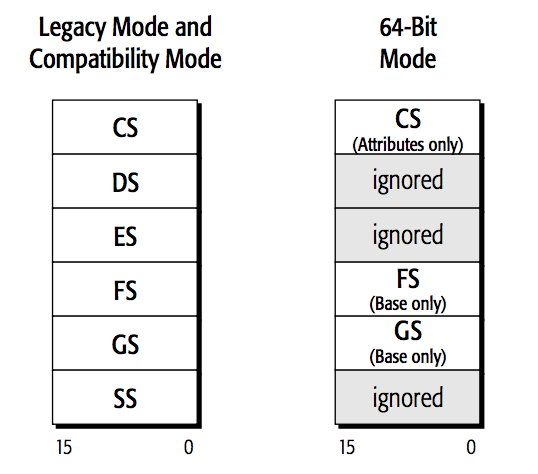
Figure 7: AMD64 Segment Registers
参考:
AMD64 Architecture Programmer’s Manual Volume 1: Application Programming, 2.1 Memory Organization
4.1.1. 64 位 Mac 中 ds,es,ss 为 unavailable
用 gdb 调试 Mac 中的 64 位程序时,gdb 显示 ss,ds,es 这 3 个寄存器为 unavailable。
(gdb) info registers
rax            0x100000f80	4294971264
rbx            0x0	0
rcx            0x7fff5fbffc70	140734799805552
rdx            0x7fff5fbffba0	140734799805344
rsi            0x7fff5fbffb90	140734799805328
rdi            0x1	1
rbp            0x7fff5fbffb70	0x7fff5fbffb70
rsp            0x7fff5fbffb70	0x7fff5fbffb70
r8             0x0	0
r9             0x7fff5fbfec38	140734799801400
r10            0x32	50
r11            0x246	582
r12            0x0	0
r13            0x0	0
r14            0x0	0
r15            0x0	0
rip            0x100000f84	0x100000f84 <main+4>
eflags         0x246	[ PF ZF IF ]
cs             0x2b	43
ss             <unavailable>
ds             <unavailable>
es             <unavailable>
fs             0x0	0
gs             0x0	0
4.2. RFLAGS and EFLAGS
In 64-bit mode, EFLAGS is extended to 64 bits and called RFLAGS. The upper 32 bits of RFLAGS register is reserved. The lower 32 bits of RFLAGS is the same as EFLAGS.
注: RFLAGS 的高 32 位全部被保留未使用。用 gdb 调试 64 位程序时仅显示 EFLAGS。
5. Moving Data
5.1. Defining Data
前文已经介绍过 Data definition 的基本格式。
The following table shows the different directives that can be used to reserve memory for specific types of data elements.
| Directive | Data Type |
|---|---|
| .ascii | Text string |
| .asciz | Null-terminated text string |
| .byte | Byte value |
| .double | Double-precision floating-point number |
| .float | Single-precision floating-point number |
| .int | 32-bit integer number |
| .long | 32-bit integer number (same as .int) |
| .octa | 16-byte integer number |
| .quad | 8-byte integer number |
| .short | 16-bit integer number |
| .single | Single-precision floating-point number (same as .float) |
如:
.section .data
msg:
    .ascii "This is a test message"
factors:
    .double 37.45, 45.33, 12.30
height:
    .int 54
length:
    .int 62, 35, 47
5.1.1. Defining static symbol (.equ or .set directive)
.equ 和.set 作用相同,是同义词,用来设置符号为指定的表达式。
.equ symbol, expression
.set symbol, expression
一旦某符号被设置为指定的表达式后,它将不能被修改。
在引用 static symbol 时,要在 symbol 前面加美元符号。 如:
.equ LINUX_SYS_CALL, 0x80

movl $LINUX_SYS_CALL, %eax
5.1.2. Defining data elements in bss section (.comm and .lcomm directive)
Defining data elements in the bss section is somewhat different from defining them in the data section. Instead of declaring specific data types, you just declare raw segments of memory that are reserved for whatever purpose you need them for.
The GNU assembler uses two directives to declare buffers, as shown in the following table.
| Directive | Description |
|---|---|
| .comm symbol, length | Declares a common memory area for data that is not initialized |
| .lcomm symbol, length | Declares a local common memory area for data that is not initialized |
One benefit to declaring data in the bss section is that the data is not included in the executable program. When data is defined in the data section, it must be included in the executable program, since it must be initialized with a specific value.
5.1.2.1. bss 例子(不占用磁盘空间)
$ cat 1.s
# Runs on 64-bit Linux only.
.section .bss
    .lcomm buffer, 10000
.section .text
.globl _start
_start:
    # exit(0)
    mov     $60, %rax               # system call 60 is exit
    xor     %rdi, %rdi              # we want return code 0
    syscall                         # invoke operating system to exit
$ gcc -c 1.s && ld 1.o -o 1
$ size 1
   text	   data	    bss	    dec	    hex	filename
     12	      0	  10000	  10012	   271c	1
$ ls -l 1
-rw-r--r-- 1 cig01 cig01 880 Sep 27 21:31 1
上面例子中,可执行程序才 880 字节,可知,bss 中的内容并不占用可执行程序的磁盘空间。
5.1.2.2. bss 例子对比(分配 buffer 在 data 段,占用磁盘空间)
$ cat 2.s
# Runs on 64-bit Linux only.
.section .data
buffer:
    .fill 10000
.section .text
.globl _start
_start:
    # exit(0)
    mov     $60, %rax               # system call 60 is exit
    xor     %rdi, %rdi              # we want return code 0
    syscall                         # invoke operating system to exit
$ gcc -c 2.s && ld 2.o -o 2
$ size 2
   text	   data	    bss	    dec	    hex	filename
     12	  10000	      0	  10012	   271c	2
$ ls -l 2
-rwxr-xr-x 1 cig01 cig01 10880 Sep 27 21:45 2
上面例子中,buffer 分配在 data 段,可执行程序有 10880 字节,比前面例子中分配 buffer 在 bss 段的可执行程序占用了更多的磁盘空间。
5.2. Moving Data (mov{bwlq})
The basic format of the MOV instruction is as follows:
MOVX source, destination
The MOVX can be the following:
movb for an 8-bit byte value
movw for a 16-bit word vlaue
movl for a 32-bit long word value
movq for a 64-bit quadruple word value
源操作数指定的值是一个立即数,存储在寄存器中或者存储器中。目的操作数指定一个位置,要么是一个寄存器,要么是一个存储器地址。
如果省略大小指示后缀,直接使用 mov ,GAS 将根据目标操作数大小进行自动选择。
注意:MOV 指令的两个操作数不能都指向存储器位置。
根据源操作数和目的操作数的类型(立即数、寄存器、存储器),有下面 5 种可能的组合:
1 movl $0x4050,%eax          Immediate--Register, 4 bytes
2 movw %bp,%sp               Register--Register,  2 bytes
3 movb (%edi,%ecx),%ah       Memory--Register,    1 byte
4 movb $-17,(%esp)           Immediate--Memory,   1 byte
5 movl %eax,-12(%ebp)        Register--Memory,    4 bytes
5.2.1. 存储器相关寻址模式(如何计算 effective address, lea{lq} )
立即数和寄存器类型的操作数,其使用较简单。
当操作数为存储器类型时,有多种表现形式。
存储器寻址的通用形式为:
offset_address(base_address, index, size)
其中,base_address 和 index 必须是寄存器;size 必须为 1,2,4 或 8。
对应 effective address 的计算方法为:
base_address + offset_address + index * size
由计算公式可知,offset_address 和 base_address 的位置在通用形式中可以互换,不影响结果。
通用形式中的某部分为 0 时可以省略,这样就有很多更简单的形式。
如:
movl %ebx, (%edi)   # moves the value in the EBX register to the memory location contained in the EDI register.
movl %edx, -4(%edi) # moves the value in the EDX register to the memory location 4 bytes before the location pointed to by the EDI register.
可用 leal 指令计算有效地址,并保存结果到寄存器。如:
leal -4(%ebp), %eax # 把-4(%ebp)对应的有效地址保存到EAX寄存器中
5.2.1.1. 寻址模式实例
Linux 中,假设有下面 32bit 汇编程序。
.section .data
values:
    .int 10, 15, 20, 25, 30, 35, 40, 45, 50, 55, 60

.section .text
.globl _start
_start:
    movl $values, %edi             # 把values的地址保存到EDI寄存器中
    movl $100, 4(%edi)             # 把100放入到EDI寄存器中内存地址加4的位置中(相当于把values中的元素15修改为了100)
    movl $1, %edi                  # 把1放入EDI寄存器中
    movl values(, %edi, 4), %ebx   # 准备exit的参数,为内存地址:values + 0 + 1*4 中的值(即100)
    movl $1, %eax                  # exit的系统调用号为1
    int $0x80
编译运行测试如下:
$ as --32 testmov.s -o testmov.o
$ ld -m elf_i386 testmov.o -o testmov
$ ./testmov
$ echo $?
100
5.2.2. 较小源数据复制到较大位置——符号位扩展(MOVSXX)和零扩展(MOVZXX)
把较小源数据复制到较大位置是合法的,高位用符号位扩展(MOVSXX)或者零扩展(MOVZXX)进行填充。
MOVSXX 和 MOVZXX 中的 X 是 b w l q 中的一个,只要第 1 个 X 比第 2 个 X“小”即可。
如:
movsbl
movsbq
movswq
movzbl
movzbq
movzwq
5.2.2.1. 实例(movb、movsbl 和 movzbl 区别)
下面实例演示 movb、movsbl 和 movzbl 区别。
#Assume initially that %dh=CD, %eax=98765432
movb %dh, %al          #  %eax=987654CD
movsbl %dh, %eax       #  %eax=FFFFFFCD
movzbl %dh, %eax       #  %eax=000000CD
5.3. Conditional Move Instructions
The conditional move instructions are available starting in the P6 family of Pentium processors (the Pentium Pro, Pentium II, and newer).
The conditional move instructions are divided into instructions used for signed operations and for unsigned operations. The unsigned conditional move instructions rely on the Carry, Zero, and Parity flags to determine the difference between two operands. The signed conditional move instructions utilize the Sign and Overflow flags to indicate the condition of the comparison between the operands.
| Instruction | Description | EFLAGS Condition |
|---|---|---|
| CMOVA/CMOVNBE | Above/not below or equal | (CF or ZF) = 0 CF=0 |
| CMOVAE/CMOVNB | Above or equal/not below | CF=0 |
| CMOVNC | Not carry | CF=1 |
| CMOVB/CMOVNAE | Below/not above or equal | CF=1 |
| CMOVC | Carry | (CF or ZF) = 1 ZF=1 |
| CMOVBE/CMOVNA | Below or equal/not above | ZF=0 |
| CMOVE/CMOVZ | Equal/zero | PF=1 |
| CMOVNE/CMOVNZ | Not equal/not zero | PF=0 |
| CMOVP/CMOVPE | Parity/parity even | (CF or ZF) = 0 CF=0 |
| CMOVNP/CMOVPO | Not parity/parity odd | CF=0 |
| Instruction | Description | EFLAGS Condition |
|---|---|---|
| CMOVGE/CMOVNL | Greater or equal/not less | (SF xor OF)=0 |
| CMOVL/CMOVNGE | Less/not greater or equal | (SF xor OF)=1 |
| CMOVLE/CMOVNG | Less or equal/not greater | ((SF xor OF) or ZF)=1 |
| CMOVO | Overflow | OF=1 |
| CMOVNO | Not overflow | OF=0 |
| CMOVS | Sign (negative) | SF=1 |
| CMOVNS | Not sign (non-negative) | SF=0 |
5.3.1. “条件数据传递指令”替换“条件转移指令”
条件数据传递指令是 Intel 在 P6 微处理器架构中开始引入的。
条件数据传递指令可以作为条件转移的一种替代策略。这种策略先计算一个条件操作的两种结果,然后再根据条件是否满足从而选取一个。但只有在某些情况下(如计算两种结果时相互没有副作用)这种策略才可行。
条件数据传递指令比条件转移指令的性能更好,它更好地匹配现代处理器的性能特性(条件数据传递指令没有分支预测错误的处罚,更容易保持流水线是满的)。
参考:Computer Systems A Programmer’s Perspective, 2nd. 3.6.6 Conditional Move Instructions
为了向下兼容,gcc 在 IA32 系统中默认不会生成条件数据传递指令;在 x86_64 系统下,gcc 会优先使用条件数据传递指令。
考虑下面 C 程序:
int max(int x, int y)
{
  return x < y ? y : x;
}
用 gcc -m32 -S max.c 生成 32-bit 汇编代码(使用条件转换指令):
max:
        pushl   %ebp
        movl    %esp, %ebp
        movl    12(%ebp), %edx
        movl    8(%ebp), %eax
        cmpl    %edx, %eax
        jge     .L3
        movl    %edx, %eax
.L3:
        popl    %ebp
        ret
用 gcc -m64 -S max.c 生成 64-bit 汇编代码(使用条件数据传递指令):
max:
        pushq   %rbp
        movq    %rsp, %rbp
        movl    %edi, -4(%rbp)
        movl    %esi, -8(%rbp)
        movl    -8(%rbp), %eax    # mov y to eax
        cmpl    %eax, -4(%rbp)    # compare y and x
        cmovge  -4(%rbp), %eax    # If >=, then set y as return value
        popq    %rbp
        ret
5.4. Exchanging Data (XCHG, XADD, CMPXCHG)
| Instruction | Description |
|---|---|
| XCHG | Exchanges the values of two registers, or a register and a memory location |
| BSWAP | Reverses the byte order in a 32-bit register |
| XADD | Exchanges two values and stores the sum in the destination operand |
| CMPXCHG | Compares a value with an external value and exchanges it with another |
| CMPXCHG8B | Compares two 64-bit values and exchanges it with another |
5.4.1. XCHG
The XCHG instruction can exchange data values between two general-purpose registers, or between a register and a memory location.
The format of the instruction is as follows:
xchg operand1, operand2
Either operand1 or operand2 can be a general-purpose register or a memory location (but both cannot be a memory location). The command can be used with any general-purpose register, although the two operands must be the same size.
When one of the operands is a memory location, the processor’s LOCK signal is automatically asserted, preventing any other processor from accessing the memory location during the exchange.
Note: Be careful when using the XCHG instruction with memory locations. The LOCK process is very time-consuming, and can be detrimental to your program’s performance.
5.4.2. CMPXCHG
The CMPXCHG instruction compares the destination operand with the value in the EAX, AX, or AL registers. If the values are equal, the value of the source operand value is loaded into the destination operand and the zero flag is set. If the values are not equal, the destination operand value is loaded into the EAX, AX, or AL registers and the zero flag is cleared.
In the GNU assembler, the format of the CMPXCHG instruction is as follows:
cmpxchg source, destination
The destination operand can be a register, or a memory location. The source operand must be a register whose size matches the destination operand.
5.4.2.1. Atomic operations in multitasking
CMPXCHG is intended to be used for atomic operations in multitasking or multiprocessor environments. To safely update a value in shared memory, for example, you might load the value into EAX, load the updated value into EBX, and then execute the instruction lock cmpxchg %ebx, value. If value has not changed since being loaded, it is updated with your desired new value, and the zero flag is set to let you know it has worked. (The LOCK prefix prevents another processor doing anything in the middle of this operation: it guarantees atomicity.) However, if another processor has modified the value in between your load and your attempted store, the store does not happen, and you are notified of the failure by a cleared zero flag, so you can go round and try again.
参考:
https://courses.engr.illinois.edu/ece390/archive/spr2002/books/labmanual/inst-ref-cmpxchg.html
6. Branches and Loops
6.1. Unconditional Branches
When an unconditional branch is encountered in the program, the instruction pointer is automatically routed to a different location. You can use three types of unconditional branches:
❑ Jumps
❑ Calls
❑ Interrupts
6.2. Conditional Branches
The result of the conditional branch depends on the state of the EFLAGS register at the time the branch is executed.
There are many bits in the EFLAGS register, but the conditional branches are only concerned with five of them:
❑ Carry flag (CF) - bit 0 (lease significant bit)
❑ Overflow flag (OF) - bit 11
❑ Parity flag (PF) - bit 2
❑ Sign flag (SF) - bit 7
❑ Zero flag (ZF) - bit 6
| Instruction | Synonym | Jump condition | Description |
|---|---|---|---|
| je | jz | ZF=1 | Equal/zero |
| jne | jnz | ZF=0 | Not equal/not zero |
| js | SF=1 | Negative | |
| jns | SF=0 | Nonnegative | |
| jg | jnle | SF=OF and ZF=0 | Greater (signed >) |
| jge | jnl | SF=OF | Greater or equal (signed >=) |
| jl | jnge | SF<>OF | Less (signed <) |
| jle | jng | SF<>OF or ZF=1 | Less or equal (signed <=) |
| ja | jnbe | CF=0 and ZF=0 | Above (unsigned >) |
| jae | jnb, jc | CF=0 | Above or equal (unsigned >=) |
| jb | jnae, jnc | CF=1 | Below (unsigned <) |
| jbe | jna | CF=1 or ZF=1 | Below or equal (unsigned <=) |
| jo | OF=1 | Overflow | |
| jno | OF=0 | Not overflow | |
| jp | jpe | PF=1 | Parity (parity even) |
| jnp | jpo | PF=0 | Not parity (parity odd) |
| jcxz | %cx = 0 | Jump if CX register is 0 | |
| jecxz | %ecx = 0 | Jump if ECX register is 0 |
6.2.1. Example: Using the Parity flag
The parity flag indicates the number of bits that should be one in a mathematical answer. This can be used as a crude error-checking system to ensure that the mathematical operation was successful.
If the number of bits set to one in the resultant is even, the parity bit is set (one). If the number of bits set to one in the resultant is odd, the parity bit is not set (zero).
比特位为 1 的个数为偶数时,PF=1;比特位为 1 的个数为奇数时,PF=0。
# paritytest.s - An example of testing the parity flag
.section .text
.globl _start
_start:
    movl $4, %ebx
    subl $3, %ebx       # try: subl $1, %ebx
    jp overhere
    movl $200, %ebx     # exit 200
    movl $1, %eax
    int $0x80
overhere:
    movl $100, %ebx     # exit 100
    movl $1, %eax
    int $0x80
In this snippet, the result from the subtraction is 1, which in binary is 00000001. Because the number of one bits is odd, the parity flag is not set, so the JP instruction should not branch.
$ gcc -g -m32 -nostdlib paritytest.s -o paritytest
$ ./paritytest
$ echo $?
200
如果把程序中 subl $3, %ebx 修改为 subl $1, %ebx ,则减法操作的结果为 3,二进制表示为 00000011,其中有偶数个 1,PF 会置为 1,jp 指令会跳转到 overhere,故程序退出码会为 100。
6.3. Loops
The loop instructions use the ECX register as a counter and automatically decrease its value as the loop instruction is executed.
| Instruction | Description |
|---|---|
| LOOP | Loop until the ECX register is zero |
| LOOPE/LOOPZ | Loop until either the ECX register is zero, or the ZF flag is not set |
| LOOPNE/LOOPNZ | Loop until either the ECX register is zero, or the ZF flag is set |
Before the loop starts, you must set the value for the number of iterations to perform in the ECX register. This usually looks something like the following:
    < code before the loop >
    movl $100, %ecx
label1:
    < code to loop through >
    loop label1
    < code after the loop >
Be careful with the code inside the loop. If the ECX register is modified, it will affect the operation of the loop.
6.4. C 循环语句对应的汇编代码
用汇编中的条件分支语句可实现 C 中的循环结构。
为了便于理解,可先把 C 循环转换为对应的 goto 语句版本,由 goto 语句版本可比较直观地得到相应的汇编代码。
参考:Computer Systems: A Programmer's Perspective, 2nd. 3.6.5 Loops
6.4.1. do-while 的汇编代码
do-while 的形式如下:
do
  body-statement
  while (test-expr);
把上面循环转换为 goto 语句版本,如下:
loop:
  body-statement
  t = test-expr;
  if (t)
    goto loop;
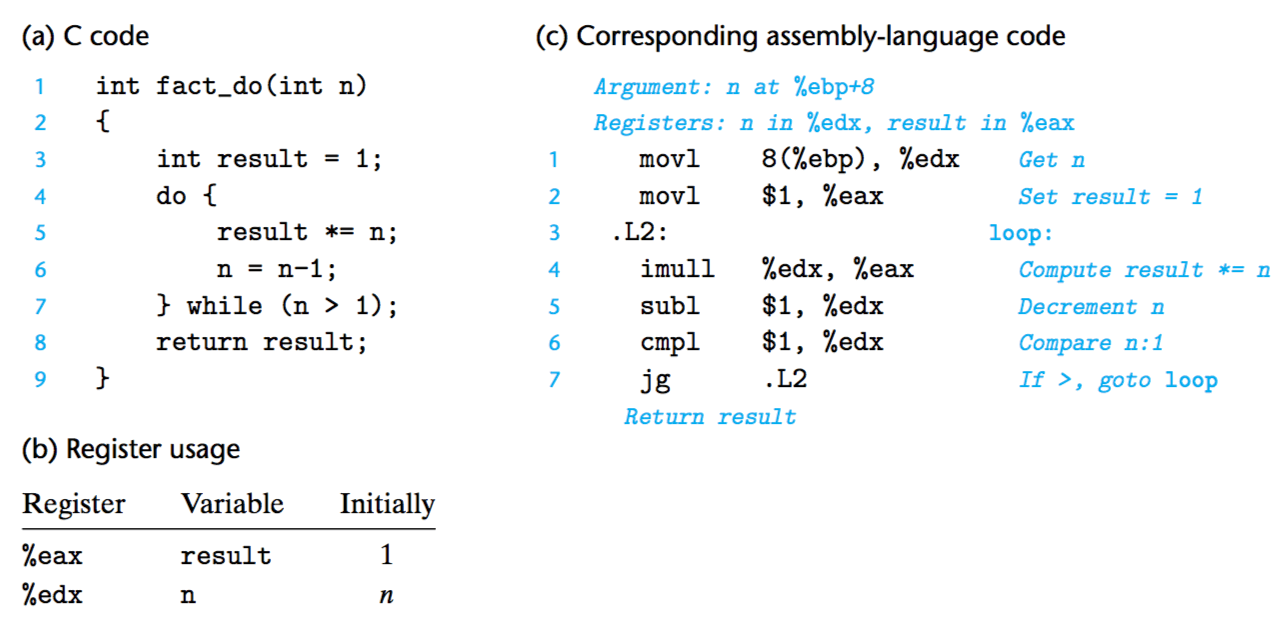
Figure 8: 实例:C语言 do-while 循环对应的汇编代码
6.4.2. while 的汇编代码
while 循环的形式如下:
while (test-expr)
  body-statement
可改为下面的 do-while 循环形式:
if (!test-expr)
  goto done;
do
  body-statement
  while (test-expr);
done:
最终,可得到下面到 goto 语句版本:
  t = test-expr;
  if (!t)
    goto done;
loop:
  body-statement
  t = test-expr;
  if (t)
    goto loop;
done:
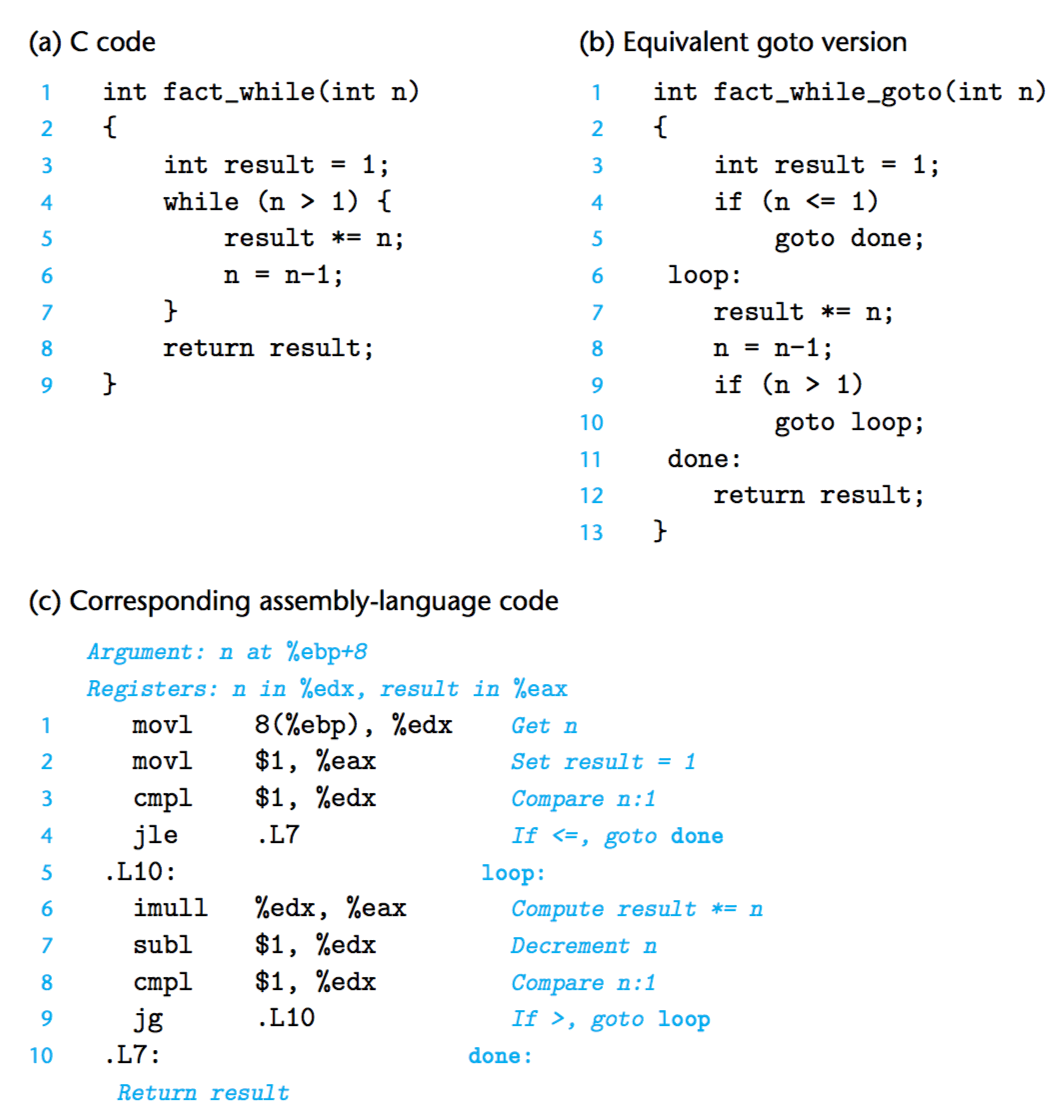
Figure 9: 实例:C语言 while 循环对应的汇编代码
6.4.3. for 的汇编代码
for 循环的形式如下:
for (init-expr; test-expr; update-expr)
  body-statement
可改为下面的 do-while 循环形式:
init-expr;
if (!test-expr)
  goto done;
do {
  body-statement
  update-expr;
} while (test-expr);
done:
最终,可得到下面到 goto 语句版本:
  init-expr;
  t = test-expr;
  if (!t)
    goto done;
loop:
  body-statement
  update-expr;
  t = test-expr;
  if (t)
    goto loop;
done:
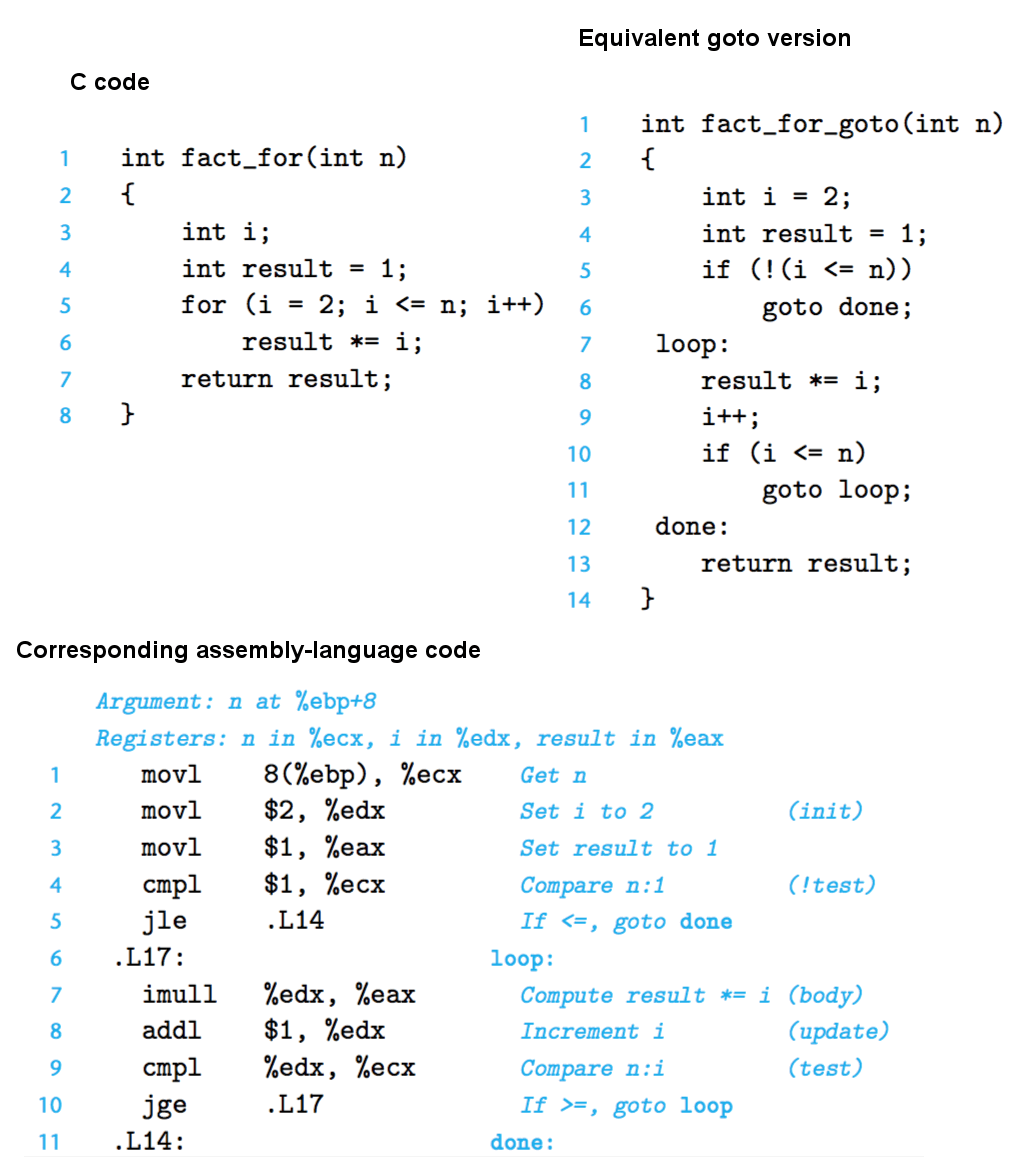
Figure 10: 实例:C语言 for 循环对应的汇编代码
7. Using Numbers
7.1. 有符号整数的表示
有符号整数用补码(Two's complement)表示。
正整数的补码和其原码(即该数的二进制表示)相同。
负整数的补码是:将该数的绝对值的二进制形式,按位取反再加 1。
显然,对于有符号整数,如果最左边的一位是 0 则表示正数,是 1 则表示负数。
如:
-1 的补码为:11111111
-2 的补码为:11111110
-3 的补码为:11111101
7.2. 浮点数的表示
The IEEE Standard 754 defines two sizes of floating-point numbers:
❑ 32-bits (called single-precision)
❑ 64-bits (called double-precision)
IEEE 754 标准用 \(V=(-1)^s \times M \times 2^E\) 的形式来表示一个浮点数。其中 s 为符号位,M为有效数字(significand),E为阶码(exponent)。
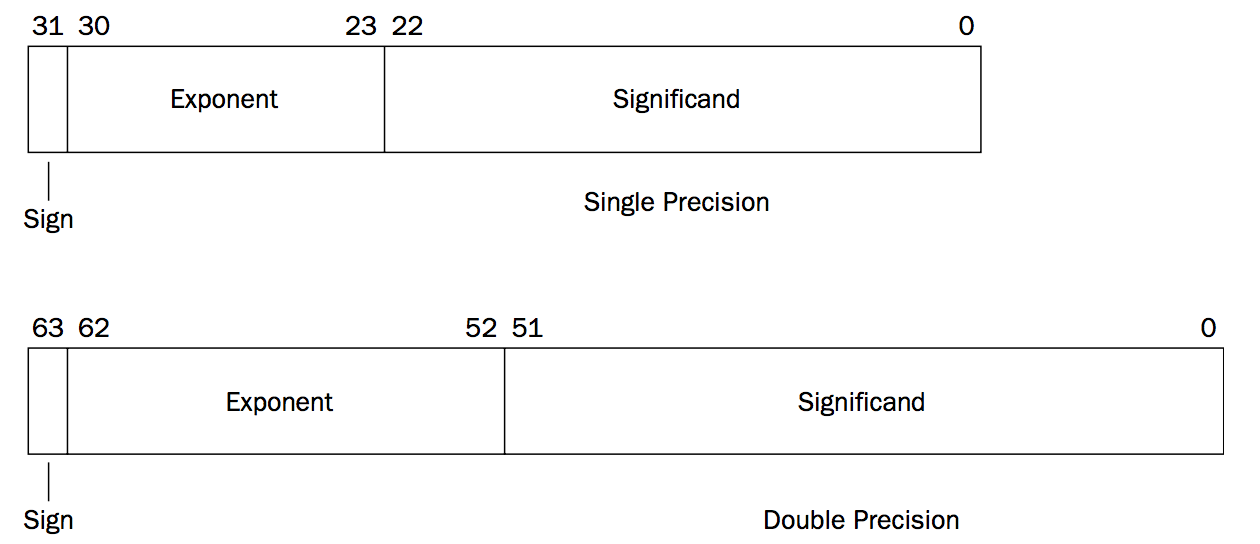
Figure 11: IEEE Standard 754 Floating Point Formats
特别注意:上示意图中的 Exponent 和 Significand 并不是简单地对应于公式 \(V=(-1)^s \times M \times 2^E\) 中的 E 和 M 的二进制编码,如可能对 E 增加偏置量后再编码。
参考:深入理解计算机系统(第 2 版),2.4.2 IEEE 浮点表示。
7.2.1. 浮点数表示实例
本节实例来自:深入理解计算机系统(第 2 版),2.4.3 数字示例
内存或寄存器中如何表示单精度浮点数 12345.0 呢?
容易知道整数 12345 的二进制表示为 11000000111001。
将二进制小数点左移 13 位,得到一个规格化的表示 \(12345.0=1.1000000111001_2 \times 2^{13}\) 。
IEEE 单精度浮点数的 significand 部分在编码时占 23 位,这里已经有了 13 位(注意:规格化表示中小数点前面的 1 不用体现在编码中),所以在末尾再增加 10 个 0,这样 significand 部分就构造完成了,为 10000001110010000000000。
为了构造阶码字段,我们用 13 加上单精度浮点数的偏置量(Bias value)127,得到 140,其二进制表示为 10001100。
加上符号位 0,最终得到单精度浮点数 12345.0 的表示为:0100 0110 0100 0000 1110 0100 0000 0000,如果解释为十六进制则为 0x4640e400。
注:“单精度浮点数的偏置量 127”的说明可参考:深入理解计算机系统(第 2 版),2.4.2 IEEE 浮点表示
7.2.2. 两种浮点体系结构(x87 和 SSE)
x86 处理器支持两种浮点体系结构:基于栈的 x87 浮点体系结构和基于寄存器的 SSE 浮点体系结构。
关于浮点操作,在 IA32 平台,GCC 默认产生 x87 代码;在 x86-64 平台,GCC 默认产生 SSE 代码。
7.2.2.1. SSE 浮点数实例
Following table explained how to move packed single-precision floating-point data into the XMM registers.
| Instruction | Description |
|---|---|
| MOVAPS | Move four aligned, single-precision values to XMM registers or memory. |
| MOVUPS | Move four unaligned, single-precision values to XMM registers or memory. |
| MOVSS | Move a single-precision value to memory or the low doubleword of a register. |
| MOVLPS | Move two single-precision values to memory or the low quad- word of a register. |
| MOVHPS | Move two single-precision values to memory or the high quad- word of a register. |
| MOVLHPS | Move two single-precision values from the low quadword to the high quadword. |
| MOVHLPS | Move two single-precision values from the high quadword to the low quadword. |
下面例子将演示 SSE 指令 movss 的简单使用:
.section .data
value1:
    .float 12345.0

.section .text
.globl _start
_start:
    nop
    movss value1, %xmm0

    # exit 0
    movl $1, %eax
    movl $0, %ebx
    int $0x80
编译及测试如下:
$ gcc -g -m32 -nostdlib ssetest.s -o ssetest
$ gdb -q ./ssetest
Reading symbols from ./ssetest...done.
(gdb) break _start
Breakpoint 1 at 0x80480b8: file ssetest.s, line 8.
(gdb) run
Starting program: /home/cig01/test/ssetest

Breakpoint 1, _start () at ssetest.s:8
8	nop
(gdb) n
9	    movss value1, %xmm0
(gdb) n
11	    movl $1, %eax
(gdb) print $xmm0
$1 = {v4_float = {12345, 0, 0, 0}, v2_double = {5.8233432323029763e-315, 0},
  v16_int8 = {0, -28, 64, 70, 0 <repeats 12 times>}, v8_int16 = {-7168, 17984,
    0, 0, 0, 0, 0, 0}, v4_int32 = {1178657792, 0, 0, 0}, v2_int64 = {
    1178657792, 0}, uint128 = 1178657792}
(gdb) print/x $xmm0
$2 = {v4_float = {0x3039, 0x0, 0x0, 0x0}, v2_double = {0x0, 0x0}, v16_int8 = {
    0x0, 0xe4, 0x40, 0x46, 0x0 <repeats 12 times>}, v8_int16 = {0xe400,
    0x4640, 0x0, 0x0, 0x0, 0x0, 0x0, 0x0}, v4_int32 = {0x4640e400, 0x0, 0x0,
    0x0}, v2_int64 = {0x4640e400, 0x0},
  uint128 = 0x0000000000000000000000004640e400}
从上面例子中,可知浮点数 12345.0 的 16 进制表达为 0x4640e400,这和上节例子中的结论一致。
参考:Professional Assembly Language, Chapter 17 Using Advanced IA-32 Features
8. Basic Math Functions
8.1. 算术运算
算术运算指令如表 11 所示。
| Instruction | Description |
|---|---|
| add{bwlq} source, destination | Sums two binary operands placing the result in the destination. |
| adc{bwlq} source, destination | Sums two binary operands placing the result in the destination. If Carry Flag is set, a 1 is added to the destination. |
| sub{bwlq} source, destination | The source is subtracted from the destination and the result is stored in the destination. |
| sbb{bwlq} source, destination | Subtracts the source from the destination, and subtracts 1 extra if the Carry Flag is set. Results are returned in dest. |
| mul{bwlq} source | Multiply (unsigned). 另一个操作数在 AX/EAX/RAX 中,其结果的高位部分在 DX/EDX/RDX 中,低位部分在 AX/EAX/RAX 中。 |
| imul{bwlq} source | Multiply (signed) |
| div{bwlq} divisor | Divide (unsigned). 被除数的高位在 DX/EDX/RDX 中,低位在 AX/EAX/RAX 中,其结果的整数部分在 AX/EAX/RAX 中,余数部分在 DX/EDX/RDX 中。 |
| idiv{bwlq} divisor | Divide (signed) |
| inc{bwlq} destination | Adds one to destination unsigned binary operand. |
| dec{bwlq} destination | Unsigned binary subtraction of one from the destination. |
| neg{bwlq} destination | Subtracts the destination from 0 and saves the result back into destination. |
The ADC instruction can be used to add two unsigned or signed integer values, along with the value contained in the carry flag from a previous ADD instruction.
The SBB instruction is most often used to "scoop up" the carry flag from a previous SUB instruction.
8.2. 移位运算
移位运算指令如表 12 所示。
| Instruction | Description |
|---|---|
| rcl{bwlq} | rotate through carry left |
| rcr{bwlq} | rotate through carry right |
| rol{bwlq} | rotate left |
| ror{bwlq} | rotate right |
| sal{bwlq} | shift arithmetic left |
| sar{bwlq} | shift arithmetic right |
| shl{bwlq} | shift logical left |
| shld{bwlq} | shift left double |
| shr{bwlq} | shift logical right |
| shrd{bwlq} | shift right double |
8.3. 逻辑运算
逻辑运算指令如表 13 所示。
| Instruction | Description |
|---|---|
| and{bwlq} | Bitwise logical AND |
| or{bwlq} | Bitwise logical OR |
| xor{bwlq} | Bitwise logical exclusive OR |
| not{bwlq} | Bitwise logical NOT |
9. Using Strings
9.1. 内存中传送字符串(MOVSB, MOVSW, MOVSL, MOVSQ)
As we known, we cannot use the MOV instruction to move data from one memory location to another. Fortunately, Intel has created a complete family of instructions (MOVS) to use when working with string data.
The MOVS instruction was created to provide a simple way for programmers to move string data from one memory location to another. There are three formats of the MOVS instruction:
❑ MOVSB: Moves a single byte
❑ MOVSW: Moves a word (2 bytes)
❑ MOVSL(MOVSD): Moves a doubleword (4 bytes)
The Intel documentation uses MOVSD for moving a doubleword. The GNU assembler decided to use MOVSL.
The MOVS instructions use implied source and destination operands. The implied source operand is the ESI register. It points to the memory location for the source string. The implied destination operand is the EDI register. It points to the destination memory location to which the string is copied. The obvious way to remember this is that the S in ESI stands for source, and the D in EDI stands for destination.
Each time a MOVS instruction is executed, when the data is moved, the ESI and EDI registers are automatically changed in preparation for another move.
9.1.1. MOVS 实例
# movstest1.s - An example of the MOVS instructions
.section .data
value1:
    .ascii "This is a test string.\n"
.section .bss
    .lcomm output, 23
.section .text
.globl _start
_start:
    nop
    leal value1, %esi      # same as: movl $value1, $esi
    leal output, %edi      # same as: movl $output, $edi
    movsb
    movsw
    movsl

    # exit 0
    movl $1, %eax
    movl $0, %ebx
    int $0x80
$ gcc -g -m32 -nostdlib movstest1.s -o movstest1
$ gdb -q ./movstest1
Reading symbols from ./movstest1...done.
(gdb) break _start
Breakpoint 1 at 0x80480b8: file movstest1.s, line 10.
(gdb) run
Starting program: /home/cig01/test/movstest1

Breakpoint 1, _start () at movstest1.s:10
10	    nop
(gdb) n
11	    leal value1, %esi      # same as: movl $value1, $esi
(gdb) n
12	    leal output, %edi      # same as: movl $output, $edi
(gdb) n
13	    movsb
(gdb) n
14	    movsw
(gdb) n
15	    movsl
(gdb) n
18	    movl $1, %eax
(gdb) x/s &output
0x80490f0 <output>:	"This is"
movs 指令成功执行后,会自动修改 esi 和 edi,以便为下一次 movs 做准备。
上面例子中,movsb 移动了 1 个字符"T"到 output 中,movsw 移动了 2 个字符"hi"到 output 中,movsl 移动了 4 个字符"s is"到 output 中。
9.1.2. Direction Flag (CLD or STD)
If the DF flag is cleared, the ESI and EDI registers are incremented after each MOVS instruction. If the DF flag is set, the ESI and EDI registers are decremented after each MOVS instruction.
To ensure that the DF flag is set in the proper direction, you can use the following commands:
❑ CLD to clear the DF flag
❑ STD to set the DF flag
9.1.3. MOVS 实例——用 loop 移动整个字符串
# movstest3.s - An example of moving an entire string
.section .data
value1:
    .ascii "This is a test string.\n"
.section .bss
    .lcomm output, 23
.section .text
.globl _start
_start:
    nop
    leal value1, %esi      # same as: movl $value1, $esi
    leal output, %edi      # same as: movl $output, $edi
    movl $23, %ecx
    cld
loop1:
    movsb
    loop loop1

    # exit 0
    movl $1, %eax
    movl $0, %ebx
    int $0x80
9.1.4. MOVS 实例——用 REP 前缀移动整个字符串
The REP instruction repeats the string instruction immediately following it until the value in the ECX register is zero.
# reptest1.s - An example of the REP instruction
.section .data
value1:
    .ascii "This is a test string.\n"
.section .bss
    .lcomm output, 23
.section .text
.globl _start
_start:
    nop
    leal value1, %esi
    leal output, %edi
    movl $23, %ecx
    cld
    rep movsb

    # exit 0
    movl $1, %eax
    movl $0, %ebx
    int $0x80
9.2. Other string operations (LODS, STOS, CMPS, SCAS)
The LODS instruction is used to move a string value in memory into the EAX register. After the LODS instruction is used to place a string value in the EAX register, the STOS instruction can be used to place it in another memory location.
The CMPS family of instructions is used to compare string values.
The SCAS family of instructions is used to scan strings for one or more search characters.
说明:上面这些指令都有大小指示后缀 b, w, l, q.
10. Using Functions
To define a function (procedure) in the GNU assembler, you must declare the name of the function as a label in the program. To declare the function name for the assembler, use the .type directive:
.type func1, @function
func1:
Once the function is created, it can be accessed from anywhere in the program. The CALL instruction is used to pass control from the main program to the function. The CALL instruction has a single operand:
call func1
call 指令的效果是将返回地址入栈,并跳转到被调过程的起始处。返回地址(return address)是程序中紧跟在 call 后面的那条指令的地址,这样当被调用过程返回时,执行会从此处继续。
ret 指令从栈中弹出地址,并跳转到这个位置(使用 ret 指令前,程序自己应该保证栈指针正好指向返回地址)。
说明:
call func1 相当于:
pushl %eip
jmp func1
ret 相当于:
popl %eip
10.1. 参数和返回值
Many (if not most) functions require some sort of input data. You must decide how your program will pass this information along to the function. Basically, three techniques can be employed:
❑ Using registers
❑ Using global variables
❑ Using the stack
When the function finishes processing the data, most likely you will want to retrieve the result back in the calling program area. Similar to the input value techniques, there are multiple ways to accomplish transferring results, although the following two are most popular:
❑ Place the result in one or more registers.
❑ Place the result in a global variable memory location.
一般地,IA32 中系统调用使用寄存器来传递参数(因为这样更快),库函数和用户函数使用栈来传递参数。
10.2. IA32 Stack Frame
IA32 中,使用栈来支持过程调用。为单个过程分配的那部分栈称为栈帧(stack frame)。寄存器%ebp 为帧指针,而寄存器%esp 为栈指针。当程序执行时,栈指针可以移动,因而大多数信息的访问(如子过程中访问参数)一般是相对于帧指针的。
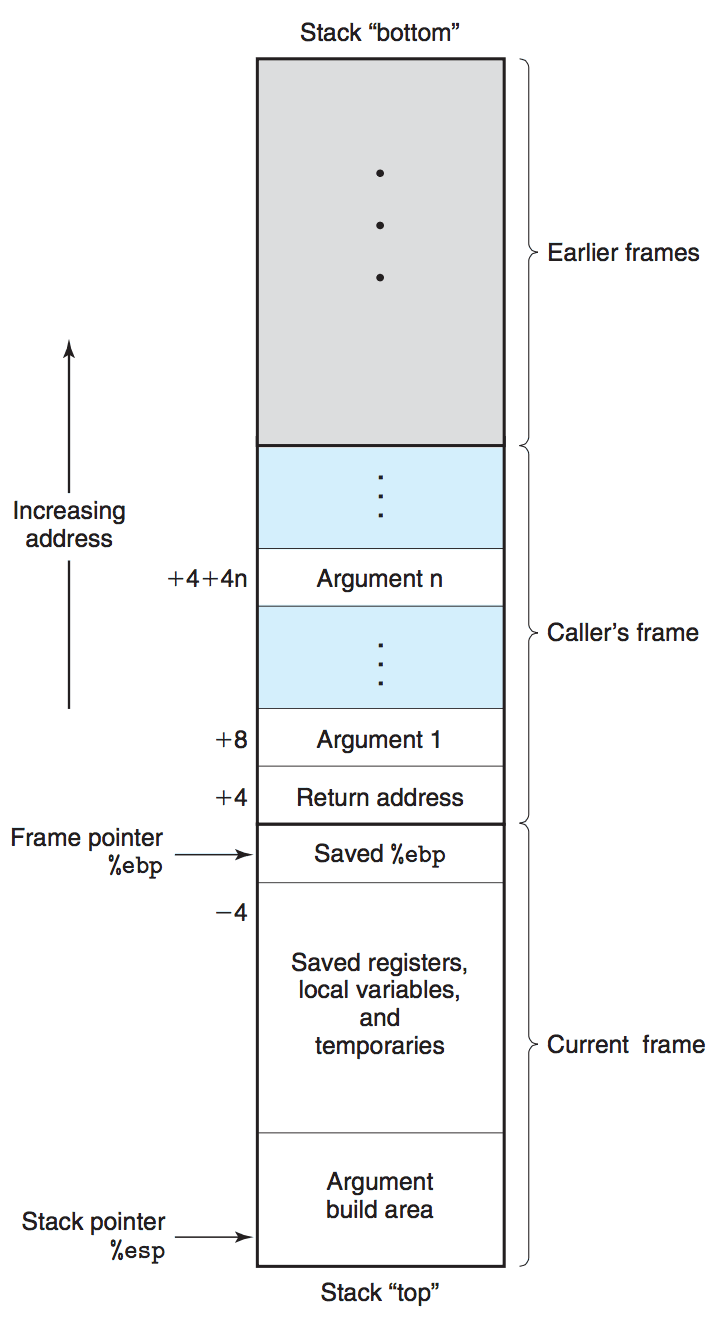
Figure 12: Stack frame structure
上图说明:
栈向低地址方向增长。
通过 8(%ebp),12(%ebp)能访问到函数的第 1 个和第 2 个参数,更多的参数依此类推。
"Return address"为紧跟在 call 指令后面的那条指令的地址。
寄存器 EBP 保存着当前栈帧起始位置(帧指针),而当前栈帧的起始处(即图中"Saved %ebp")保存着它调用者的栈帧起始位置。
一般地,IA32 中编译器会给 C 函数生成下面的对应汇编代码:
function:
    pushl %ebp
    movl %esp, %ebp
    .
    .
    .
    movl %ebp, %esp
    popl %ebp
    ret
说明:
前面两条指令(被称为函数的 prologue)用于保存以前 EBP 到栈中,以及复制当前 ESP 到 EBP 中(这样 EBP 保存着当前的帧指针)。
ret 前面的两条指令(被称为函数的 epilogue)用于撤消当前栈帧。
10.2.1. enter 和 leave
处理器提供了单独的指令 enter 和 leave 来完成准备和撤消栈帧的工作。
enter 建立栈帧,相当于:
pushl %ebp
movl %esp, %ebp
leave 使栈做好返回的准备,相当于:
movl %ebp, %esp
popl %ebp
所以,前面函数对应的汇编模板也可以写为:
function:
    enter
    .
    .
    .
    leave
    ret
注:GCC 很少为 C 函数产生 enter 指令,而是直接使用 movl 和 popl。
10.2.2. Clean the arguments from the stack
由前面的栈帧示意图我们知道,当调用一个函数前,会先把它的参数压入到 caller 的栈中,当函数返回后,这些参数仍然在 caller 的栈中。
所以,在 caller 中调用函数后紧接着的一条语句往往是释放参数所用的栈,如:
pushl %eax      # 压入compute的第2个参数
pushl %ebx      # 压入compute的第1个参数
call compute    # 调用compute
addl $8, %esp   # 释放compute参数所占用的栈
说明:
参数所占用的栈也可以由 callee 释放,如在调用约定 stdcall(Win32 API)下,就是由 callee 释放参数所占的栈。
如果由 callee 释放参数所占的栈,那么在编译时 callee 就需要知道一共有几个参数,所以这种情况下无法使用变长参数。
参考:
https://en.wikipedia.org/wiki/X86_calling_conventions#Callee_clean-up
10.2.3. IA32 栈帧实例
下面通过生成 C 程序的汇编代码来研究 IA32 栈帧如何支持函数调用。
源 C 程序 test.c 为:
int swap_add(int *xp, int *yp)
{
  int x=*xp;
  int y=*yp;

  *xp=y;
  *yp=x;
  return x+y;
}

int caller()
{
  int var1=534;
  int var2=1057;
  int sum=swap_add(&var1, &var2);
  int diff=var1-var2;

  return sum*diff;
}
用 gcc -m32 -S test.c 生成对应的汇编代码,可以得到上面程序的栈帧示意图如下:
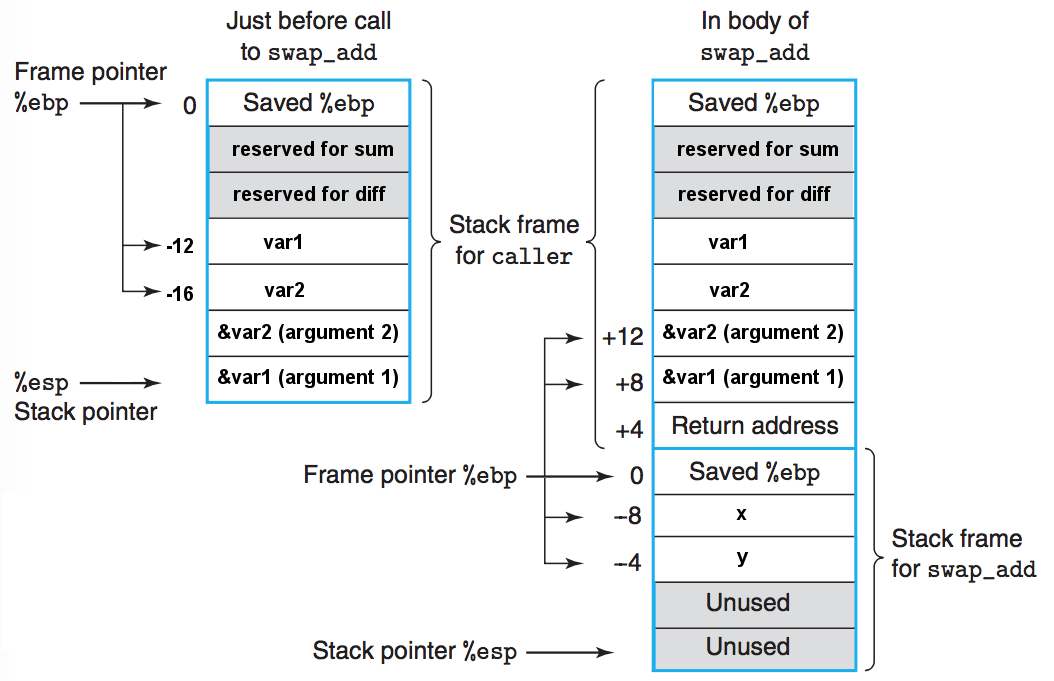
Figure 13: Stack frames for caller and swap_add
caller:
        pushl   %ebp
        movl    %esp, %ebp
        subl    $16, %esp            # 在栈上预留了16字节内存
        movl    $534, -12(%ebp)      # 设置局部变量var1的值为534
        movl    $1057, -16(%ebp)     # 设置局部变量var2的值为1057
        leal    -16(%ebp), %eax      # 计算 &var2,保存结果到%eax中
        pushl   %eax                 # 把%eax内容(即swqp_add的第2个参数)压入栈中
        leal    -12(%ebp), %eax      # 计算 &var1,保存结果到%eax中
        pushl   %eax                 # 把%eax内容(即swqp_add的第1个参数)压入栈中
        call    swap_add             # 调用swqp_add
        addl    $8, %esp             # 清除swap_add的两个参数所占用的栈
        movl    %eax, -4(%ebp)
        movl    -12(%ebp), %edx
        movl    -16(%ebp), %eax
        subl    %eax, %edx
        movl    %edx, %eax
        movl    %eax, -8(%ebp)
        movl    -4(%ebp), %eax
        imull   -8(%ebp), %eax
        leave
        ret
swap_add:
        pushl   %ebp                 # 把%ebp内容(caller的栈帧起始位置)压入栈中
        movl    %esp, %ebp           # 把swap_add的栈帧起始位置保存到%ebp中
        subl    $16, %esp            # 在栈上预留了16字节内存
        movl    8(%ebp), %eax        # 把8(%ebp)处内容(即第1个参数xp)保存到%eax中
        movl    (%eax), %eax         # 把*xp的值临时保存到%eax中
        movl    %eax, -4(%ebp)       # 把*xp的值保存到-4(%ebp)处,即局部变量x中
        movl    12(%ebp), %eax       # 把12(%ebp)处内容(即第2个参数yp)保存到%eax中
        movl    (%eax), %eax         # 把*yp的值临时保存到%eax中
        movl    %eax, -8(%ebp)       # 把*yp的值保存到到-8(%ebp)处,即局部变量y中
        movl    8(%ebp), %eax
        movl    -8(%ebp), %edx
        movl    %edx, (%eax)         # 和前面两条指令一起,把y的值放入到第1个参数的地址处
        movl    12(%ebp), %eax
        movl    -4(%ebp), %edx
        movl    %edx, (%eax)         # 和前面两条指令一起,把x的值放入到第2个参数的地址处
        movl    -4(%ebp), %edx
        movl    -8(%ebp), %eax
        addl    %edx, %eax           # 和前面两条指令一起,计算x+y,并把结果保存在%eax中
        leave
        ret
说明:不同的 GCC 版本生成的汇编代码可能会有差别。本节实例和 Computer Systems A Programmer’s Perspective, 2nd. 3.7.4 Procedure Example 的实例相同,但由于 gcc 版本不同,生成的汇编代码不完全一样(本节汇编代码由 gcc 4.9 生成)。
10.2.4. Caller/Callee Saved Registers
The set of program registers acts as a single resource shared by all of the procedures.
By convention, registers %eax, %edx, and %ecx are classified as caller-save registers. When procedure Q is called by P, it can overwrite these registers without destroying any data required by P. On the other hand, registers %ebx, %esi, and %edi are classified as callee-save registers. This means that Q must save the values of any of these registers on the stack before overwriting them, and restore them before returning, because P (or some higher-level procedure) may need these values for its future computations.
As an example, consider the following code:
int P(int x) 2{
    int y = x*x;
    int z = Q(y);
    return y + z;
}
Procedure P computes y before calling Q, but it must also ensure that the value of y is available after Q returns. It can do this by one of two means:
- It can store the value of y in its own stack frame before calling Q; when Q returns, procedure P can then retrieve the value of y from the stack. In other words, P, the caller, saves the value.
- It can store the value of y in a callee-save register (%ebx, %esi and %edi). If Q, or any procedure called by Q, wants to use this register, it must save the register value in its stack frame and restore the value before it returns (in other words, the callee saves the value). When Q returns to P, the value of y will be in the callee-save register, either because the register was never altered or because it was saved and restored.
Either convention can be made to work, as long as there is agreement as to which function is responsible for saving which value.
总结:
caller-save register: 在函数中使用寄存器%eax, %ecx, and %edx 时要小心,它们的值在调用某个子函数的前后可能不相同(这些寄存器可能被子函数修改)。
callee-save register: 如果在函数中使用寄存器%ebx, %esi, and %edi,在改变这些寄存器前必须保存它们的值,在使用完后(函数返回前)要恢复它们之前的值。
10.2.5. 省略帧指针(%ebp)
利用%ebp 的值,我们可以找到上层函数(caller)的栈帧,接着还可以找到上上层(caller 的 caller)的栈帧,以此追溯,可以得到所有函数的调用顺序,这对于调试一个程序是非常方便的。
帧指针对于支持过程调用来说不是必要的(在函数开始时分配所需要的整个栈存储,这样仅用栈指针也可以访问到函数的参数和局部变量),所以帧指针可以省掉。gcc 有个优化选项:-fomit-frame-pointer 可省略帧指针,指定-fno-omit-frame-pointer 可以保留帧指针。
说明:没有帧指针,gcc 可以利用 Dwarf 中的 Call Frame Information 得到函数的调用顺序。
10.3. x86_64 过程调用
过程调用的 x86_64 实现与 IA32 实现有很大的不同。
- 参数通过寄存器(最多 6 个,依次为%rdi,%rsi,%rdx,%rcx,%r8,%r9)传递,而不是通过栈传递(但对于多于 6 个的参数,依然通过栈传递)。
- %r10,%r11 为 caller-save registers.
- %rbx,%rbp,%r12,%r13,%14,%15 为 callee-save registers(子过程返回前要恢复它们的值).
- 可使用栈顶之外的 128 字节(其地址低于当前栈指针,称为 red zone),这样,leaf functions(不会调用其它函数的函数)可能不用显式创建栈帧,而是直接使用 red zone 作为栈空间。
参考:
Computer Systems A Programmer’s Perspective, 2nd. 3.14.4 Control
System V Application Binary Interface AMD64 Architecture Processor Supplement: http://www.x86-64.org/documentation/abi.pdf
Stack frame layout on x86-64: http://eli.thegreenplace.net/2011/09/06/stack-frame-layout-on-x86-64/
11. The Stack
The stack is a special reserved area in memory for placing data.
在 Intel 平台中,栈底在高地址处,栈向低地址方向增长,栈指针%esp 指向栈顶元素。
操作栈方法一:用 PUSH 和 POP 指令
PUSH 指令(pushl,pushw,pushq)可把数据压入栈中,POP 指令(popl,popw,popq)可把数据从栈中拿出放到寄存器或内存中。
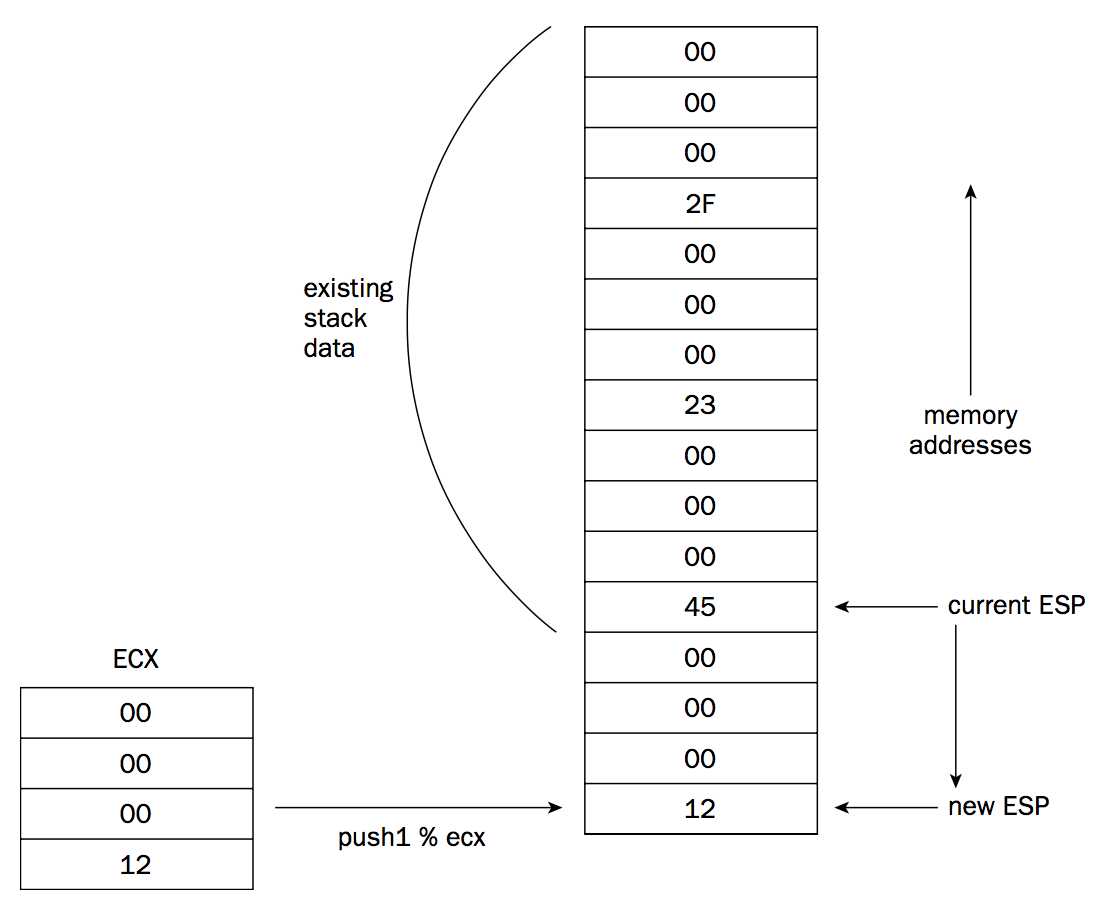
Figure 14: pushl 改变栈的示意图
操作栈方法二:直接修改 ESP 寄存器
除用 PUSH 和 POP 指令来操作栈外,由于 ESP 寄存器保存着栈顶的地址,我们可以直接通过改变 ESP 寄存器来操作栈。
如:
subl $24, %esp # 在栈上分配24字节内存。
11.1. Initial Process Stack
When a process receives control, its stack holds the arguments and environment from exec.
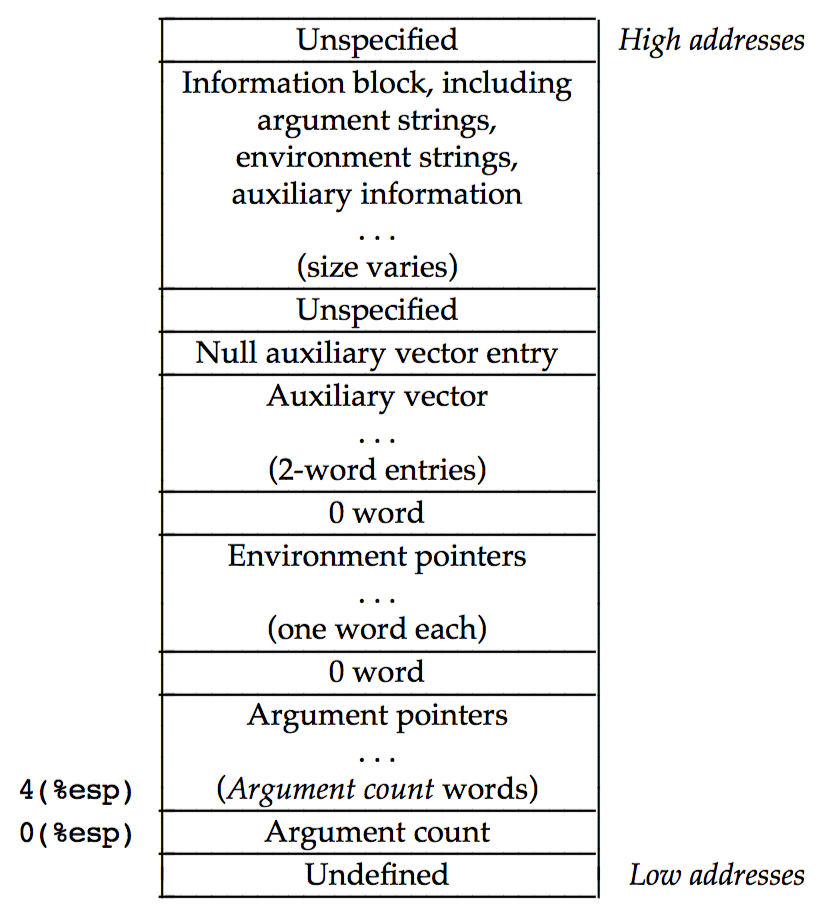
Figure 15: Initial Process Stack (from Intel386 ABI)
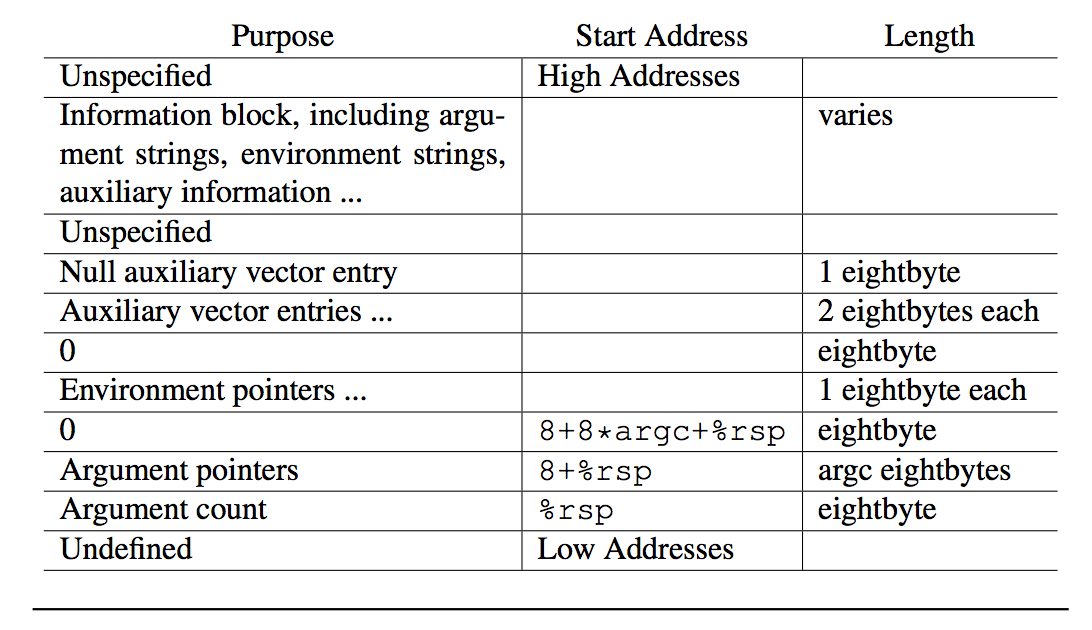
Figure 16: Initial Process Stack (from AMD64 ABI)
参考:
Intel386 ABI: http://www.sco.com/developers/devspecs/abi386-4.pdf
AMD64 ABI: http://www.x86-64.org/documentation/abi.pdf
11.1.1. 输出程序的命令行参数
由前面的 Initial Process Stack 示意图可知,通过栈指针可访问到程序的命令行参数。
# paramtest1.s - Listing command line parameters
# Only work in 32-bit Linux
.section .data
output1:
   .asciz "There are %d parameters:\n"
output2:
    .asciz "%s\n"
.section .text
.globl main
main:
    movl (%esp), %ecx   # read number of command-line parameter from the top of the stack, save it to ECX
    pushl %ecx          # 2nd parameter of printf
    pushl $output1      # 1st parameter of printf
    call printf
    addl $4, %esp       # clean 1st parameter from stack
    popl %ecx           # clean 2st parameter from stack, restore ECX (it may destroyed by printf)
    movl %esp, %ebp
    addl $4, %ebp
loop1:
    pushl %ecx
    pushl (%ebp)
    pushl $output2
    call printf
    addl $8, %esp
    popl %ecx
    addl $4, %ebp
    loop loop1
    pushl $0            # exit(0)
    call exit
参考:Professional Assembly Language. Chapter 11.5 Using Command-Line Parameters
12. SIMD (Single Instruction Multiple Data)
The main benefit that SIMD technology provides to the programmer is the capability to perform parallel mathematical operations with a single instruction.
To recap, the IA-32 SIMD architecture currently consists of four technologies:
❑ Multimedia Extensions (MMX)
❑ Streaming SIMD Extensions (SSE)
❑ Streaming SIMD Extensions Second Implementation (SSE2)
❑ Streaming SIMD Extension Third Implementation (SSE3)
The Pentium MMX and Pentium II processors support MMX.
The Pentium III processor supports both MMX and SSE technology.
The Pentium 4 processor supports MMX, SSE, and SSE2 technology.
The Pentium 4HT (hyperthreading) and Xeon processors support MMX, SSE, SSE2, and SSE3 technologies.
参考:Professional Assembly Language, Chapter 17 Using Advanced IA-32 Features
12.1. MMX(64 位寄存器 MM0-MM7)
The Multimedia Extension (MMX) technology introduced in the Pentium MMX and Pentium II processors provided three new integer types:
❑ 64-bit packed byte integers
❑ 64-bit packed word integers
❑ 64-bit packed doubleword integers
Each of these data types provides for multiple integer data elements to be contained (or packed) in a single 64-bit MMX register. Figure 17 demonstrates how each data type fits in the 64-bit register.
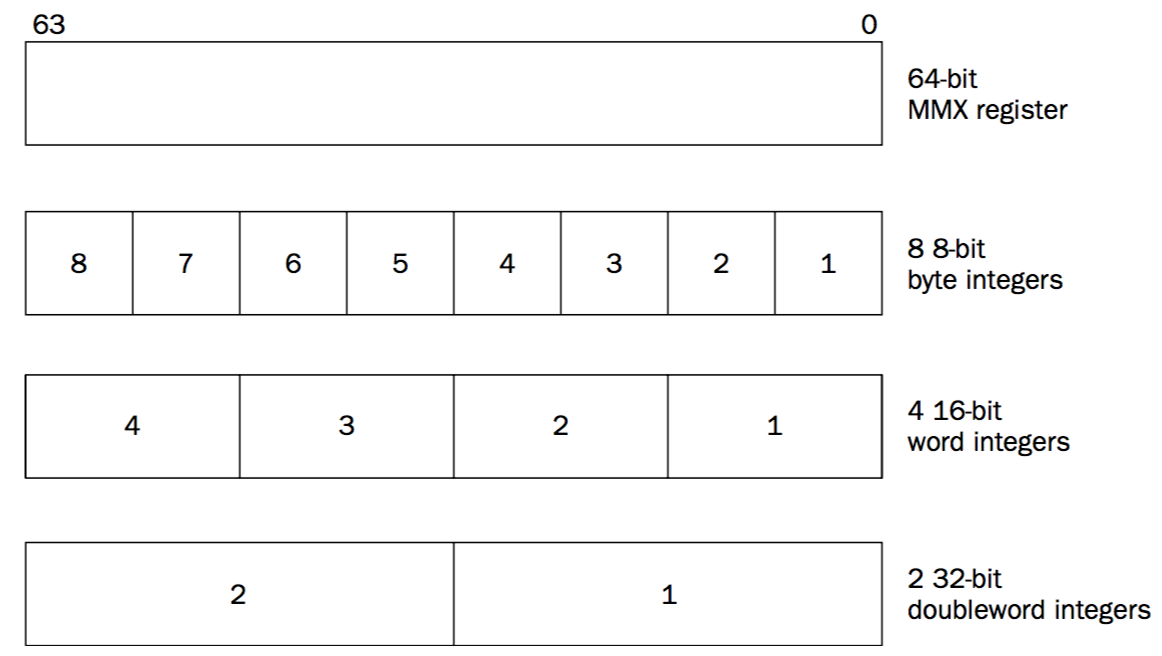
Figure 17: MMX 寄存器可同时保存多个整数(2个 32 位整数,或者 4 个 16 位整数,或者 8 个 8 位整数)
The MMX registers are mapped to the FPU registers (st0-st7).
12.1.1. 查看 MMX 寄存器
用 movq 可以把数据放到 MMX 寄存器中。
# mmxtest.s - An example of using the MMX data types
.section .data
values1:
.int 1, -1
values2:
.byte 0x10, 0x05, 0xff, 0x32, 0x47, 0xe4, 0x00, 0x01

.section .text
.globl _start
_start:
    nop
    movq values1, %mm0
    movq values2, %mm1

    # exit 0
    movl $1, %eax
    movl $0, %ebx
    int $0x80
$ gcc -g -m32 -nostdlib  mmxtest.s -o mmxtest
$ gdb -q ./mmxtest
Reading symbols from ./mmxtest...done.
(gdb) break _start
Breakpoint 1 at 0x80480b8: file mmxtest.s, line 11.
(gdb) r
Starting program: /home/cig01/test/mmxtest

Breakpoint 1, _start () at mmxtest.s:11
11	    nop
(gdb) n
12	    movq values1, %mm0
(gdb) n
13	    movq values2, %mm1
(gdb) n
16	    movl $1, %eax
(gdb) print $mm0
$1 = {uint64 = -4294967295, v2_int32 = {1, -1}, v4_int16 = {1, 0, -1, -1},
  v8_int8 = {1, 0, 0, 0, -1, -1, -1, -1}}
(gdb) print $mm1
$2 = {uint64 = 72308588487312656, v2_int32 = {855573776, 16835655},
  v4_int16 = {1296, 13055, -7097, 256}, v8_int8 = {16, 5, -1, 50, 71, -28, 0,
    1}}
(gdb) print/x $mm1
$3 = {uint64 = 0x100e44732ff0510, v2_int32 = {0x32ff0510, 0x100e447},
  v4_int16 = {0x510, 0x32ff, 0xe447, 0x100}, v8_int8 = {0x10, 0x5, 0xff, 0x32,
    0x47, 0xe4, 0x0, 0x1}}
(gdb) print $st0
$1 = -nan(0xffffffff00000001)
(gdb) print $st1
$2 = -nan(0x100e44732ff0510)
(gdb)
12.1.2. MMX 单指令多数据的实例——加法操作
Once the data is loaded into the MMX register, parallel operations can be performed on the packed data using a single instruction. The operations are performed on each packed integer value in the register, utilizing the same placed packed integer values.
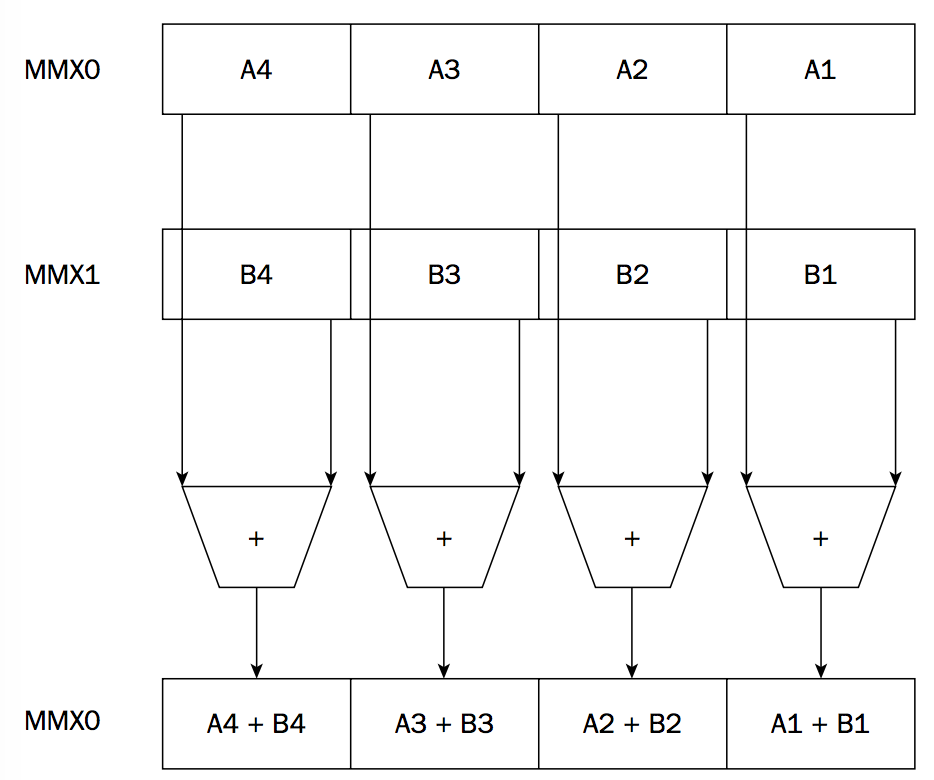
Figure 18: MMX 单指令多数据的实例——加法操作
There are three overflow methods for performing the mathematical operations:
❑ Wraparound arithmetic
❑ Signed saturation arithmetic
❑ Unsigned saturation arithmetic
The wraparound arithmetic method assumes that you will check the operands before performing the operation to ensure that an overflow condition will not be present. If it is, the resulting value will be truncated, removing any carry values.
The signed and unsigned saturation arithmetic methods set the result of an overflow condition to a preset value.
| MMX | Instruction Description |
|---|---|
| PADDB | Add packed byte integers with wraparound |
| PADDW | Add packed word integers with wraparound |
| PADDD | Add packed doubleword integers with wraparound |
| PADDSB | Add packed byte integers with signed saturation |
| PADDSW | Add packed word integers with signed saturation |
| PADDUSB | Add packed byte integers with unsigned saturation |
| PADDUSW | Add packed word integers with unsigned saturation |
实例程序:
# mmxadd.s - An example of performing MMX addition
.section .data
value1:
    .int 10, 20
value2:
    .int 30, 40

.section .bss
    .lcomm result, 8

.section .text
.globl _start
_start:
    nop
    movq value1, %mm0
    movq value2, %mm1
    paddd %mm1, %mm0
    movq %mm0, result

    # exit 0
    movl $1, %eax
    movl $0, %ebx
    int $0x80
测试如下:
$ gcc -g -m32 -nostdlib  mmxadd.s -o mmxadd
$ gdb -q ./mmxadd
Reading symbols from ./mmxadd...done.
(gdb) break _start
Breakpoint 1 at 0x80480b8: file mmxadd.s, line 13.
(gdb) r
Starting program: /home/cig01/test/mmxadd

Breakpoint 1, _start () at mmxadd.s:13
13	_start: nop
(gdb) n
14	    movq value1, %mm0
(gdb) n
15	    movq value2, %mm1
(gdb) n
16	    paddd %mm1, %mm0
(gdb) n
17	    movq %mm0, result
(gdb) n
20	    movl $1, %eax
(gdb) x/2d &value1
0x80490dd:	10	20
(gdb) x/2d &value2
0x80490e5:	30	40
(gdb) x/2d &result
0x80490f0 <result>:	40	60
(gdb)
12.2. SSE(128 位寄存器 XMM0-XMM15)
IA32 中只有 8 个 SSE 寄存器(XMM0-XMM7),AMD64 增加了 8 个 SSE 寄存器(XMM8-XMM15)。
12.3. 扩展 XMM 寄存器到 256 位——AVX (Advanced Vector Extensions)
Advanced Vector Extensions (AVX) are extensions to the x86 instruction set architecture for microprocessors from Intel and AMD proposed by Intel in March 2008 and first supported by Intel with the Sandy Bridge processor shipping in Q1 2011 and later on by AMD with the Bulldozer processor shipping in Q3 2011.
In AVX, the width of the SIMD register file is increased from 128 bits to 256 bits, and renamed from XMM0–XMM7 to YMM0–YMM7 (in x86-64 mode, YMM0–YMM15).
注:在 AVX-512 中,YMM 寄存器被扩展为 512 位(被命令为 ZMM 寄存器)。
13. Tips
13.1. AMD64 中扩展了哪些寄存器
下图中的灰色部分为 AMD64 中扩展的寄存器。
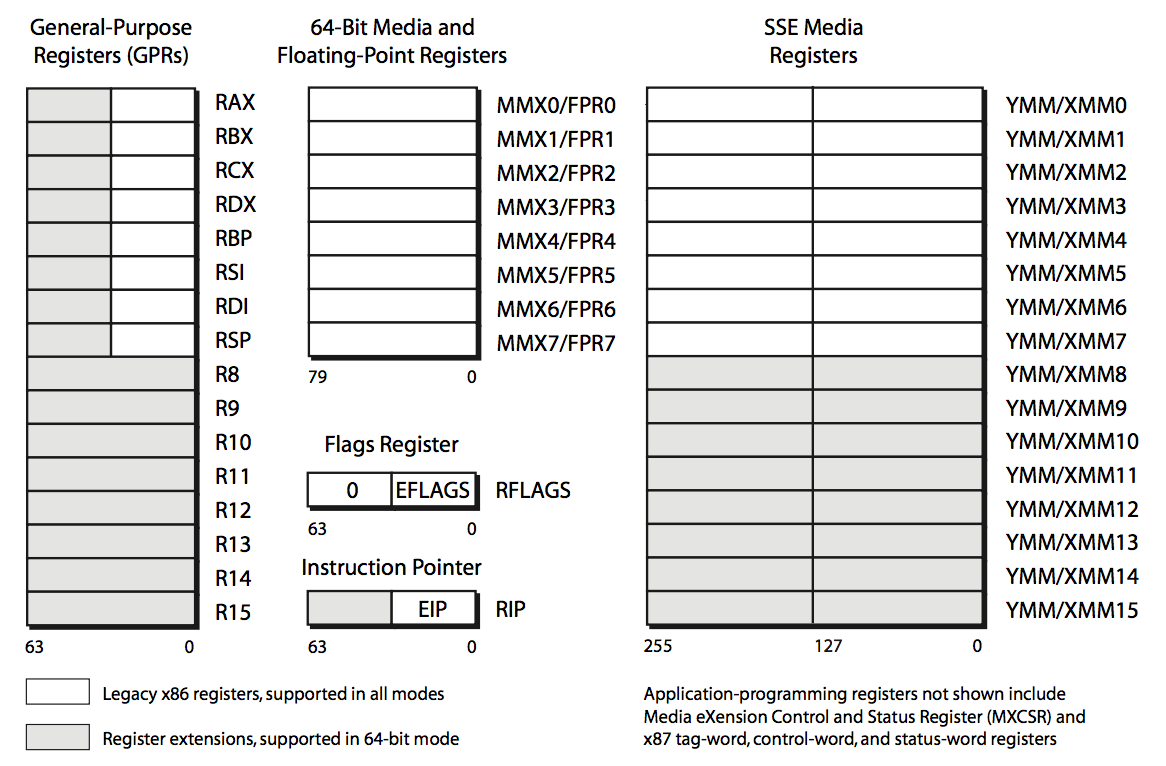
Figure 19: AMD64 Application-Programming Register Set
参考:
AMD64 Architecture Programmer’s Manual Volume 1: Application Programming, 1.1.1 AMD64 Features
13.2. AT&T vs Intel style
x86 assembly language has two main syntax branches: Intel syntax and AT&T syntax.
Intel syntax is dominant in the MS-DOS and Windows world, and AT&T syntax is dominant in the Unix world, since Unix was created at AT&T Bell Labs.
| 不同点 | AT&T | Intel |
|---|---|---|
| Operand order | Opcode src, dst | Opcode dst, src |
| Operand Size | Opcode suffixes of 'b', 'w', 'l' and 'q' specify 8/16/32/64 bit | Prefixing memory operands with 'byte ptr', 'word ptr', 'dword ptr' and 'qword ptr'. |
| Register Naming | Prefixed by '%' | No prefix, just register name. |
| Immediate Operand | Preceded by '$'. | No prefix, just literal number. |
| Effective addresses | disp(base, index, scale). | [base + index*scale + disp]. |
Now we'll look at some examples for better understanding.
| AT&T Syntax | Intel Syntax |
|---|---|
| movl $1, %eax | mov eax, 1 |
| movl $0xff, %ebx | mov ebx, 0ffh |
| int $0x80 | int 80h |
| movl %eax, %ebx | mov ebx, eax |
| movl (%ecx), %eax | mov eax, DWORD PTR [ecx] |
| movl 3(%ebx), %eax | mov eax, DWORD PTR [ebx+3] |
| movl 0x20(%ebx), %eax | mov eax, DWORD PTR [ebx+20h] |
| addl (%ebx,%ecx,0x2), %eax | add eax, DWORD PTR [ebx+ecx*2h] |
| leal (%ebx,%ecx), %eax | lea eax, DWORD PTR [ebx+ecx] |
| subl -0x20(%ebx,%ecx,0x4), %eax | sub eax, DWORD PTR [ebx+ecx*4h-20h] |
参考:http://www.ibiblio.org/gferg/ldp/GCC-Inline-Assembly-HOWTO.html#s3
13.3. Linux 64-bit 系统中产生 32-bit 代码
编译和链接过程分开进行时,可以用 as 的 --32 选项和 ld 的 -m elf_i386 在 64 位系统中产生 32 位代码。如:
$ as --32 test.s -o test.o
$ ld -m elf_i386 test.o -o test
如果直接使用 GCC,则可以用 gcc -m32
参考:
http://stackoverflow.com/questions/16004206/force-gnu-linker-to-generate-32-bit-elf-executables
13.4. Using C Library Functions in Assembly
如何在汇编程序中如何用 C 的库函数呢?
下面介绍在 64 位 Linux 系统中的实例,测试程序 testc.s:
# ------------------------------------------------------------------------------
# Writes "Hello, World" to the console using C library functions.
# Runs on 64-bit Linux only.
#
# To assemble, link and run:
# $ as -o testc.o testc.s
# $ ld -dynamic-linker /lib64/ld-linux-x86-64.so.2 -o testc -lc testc.o
# $ ./testc
# ------------------------------------------------------------------------------
.section .data
message:
    .asciz  "Hello, world\n"

.section .text
.globl _start
_start:
    movq $message, %rdi          # 准备printf的参数
    callq printf                 # 调用printf

    # exit(0)
    movq $0, %rdi                # 准备exit的参数
    callq exit                   # 调用exit
用下面命令可正常编译:
$ as -o testc.o testc.s
用下面命令进行链接,但提示错误:
$ ld -o testc testc.o
testc.o: In function `_start':
(.text+0x8): undefined reference to `printf'
testc.o: In function `_start':
(.text+0x14): undefined reference to `exit'
为解决上面错误,需要和 C 库一起链接,可以用下面的任意一种方法:
$ ld -o testc /usr/lib/x86_64-linux-gnu/libc.so testc.o
$ ld -o testc -lc testc.o
运行上面命令生成的可执行程序,但提示找不到文件,比较奇怪:
$ ./testc
bash: ./testc: No such file or directory
为解决上面问题,需要在链接时指定运行时所需要的动态链接器(通过选项 -dynamic-linker ):
$ ld -dynamic-linker /lib64/ld-linux-x86-64.so.2 -o testc -lc testc.o
$ ./testc
Hello, world
执行程序 testc 时,会先执行动态链接器 /lib64/ld-linux-x86-64.so.2,然后动态链接器会重定位 libc.so 的文本段和数据段到某个存储器段,再重定位 testc 中所有由 libc.so 定义的符号的引用,最后动态链接器将控制传递给应用程序。
13.5. Inline Assembly
In computer programming, the inline assembler is a feature of some compilers that allows very low level code written in assembly to be embedded in a high level language like C.
参考:
How to Use Inline Assembly Language in C Code: https://gcc.gnu.org/onlinedocs/gcc/Using-Assembly-Language-with-C.html
GCC-Inline-Assembly-HOWTO: http://www.ibiblio.org/gferg/ldp/GCC-Inline-Assembly-HOWTO.html
Linux 中 x86 的内联汇编:http://www.ibm.com/developerworks/cn/linux/sdk/assemble/inline/
13.6. 美元符号在 GAS 汇编中的含义
美元符号 $ 在 GAS 汇编中可以表示:立即数和 label 的地址。
13.7. 汇编中 PC 是什么
PC stands for Program Counter.
程序计数器,用于指示当前将要执行的下一条机器指令的内存地址。
在 x86 机器中,IP/EIP/RIP 寄存器承担着 PC 的功能。