Golang
Table of Contents
- 1. Go 语言简介
- 2. 变量和常量
- 3. 基本类型
- 4. 基本控制结构
- 5. Arrays, Slices, Maps
- 6. 函数
- 7. 指针
- 8. 结构体
- 9. 泛型(Generics)
- 10. 错误处理
- 11. 面向对象编程
- 12. 并发编程
- 13. 反射
- 14. 其它主题
- 15. 环境配置
- 16. Go 语言标准库
- 17. Tips
1. Go 语言简介
Go, also commonly referred to as golang, is a programming language developed at Google in 2007 by Robert Griesemer, Rob Pike, and Ken Thompson. The language was announced in November 2009.
Go is a compiled, statically typed language in the tradition of Algol and C, with garbage collection, limited structural typing, memory safety features and CSP-style concurrent programming features added.
参考:
An Introduction to Programming in Go: https://www.golang-book.com/books/intro (较好的入门资料)
Go home page: https://golang.org/
Go For CPP Programmers: https://github.com/golang/go/wiki/GoForCPPProgrammers
Go by Example: https://gobyexample.com/ (本文的很多例子摘自这个网站)
Go Tutorial: http://www.tutorialspoint.com/go/index.htm
The official Go Language specification: https://golang.org/ref/spec
Go 语言编程(许式伟等编)
1.1. Hello World
首先,编写一个 Hello World 程序:
package main

import "fmt"

func main() {
    fmt.Printf("Hello, World\n")
}
直接执行(在临时目录中编译后运行):
$ go run hello.go
Hello, World
编译运行:
$ go build hello.go
$ ls
hello hello.go
$ ./hello
Hello, World
1.2. 查看帮助文档(godoc)
使用 godoc package [name ...] 可以查看函数的帮助文档。如:
$ godoc fmt Println
func Println(a ...interface{}) (n int, err error)
    Println formats using the default formats for its operands and writes to
    standard output. Spaces are always added between operands and a newline
    is appended. It returns the number of bytes written and any write error
    encountered.
2. 变量和常量
2.1. 变量
可以用 var 关键字来声明变量,变量的类型信息放在变量名之后。也可以用简写形式 := 定义变量,这时不需要 var 关键字,也可以省略类型信息。
// file variables.go
package main

import "fmt"

func main() {

    var a string = "initial"   // 使用var关键字声明变量
    fmt.Println(a)

    var b, c int = 1, 2        // 可同时声明两个变量,并对它们分别赋初始值
    fmt.Println(b, c)

    var d = true               // 省略类型,通过初始值可推导类型。这里相当于 var d bool = true
    fmt.Println(d)

    var e int                  // 变量不显式初始化时,其默认值为0。所以下行语句会输出0
    fmt.Println(e)

    f := "test"                // := 是 short variable declaration。这里相当于 var f = "test"
    fmt.Println(f)

    const g = "ABC"            // 用const可声明常量
    fmt.Println(g)
}
2.1.1. Short Variable Declarations
Golang 中, := 是 Short Variable Declarations。
需要注意的是, := 可能 redeclare(redeclare 的意思是没有引入新变量,只是给变量赋值)同一个 block 中的变量。下面是它的例子:
package main

import (
	"fmt"
	"log"
)

func f100() (int, error) {
	return 0, fmt.Errorf("this is an error raised in f100")
}

func f1() {
	var err = fmt.Errorf("this is an error raised")

	a, err := f100() // short variable declaration。这里 a 是新变量,但 err 却不是新变量,这里只是对前面 err 的赋值(redeclare err)
	if err != nil {
		log.Printf("find error: %s", err)
	} else {
		log.Print(a)
	}

	log.Print(err) // 问 1:这行会输出 "this is an error raised" 还是 "this is an error raised in f100"?
}

func f2() {
	var err = fmt.Errorf("this is an error raised")

	if true {
		a, err := f100() // short variable declaration
		if err != nil {
			log.Printf("find error: %s", err)
		} else {
			log.Print(a)
		}
	}

	log.Print(err) // 问 2:这行会输出 "this is an error raised" 还是 "this is an error raised in f100"?
}

func f3() {
	var err = fmt.Errorf("this is an error raised")

	if true {
		var a int
		a, err = f100() // 这是普通赋值
		if err != nil {
			log.Printf("find error: %s", err)
		} else {
			log.Print(a)
		}
	}

	log.Print(err) // 问 3:这行会输出 "this is an error raised" 还是 "this is an error raised in f100"?
}

func main() {
	f1()
	f2()
	f3()
}
问题 1/2/3 的答案分别是:
this is an error raised in f100
this is an error raised
this is an error raised in f100
为什么 f2 中的 log.Print(err) 会输出 "this is an error raised" 呢?因为 f2 中的 Short Variable Declaration a, err := f100() 出现在 if 块中, Short Variable Declaration 只可能 redeclare 同一个 block 中的变量, 所以它并不能 redeclare 外围的 err ,外围的 err 不受影响。
关于 Short Variable Declarations,在 Golang 语言规范中是这样描述的:
Unlike regular variable declarations, a short variable declaration may redeclare variables provided they were originally declared earlier in the same block (or the parameter lists if the block is the function body) with the same type, and at least one of the non-blank variables is new. As a consequence, redeclaration can only appear in a multi-variable short declaration. Redeclaration does not introduce a new variable; it just assigns a new value to the original.
2.1.2. 匿名变量(_)
Go 中 _ 表示匿名变量。匿名变量常用于忽略函数中我们不关心的那些返回值。
func GetName() (firstName, lastName, nickName string) {  // 函数GetName有3个返回值
    return "May", "Chan", "Chibi Maruko"
}

_, _, nickName := GetName()             // 我们不关心函数GetName的第1个和第2个返回值
2.1.3. 同时定义多个变量
用 () 可以同时定义多个变量,例如:
package main

import "fmt"

func main() {
    var (
      a = 1
      b = 2
      c = 3
    )
    fmt.Println(a)
    fmt.Println(b)
    fmt.Println(c)
}
类似地,用同样方法可以一次定义多个常量(把 var 改为 const 即可)。
2.2. 常量
用 const 关键字可以声明常量。如:
const Pi float64 = 3.14159265358979323846

const (                  // 同时声明两个常量
	a int = 10
	b int = 20
)
2.2.1. 字面常量(无类型)
在其他语言(如 C 语言)中,常量通常有特定的类型。比如 -12 在 C 语言中会认为是一个 int 类型的常量;如果要指定一个值为 -12 的 long 类型常量,需要写成 -12l,多少有点啰嗦。
Go 语言的字面常量是无类型的。 只要这个常量在相应类型的值域范围内,就可以作为该类型的常量,比如上面的常量 -12,它可以赋值给 int、uint、int32、int64、float32、float64、complex64、complex128 等类型的变量。
2.2.2. 标识符 iota
标识符 iota 比较特殊,可以被认为是一个可被编译器修改的常量,在每一个 const 关键字出现时被重置为 0。使用一个 const 语句声明多个常量时,每声明一个常量,iota 其所代表的数字会自动增 1。
const x = iota  // x == 0  (iota has been reset)
const y = iota  // y == 0  (iota has been reset)

const ( // iota is reset to 0
	c0 = iota  // c0 == 0
	c1 = iota  // c1 == 1
	c2 = iota  // c2 == 2
)
注 1:如果赋值语句的表达式是一样的,那么可以省略后面的赋值表达式。如:
const (
    c0 = iota
    c1          // 相当于 c1 = iota
    c2          // 相当于 c2 = iota
)
注 2:用一个 const 语句同时声明多个常量时,如果某个常量并没有使用 iota,iota 的值也会增加 1。如:
const ( // iota is reset to 0
	a = 1 << iota  // a == 1      这行的iota为0
	b = 1 << iota  // b == 2      这行的iota为1
	c = 3          // c == 3      注意:iota is not used but still incremented
	d = 1 << iota  // d == 8      这行的iota为3!
)
注 3:如果多个 iota 用在同一个 ExpressionList 中,iota 不会变。如:
const (
	bit0, mask0 = 1 << iota, 1<<iota - 1  // bit0 == 1, mask0 == 0    这行的两个iota都为0
	bit1, mask1                           // bit1 == 2, mask1 == 1    省略了赋值表达式
	_, _                                  // skips iota == 2          省略了赋值表达式
	bit3, mask3                           // bit3 == 8, mask3 == 7    省略了赋值表达式
)
说明:C++ 中也有 iota ,名称 iota 来源于 APL 语言。
2.2.3. 数字类型的常量具有任意精度
在 Go 语言中,数字类型的常量具有任意精度。 如:
const Huge1 = 1e1000
const Pi = 3.14159265358979323846264338327950288419716939937510582097494459  // math包中就是这样定义Pi的
当我们把常量赋值给变量时,如果常量不在变量所能表达的范围内(比如常量太大),编译时会报错;如果常量在变量所能表达的范围内,只是精度太大,则变量赋值时会丢失精度。如:
var Huge1 = 1e1000                   // 编译时会报错:constant 1e+1000 overflows float64
var Pi = 3.14159265358979323846264338327950288419716939937510582097494459 // 会丢失精度
乍看上去大常量没什么用,其实不然。我们可以直接拿常量进行计算,如:
package main

import "fmt"

func main() {
	const Huge1 = 1e1000
	const Huge2 = 1e999
	fmt.Println(Huge1 / Huge2)   // 会正确地输出10
}
3. 基本类型
3.1. 数字类型
Go 中的数字类型如表 1 所示。
| Type name | Description |
|---|---|
| uint8 | the set of all unsigned 8-bit integers (0 to 255) |
| uint16 | the set of all unsigned 16-bit integers (0 to 65535) |
| uint32 | the set of all unsigned 32-bit integers (0 to 4294967295) |
| uint64 | the set of all unsigned 64-bit integers (0 to 18446744073709551615) |
| int8 | the set of all signed 8-bit integers (-128 to 127) |
| int16 | the set of all signed 16-bit integers (-32768 to 32767) |
| int32 | the set of all signed 32-bit integers (-2147483648 to 2147483647) |
| int64 | the set of all signed 64-bit integers (-9223372036854775808 to 9223372036854775807) |
| float32 | the set of all IEEE-754 32-bit floating-point numbers |
| float64 | the set of all IEEE-754 64-bit floating-point numbers |
| complex64 | the set of all complex numbers with float32 real and imaginary parts |
| complex128 | the set of all complex numbers with float64 real and imaginary parts |
| byte | alias for uint8 |
| rune | alias for int32 |
| uint | either 32 or 64 bits (implementation-specific) |
| int | same size as uint (implementation-specific) |
| uintptr | an unsigned integer large enough to store the uninterpreted bits of a pointer value (implementation-specific) |
3.2. 字符串
可以用一对双引号 "" 或者一对反引号 `` 来创建“字符串常量”。它们的区别在于:双引号括起来的字符串常量允许转义(比如 "\n" 表示换行),而反引号括起来的字符串常量不允许转义。如:
package main

import "fmt"

func main() {
    fmt.Println("Hello World")
    fmt.Println(`Hello World`)
    fmt.Println("Hello \nWorld")
    fmt.Println(`Hello \nWorld`)
}
上面程序将输出:
Hello World
Hello World
Hello
World
Hello \nWorld
使用内置函数 len() 可以计算字符串的长度;使用操作符 + 可以拼接两个字符串,如:
package main

import "fmt"

func main() {
  fmt.Println(len("Hello World"))    // 输出 11
  fmt.Println("Hello " + "World")    // Hello World
  fmt.Println(len("中文"))           // 输出 6(utf8编码),而不是 2
}
说明: len() 计算的是字符串所占的字节数(如上面例子中字符串“中文”的长度输出不是 2),如果你希望得到 Unicode 字符串中的字符数,可以使用 RuneCountInString 。
3.2.1. 遍历 UTF-8
下面是遍历 UTF-8 的例子:
package main

import (
	"fmt"
	"unicode/utf8"
)

func main() {
	const han = "这是汉字"

	// 方式一,遍历 UTF-8
	for index, runeValue := range han {
		fmt.Printf("%#U starts at byte position %d\n", runeValue, index)
	}

	// 方式二,遍历 UTF-8,同时访问前一个/后一个字符
	var previousWord rune
	for i, w := 0, 0; i < len(han); i += w {
		if i == 0 {
			fmt.Printf("previousWord=nil, ")
		} else if i > 0 { // not the first word
			fmt.Printf("previousWord=%s, ", string(previousWord))
		}

		currWord, width := utf8.DecodeRuneInString(han[i:])
		fmt.Printf("currWord=%s, ", string(currWord))

		if i + width == len(han) {
			fmt.Printf("nextWord=nil\n")
		} else if i + width < len(han) { // not the last word
			nextWord, _ := utf8.DecodeRuneInString(han[i+width:])
			fmt.Printf("nextWord=%s\n", string(nextWord))
		}

		previousWord = currWord

		w = width
	}

}
上面程序将输出:
U+8FD9 '这' starts at byte position 0
U+662F '是' starts at byte position 3
U+6C49 '汉' starts at byte position 6
U+5B57 '字' starts at byte position 9
previousWord=nil, currWord=这, nextWord=是
previousWord=这, currWord=是, nextWord=汉
previousWord=是, currWord=汉, nextWord=字
previousWord=汉, currWord=字, nextWord=nil
3.2.2. 字符串和其它类型的转换(包 strconv)
包 strconv 提供了很多方便的函数可以进行字符串和其它类型的转换。
整数和字符串之间的转换可以使用下面函数:
// 整数转字符串:
func FormatUint(i uint64, base int) string
func FormatInt(i int64, base int) string
func Itoa(i int) string                    // 它是通过调用 FormatInt(i, 10) 实现的

// 字符串转整数:
func ParseInt(s string, base int, bitSize int) (i int64, err error)
func ParseUint(s string, base int, bitSize int) (n uint64, err error)
func Atoi(s string) (i int, err error)     // 它是通过调用 ParseInt(s, 10, 0) 实现的
注:通过 string(65) 这种方式不会将整数 65 转为字符串,实际上得到的是 ASCII 值为 65 的字符,即'A'。
浮点数和字符串之间的转换可以使用下面函数:
// 浮点数转字符串:
func FormatFloat(f float64, fmt byte, prec, bitSize int) string

// 字符串转浮点数:
func ParseFloat(s string, bitSize int) (f float64, err error)
3.2.3. 字符串格式化
golang 支持丰富的字符串格式化方式,如:
// Go offers excellent support for string formatting in
// the `printf` tradition. Here are some examples of
// common string formatting tasks.

package main

import "fmt"
import "os"

type point struct {
    x, y int
}

func main() {

    // Go offers several printing "verbs" designed to
    // format general Go values. For example, this prints
    // an instance of our `point` struct.
    p := point{1, 2}
    fmt.Printf("%v\n", p)

    // If the value is a struct, the `%+v` variant will
    // include the struct's field names.
    fmt.Printf("%+v\n", p) // 使用 %+v 时结构体字段名也会输出,即 {x:1 y:2}

    // The `%#v` variant prints a Go syntax representation
    // of the value, i.e. the source code snippet that
    // would produce that value.
    fmt.Printf("%#v\n", p)

    // To print the type of a value, use `%T`.
    fmt.Printf("%T\n", p)

    // Formatting booleans is straight-forward.
    fmt.Printf("%t\n", true)

    // There are many options for formatting integers.
    // Use `%d` for standard, base-10 formatting.
    fmt.Printf("%d\n", 123)

    // This prints a binary representation.
    fmt.Printf("%b\n", 14)

    // This prints the character corresponding to the
    // given integer.
    fmt.Printf("%c\n", 33)

    // `%x` provides hex encoding.
    fmt.Printf("%x\n", 456)

    // There are also several formatting options for
    // floats. For basic decimal formatting use `%f`.
    fmt.Printf("%f\n", 78.9)

    // `%e` and `%E` format the float in (slightly
    // different versions of) scientific notation.
    fmt.Printf("%e\n", 123400000.0)
    fmt.Printf("%E\n", 123400000.0)

    // For basic string printing use `%s`.
    fmt.Printf("%s\n", "\"string\"")

    // To double-quote strings as in Go source, use `%q`.
    fmt.Printf("%q\n", "\"string\"")

    // As with integers seen earlier, `%x` renders
    // the string in base-16, with two output characters
    // per byte of input.
    fmt.Printf("%x\n", "hex this")

    // To print a representation of a pointer, use `%p`.
    fmt.Printf("%p\n", &p)

    // When formatting numbers you will often want to
    // control the width and precision of the resulting
    // figure. To specify the width of an integer, use a
    // number after the `%` in the verb. By default the
    // result will be right-justified and padded with
    // spaces.
    fmt.Printf("|%6d|%6d|\n", 12, 345)

    // You can also specify the width of printed floats,
    // though usually you'll also want to restrict the
    // decimal precision at the same time with the
    // width.precision syntax.
    fmt.Printf("|%6.2f|%6.2f|\n", 1.2, 3.45)

    // To left-justify, use the `-` flag.
    fmt.Printf("|%-6.2f|%-6.2f|\n", 1.2, 3.45)

    // You may also want to control width when formatting
    // strings, especially to ensure that they align in
    // table-like output. For basic right-justified width.
    fmt.Printf("|%6s|%6s|\n", "foo", "b")

    // To left-justify use the `-` flag as with numbers.
    fmt.Printf("|%-6s|%-6s|\n", "foo", "b")

    // So far we've seen `Printf`, which prints the
    // formatted string to `os.Stdout`. `Sprintf` formats
    // and returns a string without printing it anywhere.
    s := fmt.Sprintf("a %s", "string")
    fmt.Println(s)

    // You can format+print to `io.Writers` other than
    // `os.Stdout` using `Fprintf`.
    fmt.Fprintf(os.Stderr, "an %s\n", "error")
}
参考:
https://golang.org/pkg/fmt/
https://gobyexample.com/string-formatting
3.2.4. 字符串相关处理(包 strings)
包 strings 中有很多字符串相关处理函数,如:
func Compare(a, b string) int
func Contains(s, substr string) bool
func ContainsAny(s, chars string) bool
func ContainsRune(s string, r rune) bool
func Count(s, substr string) int
func EqualFold(s, t string) bool
func Fields(s string) []string
func FieldsFunc(s string, f func(rune) bool) []string
func HasPrefix(s, prefix string) bool
func HasSuffix(s, suffix string) bool
func Index(s, substr string) int
func IndexAny(s, chars string) int
func IndexByte(s string, c byte) int
func IndexFunc(s string, f func(rune) bool) int
func IndexRune(s string, r rune) int
func Join(elems []string, sep string) string
func LastIndex(s, substr string) int
func LastIndexAny(s, chars string) int
func LastIndexByte(s string, c byte) int
func LastIndexFunc(s string, f func(rune) bool) int
func Map(mapping func(rune) rune, s string) string
func Repeat(s string, count int) string
func Replace(s, old, new string, n int) string
func ReplaceAll(s, old, new string) string
func Split(s, sep string) []string
func SplitAfter(s, sep string) []string
func SplitAfterN(s, sep string, n int) []string
func SplitN(s, sep string, n int) []string
func Title(s string) string
func ToLower(s string) string
func ToLowerSpecial(c unicode.SpecialCase, s string) string
func ToTitle(s string) string
func ToTitleSpecial(c unicode.SpecialCase, s string) string
func ToUpper(s string) string
func ToUpperSpecial(c unicode.SpecialCase, s string) string
func ToValidUTF8(s, replacement string) string
func Trim(s string, cutset string) string
func TrimFunc(s string, f func(rune) bool) string
func TrimLeft(s string, cutset string) string
func TrimLeftFunc(s string, f func(rune) bool) string
func TrimPrefix(s, prefix string) string
func TrimRight(s string, cutset string) string
func TrimRightFunc(s string, f func(rune) bool) string
func TrimSpace(s string) string
func TrimSuffix(s, suffix string) string
3.3. 字符
Go 语言有两种字符类型,一个是 byte(它是 uint8 的别名),代表 UTF-8 字符串的单个字节的值;另一个是 rune(它是 int32 的别名),代表“单个 Unicode 字符”。
参考:
https://golang.org/pkg/builtin/#byte
https://golang.org/pkg/builtin/#rune
3.3.1. rune literal(单引号)
单引号表示 rune literal。如:
package main

import "fmt"

func main() {
    var x rune = 'a'             // rune是int32的别名,这行也可以写为var x int32 = 'a'
    var y rune = '\n'
    var z rune = '我'
    fmt.Println(x)
    fmt.Println(y)
    fmt.Println(z)
}
输出:
97
10
25105
3.4. 布尔类型
go 中支持 Booleans 类型。如:
package main

import "fmt"

func main() {
    var a bool = true
    fmt.Println(a)             // true
    fmt.Println(true)          // true
    fmt.Println(false)         // false
    fmt.Println(true || true)  // true
    fmt.Println(true || false) // true
    fmt.Println(true && true)  // true
    fmt.Println(true && false) // false
    fmt.Println(!true)         // false
    fmt.Println(!false)        // true
}
4. 基本控制结构
4.1. If else 语句
If else 语句的实例如下。注意条件表达式不要用小括号包围,但语句一定要有大括号。
package main

import "fmt"

func main() {

    // Here's a basic example.
    if 7%2 == 0 {
        fmt.Println("7 is even")
    } else {
        fmt.Println("7 is odd")
    }

    // You can have an `if` statement without an else.
    if 8%4 == 0 {
        fmt.Println("8 is divisible by 4")
    }

    // A statement can precede conditionals; any variables
    // declared in this statement are available in all
    // branches.
    if num := 9; num < 0 {
        fmt.Println(num, "is negative")
    } else if num < 10 {
        fmt.Println(num, "has 1 digit")
    } else {
        fmt.Println(num, "has multiple digits")
    }
}
4.1.1. 条件部分可以创建隐式词法域
if 语句的条件部分可以创建隐式词法域,如:
if x := f(); x == 0 {           # 这里创建了x
    fmt.Println(x)              # 这里x可见
} else if y := g(x); x == y {   # 这里x可见,这里还创建了y
    fmt.Println(x, y)           # 这里x,y可见
} else {
    fmt.Println(x, y)           # 这里x,y可见
}
# if结束后,x,y不可见
fmt.Println(x, y) // compile error: x and y are not visible here
由于上面例子中,第二个 if 语句嵌套在第一个内部,因此第一个 if 语句条件初始化词法域声明的变量(即 x)在第二个 if 中也可以访问。
4.2. For 语句
有 3 种形式的 for 语句。Go 语言中没有 while 语句。
package main

import "fmt"

func main() {

    // The most basic type, with a single condition.
    i := 1
    for i <= 3 {
        fmt.Println(i)
        i = i + 1
    }

    // A classic initial/condition/after `for` loop.
    for j := 1; j <= 10; j++ {              // 输出 1 到 10
        fmt.Println(j)
    }

    // `for` without a condition will loop repeatedly
    // until you `break` out of the loop or `return` from
    // the enclosing function.
    for {
        fmt.Println("just once")
        break
    }
}
节 5.3 中介绍了 for range 的用法。
4.3. Switch 语句
Go 中有两种 Switch 语言:“expression switches”和“type switches”。这里仅介绍“expression switches”,关于“type switches”可参考节 14.3 。
Switch 语句的一个分支结束时,不需要 break 语句(这点和 C 语言中 Switch 语句是不同的)。Go 中 Switch 语句的基本用法如下:
package main

import "fmt"
import "time"

func main() {

    // Here's a basic `switch`.
    i := 2
    fmt.Print("write ", i, " as ")
    switch i {
    case 1:
        fmt.Println("one")                     // 和C语言不同,一个分支结束时,不需要break语句
    case 2:
        fmt.Println("two")
    case 3:
        fmt.Println("three")
    }

    // You can use commas to separate multiple expressions
    // in the same `case` statement. We use the optional
    // `default` case in this example as well.
    switch time.Now().Weekday() {
    case time.Saturday, time.Sunday:           // 逗号可以分隔多个case语句
        fmt.Println("it's the weekend")
    default:
        fmt.Println("it's a weekday")
    }
}
Switch 语句还有一种形式,即省略 switch 关键字后面的表达式,这时和多个 if...else...语句的逻辑相同。如:
package main

import "fmt"
import "time"

func main() {

    // `switch` without an expression is an alternate way
    // to express if/else logic. Here we also show how the
    // `case` expressions can be non-constants.
    t := time.Now()
    switch {                                      // switch后面可以不接表达式
    case t.Hour() < 12:
        fmt.Println("it's before noon")
    default:
        fmt.Println("it's after noon")
    }
}
4.3.1. fallthrough
前面介绍过,Go 中 Switch 语句的一个分支结束时,不需要 break 语句。如果我们想要匹配某个分支后强制执行下一个的 case 代码,这时可以使用 fallthrough 关键字。如:
package main

import "fmt"

func main() {

    i := 2

    switch i {
    case 0:
        fmt.Println("0")
    case 1:
        fmt.Println("1")
    case 2:
        fmt.Println("2")
        fallthrough                    // 如果进到这个分支,会强制执行下一个的case代码
    case 3:
        fmt.Println("3")
    case 4, 5, 6:
        fmt.Println("4, 5, 6")
    default:
        fmt.Println("Default")
    }
}
上面程序会输出:
2
3
显然,最后一个分支是不能使用 fallthrough 关键字的,因为最后一个分支没有下一个分支了。
4.4. Goto 语句
使用 goto 语句可以在当前函数内转移执行流程。不要过度依赖 goto 进行控制转移,它会代码变得复杂。
标准库中有 goto 语句的使用例子,如:math/gamma.go
4.5. Break 和 Continue 语句
4.5.1. Break 语句
break 语句可以中断 for, switch, 及 select 语句的执行。
一般地, break 后面不用加 Label 名,表示中断最内层 for, switch, 及 select 语句的执行;如果要中断到多层嵌套 for 语句(或者 switch, select 语句)的外层,则可以在 break 后面增加 Label 名,如:
OuterLoop:
	for i = 0; i < n; i++ {
		for j = 0; j < m; j++ {
			switch a[i][j] {
			case nil:
				state = Error
				break OuterLoop    // 没有 Label 的话,仅是中断 switch 语句
			case item:
				state = Found
				break OuterLoop
			}
		}
	}
4.5.2. Continue 语句
continue 用于 for 语句中。后面不加 Label 名时,它表示停止最内层 for 语句的本次循环,开始下一轮循环。
如果希望停止多层 for 语句的外层 for 语句,并开始下一轮外层循环时,可以在 continue 后面加 Label 名,如:
RowLoop:
	for y, row := range rows {
		for x, data := range row {
			if data == endOfRow {
				continue RowLoop  // 没有 Label 的话,仅是停止内层循环的本次执行
			}
			row[x] = data + bias(x, y)
		}
	}
5. Arrays, Slices, Maps
5.1. Arrays (var x [n]T)
Go 中,数组声明的语法为:
var variable_name [SIZE]variable_type
下面是使用数组的例子:
package main

import "fmt"

func main() {

    // Here we create an array `a` that will hold exactly
    // 5 `int`s. The type of elements and length are both
    // part of the array's type. By default an array is
    // zero-valued, which for `int`s means `0`s.
    var a [5]int
    fmt.Println("emp:", a)

    // We can set a value at an index using the
    // `array[index] = value` syntax, and get a value with
    // `array[index]`.
    a[4] = 100
    fmt.Println("set:", a)
    fmt.Println("get:", a[4])

    // The builtin `len` returns the length of an array.
    fmt.Println("len:", len(a))

    // Use this syntax to declare and initialize an array
    // in one line.
    b := [...]int{1, 2, 3, 4, 5}                          // 能自动计算数组的大小。相当于 b := [5]int{1, 2, 3, 4, 5}
    fmt.Println("dcl:", b)

    // Array types are one-dimensional, but you can
    // compose types to build multi-dimensional data
    // structures.
    var twoD [2][3]int                                    // 二维数组
    for i := 0; i < 2; i++ {
        for j := 0; j < 3; j++ {
            twoD[i][j] = i + j
        }
    }
    fmt.Println("2d: ", twoD)
}
执行上面程序,会输出:
emp: [0 0 0 0 0]
set: [0 0 0 0 100]
get: 100
len: 5
dcl: [1 2 3 4 5]
2d:  [[0 1 2] [1 2 3]]
5.1.1. 数组有边界检查
Go 语言中,会自动对数组进行边界检查,超过边界的访问会报错。
package main

import "fmt"

func main() {
  var a [2]int
  for i := 0 ; i<15 ; i++ {
    fmt.Printf("Element: %d %d\n", i, a[i])
  }
}
运行上面程序时,会提示错误:
Element: 0 0
Element: 1 0
panic: runtime error: index out of range
5.2. Slices
数组(Arrays)是固定大小的,不太方便。Go 中提供了一个新的类型——Slices,它是“可变长度的”。在 Go 中,Slices 比 Arrays 更常用。
有两种方法定义一个 Slice:
var numbers []int                   /* a slice of unspecified size */
var numbers = make([]int, 3, 5)     /* a slice of length 3 and capacity 5 */
下面是 Slice literal 的例子:
package main

import "fmt"

func main() {
	s := []int{2, 3, 5, 7, 11, 13}    // slice literal
	fmt.Println(s)
}
Slice 也通过数组的“切片操作”得到,如:
package main

import "fmt"

func main() {
	primes := [6]int{2, 3, 5, 7, 11, 13}  // 数组

	var s []int = primes[2:5]  // 切片,从 primes 下标 2 开始,到下标 5-1 的元素
	fmt.Println(s)             // 输出 [5 7 11]

	s = primes[:3]             // 切片,同 primes[0:3]。从 primes 下标 0 开始,到下标 3-1 的元素
	fmt.Println(s)             // 输出 [2 3 5]
}
5.2.1. len() 和 cap()
Slice actually uses array as an underlying structure. len() function returns the elements presents in the slice where cap() function returns the capacity of slice as how many elements it can be accomodate.
Slice 简单实例:
package main

import "fmt"

func main() {
   var numbers = make([]int, 3, 5)                             // 指定length为3,capacity为5
   printSlice(numbers)
}

func printSlice(x []int){
   fmt.Printf("len=%d cap=%d slice=%v\n", len(x), cap(x), x)   // 输出len=3 cap=5 slice=[0 0 0]
}
5.2.2. append() 和 copy()
Slice allows increasing the capacity of a slice using append() function. Using copy() function, contents of a source slice are copied to destination slice. Following is the example:
package main

import "fmt"

func main() {
   var numbers []int
   printSlice(numbers)

   /* append allows nil slice */
   numbers = append(numbers, 0)
   printSlice(numbers)

   /* add one element to slice */
   numbers = append(numbers, 1)
   printSlice(numbers)

   /* add more than one element at a time */
   numbers = append(numbers, 2,3,4)
   printSlice(numbers)

   /* create a slice numbers1 with double the capacity of earlier slice */
   numbers1 := make([]int, len(numbers), (cap(numbers))*2)

   /* copy content of numbers to numbers1 */
   copy(numbers1, numbers)
   printSlice(numbers1)
}

func printSlice(x []int){
   fmt.Printf("len=%d cap=%d slice=%v\n",len(x),cap(x),x)
}
运行上面程序,可能得到下面结果:
len=0 cap=0 slice=[]
len=1 cap=1 slice=[0]
len=2 cap=2 slice=[0 1]
len=5 cap=6 slice=[0 1 2 3 4]
len=5 cap=12 slice=[0 1 2 3 4]
注意:上面输出中 cap 的值在不同的 Go 实现中可能不一样。
5.2.3. nil slice
Slice 的 Zero value 是 nil ,它没有关联的 underlying array,它的长度和 capacity 为 0,如:
package main
import "fmt"

func main() {
	var s []int
	fmt.Printf("s = %v, len = %d, cap = %d\n", s, len(s), cap(s))   // s = [], len = 0, cap = 0

	if s == nil {
		fmt.Println("s is nil")   // s is nil
	}
}
把 Slice 赋值为 nil 可以清空 Slice,遍历 nil Slice 是安全的,不会报错。如:
a := []string{"A", "B", "C", "D", "E"}
a = nil     // 清空slice
fmt.Println(a, len(a), cap(a)) // [] 0 0

for _, v := range a {      // a 是 nil slice,遍历它不会报错
    fmt.Println("%v", v)
}
如果清空时你想保留 Slice 底层的数据,可以使用下面操作:
a := []string{"A", "B", "C", "D", "E"}
a = a[0:0]     // 清空slice,不过底层数据还在。可简写为a = a[:0]
fmt.Println(a, len(a), cap(a)) // [] 0 5

// 底层数据还存在,如:
fmt.Println(a[:2]) // [A B]
5.2.4. Tips: concatenate 两个 slice
使用 append() 可以把一个元素增加到一个 slice 中,如何连接两个 slice 呢?答案是在第 2 个 slice 后面使用三个点,如:
s0 := []int{1, 2}
s1 := []int{3, 4}
// s3 := append(s0, s1)    // 会报错,append第二个参数是类型应该是“slice元素对应的类型”
s3 := append(s0, s1...)    // 连接两个slice,第二个参数中使用了三个点
s4 := append(s0, 3, 4)     // 结果和上一行相同
参见节:6.4.1
5.2.5. Tips: 去除 slice 中不满足条件的元素
下面代码可以去除 a 中不满足条件的元素,结果保存在 b 中(如果 a 中所有元素都满足条件,这个过程中没有内存分配):
b := a[:0]
for _, x := range a {
	if f(x) {
		b = append(b, x)
	}
}
参考:https://github.com/golang/go/wiki/SliceTricks#filtering-without-allocating
5.2.6. Tips: 反转 slice
反转 Slice,没有现成的方法。可以这样实现:
for i := len(a)/2-1; i >= 0; i-- {
	opp := len(a)-1-i
	a[i], a[opp] = a[opp], a[i]
}
或者这样实现:
for left, right := 0, len(a)-1; left < right; left, right = left+1, right-1 {
	a[left], a[right] = a[right], a[left]
}
5.3. for range
for range 可以用来迭代 array, slice, string, channel or map. 如表 2 所示。
| Range expression | 1st Value | 2nd Value(Optional) | |
|---|---|---|---|
| Array a [n]E | index i int | a[i] E | |
| Slice a []E | index i int | a[i] E | |
| String s string type | index i int | rune int | 对于 string,range 迭代的是 Unicode,所以第 2 个迭代变量为 rune |
| map m map[K]V | key k K | value m[k] V | |
| channel c chan E | element e E | none | 对于 channel,range 只能指定一个迭代变量 |
下面是 range 的使用实例:
package main

import "fmt"

func main() {

	// Here we use `range` to sum the numbers in a slice.
	// Arrays work like this too.
	nums := []int{2, 3, 4}
	for i, num := range nums {
		if num == 3 {
			fmt.Println("index:", i)  // 输出 index: 1
		}
	}

	sum := 0
	for _, num := range nums {   // 这里用`_`表示不关心range返回的第1个值
		sum += num
	}
	fmt.Println("sum:", sum)

	sum = 0
	for i := range nums {     // 忽略range返回的第2个值,这行相当于 for i, _ := range nums {
		sum += nums[i]
	}
	fmt.Println("sum:", sum)
}
5.3.1. for range 的“迭代变量”被创建一次还是多次(Go 1.21 和 Go 1.22 不同)
for range 的“迭代变量”在 Go 1.21 及以前版本中,只会被“创建一次”,在每次迭代时会被赋值。但这很可能导致问题,后面有例子介绍。
在 Go 1.22 中修改了这个行为:for range 的“迭代变量”每次迭代时都会被“重新创建”并被赋值。
package main

import "fmt"

func main() {
	done := make(chan bool)

	values := []string{"a", "b", "c"}
	for i, v := range values {         // Go 1.21 中,只会创建一次 i,v,每次迭代时会给 i,v 赋值
                                           // Go 1.22 中,每次迭代时都会创建新 i,v 并给它们赋值
		go func() {
			fmt.Printf("%d -> %v\n", i, v)
			done <- true
		}()
	}

	// wait for all goroutines to complete before exiting
	for _ = range values {
		<-done
	}
}
上面代码,在 Go 1.21 环境会输出(注:这个代码在 Go 1.21 中有竞争条件的问题,参见节 6.6.2):
2 -> c
2 -> c
2 -> c
在 Go 1.22 环境会输出(由于是并发,输出顺序可能不一样):
0 -> a
2 -> c
1 -> b
如果在 Go 1.21 中想和 Go 1.22 中一样的行为,可以采用下面办法:
	for i, v := range values {
                i := i               // Go 1.21 及以前,往往进行这个修改,即人为引入新变量
                v := v               // Go 1.21 及以前,往往进行这个修改,即人为引入新变量
		go func() {
			fmt.Printf("%d -> %v\n", i, v)
			done <- true
		}()
	}
5.3.1.1. 迭代变量每次迭代时都会被更新(迭代变量并不是指针)
考虑下面程序:
package main

import "fmt"

type Book struct {
	title string
	bookId int
}

func main() {
	books := []Book{
		{"Go Programming", 100},
		{"Concurrency in Go", 101},
	}
	fmt.Println(books)               // 输出 [{Go Programming 100} {Concurrency in Go 101}]

	for i, book := range books {         // Go 1.21 及之前,只创建一次变量 book,每次迭代时把 books 中某元素赋值到变量 book 中
                                             // Go 1.22 及之后,每次迭代都创建新变量 book,每次迭代时把 books 中某元素赋值到变量 book 中
		book.bookId = 101 + 100      // 对 book.bookId 进行修改:每个bookId都加100
		fmt.Println("index", i, book)
	}

	fmt.Println(books)               // 会输出 [{Go Programming 200} {Concurrency in Go 201}] 吗?不会
}
运行上面程序,不管是 Go 1.21 还是 Go 1.22 都会输出:
[{Go Programming 100} {Concurrency in Go 101}]
index 0 {Go Programming 201}
index 1 {Concurrency in Go 201}
[{Go Programming 100} {Concurrency in Go 101}]
可见, range 中对每个 bookId 都加 100 的操作,并没有影响到 books 变量。这是因为 range 的迭代变量(如 book)仅是从 books 中复制出来的一个拷贝,并不是 books 中元素的指针。
如果,我们希望在 range 中对每个 bookId 都加 100 的操作最终影响到 books 变量,则可以把上面代码修改为:
	for i := range books {
		books[i].bookId = 101 + 100
		fmt.Println("index", i, books[i])
	}
下面,我们再来看一个例子(摘自:https://github.com/golang/go/wiki/Range ):
items := make([]map[int]int, 10)
for _, item := range items {
	item = make(map[int]int, 1) // Oops! item is only a copy of the slice element.
	item[1] = 2                 // This 'item' will be lost on the next iteration.
}
上面程序并不能如你所愿,不会修改 items,这是因为 item 仅是一个拷贝。如果想在 range 中修改 items,可以使用下面代码:
items := make([]map[int]int, 10)
for i := range items {
	items[i] = make(map[int]int, 1)
	items[i][1] = 2
}
5.3.2. range 表达式在第一次执行时构建
考虑下面程序:
package main

import "fmt"

func main() {
	s := []int{1, 2, 3}
	for i := range s {
		s = append(s, i)         // 在使用range迭代切片s的过程中,对s进行了修改
		fmt.Printf("s=%v\n", s)
	}
}
我们在使用 range 迭代遍历 s 的过程中,增加了 s 的长度,那么这个 for ... range 会无限循环下去吗?答案是否定的,运行上面程序会输出:
s=[1 2 3 0]
s=[1 2 3 0 1]
s=[1 2 3 0 1 2]
可见 for ... range 循环体只执行了 3 次(即切片 s 在迭代前的长度)。range 在执行之初就构建好了 range 表达式的内容了,虽然后面 slice 的内容增加了,但是并不会影响初始构建的结果。
参考:https://garbagecollected.org/2017/02/22/go-range-loop-internals/
5.3.3. range over map
当我们使用 for ... range 迭代遍历 map 的过程中,修改了 map,会出现什么情况呢?Golang Specification 对此的说明为:
The iteration order over maps is not specified and is not guaranteed to be the same from one iteration to the next. If a map entry that has not yet been reached is removed during iteration, the corresponding iteration value will not be produced. If a map entry is created during iteration, that entry may be produced during the iteration or may be skipped.
上面这段说明中有三个要点:
- 每次迭代 map 的顺序不一定相同(尽管可能你多运行几次看到的顺序没变,但这是没有保证的);
- 如果迭代 map 过程中删除了元素,则这个元素不会出现在后续的迭代中;
- 如果迭代 map 过程中增加了元素,则这个元素可能会(也可能不会)出现在后续的迭代中。
5.3.4. range 表达式可以是指针,但只能是数组指针
前面说过,range 表达式可以是 array, slice, string, map, channel ,其实 range 表达式还可以是指针,不过只能是数组指针。
也就是说,range 表达式可以是下面 6 种类型:
array
pointer to an array
slice
string
map
channel
下面是 range 表达式为数组指针的例子:
package main

import "fmt"

func main() {
	//compile error: cannot range over datas (type *string)
	//d := "golang"
	d := [3]int{1, 2, 3} //range successfully
	//d := []int{1, 2, 3} //compile error: cannot range over datas (type *[]int)
	//d := make(map[string]int) //compile error: cannot range over datas (type *map[string]int)

	datas := &d  // 取地址,得到指针

	for k, v := range datas {
		fmt.Printf("k_addr:%p, k_value:%v\nv_addr:%p, v_value:%v\n------\n", &k, k, &v, v)
	}
}
5.4. Maps (var x map[T]T)
Maps 就是哈希表,在使用前需要用内置函数 make() 初始化。如:
var myMap map[string] int          // 声明一个Map
myMap = make(map[string] int)      // 初始化Map
myMap["key1"] = 100                // 往Map中插入元素 key1:100
myMap["key2"] = 200                // 往Map中插入元素 key2:200
也可以在定义时就给 map 赋值,这种情况下不用使用 make() 进行初始化。 如:
elements := map[string]string{
  "H":  "Hydrogen",
  "He": "Helium",
  "Li": "Lithium",
  "Be": "Beryllium",
  "B":  "Boron",
  "C":  "Carbon",
  "N":  "Nitrogen",
  "O":  "Oxygen",
  "F":  "Fluorine",
  "Ne": "Neon",
}
5.4.1. 删除元素:delete()
使用内置函数 delete() 可以删除 Map 中的元素,如果待删除的元素不存在 delete() 也不会报错。如:
delete(myMap, "key1") // 删除myMap中key为“key1”的元素,不存在也不报错
5.4.2. 查找 key 对应的 value,判断 key 是否存在
要从 map 中查找一个特定的键:
value1 := myMap["key1"] // 如果 key1 不存在,也不报错,会得到 value 类型的零值
上面代码中,如果键 key1 在 myMap 中不存在,也不会报错,会得到 value 类型的零值(如 int 就是 0,字符串就是空字符串)。
如果我们想“准确地”知道某个键是否在 map 中存在,则可以通过下面的代码来实现:
value1, ok := myMap["key1"]
if ok {  // 键 key1 在 myMap 中存在
  // 处理找到的value1
} else { // 键 key1 在 myMap 中不存在
  // 其他处理
}
5.4.3. Map 完整实例
下面是 Map 的一个例子:
package main

import "fmt"

func main() {
    var countryCapitalMap map[string]string            // string -> string

    /* create a map */
    countryCapitalMap = make(map[string]string)

    /* insert key-value pairs in the map */
    countryCapitalMap["France"] = "Paris"
    countryCapitalMap["Italy"] = "Rome"
    countryCapitalMap["Japan"] = "Tokyo"
    countryCapitalMap["India"] = "New Delhi"

    fmt.Println(countryCapitalMap);

    /* delete an entry */
    delete(countryCapitalMap, "India");                       // delete函数可以删除map中元素

    fmt.Println(countryCapitalMap);

    /* print map */
    for country, capital := range countryCapitalMap {
        fmt.Println("Capital of", country, "is", capital)
    }

    /* test if entry is present in the map or not */
    capital, ok := countryCapitalMap["United States"]
    /* if ok is true, entry is present otherwise entry is absent */
    if ok {
        fmt.Println("Capital of United States is", capital)
    } else {
        fmt.Println("Capital of United States is not present")
    }
}
上面程序的输出如下:
map[France:Paris Italy:Rome Japan:Tokyo India:New Delhi]
map[France:Paris Italy:Rome Japan:Tokyo]
Capital of France is Paris
Capital of Italy is Rome
Capital of Japan is Tokyo
Capital of United States is not present
5.5. Slices, Maps and Channels 是引用类型
Slices, Maps and Channels 是“引用类型”。数组则不是引用类型。
These are reference types, meaning that you always access them via a reference. For example, if you assign one map-typed variable to another, then you will have two variables referring to the same map.
5.5.1. 数组不是引用类型(参数是数组时会复制整个数组)
在 C 语言中,数组比较特别:通过函数传递一个数组时传递的是数组首元素的地址(像“引用类型”),而在结构体中定义数组变量对它赋值时数组会被完整地复制(像“值类型”)。
在 Go 语言中,数组是彻底的值类型。如果函数的参数是数组类型,则调用函数时会复制整个数组。如:
package main

import "fmt"

func main() {
    var a [3]string;
    a[0] = "test1";
    a[1] = "test2";
    a[2] = "test3";

    change1(a);
    print(a[:]);     // 相当于 print(a[0:3]);

    change2(a[:]);
    print(a[:]);
}

func change1(array [3]string) {    // 它的参数是数组,调用函数时会复制整个数组!函数内对array的修改不会影响函数外的数组
    array[2] = "new1";
}

func change2(array []string) {     // 它的参数是Slices。函数内对array的修改会影响函数外的数组
    array[2] = "new2";
}

func print(array []string) {       // 它的参数是Slices
    for i := 0; i < len(array); i++ {
        fmt.Println(array[i])
    }
}
运行上面程序,会输出:
test1
test2
test3
test1
test2
new2
从上面的输出可知,change1(参数类型为数组)并不会修改数组 a(因为它只是修改的复制数组的副本),而 change2 修改了数组 a。
6. 函数
关键字 func 可以用来定义一个函数。其形式如下:
func function_name( [parameter list] ) [return_types] {
   // body of the function
}
函数实例:
package main
import "fmt"

func max(a int, b int) int {     // 说明:对参数类型的说明在参数名之后。
    if a > b {
        return a
    }
    return b
}

func main() {
    fmt.Println(max(2, 3))
}
如果参数列表中若干个相邻的参数类型的相同(比如上面例子中 max 函数的参数 a 和 b),则可以在参数列表中省略前面变量的类型声明,如前面例子的 max 函数还可写为:
func max(a, b int) int {        // 参数列表中省略了前面变量的类型声明
    if a > b {
        return a
    }
    return b
}
注 1:Go 语言不支持函数重载(Overload)。如果有两个函数的参数不同,但函数名相同,编译器会报错。
注 2:Go 语言不支持函数嵌套。
注 3:Go 语言不支持函数默认参数。
6.1. 函数可返回多个值
Go 函数可以返回多个值,用逗号分开即可。如:
package main

import "fmt"

func swap(x, y string) (string, string) {   // 同时返回两个值
   return y, x
}

func main() {
   a, b := swap("abc", "xyz")
   fmt.Println(a, b)                        // 输出 xyz abc
}
6.2. 函数的命名返回值
Go 函数的返回值可被命名,它们会被视作定义在函数开始部分的变量,被初始化为它们的零值。
没有参数的 return 语句返回已命名的返回值,也就是“裸返回”。
“裸返回”语句应当仅用在的较短的函数中,在较长的函数中它们会影响代码的可读性。
package main

import "fmt"

func split(sum int) (x, y int) { // 两个命名返回值:x 和 y
	x = sum * 4 / 9
	y = sum - x
	return
    // 上一行是“裸返回”语句,相当于 return x, y
}

func main() {
	fmt.Println(split(17))  // 7 10
}
6.3. 参数传递方式为“值传递”
package main

import "fmt"

func fun_foo(a int) (int) {
    a = 5
    return a
}

func main() {
    var x = 1
    fun_foo(x)
    fmt.Println(x)              // 参数为值传递,会输出1
}
Go 语言所有传参都是“值传递”,函数里得到的是一个拷贝。当参数是非引用类型(int、string、struct 等)时,在函数中无法修改原数据;当参数是引用类型(指针、map、slice、chan)时,可以修改原内容数据。
6.4. 变长参数函数(...)
Go 支持变长参数函数。实例如下:
package main
import "fmt"

func add(args ...int) int {    // ... 表示变长参数,零个或多个参数
    total := 0
    for _, v := range args {
        total += v
    }
    return total
}

func main() {
    fmt.Println(add())         // 输出 0
    fmt.Println(add(1,2))      // 输出 3
    fmt.Println(add(1,2,3))    // 输出 6
}
6.4.1. 传递 slice 到变长参数
有时我们想要把 slice 变量(如 a)传递给接收变长参数的函数,这时传递 a... 即可,如:
package main

import "fmt"

func echo(strings ...string) {   // echo 接收变长参数
    for _, s := range strings {
        fmt.Println(s)
    }
}

func main() {
    a := []string{"str1", "str2", "str3"}

    // echo(a)                    // 这行会报错,echo接收变长参数,而不是slice
    echo("str1", "str2", "str3")
    echo(a...)                    // 输出和上行相同
}
参考:https://golang.org/ref/spec#Passing_arguments_to_..._parameters
6.5. Create Functions on the Fly
Go programming language provides flexibility to create functions on the fly and use them as values.
package main

import (
    "fmt"
    "math"
)

func main(){
    /* declare a function variable */
    getSquareRoot := func(x float64) float64 {
        return math.Sqrt(x)
    }

    /* use the function */
    fmt.Println(getSquareRoot(9))

    i := 100
    func() {                 /* 创建函数后,马上调用它 */
        fmt.Println(i)
    } ()
}
参考:http://www.tutorialspoint.com/go/go_function_as_values.htm
6.6. Function Closure(函数闭包)
Go programming language supports anonymous functions which can acts as function closures.
package main

import "fmt"

func getSequence() func() int {           // 函数getSequence返回另一个函数
    i:=0
    return func() int {
        i+=1
        return i
    }
}

func main(){
    /* nextNumber is now a function with i as 0 */
    nextNumber := getSequence()

    /* invoke nextNumber to increase i by 1 and return the same */
    fmt.Println(nextNumber())
    fmt.Println(nextNumber())
    fmt.Println(nextNumber())

    /* create a new sequence and see the result, i is 0 again */
    nextNumber1 := getSequence()
    fmt.Println(nextNumber1())
    fmt.Println(nextNumber1())
}
When the above code is compiled and executed, it produces the following result:
1
2
3
1
2
参考:http://www.tutorialspoint.com/go/go_function_closures.htm
6.6.1. 再看闭包
什么是闭包?如果函数中存在“非局部且非全局的变量”,则函数和“非局部且非全局的变量”一起构成“闭包”。
package main
import "fmt"

func main() {
  x := 0                      // 本行和下面4行构造闭包
  increment := func() int {   // 变量 x 和函数 increment 构成闭包
    x++                       // 变量 x 不是函数 func 的局部变量,也不是全局变量
    return x
  }
  fmt.Println(increment())
  fmt.Println(increment())
}
使用闭包的常见方法是写一个函数,它返回另外一个函数。如:
package main
import "fmt"

func makeEvenGenerator() func() uint {
  i := uint(0)
  return func() (ret uint) {
    ret = i
    i += 2
    return
  }
}
func main() {
  nextEven := makeEvenGenerator()
  fmt.Println(nextEven()) // 0
  fmt.Println(nextEven()) // 2
  fmt.Println(nextEven()) // 4
}
6.6.2. goroutine 启动闭包时要避免竞争条件
下面代码中的 for 循环能够输出 values 中的各个值吗?
package main

import "fmt"

func main() {
	values := []int{1, 2, 3, 4, 5, 6, 7, 8, 9, 10, 11, 12, 13, 14, 15, 16, 17, 18, 19, 20}

	for _, val := range values {
		go func() {
			fmt.Println(val)    // 存在竞争条件。val 被 main goroutine 写,同时被多个 closure goroutine 读取
		}()
	}

	time.Sleep(5 * time.Second) // 等待 goroutine 结束
}
答案是否定的,上面代码存在竞争条件(注:在 Go 1.22 中由于修改了 for range 的行为,已经不存在竞争条件了,参见 5.3.1)。使用 -race 参数(如 go run -race main.go )可以检测出竞争条件。
下面介绍两个解决办法。
解决办法一,启动每个 closure goroutine 前,复制一下 val:
package main

import (
	"fmt"
	"time"
)

func main() {
	values := []int{1, 2, 3, 4, 5, 6, 7, 8, 9, 10, 11, 12, 13, 14, 15, 16, 17, 18, 19, 20}

	for _, val := range values {
		data := val                 // data 每次都是先被 main goroutine 写完,再被某一个 closure goroutine 读取。不存在竞争条件
		go func() {
			fmt.Println(data)
		}()
	}

	time.Sleep(5 * time.Second) // 等待 goroutine 结束
}
解决办法二,为 closure 增加函数参数,启动时指定 val 为实参,相当于把 val 复制到 goroutine 的栈中:
package main

import (
	"fmt"
	"time"
)

func main() {
	values := []int{1, 2, 3, 4, 5, 6, 7, 8, 9, 10, 11, 12, 13, 14, 15, 16, 17, 18, 19, 20}

	for _, val := range values {
		go func(arg any) {
			fmt.Println(arg)
		}(val)                      // val 作为函数参数传给 goroutine
	}

	time.Sleep(5 * time.Second) // 等待 goroutine 结束
}
参考:https://github.com/golang/go/wiki/CommonMistakes#using-goroutines-on-loop-iterator-variables
6.7. defer 语句
Go 语言中有个特别的 defer 语句,在当前函数退出前才执行 defer 关联的函数。比如:
package main

import "fmt"

func first() {
  fmt.Println("1st")
}
func second() {
  fmt.Println("2nd")
}
func main() {
  defer second()   // 当前函数main退出前,才执行second()函数
  first()
}
defer 常常用于资料的释放。如:
f, _ := os.Open(filename)
defer f.Close()
This has 3 advantages:
(1) it keeps our Close call near our Open call so it's easier to understand,
(2) if our function had multiple return statements (perhaps one in an if and one in an else) Close will happen before both of them.
(3) deferred functions are run even if a run-time panic occurs.
注:如果在函数中添加多个 defer 语句。当函数执行到最后时,这些 defer 语句会按照“逆序”执行,最后该函数返回。
6.7.1. defer 函数的参数在声明 defer 函数时被求值
defer 函数的参数在声明 defer 函数时被求值,如:
func a() {
    i := 0
    defer fmt.Println(i)         // 将打印0,而不是1
    i++
    return
}
6.8. Named Return Values(命名返回值)
在定义函数时,我们可以“指定返回值名字”。如:
func split(sum int) (x, y int) {  // 声明返回值时指定了名字
	x = sum * 4 / 9
	y = sum - x
	return                        // 直接 return 即可,相当于 return x, y
}
上面函数相当于:
func split(sum int) (int, int) {
	var x = sum * 4 / 9
	var y = sum - x
	return x, y
}
6.8.1. 命名返回值和 defer 语句带来的困惑
当“命名返回值”函数内有 defer 语句时,可能导致难以发现的 bug,如下面函数将返回 6:
func c() (i int) {           // “命名返回值”函数
    defer func() { i++ }()
    return 5
}
参考:https://stackoverflow.com/questions/37248898/how-does-defer-and-named-return-value-work-in-golang
7. 指针
和 C 类似,Go 支持指针。指针的 * 和 & 操作符和 C 类似。
package main

import "fmt"

func main() {
   var a int = 10
   var ptr *int = &a

   fmt.Printf("Address of a variable: %x\n", ptr)
   fmt.Printf("%d\n", a)                              // 输出10
   fmt.Printf("%d\n", *ptr)                           // 输出10
}
7.1. Array of pointers
package main
import "fmt"
const MAX int = 3

func main() {
   a := []int{10,100,200}
   var i int
   var ptr [MAX]*int;                    // 声明ptr为指针数组

   for  i = 0; i < MAX; i++ {
      ptr[i] = &a[i]                     /* assign the address of integer. */
   }

   for  i = 0; i < MAX; i++ {
      fmt.Printf("Value of a[%d] = %d\n", i, *ptr[i])
   }
}
7.2. new()
Another way to get a pointer is to use the built-in new function. new takes a type as an argument, allocates enough memory to fit a value of that type and returns a pointer to it.
package main
import "fmt"

func one(xPtr *int) {
  *xPtr = 1
}
func main() {
  xPtr := new(int)
  one(xPtr)
  fmt.Println(*xPtr)   // 输出 1
}
8. 结构体
Go 中声明结构体的语法如下:
type struct_variable_type struct {
   member definition;
   member definition;
   ...
   member definition;
}
下面是使用结构体的一个例子:
package main

import "fmt"

type Books struct {        // 定义结构体
   title string
   author string
   subject string
   book_id int
}

func main() {
   var Book1 Books        /* Declare Book1 of type Book */
   var Book2 Books        /* Declare Book2 of type Book */

   /* book 1 specification */
   Book1.title = "Go Programming"
   Book1.author = "Mahesh Kumar"
   Book1.subject = "Go Programming Tutorial"
   Book1.book_id = 6495407

   /* book 2 specification */
   Book2.title = "Telecom Billing"
   Book2.author = "Zara Ali"
   Book2.subject = "Telecom Billing Tutorial"
   Book2.book_id = 6495700

   printBook1(Book1)

   printBook2(&Book2)
}

func printBook1( book Books ) {
   fmt.Printf( "Book title : %s\n", book.title);          // 通过结构体访问结构体成员用点号(.)
   fmt.Printf( "Book author : %s\n", book.author);
   fmt.Printf( "Book subject : %s\n", book.subject);
   fmt.Printf( "Book book_id : %d\n", book.book_id);
}

func printBook2( book *Books ) {
   fmt.Printf( "Book title : %s\n", book.title);          // 通过指针访问结构体成员也用点号(.),这和C语言不同。
   fmt.Printf( "Book author : %s\n", book.author);
   fmt.Printf( "Book subject : %s\n", book.subject);
   fmt.Printf( "Book book_id : %d\n", book.book_id);
}
8.1. Go 中的结构体是“值类型”
和 C 语言一样,Go 中的结构体是“值类型”,这意味着对结构体对象进行赋值时,会生成一个拷贝。这一点和 Java 不一样。
下面是一个相关测试代码:
package main

import "fmt"

func main() {
	type people struct {
		name string
		age int
	}

	u1 := people{name: "alice", age: 20}

	u2 := u1              // u2 得到的是一个拷贝
	u2.name = "bob"
	fmt.Println(u1.name)  // 还是会输出 alice,而不是输出 bob

	u3 := &u1
	u3.name = "carol"
	fmt.Println(u1.name)  // 输出 carol
}
8.2. Struct Literals
创建结构体时可以同时为结构体的域指定对应的值。如:
package main

import "fmt"

type Vertex struct {
	X, Y int
}

func main() {
	v1 := Vertex{1, 2}                             // has type Vertex
	v2 := Vertex{X: 1, Y: 2}                       // 同上
	v3 := Vertex{X: 1}                             // 这里仅指定了X为1,没有指定的域默认为0
	v4 := Vertex{}                                 // X:0 and Y:0
	v5 := []Vertex{{X: 11, Y: 21}, {X: 12, Y: 22}} // 结构体数组字面量
	p := &Vertex{1, 2}                             // has type *Vertex

	fmt.Println(v1)
	fmt.Println(v2)
	fmt.Println(v3)
	fmt.Println(v4)
	fmt.Println(v5)
	fmt.Println(p)
}
上面程序的输出:
{1 2}
{1 2}
{1 0}
{0 0}
[{11 21} {12 22}]
&{1 2}
8.3. Struct Embedding(嵌套结构体)
Go 中不支持结构体继承。但 Go 支持 Struct Embedding(嵌套结构体),下面是嵌套结构体的使用例子:
package main

import "fmt"

type base struct {
	num int
}

func (b base) describe() string {
	return fmt.Sprintf("base with num=%v", b.num)
}

// A `container` _embeds_ a `base`. An embedding looks
// like a field without a name.
type container struct {
	base                // 这就是 Struct Embedding,只有类型,没有字段名
	str string
}

func main() {

	// When creating structs with literals, we have to
	// initialize the embedding explicitly; here the
	// embedded type serves as the field name.
	co := container{
		base: base{
			num: 1,
		},
		str: "some name",
	}

	// We can access the base's fields directly on `co`,
	// e.g. `co.num`.
	fmt.Printf("co={num: %v, str: %v}\n", co.num, co.str)

	// Alternatively, we can spell out the full path using
	// the embedded type name.
	fmt.Println("also num:", co.base.num)

	// Since `container` embeds `base`, the methods of
	// `base` also become methods of a `container`. Here
	// we invoke a method that was embedded from `base`
	// directly on `co`.
	fmt.Println("describe:", co.describe())
}
9. 泛型(Generics)
Go 1.18 中支持了期待已久的泛型(Generics),也称为 Type Parameter。
下面是泛型的一个使用例子(摘自:https://gobyexample.com/generics ):
package main

import "fmt"

func MapKeys[K comparable, V any](m map[K]V) []K {
    r := make([]K, 0, len(m))
    for k := range m {
        r = append(r, k)
    }
    return r
}

type List[T any] struct {
    head, tail *element[T]
}

type element[T any] struct {
    next *element[T]
    val  T
}

func (lst *List[T]) Push(v T) {
    if lst.tail == nil {
        lst.head = &element[T]{val: v}
        lst.tail = lst.head
    } else {
        lst.tail.next = &element[T]{val: v}
        lst.tail = lst.tail.next
    }
}

func (lst *List[T]) GetAll() []T {
    var elems []T
    for e := lst.head; e != nil; e = e.next {
        elems = append(elems, e.val)
    }
    return elems
}

func main() {
    var m = map[int]string{1: "2", 2: "4", 4: "8"}

    fmt.Println("keys:", MapKeys(m))

    _ = MapKeys[int, string](m)

    lst := List[int]{}
    lst.Push(10)
    lst.Push(13)
    lst.Push(23)
    fmt.Println("list:", lst.GetAll())
}
下面是泛型的另一个使用例子(摘自:https://go.dev/doc/tutorial/generics ):
package main

import "fmt"

type Number interface {
    int64 | float64
}

func main() {
    // Initialize a map for the integer values
    ints := map[string]int64{
        "first": 34,
        "second": 12,
    }

    // Initialize a map for the float values
    floats := map[string]float64{
        "first": 35.98,
        "second": 26.99,
    }

    fmt.Printf("Non-Generic Sums: %v and %v\n",
        SumInts(ints),
        SumFloats(floats))

    fmt.Printf("Generic Sums: %v and %v\n",
        SumIntsOrFloats[string, int64](ints),
        SumIntsOrFloats[string, float64](floats))

    fmt.Printf("Generic Sums, type parameters inferred: %v and %v\n",
        SumIntsOrFloats(ints),
        SumIntsOrFloats(floats))

    fmt.Printf("Generic Sums with Constraint: %v and %v\n",
        SumNumbers(ints),
        SumNumbers(floats))
}

// SumInts adds together the values of m.
func SumInts(m map[string]int64) int64 {
    var s int64
    for _, v := range m {
        s += v
    }
    return s
}

// SumFloats adds together the values of m.
func SumFloats(m map[string]float64) float64 {
    var s float64
    for _, v := range m {
        s += v
    }
    return s
}

// SumIntsOrFloats sums the values of map m. It supports both floats and integers
// as map values.
func SumIntsOrFloats[K comparable, V int64 | float64](m map[K]V) V {
    var s V
    for _, v := range m {
        s += v
    }
    return s
}

// SumNumbers sums the values of map m. Its supports both integers
// and floats as map values.
func SumNumbers[K comparable, V Number](m map[K]V) V {
    var s V
    for _, v := range m {
        s += v
    }
    return s
}
10. 错误处理
10.1. 返回 error
Go 中一般通过返回 error 来表示函数出错,调用者需要检查函数的返回错误。
它有两个不足:
1、如果在一个方法内调用其它方法返回 err,一种粗暴的处理方式,直接 return fmt.Errorf("operate failed %v", err) 。这种做法问题是把 err 转换成为另一个“字符串”,原始的 err 被抹掉了。如果想添加额外的错误信息,又不想抹掉原始的 err,可以封装一个 struct,上层通过 err.Err.(type) 的方式来检查,但这样会增加编码的复杂度。
2、无法方便地输出错误信息中的调用链信息,不方便定位错误原因。
10.1.1. Go 1.13 之前(xerrors)
使用第三方库 xerrors 可以解决前面提到的不足。
如果 xerrors.Errorf 的格式字符串(即其第 1 个参数)以 : %s, : %v, : %w 结尾(w 是 wrapper 的缩写,即对错误的封装),则会保存错误发生时的调用链信息。这样,在最上层使用 %+v 输出 error 时,可以输出错误发生时的调用链,方便调试。
下面介绍一下 %w 的使用,它用于包装错误,可以使用 xerrors.Is 测试被包装的错误,使用 xerrors.Unwrap 得到包装前的错误。下面是一些测试实例:
package main

import (
	"fmt"
	"golang.org/x/xerrors"
)

var ErrBase = xerrors.New("a new error")

func test1() {
	err := xerrors.Errorf("raiseError: %w", ErrBase)
	fmt.Println(ErrBase == ErrBase)                       // 输出 true,地址相同
	fmt.Println(err == ErrBase)                           // 输出 false,基于ErrBase包装之后不同
	fmt.Println(xerrors.Is(err, ErrBase))                 // 输出 true,Is方法可以验证err基于ErrBase
	fmt.Println(xerrors.Opaque(err) == err)               // 输出 false,解除关系链之后不为相同地址
	fmt.Println(xerrors.Is(xerrors.Opaque(err), ErrBase)) // 输出 false,解除关系链之后无法确定关系
	fmt.Println(xerrors.Unwrap(err) == ErrBase)           // 输出 true,获取内层错误为原错误,地址相同
}

// 在Wrap多层之后,错误类型也能通过xerrors.Is方法正确识别
func test2() {
	err := xerrors.Errorf("raiseError: %w", ErrBase)
	err2 := xerrors.Errorf("wrap#01: %w", err)
	err3 := xerrors.Errorf("wrap#02: %w", err2)
	fmt.Println(xerrors.Is(err, ErrBase))   // 输出 true
	fmt.Println(xerrors.Is(err3, ErrBase))  // 输出 true ,在Wrap多层之后,也能够正确识别关系
}

// 使用 %+v 会输出错误时,会输出调用链
func test3() {
	err := xerrors.Errorf("raiseError: %w", ErrBase)
	err2 := xerrors.Errorf("wrap#01: %w", err)
	err3 := xerrors.Errorf("wrap#02: %w", err2)
	fmt.Printf("%v\n", err3)   // %v 不会输出调用链
    // 上一行会输出:
    // wrap#02: wrap#01: raiseError: a new error
	fmt.Printf("%+v\n", err3)  // %+v 会输出调用链
    // 上一行会输出:
    // wrap#02:
    //     main.test3
    //         /Users/cig01/go/src/proj1/main.go:33
    //   - wrap#01:
    //     main.test3
    //         /Users/cig01/go/src/proj1/main.go:32
    //   - raiseError:
    //     main.test3
    //         /Users/cig01/go/src/proj1/main.go:31
    //   - a new error:
    //     main.init.ializers
    //         /Users/cig01/go/src/proj1/main.go:8
}

func main() {
	test1()
	test2()
	test3()
}
参考:
https://ethancai.github.io/2017/12/29/Error-Handling-in-Go/
https://www.4async.com/2019/01/go-new-xerrors/
https://crawshaw.io/blog/xerrors
10.1.2. Go 1.13
Go 1.13 增强了内置库 errors ,这样不使用第三方库就可以解决之前提到的 golang 错误处理的第一点不足(原始 err 会被抹掉的问题)。至于第二点不足(无法方便地输出错误信息中的调用链信息),将在 Go 1.14 中解决。
Go 1.13 中, fmt.Errorf 使用 %w 的话,表示包装一个 error,整个错误链可能包装很多个 error,使用新增的方法 errors.Is 或 errors.As 可以对错误链中的错误进行测试。
下面是 %w , errors.Is 和 errors.As 的一个测试程序:
package main

import (
	"errors"
	"fmt"
	"io/ioutil"
	"os"
)

func openSomething() (string, error) {
	b, err := ioutil.ReadFile("non-existing")
	if err != nil {
		return "", fmt.Errorf("ReadFile fail: %w", err)  // Go 1.13之前没有 %w,会抹掉原始的 err
	}

	return string(b), nil
}

func main() {
	if _, err := openSomething(); err != nil {
		// errors.Is 的使用测试
		if errors.Is(err, os.ErrNotExist) { // 类似于 if err == os.ErrNotFound {
			fmt.Println("File not exist")
		} else {
			fmt.Printf("other err %v", err)
		}

		// errors.As 的使用测试
		var pathError *os.PathError
		if errors.As(err, &pathError) { // 类似于 if _, ok := err.(*os.PathError); !ok {
			fmt.Println("Failed at path:", pathError.Path)
		} else {
			fmt.Printf("other err %v", err)
		}
	}
}
10.2. panic & recover
Go 中没有像 C++/Java 中的 try...catch 语句。Go 中可以使用函数 panic 和 recover 来实现类似异常处理的功能。
Built-in panic function cause a run time error. Built-in functioin recover stops the panic and returns the value that was passed to the call to panic.
请看下面例子:
package main
import "fmt"

func main() {
  panic("PANIC, MY GOD")
  str := recover()        # 由于panic会导致main函数马上停止执行,所以recover()并不会执行
  fmt.Println(str)
}
上面程序执行时,panic 还是会生效,recover 并没阻止 panic(因为 recover 根本没有执行)。如:
$ go run main.go
panic: PANIC, MY GOD

goroutine 1 [running]:
main.main()
	/Users/cig01/test/main.go:5 +0x65
exit status 2
可以把前面程序修改为:
package main
import "fmt"

func main() {
  defer func() {
    str := recover()
    fmt.Println(str)
  }()
  panic("PANIC, MY GOD")
}
这样, recover 可以成功地阻止 panic。如:
$ go run main.go
PANIC, MY GOD
需要说明的是, recover 只能捕获“同一个 goroutine 内的 panic”。假如有 2 个 goroutine,你需要避免它们 panic,则你需要在每个 goroutine 中使用 recover 来捕获。
11. 面向对象编程
对于面向对象编程的支持 Go 语言设计得非常简洁。简洁之处在于,Go 语言放弃了传统面向对象编程中的诸多概念,比如继承、虚函数、构造函数和析构函数、隐藏的 this 指针等。
本节内容主要参考:《Go 语言编程(许式伟等编)》
11.1. 类型系统
类型系统是指一个语言的类型体系结构。一个典型的类型系统通常包含如下基本内容:
- 基础类型,如 byte、int、bool、float 等;
- 复合类型,如数组、结构体、指针等;
- 可以指向任意对象的类型(Any 类型);
- 值语义和引用语义;
- 面向对象,即所有具备面向对象特征(比如成员方法)的类型;
- 接口。
类型系统描述的是这些内容在一个语言中如何被关联。
11.1.1. 声明新类型,给类型添加方法
Go 中用 type 可以基于某个类型声明一个新类型(Go 中的 type 相当于 Java 等语言的 class)。
例如, type T1 string 表示声明 T1 是 string 类型。
下面例子声明了一个新类型 Integer,且为类型 Integer 增加了一个新方法 Less()。
type Integer int

func (a Integer) Less(b Integer) bool {   // a Integer称为receiver,其中Integer是receiver type
    return a < b
}
这样,我们在使用 Integer 时,可以像一个普通的类一样使用。如:
// 面向对象的方式
package main
import "fmt"

/* 这里省略了Integer定义等内容 */

func main() {
    var a Integer = 1
    if a.Less(2) {                      // 在a上调用Less
        fmt.Println(a, "Less 2")        // 输出 1 Less 2
    }
}
如果不使用面向对象的方式,而是使用面向过程的方式,则相应的实现细节为:
// 面向过程的方式
package main

import "fmt"

type Integer int

func Integer_Less(a Integer, b Integer) bool {
    return a < b
}
func main() {
    var a Integer = 1
    if Integer_Less(a, 2) {             // 调用形式和面向对象的调用形式不一样
        fmt.Println(a, "Less 2")
    }
}
对比两种形式,可以看出:面向对象只是换了一种语法形式来表达。
C++/Java/C# 等语言都包含有一个隐藏的 this 指针(方法施加的目标)。如用 Java 实现和前面功能类似的代码:
class Integer {
  private int val;
  public boolean Less(Integer b) {  // 可以理解为Less方法有两个参数,但隐藏了第一个参数this
    return this.val< b.val;         // 直接使用this即可,它代表了方法施加的目标(也就是“对象”)
  }
}
如果将上面代码翻译成 C 代码,会更清晰:
struct Integer {
    int val;
};
bool Integer_Less(Integer* this, Integer* b) {
     return this->val < b->val;
}
在 Go 语言中没有隐藏的 this 指针 ,这句话的含义是:
- 方法施加的目标(也就是“对象”)显式传递,没有被隐藏起来;
- 方法施加的目标(也就是“对象”)不需要非得是指针,也不用非得叫 this。
只有在你需要修改对象的时候,才必须用指针。它不是 Go 语言的约束,而是一种自然约束。举个例子:
func (a *Integer) Add(b Integer) {
    *a += b
}
这里为 Integer 类型增加了 Add() 方法。由于 Add() 方法需要修改对象的值,所以需要用指针引用。调用如下:
func main() {
    var a Integer = 1
    a.Add(2)
    fmt.Println("a =", a)     // 输出 a = 3
}
如果你实现成员方法时传入的不是指针而是值(即传入 Integer,而非 *Integer),如下所示:
func (a Integer) Add(b Integer) {
    a += b
}
那么运行程序得到的结果是“a = 1”,也就是维持原来的值。Go 语言和 C 语言一样,类型都是基于值传递的。要想修改变量的值,只能传递指针。
11.1.2. 类型别名
类型别名使用 = 来定义,如下面代码的第二行:
type MyInt1 int       # 基于int创建一个新类型MyInt1,它和int不是同一个类型
type MyInt2 = int     # 创建一个int的类型别名MyInt2,它和int是同一个类型
下面演示了“基于类型创建的新类型”和“类型别名”的不同:
var i int =0
var i2 MyInt2 = i   // 不会出错,因为MyInt2是int的别名(同一个类型)
var i1 MyInt1 = i   // 报错!MyInt1和int是不同类型。Go是强类型语言,类型之间的转换必须强制转换
11.1.3. 实现“枚举”类型
目前 Golang 中,还没有原生地支持“枚举”类型。可以使用下面方式来模拟“枚举”类型,比如定义“方向”:
type Direction int

const (
    North Direction = iota
    East
    South
    West
)

func (d Direction) String() string {
    return [...]string{"North", "East", "South", "West"}[d]
}
11.2. 再看结构体
Go 语言的结构体(struct)和其他语言的类(class)有同等的地位,但 Go 语言放弃了包括继承在内的大量面向对象特性,只保留了组合(composition)这个最基础的特性。
11.2.1. 匿名字段(Anonymous fields)
下面例子中定义了两个类型 Person 和 Employee:
package main
import "fmt"

type Person struct {
    name string
    age  int
    addr string
}

type Employee struct {
    person Person
    salary int
}

func main() {
    var em1 Employee;
    em1.person = Person{"cig01", 10, "Guangming Road"};
    em1.salary = 10000;
    fmt.Println(em1);              // 输出 {{cig01 10 Guangming Road} 10000}
    fmt.Println(em1.person.name);  // 输出 cig01
    fmt.Println(em1.salary);       // 输出 10000
}
从上面例子中可以看到,使用 em1.person.name 可以访问 Employee 的名字。有没有办法可以使用 em1.name 直接访问 Employee 的名字?有,使用匿名字段(Anonymous fields)即可。
在 Go 中,结构体中的匿名字段(Anonymous fields)是指只声明字段的类型,而省略其名字的字段。 匿名字段的实例如下:
package main
import "fmt"

type Person struct {
    name string
    age  int
    addr string
}

type Employee struct {
    Person              // 这是匿名字段(Anonymous fields),只声明字段的类型,而省略其名字
    salary int
}

func main() {
    var em1 Employee = Employee{Person{"cig01", 10, "Guangming Road"}, 10000};
    fmt.Println(em1);              // 输出 {{cig01 10 Guangming Road} 10000}
    fmt.Println(em1.name);         // 输出 cig01
    fmt.Println(em1.salary);       // 输出 10000
}
11.2.1.1. 名字冲突
如果一个类型包含多个匿名字段,这些匿名字段相应类型中有相同名字的域,则会出现“可能的”名字冲突问题。之所以说“可能的”,是因为编译器仅当用户代码中引用冲突的 field 时才会报错,如果用户代码中不引用冲突的 field,则不会报错。
匿名字段导致名字冲突的实例如下:
package main
import "fmt"

type X struct {
    Name string    // 存在名为Name的域
    xxx int
}
type Y struct {
    Name string    // 这里也存在名为Name的域
    yyy int
}

type Z struct {
    X            // 匿名字段
    Y            // 匿名字段
}

func main() {
    var z Z;
    fmt.Println(z.xxx);
    fmt.Println(z.yyy);
    fmt.Println(z.Name);      // 编译器会报错!提示ambiguous selector z.Name
}
上面实例中,如果把“fmt.Println(z.Name);”这一行注释掉,则编译器会忽略掉冲突问题(反正用户代码中没有引用冲突的 field),顺利通过编译。
11.2.1.2. 名字隐藏(类似 C++ 中的 overriding)
考虑下面的例子。组合的类型(Employee)和被组合的类型(Persion)都包含一个名为 addr 的成员,会不会有问题呢?答案是不会有问题。默认被组合的类型中的 addr 会被隐藏(通过 em1.addr 访问不到它),不过通过 Person.addr 的方式可以访问到会被隐藏的 addr。
名字隐藏的例子:
package main
import "fmt"

type Person struct {
    name string
    age  int
    addr string        // 这里有addr
}

type Employee struct {
    Person             // 匿名字段
    salary int
    addr string        // 这里也有addr。会覆盖(overriding)匿名字段Person中的addr
}

func main() {
    var em1 Employee = Employee{Person{"cig01", 10, "Guangming Road"}, 5000, "Chaoyang Road"}
    fmt.Println(em1);                 // 输出 {{cig01 10 Guangming Road} 10000}
    fmt.Println(em1.addr);            // 输出 Chaoyang Road
    fmt.Println(em1.Person.addr);     // 输出 Guangming Road
}
11.3. 可见性
Go 语言对关键字的增加非常吝啬,其中没有 private、protected、public 这样的关键字。 要使某个符号对其他包(package)可见(即可以访问),需要将该符号定义为以大写字母开头 ,如:
type Rect struct {
    X, Y float64
    Width, Height float64
}
这样,Rect 类型的成员变量就全部被导出了,可以被所有其他引用了 Rect 所在包的代码访问到。
成员方法的可访问性遵循同样的规则,例如:
func (r *Rect) area() float64 {
    return r.Width * r.Height
}
这样,Rect 的 area() 方法只能在该类型所在的包内使用。
需要注意的一点是, Go 语言中符号的可访问性是包一级的而不是类型一级的。 在上面的例子中,尽管 area() 是 Rect 的内部方法,但同一个包中的其他类型也都可以访问到它。这样的可访问性控制很粗旷,但是非常实用。如果 Go 语言符号的可访问性是类型一级的,少不了还要加上 friend 这样的关键字,以表示两个类是朋友关系,可以访问彼此的私有成员。
11.4. 接口(Interface)
Go 语言的主要设计者之一罗布·派克(Rob Pike)曾经说过,如果只能选择一个 Go 语言的特性移植到其他语言中,他会选择接口。接口在 Go 语言有着至关重要的地位。
Go 中用接口(Interface)实现多态。 接口是“方法签名”的集合。
假设定义了方法 method_name1/method_name2/method_name3 等等:
/* define a struct */
type struct_name struct {
   /* variables */
}

/* implement interface methods */
func (struct_name_variable struct_name) method_name1() [return_type] {
   /* method implementation */
}

/* other methods definition: method_name2, method_name3  */

func (struct_name_variable struct_name) method_namen() [return_type] {
   /* method implementation */
}
使用下面语法可以把上面的这些“方法签名”定义为一个接口。如果一个类(type)实现了接口要求的所有函数,我们就说这个类(type)实现了该接口。
/* define an interface */
type interface_name interface {
   method_name1 [return_type]
   method_name2 [return_type]
   method_name3 [return_type]
   ...
   method_namen [return_type]
}
11.4.1. 用接口实现多态
下面通过一个例子来演示接口是如何实现多态的。
// _Interfaces_ are named collections of method signatures.

package main

import "fmt"
import "math"

/* 定义接口,其名为geometry,它包含两个方法 */
type geometry interface {
    area() float64                // 计算面积
    perimeter() float64           // 计算周长
}

/* 定义长方形和圆形 */
type rect struct {
    width, height float64
}
type circle struct {
    radius float64
}

/* 实现长方形的接口函数 */
func (r rect) area() float64 {
    return r.width * r.height
}
func (r rect) perimeter() float64 {
    return 2*r.width + 2*r.height
}

/* 实现圆形的接口函数 */
func (c circle) area() float64 {
    return math.Pi * c.radius * c.radius
}
func (c circle) perimeter() float64 {
    return 2 * math.Pi * c.radius
}

// If a variable has an interface type, then we can call
// methods that are in the named interface. Here's a
// generic `measure` function taking advantage of this
// to work on any `geometry`.
func measure(g geometry) {                // 函数measure的参数是接口geometry。如果对象实现了接口geometry,则对象可以作为它的参数。
    fmt.Println(g)
    fmt.Println(g.area())                 // g是rect时,会调用rect相关的area方法;g是circle时,会调用circle相关的area方法。这实现了多态!
    fmt.Println(g.perimeter())
}

func main() {
    r := rect{width: 3, height: 4}
    c := circle{radius: 5}

    measure(r)   // 输出长方形的面积和周长
    measure(c)   // 输出圆形的面积和周长
}
11.4.2. 匿名变量的应用:检查某类型是否实现了某接口
如何检查某类型 T 是否实现了某接口 I 呢?直接把类型 T 数据向某个类型声明为接口 I 的变量进行赋值即可,由于我们并不要真正使用这个变量,所以使用匿名变量 _ 即可,如:
 1: package main
 2:
 3: type I interface {
 4: 	Foo()
 5: 	Bar()
 6: }
 7:
 8: type T struct {
 9: }
10:
11: func (t T) Foo() {
12: 	println("Foo called")
13: }
14:
15: //func (t T) Bar() {
16: //	println("Bar called")
17: //}
18:
19: var _ I = T{}           // 把 T{} 赋值给声明类型为 I 的匿名变量,编译器会检查类型 T 是否实现了接口 I 定义的所有方法
20:
21: func main() {
22: }
上面代码中,由于类型 T 没有实现接口 I 中的 Bar() 方法(只实现了 Foo() 方法),编译器会报下面错误:
./main.go:19:5: cannot use T{} (type T) as type I in assignment:
        T does not implement I (missing Bar method)
如果为类型 T 实现 Bar() 方法(比如把代码中第 15-17 行的注释打开),则可以顺利通过编译。使用这种方法来检测类型 T 是否实现了某接口 I 是比较常见的,比如在 https://golang.org/src/database/sql/driver/types.go#L59 中就有这种用法。
其实,除了这种方法外,还有两种方法可以检测类型 T 是否实现了某接口 I ,下面例子中演示了这三种方法:
package main

type shape interface {
	getNumSides() int
	getArea() int
}

type square struct {
	len int
}

func (s square) getNumSides() int {
	return 4
}

func (s square) getArea() int {
	return s.len * 2
}

func main() {
	// 方法 1。验证 square 是否实现了接口 shape
	var _ shape = square{}

	// 方法 2。验证 *square 是否实现了接口 shape
	var _ shape = &square{}

	// 方法 3。验证 *square 是否实现了接口 shape
	var _ shape = (*square)(nil) // 把 nil 转换为 *square,并赋值给 shape 接口类型的匿名变量
}
参考:https://golangbyexample.com/go-check-if-type-implements-interface/
11.4.3. 非侵入式接口
Go 语言的接口和其他语言(C++、Java、C# 等)中的接口有明显的不同。
在 Go 语言出现之前,接口主要作为不同组件之间的契约存在。对契约的实现是强制的,你必须声明你的确实现了该接口。为了实现一个接口,你需要从该接口继承:
interface IFoo {
    void Bar();
}
class Foo implements IFoo {  // Java文法
    // ...
}
class Foo : public IFoo {    // C++文法
    // ...
}

IFoo* foo = new Foo;
即使另外有一个接口 IFoo2 实现了与 IFoo 完全一样的接口方法甚至名字也叫 IFoo 只不过位于不同的名字空间下,编译器也会认为上面的类 Foo 只实现了 IFoo 而没有实现 IFoo2 接口。 这类接口我们称为侵入式接口。“侵入式”的主要表现在于实现类需要明确声明自己实现了某个接口。
在 Go 语言中,一个类(type)只需要实现了接口要求的所有函数,我们就说这个类(type)实现了该接口,而不用显式地声明某个类(type)实现了某某接口。Go 中的接口可称为非侵入式接口。
11.4.4. 接口赋值
11.4.4.1. 对象实例赋值给接口
在 Go 语言中,一个类只需要实现了接口要求的所有函数,我们就说这个类实现了该接口。如:
type File struct {
    // ...
}
func (f *File) Read(buf []byte) (n int, err error)
func (f *File) Write(buf []byte) (n int, err error)
func (f *File) Seek(off int64, whence int) (pos int64, err error)
func (f *File) Close() error
假设我们有下面接口:
type IFile interface {
    Read(buf []byte) (n int, err error)
    Write(buf []byte) (n int, err error)
    Seek(off int64, whence int) (pos int64, err error)
    Close() error
}

type IReader interface {
    Read(buf []byte) (n int, err error)
}
显然,File 类实现了接口 IFile 和 IReader,可以把 File 类实例赋值给接口 IFile 和 IReader:
var file1 IFile = new(File)
var file2 IReader = new(File)
下面考虑一个复杂些的例子:
type Integer int
func (a Integer) Less(b Integer) bool {
    return a < b
}
func (a *Integer) Add(b Integer) {
    *a += b
}

type LessAdder interface {
    Less(b Integer) bool
    Add(b Integer)
}

var a Integer = 1
var b1 LessAdder = &a   // (1)
var b2 LessAdder = a    // (2)
上面例子中对象实例赋值给一个接口时,应该采用语句(1),还是语句(2)呢?答案是语句(1)。原因在于,Go 语言可以根据下面的函数:
func (a Integer) Less(b Integer) bool
自动生成一个新的 Less()方法:
// 自动生成的方法
func (a *Integer) Less(b Integer) bool {
    return (*a).Less(b)
}
这样,类型*Integer 就既存在 Less() 方法,也存在 Add() 方法,满足 LessAdder 接口,所以可以使用语句(1)赋值。而从另一方面来说,根据
func (a *Integer) Add(b Integer)
这个方法无法自动生成以下这个方法:
func (a Integer) Add(b Integer) {
    (&a).Add(b)
}
因为(&a).Add() 改变的只是函数参数 a,对外部实际要操作的对象并无影响,这不符合用户的预期。所以,Go 语言不会自动为其生成该函数。因此,类型 Integer 只存在 Less() 方法, 缺少 Add() 方法,不满足 LessAdder 接口,故此上面的语句(2)不能赋值。
为了进一步证明以上的推理,我们把 LessAdder 中的 Add() 方法注释掉,即为如下:
type LessAdder interface {
    Less(b Integer) bool
    //Add(b Integer)
}
可以验证,此时语句(1)和语句(2)都是合法的。
11.4.4.2. 将一个接口赋值给另一个接口
接口赋值并不要求两个接口必须等价。如果接口 A 的方法列表是接口 B 的方法列表的子集,那么接口 B 可以赋值给接口 A。
11.4.5. 接口组合
Go 语言支持接口组合。Go 语言包中有 io.Reader 接口和 io.Writer 接口,同样来自于 io 包的另一个接口 io.ReadWriter,它是 io.Reader 接口和 io.Writer 接口的组合:
// ReadWriter接口将基本的Read和Write方法组合起来
type ReadWriter interface {
    Reader
    Writer
}
它完全等同于如下写法:
type ReadWriter interface {
    Read(p []byte) (n int, err error)
    Write(p []byte) (n int, err error)
}
11.4.6. 空接口 interface{}
当函数可以接受任意的对象实例时,我们会将其声明为空接口 interface{} ,最典型的例子是标准库 fmt 中 PrintXXX 系列的函数 ,例如:
func Printf(fmt string, args ...interface{})
func Println(args ...interface{})
......
可以认为,Go 中的空接口 interface{} 和 Java 中的 java.lang.Object 类似。
注:从 Go 1.18 开始可以使用别名 any 来代替 interface{} ,代码可读性更好。
12. 并发编程
Go 语言引入了 goroutine 概念,它使得并发编程变得非常简单。通过使用 goroutine 而不是直接用操作系统的并发机制,以及使用消息传递来共享内存而不是使用共享内存来通信,Go 语言让并发编程变得更加轻盈和安全。
goroutine 是一种比线程更加轻盈、更省资源的协程。Go 语言通过系统的线程来多路派遣这些 goroutine 的执行。当一个协程阻塞的时候,调度器就会自动把其他协程安排到另外的线程中去执行,从而实现了程序无等待并行化运行。而且调度的开销非常小,一颗 CPU 调度的规模不下于每秒百万次,这使得我们能够创建大量的 goroutine,从而可以很轻松地编写高并发程序,达到我们想要的目的。
本节内容主要参考:《Go 语言编程(许式伟等编)》第 1.2.7 节、第 4 章
12.1. 并发基础
并发主要有下面几种实现模型:
- 多进程
- 多进程是在操作系统层面进行并发的基本模式。同时也是开销最大的模式。
- 多线程
- 多线程在大部分操作系统上都属于系统层面的并发模式,也是我们使用最多的最有效的一种模式。它比多进程的开销小很多,但是其开销依旧比较大,且在高并发模式下,效率会有影响。
- 基于回调的非阻塞/异步 I/O
- 这种架构的诞生实际上来源于多线程模式的危机。在很多高并发服务器开发实践中,使用多线程模式会很快耗尽服务器的内存和 CPU 资源。而这种模式通过事件驱动的方式使用异步 I/O,使服务器持续运转,且尽可能地少用线程,降低开销,它目前在 Node.js 中得到了很好的实践。但是使用这种模式,编程比多线程要复杂,因为它把流程做了分割,对于问题本身的反应不够自然。
- 协程(轻量级线程)
- 协程(Coroutine)本质上是一种用户态线程,不需要操作系统来进行抢占式调度,且在真正的实现中寄存于线程中,因此,系统开销极小,可以有效提高线程的任务并发性,而避免多线程的缺点。不过,目前,原生支持协程的语言还很少。Go 语言中的 goroutine 是一种协程。
12.1.1. 并发执行体之间的通信
执行体是个抽象的概念,在操作系统层面有多个概念与之对应,比如进程(process)、进程内的线程(thread)以及进程内的协程(coroutine)。
在工程上,有两种最常见的并发通信模型:“共享数据”和“消息”。
12.1.1.1. 共享数据
共享数据是指多个并发单元分别保持对同一个数据的引用,实现对该数据的共享。被共享的数据可能有多种形式,比如内存数据块、磁盘文件等等。在实际工程应用中最常见的无疑是内存了,也就是常说的“共享内存”。
读写“共享内存”时往往需要加锁,这使得程序变得复杂。想象一下,在一个大的系统中具有无数的锁、无数的共享变量、无数的业务逻辑与错误处理分支,那将是一场噩梦。这噩梦就是众多 C/C++ 开发者正在经历的,其实 Java 和 C#开发者也好不到哪里去。
Go 中提供了“锁”(如 sync.Mutex 和 sync.RWMutex 等)等机制来保障共享数据的读写正确。不过, Go 语言中并不倡导通过共享数据来进行通信。Go 语言中倡导使用消息机制来通信。Go 语言共享数据理念:“不要通过共享内存来通信,而应该通过通信来共享内存。”
12.1.1.2. 消息机制
消息机制认为每个并发单元是自包含的、独立的个体,并且都有自己的变量,但在不同并发单元间这些变量不共享。每个并发单元的输入和输出只有一种,那就是消息。不同并发单元间靠消息来通信,它们不会共享内存。
Go 语言提供的消息通信机制被称为 channel。
12.2. Goroutines (go)
A goroutine is a function that is capable of running concurrently with other functions. To create a goroutine we use the keyword go followed by a function invocation.
package main

import "fmt"

func f(n int) {
  for i := 0; i < 10; i++ {
    fmt.Println(n, ":", i)
  }
}

func main() {
  go f(0)
  go f(1)

  var input string
  fmt.Scanln(&input)      // 等待用户输入(防止main过早退出)
}
上面代码的输出不会每次一样。代码中有三个 Goroutines,一个是 go f(0),另一个是 go f(1),还是一个隐含的 main。
12.3. Channels (chan)
channel 是 Go 在语言级别提供的 goroutine 间的通信方式。我们可以使用 channel 在两个或多个 goroutine 之间传递消息。
channel 是类型相关的。也就是说,一个 channel 只能传递一种类型的值,这个类型需要在声明 channel 时指定。
12.3.1. 基本语法
一般 channel 的声明形式为:
var chanName chan ElementType
与一般的变量声明不同的地方仅仅是在类型之前加了 chan 关键字。ElementType 指定这个 channel 所能传递的元素类型。如,下面声明一个传递类型为 int 的 channel:
var ch chan int // 声明一个传递类型为int的channel
定义一个 channel 很简单,直接使用内置的函数 make() 即可。如:
ch := make(chan int) // 声明并初始化了一个int型的名为ch的channel(不带缓冲的channel)
这就声明并初始化了一个 int 型的名为 ch 的 channel。这是不带缓冲的 channel,后文会介绍如何创建带缓冲的 channel。
12.3.1.1. 写入和读取通道
在 channel 的用法中,最常见的包括“写入”和“读取”。将一个数据写入(发送)至 channel 的语法很直观,如下:
ch <- value // 将一个数据 value “写入”到名为 ch 的 channel 中
对于不带缓冲的 channel,向 channel 写入数据会导致程序阻塞(不管 channel 是否为空),直到有其他 goroutine 从这个 channel 中读取数据。
从 channel 中读取数据的语法是:
var value = <-ch        // 从名为 ch 的 channel 中“读取”数据,保存到变量 value 中
                        // 如果 ch 中没数据,会导致程序阻塞
                        // 如果 ch 中没数据,且被关闭,则程序不会阻塞,value 为 ch 类型所对应的零值
如果 channel ch 中有数据就读出来保存到 value 中, 如果 channel 为空,那么从 channel 中读取数据会导致程序阻塞,直到 channel 中被写入数据或者 channel 被 close 为止。
12.3.2. select 语句
早在 Unix 时代,select 机制就已经被引入。通过调用 select() 函数来监控一系列的文件句柄,一旦其中一个文件句柄发生了 I/O 动作,该 select() 调用就会被返回。
Go 语言直接在语言级别支持 select 关键字,用于处理异步 I/O 问题。
select 的用法与 switch 语句非常类似,由 select 开始一个新的选择块,每个选择条件由 case 语句来描述。
不过, 在 select 中,每个 case 语句里必须是一个 I/O 操作。 其大致的结构如下:
select {
    case <-chan1:         // case d := <- chan1  这样可以把读取的数据保存在 d 中
    // 如果chan1成功读到数据,或者chan1被关闭,则进行该case处理语句
    case chan2 <- 1:
    // 如果成功向chan2写入数据,则进行该case处理语句
    default:
    // 如果上面都没有成功,则进入default处理流程。当省略default时,如果上面都没有成功,则select会阻塞
}
可以看出,select 语句后面不接表达式(这和 switch 语句不同,switch 语句后面可接也可不接表达式),而是直接去查看 case 语句。每个 case 语句都必须是一个面向 channel 的操作。上面的例子中,第一个 case 试图从 chan1 读取一个数据并直接忽略读到的数据,而第二个 case 则是试图向 chan2 中写入一个整型数 1,如果这两者都没有成功,则到达 default 语句。
12.3.2.1. sleep 永远:select {}
下面语句会导致当前 goroutine 永远 sleep:
select {}
它往往用于多 goroutine 程序的 main 函数 return 前,这样 main 函数就永远不会 return 。从而,其它 goroutine 不会由于 main 结束(程序退出)而得不到执行。
12.3.3. 缓冲机制
之前我们示范创建的都是不带缓冲的 channel,这种做法对于传递单个数据的场景可以接受。但对于需要持续传输大量数据的场景就有些不合适了。接下来我们介绍如何给 channel 带上缓冲,从而达到消息队列的效果。
要创建一个带缓冲的 channel,在调用 make() 时将缓冲区大小作为第二个参数传入即可。如:
c := make(chan int, 1024) // 创建带缓冲的channel
上面这个例子就创建了一个大小为 1024 的 int 类型 channel,即使没有读取方,写入方也可以一直往 channel 里写入,在缓冲区被填完之前都不会阻塞。注:这和不带缓冲的 channel 是不同的,往不带缓冲的 channel 中写入数据都会阻塞(不管 channel 是否为空),直到其他 goroutine 从这个 channel 中读取数据。
c1 := make(chan int, 1)   // 带缓冲的channel,缓冲大小为1。channel为空时写操作不会阻塞
c2 := make(chan int)      // 不带缓冲的channel,和上行不同!不管channel是否为空写操作会阻塞!
c3 := make(chan int, 0)   // 不带缓冲的channel,和上行相同。
12.3.3.1. 建议:Channel 的 size 要么是 1,要么是无缓冲的
Uber 出品的“Go 风格指南”中提到: Channel 的 size 要么是 1,要么是 0(无缓冲的),不建议使用其它 size 的 Channel。
Channels should usually have a size of one or be unbuffered. By default, channels are unbuffered and have a size of zero. Any other size must be subject to a high level of scrutiny. Consider how the size is determined, what prevents the channel from filling up under load and blocking writers, and what happens when this occurs.
参考:https://github.com/uber-go/guide/blob/master/style.md#channel-size-is-one-or-none
12.3.4. 超时机制
在并发编程的通信过程中,往往需要处理超时问题,即向 channel 写数据时发现 channel 已满,或者从 channel 试图读取数据时发现 channel 为空。如果不正确处理这些情况,很可能会导致整个 goroutine 锁死。
Go 语言没有提供直接的超时处理机制,但我们可以利用 select 机制。虽然 select 机制不是专为超时而设计的,却能很方便地解决超时问题。因为 select 的特点是只要其中一个 case 已经完成,程序就会继续往下执行,而不会考虑其他 case 的情况。
基于 select 此特性,我们来为 channel 实现超时机制:
// 首先,我们实现并执行一个匿名的超时等待函数
timeout := make(chan bool, 1)
go func() {
    time.Sleep(1 * time.Second) // 等待1秒钟
    timeout <- true
}()

// 然后我们把timeout这个channel利用起来
select {
    case <-ch:
    // 从ch中读取到数据
    case <-timeout:
    // 一直没有从ch中读取到数据,但从timeout中读取到了数据
}
这样使用 select 机制可以避免永久等待的问题,因为程序会在 timeout 中获取到一个数据后继续执行,无论对 ch 的读取是否还处于等待状态,从而达成 1 秒超时的效果。
使用 time.After 可以方便地得到类似上面例子中的 timeout channel,如:
package main

import (
	"fmt"
	"io/ioutil"
	"log"
	"net/http"
	"time"
)

func main() {
	response := make(chan *http.Response, 1)
	errors := make(chan *error)

	go func() {
		resp, err := http.Get("http://localhost:8000/")
		if err != nil {
			errors <- &err
		}
		response <- resp
	}()

	select {
	case r := <-response:
		defer r.Body.Close()
		body, _ := ioutil.ReadAll(r.Body)
		fmt.Printf("%s", body)
		return
	case err := <-errors:
		log.Fatal(*err)
	case <-time.After(200 * time.Millisecond):
		fmt.Printf("Timed out!")
		return
	}
}
12.3.5. 单向 channel
顾名思义,单向 channel 只能用于发送或者接收数据。不过,channel 本身必然是同时支持读写的,否则根本没法用。假如一个 channel 真的只能读,那么肯定只会是空的,因为你没机会往里面写数据。同理,如果一个 channel 只允许写,即使写进去了,也没有丝毫意义,因为没有机会读取里面的数据。 所谓的单向 channel 概念,其实只是对 channel 的一种使用限制。
将一个 channel 变量传递到一个函数时,可以通过将其指定为单向 channel 变量,从而限制该函数中可以对此 channel 的操作,比如只能往这个 channel 写,或者只能从这个 channel 读。
单向 channel 的好处在于:使代码遵循“最小权限原则”,避免没必要地使用泛滥问题,进而导致程序失控。写过 C++ 程序的读者肯定就会联想起 const 指针的用法。
单向 channel 变量的声明非常简单,如下:
var ch1 chan int        // ch1是一个正常的channel,不是单向的
var ch2 chan<- float64  // ch2是单向channel,只用于写float64数据
var ch3 <-chan int      // ch3是单向channel,只用于读取int数据
那么单向 channel 如何初始化呢?方式是对双向 channel 进行类型转换。如:
ch4 := make(chan int)
ch5 := <-chan int(ch4)    // ch5就是一个单向的读取channel
ch6 := chan<- int(ch4)    // ch6就是一个单向的写入channel
12.3.6. 关闭 channel
关闭 channel 非常简单,直接使用 Go 语言内置的 close() 函数即可:
close(ch)
如何判断一个 channel 是否已经被关闭?我们可以在读取的时候使用多重返回值的方式:
x, ok := <-ch
这个用法与 map 中的按键获取 value 的过程比较类似,只需要看第二个 bool 返回值即可,如果返回值是 false 则表示 ch 已经被关闭。
注 1:“Only the sender should close a channel, never the receiver. Sending on a closed channel will cause a panic.”
注 2:“It's OK to leave a Go channel open forever and never close it. When the channel is no longer used, it will be garbage collected.” 那什么时候需要关闭 channel 呢?参见节 12.3.7 。
12.3.7. range over channel
The loop for i := range ch receives values from the channel repeatedly until it is closed.
下面是 for ... range 操作 channel 的例子:
package main

import "fmt"

func main() {

    queue := make(chan string, 2)
    queue <- "one"
    queue <- "two"
    close(queue)

    // This `range` iterates over each element as it's
    // received from `queue`. Because we `close`d the
    // channel above, the iteration terminates after
    // receiving the 2 elements.
    for elem := range queue {
        fmt.Println(elem)
    }
}
下面是 for ... range 操作 channel 的另一个例子:
package main

import "fmt"

func fibonacci(n int, c chan int) {
    x, y := 0, 1
    for i := 0; i < n; i++ {
        c <- x
        x, y = y, x+y
    }
    close(c)   // 会使 main 中的 for i := range c 结束
}

func main() {
    c := make(chan int, 10)
    go fibonacci(cap(c), c)
    for i := range c {
        fmt.Println(i)
    }
}
注:如果上面函数 fibonacci 中没有 close(c) ,则函数 main 中的“for i := range c”不会结束,执行程序会提示下面错误:
$ go run 1.go
0
1
1
2
3
5
8
13
21
34
fatal error: all goroutines are asleep - deadlock!

goroutine 1 [chan receive]:
main.main()
        /Users/cig01/test/1.go:17 +0x97
exit status 2
12.3.8. 实例:用 channel 实现 goroutine 同步
我们知道,语法 <-chanName 会一直阻塞当前 goroutine 直到通道 chanName 中有数据,或者 chanName 被关闭。利用这点可以实现 goroutine 同步,代码如下:
// We can use channels to synchronize execution
// across goroutines. Here's an example of using a
// blocking receive to wait for a goroutine to finish.

package main

import "fmt"
import "time"

// This is the function we'll run in a goroutine. The
// `done` channel will be used to notify another
// goroutine that this function's work is done.
func worker(done chan bool) {
    fmt.Print("working...")
    time.Sleep(time.Second)
    fmt.Println("done")

    // Send a value to notify that we're done.
    done <- true
}

func main() {

    // Start a worker goroutine, giving it the channel to
    // notify on.
    done := make(chan bool, 1)
    go worker(done)

    // Block until we receive a notification from the
    // worker on the channel.
    <-done
}
12.4. worker pool(线程池)
worker pool(或者称为“线程池”)是一种常见的并发设计模式,如图 1(摘自:https://brandur.org/go-worker-pool )所示。

Figure 1: worker pool
下面是 Golang 中使用 goroutine 和 channel 实现 worker pool 的例子:
// From https://gobyexample.com/worker-pools
//
// In this example we'll look at how to implement
// a _worker pool_ using goroutines and channels.

package main

import "fmt"
import "time"

// Here's the worker, of which we'll run several
// concurrent instances. These workers will receive
// work on the `jobs` channel and send the corresponding
// results on `results`. We'll sleep a second per job to
// simulate an expensive task.
func worker(id int, jobs <-chan int, results chan<- int) {
    for j := range jobs {
        fmt.Println("worker", id, "started  job", j)
        time.Sleep(1 * time.Second)
        fmt.Println("worker", id, "finished job", j, "result is", j * 2)
        results <- j * 2
    }
}

func main() {

    // In order to use our pool of workers we need to send
    // them work and collect their results. We make 2
    // channels for this.
    jobs := make(chan int, 100)
    results := make(chan int, 100)

    // This starts up 3 workers, initially blocked
    // because there are no jobs yet.
    for w := 1; w <= 3; w++ {
        go worker(w, jobs, results)
    }

    // Here we send 5 `jobs` and then `close` that
    // channel to indicate that's all the work we have.
    for j := 1; j <= 5; j++ {
        jobs <- j
    }
    close(jobs)

    // Finally we collect all the results of the work.
    finalResult := 0
    for a := 1; a <= 5; a++ {
        finalResult += <-results
    }
    fmt.Println("finalResult is", finalResult)
}
运行上面程序,输出:
worker 3 started  job 1
worker 1 started  job 2
worker 2 started  job 3
worker 1 finished job 2 result is 4
worker 1 started  job 4
worker 3 finished job 1 result is 2
worker 3 started  job 5
worker 2 finished job 3 result is 6
worker 3 finished job 5 result is 10
worker 1 finished job 4 result is 8
finalResult is 30
上面例子中,假设 worker 是不会出错的(出错也没有地方返回错误)。如果我们要处理 worker 出错的情况,可以再增加一个 channel,用于收集错误,详情可参考:https://brandur.org/go-worker-pool
13. 反射
什么是反射?
In computer science, reflection is the ability of a computer program to examine and modify its own structure and behavior (specifically the values, meta-data, properties and functions) at runtime.
摘自:https://en.wikipedia.org/wiki/Reflection_(computer_programming)
需要说明的是,反射是一个复杂的内省技术,不应该随意使用。
13.1. 为什么需要反射
有时候我们需要编写一个函数能够处理一类并不满足普通公共接口的类型的值,也可能是因为它们并没有确定的表示方式,或者是在我们设计该函数的时候这些类型可能还不存在。这时,函数的参数就只能定义为 interface{} 类型(任意类型)了。
一个大家熟悉的例子是 fmt.Fprintf 函数提供的字符串格式化处理逻辑,它可以用来对任意类型的值格式化并打印,甚至支持用户自定义的类型。
Golang 中使用反射最常见的用途是“在运行时分析 interface{} 对象的信息”。
13.2. 每个 interface 对象都有两个信息(“类型信息”和“值信息”)
A variable of interface type stores a pair: (1) the concrete value assigned to the variable, (2) and that value's type descriptor.
使用 reflect 包中的 reflect.TypeOf() 和 reflect.ValueOf() 方法可以分别获取接口变量的“类型信息”和“值信息”。 下面是 reflect.TypeOf() 和 reflect.ValueOf() 的使用实例:
package main

import (
	"fmt"
	"reflect"
)

func fun1(v interface{}) {
	fmt.Printf("type of v: %v\n", reflect.TypeOf(v))
	fmt.Printf("value of v: %v\n", reflect.ValueOf(v))
}

func main() {
	type MyInt int
	var v1 MyInt = 2

	fun1(1)
	fun1(v1)
	fun1("abc")
	fun1(func(){})
}
上面程序将输出:
type of v: int
value of v: 1
type of v: main.MyInt
value of v: 2
type of v: string
value of v: abc
type of v: func()
value of v: 0x10909e0
13.3. 无限的 type,有限的 kind
上节中,我们知道使用 reflect.TypeOf() 方法可以得到接口类型对象的类型信息,不过这个类型信息是具体类型信息(如 main.MyInt),它可能有无限多种。如果我们想实现类似 fmt.Fprintf 函数(其参数是接口类型)的功能,我们需要对不同的类型进行不同的输出处理,如果有办法把无限“所有类型”都统一为有限的几个种类(Kind)就方便多了(比如上面例子中 main.MyInt 和 int 可以归为一类)。
Golang 反射包中的下面方法可以得到接口的 Kind:
reflect.TypeOf(obj1).Kind()   # 返回obj1的Kind
reflect.ValueOf(obj1).Kind()  # 同上
目前,Golang 中一共有 26 个(有限的)有效 Kind:
// 摘自go源码
type Kind uint

const (
	Invalid Kind = iota
	Bool
	Int
	Int8
	Int16
	Int32
	Int64
	Uint
	Uint8
	Uint16
	Uint32
	Uint64
	Uintptr
	Float32
	Float64
	Complex64
	Complex128
	Array
	Chan
	Func
	Interface
	Map
	Ptr
	Slice
	String
	Struct
	UnsafePointer
)
下面是 reflect.ValueOf(obj1).Kind() 的使用实例:
package main

import (
	"fmt"
	"reflect"
)

func fun1(v interface{}) {
	switch v := reflect.ValueOf(v); v.Kind() {
	case reflect.String:
		fmt.Printf("find string %s\n", v.String())
	case reflect.Int, reflect.Int8, reflect.Int16, reflect.Int32, reflect.Int64:
		fmt.Printf("find int %d\n", v.Int())
	case reflect.Func:
		fmt.Printf("find func %v\n", v)
	default:
		fmt.Printf("unhandled kind %s\n", v.Kind())
	}
}

func main() {

	type MyInt int
	var v1 MyInt = 2

	fun1(1)
	fun1(v1)
	fun1("abc")
	fun1(func(){})
}
输出:
find int 1
find int 2
find string abc
find func 0x10903a0
可见,有了 Kind() 后,我们可以方便地处理“所有类型”了。
13.4. 实例:用反射分析结构体
前面介绍了使用返回分析 int、函数等类型。下面介绍用反射分析结构体:
package main

import (
	"reflect"
)

func fun1(v interface{}) {        // 它的参数类型是 interface{}
	field1 := reflect.Indirect(reflect.ValueOf(v)).FieldByName("A")
	if field1.IsValid() {
		println(field1.String())
	} else {
		println("field A not exist")
	}

	field2 := reflect.Indirect(reflect.ValueOf(v)).FieldByName("B")
	if field2.IsValid() {
		println(field2.Int())
	} else {
		println("field B not exist")
	}

	field3 := reflect.Indirect(reflect.ValueOf(v)).FieldByName("C")
	if field3.IsValid() {
		println(field3.String())
	} else {
		println("field C not exist")
	}
}

func main() {
	type S struct {
		A string
		B int
	}

	var s = S {
		A: "hello world",
		B: 100,
	}

	fun1(s)     // 结构体 s 传给了参数类型为 interface{} 的函数
}
运行上面程序会输出:
hello world
100
field C not exist
14. 其它主题
14.1. import 语句
假设你有包 lib/math,其中导出了函数 Sin。在不同的 import 方式下,使用函数 Sin 时的方式也不一样。如:
Import declaration          Local name of Sin

import   "lib/math"         math.Sin
import m "lib/math"         m.Sin
import . "lib/math"         Sin
14.1.1. 仅执行包的 init 函数
有时,我们会看到下面的代码:
import _ "pkg1"
它表示 仅执行该包的 init 函数, 而不显式地使用这个它。由于程序中没有显式地使用 pkg1,所以不能去掉 _ ,否则会报“imported and not used pkg1”。
关于 import _ 的常见例子是:
import _ "net/http/pprof"
因为使用包 pprof 时,我们并不需要显式执行包中的函数,仅需要注册一下即可(包 pprof 中的 init 函数就是完成这个注册任务的)。
14.2. Type assertions
要对变量 x 的类型进行测试断言,可以使用“Type assertions”语法,如:
t := x.(T)
如果变量 x 确实是类型 T ,则 x 会赋值给 t ;如果变量 x 不是类型 T ,则会引发 panic。
下面形式的“Type assertions”不会引发 panic。当变量 x 确实是类型 T 时,变量 ok 会是 true ,否则变量 ok 为 false 。
t, ok := x.(T)
使用“Type assertions”可以检测某变量是否满足接口。假设有接口 net.Error :
package net

type Error interface {
    error
    Timeout() bool   // Is the error a timeout?
    Temporary() bool // Is the error temporary?
}
可以这样来测试某变量 err 是否满足接口 net.Error:
if nerr, ok := err.(net.Error); ok && nerr.Temporary() {   // 测试变量 err 是否满足接口 net.Error
    time.Sleep(1e9)
    continue
}
if err != nil {
    log.Fatal(err)
}
14.3. Type switches
“Type switches”的语法如下所示,它和普通的 switch 语句(参见节 4.3 )类似。
package main

import "fmt"

func do(i interface{}) {
	switch v := i.(type) {     // This is 'Type switch'
	case int:
		fmt.Printf("Twice %v is %v\n", v, v*2)
	case string:
		fmt.Printf("%q is %v bytes long\n", v, len(v))
	default:
		fmt.Printf("I don't know about type %T!\n", v)
	}
}

func main() {
	do(21)
	do("hello")
	do(true)
}
运行上面程序,会得到下面结果:
Twice 21 is 42
"hello" is 5 bytes long
I don't know about type bool!
14.4. 单元测试
使用 go test 命令可以执行测试代码,我们需要遵守一些规则来编写测试代码:
1、如果源码文件名为 file1.go,则对应的测试代码文件名就是同目录下的 file1_test.go。
2、测试函数的名称以 Test 开头,接受 *testing.T 参数,且没有返回值。
14.4.1. 编写单元测试实例
假设项目中有下面源文件(文件名为 util/math.go):
package util

func AddInt(a, b int) int {
	return a + b
}

func SubInt(a, b int) int {
	return a - b
}
则,我们可以编写下面的测试代码(文件名为 util/math_test.go):
package util

import "testing"

func TestAddInt(t *testing.T) {
	if AddInt(1, 2) != 3 {
		t.Errorf("test fail")
	}
}

func TestSubInt(t *testing.T) {
	testCases := []struct {
		a    int
		b    int
		want int
	}{
		{1, 1, 0},
		{1, 2, -1},
		{1, 3, -2},
	}

	for _, tc := range testCases {
		got := SubInt(tc.a, tc.b)
		want := tc.want
		if got != want {
			t.Errorf("addInt(%d, %d) got %d, want %d\n", tc.a, tc.b, got, want)
		}
	}
}
执行 go test packagename 可以运行测试用例。如:
cig01@MacBook-Pro ~/go/src/proj1$ go test proj1/util
ok  	proj1/util	0.006s
cig01@MacBook-Pro ~/go/src/proj1$ go test -v proj1/util
=== RUN   TestAddInt
--- PASS: TestAddInt (0.00s)
=== RUN   TestSubInt
--- PASS: TestSubInt (0.00s)
PASS
ok  	proj1/util	0.006s
如果想得到 coverage 数据,则可以增加 -cover 选项。如:
cig01@MacBook-Pro ~/go/src/proj1$ go test -cover -v proj1/util
=== RUN   TestAddInt
--- PASS: TestAddInt (0.00s)
=== RUN   TestSubInt
--- PASS: TestSubInt (0.00s)
PASS
coverage: 100.0% of statements
ok  	proj1/util	0.006s	coverage: 100.0% of statements
如果只想运行某个测试函数,则可以通过 -run regexp 来过滤。比如,执行下面命令仅会运行测试 TestAddInt:
cig01@MacBook-Pro ~/go/src/proj1$ go test -v -run '^TestAddInt$' proj1/util
=== RUN   TestAddInt
--- PASS: TestAddInt (0.00s)
PASS
ok  	proj1/util	0.006s
14.4.2. TestMain(可实现初始化和清理工作)
如果想在运行测试用例前执行一个初始化工作,或者运行测试用例后执行一些清理工作,可以使用 TestMain,如:
package packagename

import (
    "testing"
    "os"
)

func TestMain(m *testing.M) {
    log.Println("Do stuff BEFORE the tests!")

    // run test cases
    exitVal := m.Run()

    log.Println("Do stuff AFTER the tests!")

    os.Exit(exitVal)
}

func TestA(t *testing.T) {
    log.Println("TestA running")
}

func TestB(t *testing.T) {
    log.Println("TestB running")
}
14.5. 基准测试
基准测试是一种测试代码性能的方法。想要测试解决同一问题的不同方案的性能,基准测试就会很有用。
和单元测试文件一样,基准测试的文件名也必须以 _test.go 结尾。测试函数的名称以 Benchmark 开头,它接受的参数类型为 *testing.B ,没有返回值。
14.5.1. 编写基准测试实例
把整数转为字符串有下面几种方式:
fmt.Sprintf("%d", number)
strconv.FormatInt(number, 10)
strconv.Itoa(number)
下面通过基准测试找出最快的一种方法。
首先编写 Sprintf 的基准测试函数,如下:
package util

import (
	"fmt"
	"testing"
)

func BenchmarkSprintf(b *testing.B) {   // 函数名以Benchmark开头,参数类型为*testing.B
	number := 10

	b.ResetTimer()  // 重置计时器,保证测试代码执行前的初始化代码,不会干扰计时器的结果
                    // 初始化代码仅有number := 10,基本不会影响结果,但测试前重置计时器是好习惯

	for i := 0; i < b.N; i++ {  // 为了让基准测试能准确测试性能,要在一段时间内反复运行Sprintf
		fmt.Sprintf("%d", number)
	}
}
一定要将所有要进行基准测试的代码都放到循环里,并且用 b.N 控制循环的次数。当测试框架认为执行足够多次时,自己会停止(一般可能就 1 钞多钟)。
通过 go test -bench=BenchmarkSprintf 可以执行基准测试代码,默认也会执行单元测试代码,通过指定 -run="none" 可以达到不执行单元测试的效果(因为你一般不会有名为 none 的单元测试函数)。如:
cig01@MacBook-Pro ~/go/src/proj1$ go test -v -run="none" -bench="BenchmarkSprintf" proj1/util
goos: darwin
goarch: amd64
pkg: proj1/util
BenchmarkSprintf-8   	20000000	        99.4 ns/op
PASS
ok  	proj1/util	2.104s
上面输出中,20000000 表示循环执行的次数,而 99.4 ns 表示执行一次所花费的时间(99.4 纳秒)。
下面给出包含另外两个基准测试函数(一共三个测试函数)的完整代码:
package util

import (
	"fmt"
	"strconv"
	"testing"
)

// BenchmarkSprintf 对 fmt.Sprintf 函数进行基准测试
func BenchmarkSprintf(b *testing.B) {
	number := 10

	b.ResetTimer()

	for i := 0; i < b.N; i++ {
		fmt.Sprintf("%d", number)
	}
}

// BenchmarkFormat 对 strconv.FormatInt 函数进行基准测试
func BenchmarkFormat(b *testing.B) {
	number := int64(10)

	b.ResetTimer()

	for i := 0; i < b.N; i++ {
		strconv.FormatInt(number, 10)
	}
}

// BenchmarkItoa 对 strconv.Itoa 函数进行基准测试
func BenchmarkItoa(b *testing.B) {
	number := 10

	b.ResetTimer()

	for i := 0; i < b.N; i++ {
		strconv.Itoa(number)
	}
}
下面是运行基准测试的结果:
cig01@MacBook-Pro ~/go/src/proj1$ go test -v -run="none" -bench="." proj1/util
goos: darwin
goarch: amd64
pkg: proj1/util
BenchmarkSprintf-8   	20000000	        99.6 ns/op
BenchmarkFormat-8    	500000000	         3.65 ns/op
BenchmarkItoa-8      	300000000	         5.61 ns/op
PASS
ok  	proj1/util	6.558s
从上面的输出中可见,FormatInt 的性能是最好的,Sprintf 的性能是最差的。
运行基准测试时,另一个很有用的选项是 -benchmem 选项。如:
cig01@MacBook-Pro ~/go/src/proj1$ go test -v -run="none" -bench="." -benchmem proj1/util
goos: darwin
goarch: amd64
pkg: proj1/util
BenchmarkSprintf-8   	20000000	        98.5 ns/op	      16 B/op	       2 allocs/op
BenchmarkFormat-8    	500000000	         3.63 ns/op	       0 B/op	       0 allocs/op
BenchmarkItoa-8      	300000000	         5.65 ns/op	       0 B/op	       0 allocs/op
PASS
ok  	proj1/util	6.533s
增加 -benchmem 选项后输出的结果会多出两组新的数值: 一组数值的单位是 B/op(表示每次操作分配的字节数),另一组的单位是 allocs/op(表示每次操作从堆上分配内存的次数)。
15. 环境配置
15.1. workspace
Go 程序员往往把所有的 Go 代码放入到一个 workspace 中。
workspace 一般包含下面三个目录:
src/     contains Go source files,
pkg/     contains package objects, and
bin/     contains executable commands.
下面是 workspace 目录结构的一个例子:
bin/
    hello                          # command executable
    outyet                         # command executable
pkg/
    linux_amd64/
        github.com/golang/example/
            stringutil.a           # package object
src/
    github.com/golang/example/
        .git/                      # Git repository metadata
        hello/
            hello.go               # command source
        outyet/
            main.go                # command source
            main_test.go           # test source
        stringutil/
            reverse.go             # package source
            reverse_test.go        # test source
    golang.org/x/image/
        .git/                      # Git repository metadata
        bmp/
            reader.go              # package source
            writer.go              # package source
    ... (many more repositories and packages omitted) ...
参考:
How to Write Go Code: https://golang.org/doc/code.html
15.1.1. GOPATH
GOPATH 用于指定 workspace 的位置。
下面例子是设置 GOPATH 为$HOME/work:
export GOPATH=$HOME/work
用 go env GOPATH 可以查看当前 GOPATH 的设置。
15.2. 交叉编译
Go 内置了交叉编译功能。编译时只需要指定两个环境变量:GOOS 和 GOARCH,它们分别代表“Target Host OS”和“Target Host ARCH”,如果没有显式地设置这些环境变量,我们通过 go env GOOS 和 go env GOARCH 看到它们的当前值。
表 3 是 go 交叉编译所支持的组合。
| $GOOS | $GOARCH |
|---|---|
| android | arm |
| darwin | 386 |
| darwin | amd64 |
| darwin | arm |
| darwin | arm64 |
| dragonfly | amd64 |
| freebsd | 386 |
| freebsd | amd64 |
| freebsd | arm |
| linux | 386 |
| linux | amd64 |
| linux | arm |
| linux | arm64 |
| linux | ppc64 |
| linux | ppc64le |
| linux | mips |
| linux | mipsle |
| linux | mips64 |
| linux | mips64le |
| netbsd | 386 |
| netbsd | amd64 |
| netbsd | arm |
| openbsd | 386 |
| openbsd | amd64 |
| openbsd | arm |
| plan9 | 386 |
| plan9 | amd64 |
| solaris | amd64 |
| windows | 386 |
| windows | amd64 |
例如,我们可以在 Linux(或 Mac 或其它系统)中编译能在 windows 平台下运行的 64 位程序,编译时指定 GOOS=windows GOARCH=amd64 即可:
$ GOOS=windows GOARCH=amd64 go build
15.2.1. CGO 交叉编译
如果代码依赖于 CGO,那么交叉编译将麻烦一些。
下面是 CGO 示例代码,导出了两个 C 函数 Concat/FreeString:
package main

/*
#include <stdlib.h> // 后面用到了 C.free,必须引入这个头文件
*/
import "C"
import "unsafe"

//export Concat
func Concat(s1 *C.char, s2 *C.char, result **C.char) {
	// Convert C string to Go string
	str1 := C.GoString(s1)
	str2 := C.GoString(s2)

	// Concatenate two strings
	concatStr := str1 + str2

	// Convert Go string to C string
	cStr := C.CString(concatStr)

	// Assign the result to the output parameter
	*result = cStr
}

//export FreeString
func FreeString(str *C.char) {
	C.free(unsafe.Pointer(str))
}

func main() {
}
常规编译为动态库:
$ go build -o liba.so -buildmode=c-shared main.go
交叉编译为动态库(目标 OS 为 Linux,目标平台为 arm64/arm32):
$ GOOS=linux GOARCH=arm64 CGO_ENABLED=1 CC=aarch64-linux-gnu-gcc go build -o liba.so -buildmode=c-shared main.go # 目标平台为 arm64
$ GOOS=linux GOARCH=arm CGO_ENABLED=1 CC=arm-linux-gnueabihf-gcc go build -o liba.so -buildmode=c-shared main.go # 目标平台为 armhf
$ GOOS=linux GOARCH=arm CGO_ENABLED=1 CC=arm-linux-gnueabi-gcc go build -o liba.so -buildmode=c-shared main.go   # 目标平台为 armel
如果目标架构为 32 位 ARM,也可以通过设置 GOARM=5/6/7 来明确指定哪个 ARM 构架,参考:https://github.com/golang/go/wiki/GoArm
执行上面命令时如果提示找不到 aarch64-linux-gnu-gcc(或 arm-linux-gnueabihf-gcc 或 arm-linux-gnueabi-gcc),那是因为本地机器没有安装 gcc 的交叉编译器,使用下面命令可以安装它:
$ sudo yum install gcc-aarch64-linux-gnu     # Redhat 中安装 arm64 交叉编译器
$ sudo yum install gcc-arm-linux-gnueabihf   # Redhat 中安装 armhf 交叉编译器
$ sudo yum install gcc-arm-linux-gnueabi     # Redhat 中安装 armel 交叉编译器

$ sudo apt install gcc-aarch64-linux-gnu     # Debian 中安装 arm64 交叉编译器
$ sudo apt install gcc-arm-linux-gnueabihf   # Debian 中安装 armhf 交叉编译器
$ sudo apt install gcc-arm-linux-gnueabi     # Debian 中安装 armel 交叉编译器
15.3. 去掉 debug 信息和 DWARF 符号
在 Go linker 中指定选项 -s 可去掉 debug 信息,在 Go linker 中指定 -w 可去掉 DWARF 符号。所以指定 -ldflags="-s -w" 后可以去掉 debug 信息和 DWARF 符号:
$ go build -o mybinary -ldflags="-s -w" main.go                     # 去掉可执行程序中的debug 信息和 DWARF 符号
$ go build -o liba.so -ldflags="-s -w" -buildmode=c-shared main.go  # 去掉动态库中的debug 信息和 DWARF 符号
15.4. 使用 dep 进行包的依赖管理
dep 是一个 go pkg 依赖管理工具。可以使用下面命令安装它:
$ go get -u github.com/golang/dep/cmd/dep
在 go 工程根目录中,执行下面命令可自动分析项目中所有使用的包,并下载它们:
$ dep init -v        # 生成 Gopkg.toml 文件
$ dep ensure         # 确保依赖都已经下载
15.5. go modules
go modules 提出来之前,我们需要把 go 项目放到 GOPATH 指定目录下。使用 go modules,可以在任何目录(不用指定 GOPATH)下创建 go 项目了。go modules 和传统的 GOPATH 不同,不需要包含例如 src,bin 这样的子目录,任何一个目录,只要其中包含有 go.mod 文件,都可以作为 module。
A module is a collection of related Go packages that are versioned together as a single unit.
The relationship between repositories, modules, and packages:
- A repository contains one or more Go modules(尽管如此,一个 repository 推荐只包含一个 go module).
- Each module contains one or more Go packages.
- Each package consists of one or more Go source files in a single directory.
15.5.1. go module 实例
下面介绍 go module 的创建和编译。
首先,准备工程目录:
$ mkdir -p /tmp/scratchpad/hello
$ cd /tmp/scratchpad/hello
初始化工程为一个 go module:
$ go mod init github.com/you/hello

go: creating new go.mod: module github.com/you/hello
上面命令执行后,会在当前目录中生成 go.mod 文件,内容如下:
module github.com/you/hello

go 1.12
然后,在工程根目录中创建文件 hello.go,内容如下:
package main

import (
    "fmt"
    "rsc.io/quote"
)

func main() {
    fmt.Println(quote.Hello())
}
最后,编译运行:
$ go build     # 对于module,go build会自动下载源码中的依赖到~/go/pkg/mod/中,并更新go.mod文件
$ ./hello
Hello, world.
go module 依赖的相关源码会保存到目录 “~/go/pkg/mod/” 中,再次查看 go.mod 文件,可发现自动增加一行 require 语句:
module github.com/you/hello go 1.12 require rsc.io/quote v1.5.2
上面例子仅简单介绍了 go module 的使用,下面是一个 go module 使用另外一个 go module 的完整实例,包含如何指定版本等等,推荐参考:https://roberto.selbach.ca/intro-to-go-modules/
15.5.2. 整理 go.mod
执行 go mod tidy -v 可以自动整理 go.mod 文件,即:
1、添加 go.mod 中不存在,但代码中引用了的 mod;
2、删除 go.mod 文件中存在,但代码中却没有引用的 mod。
15.5.3. GOPROXY 环境变量
设置 GOPROXY 环境变量可以让 Go 命令从指定的地方下载 module,如:
$ export GOPROXY=https://goproxy.io
16. Go 语言标准库
Go 语言的标准库提供了丰富的功能,能够满足大部分开发需求。完整列表可参考:https://golang.org/pkg/
16.1. 实例:Http Server
下面是 Go 实现的一个简单的 Http Server:
package main
import (
"encoding/json"
"flag"
"fmt"
"net/http"
"time"
)
var addr = flag.String("addr", ":8080", "http service address")
type Status struct {
Cars []string `json:"cars"`
}
func handler1(w http.ResponseWriter, r *http.Request) {
fmt.Fprintf(w, "Hi %s!", r.URL.Path)
}
// respond {"cars":["Mercedes","Honda","Toyota"]} or {"cars":["Ford","BMW"]}
func handler2(w http.ResponseWriter, r *http.Request) {
if r.Method == "GET" {
data := Status{Cars: []string{"Ford", "BMW"}}
if time.Now().UnixNano()%2 == 0 {
data = Status{Cars: []string{"Mercedes", "Honda", "Toyota"}}
}
js, err := json.Marshal(data)
if err != nil {
http.Error(w, err.Error(), http.StatusInternalServerError)
return
}
w.Header().Set("Content-Type", "application/json")
w.Write(js)
}
}
// start server:
// $ ./prog -addr ":9000"
// test:
// $ curl localhost:9000 # Hi /!
// $ curl localhost:9000/test # {"cars":["Mercedes","Honda","Toyota"]} or {"cars":["Ford","BMW"]}
// $ curl localhost:9000/other/path # Hi /other/path!
func main() {
flag.Parse()
http.HandleFunc("/", handler1)
http.HandleFunc("/test", handler2)
http.ListenAndServe(*addr, nil)
}
17. Tips
17.1. 小心陷阱:循环中的 Per Loop Bindings
思考问题:下面代码会输出多少?
package main
import (
"fmt"
"time"
)
func func1(a *int) {
go func() {
fmt.Printf("%v ", *a)
}()
}
func main() {
for i := 0; i < 3; i++ {
func1(&i)
}
time.Sleep(time.Second)
}
答案是:
3 3 3
为什么不会输出 0 1 2 呢?因为变量 i 在 golang 是 Per Loop Bindings,而不是 Per Iteration Bindings。在函数 func1 中 goroutine 启动时,变量 i 已经在 main 中被赋值为 3 了。
类似地,下面代码也不是按人们的预期工作:
var all []*Item
for _, item := range items {
all = append(all, &item)
}
循环结束后, all 中包含了重复的指针,这些指针指向同一个元素(也就是 items 的最后一个元素)。这是因为变量 item 是 Per Loop Bindings,而不是 Per Iteration Bindings。这导致 &item 在每次迭代时都相同,只是 item 的内容每次迭代时会被重新赋值。
要修复上面的 bug,最简单的办法是:
var all []*Item
for _, item := range items {
item := item
all = append(all, &item)
}
这个行为太容易导致 bug 了,Russ Cox 开始讨论这个问题了,参考:redefining for loop variable semantics
关于其它语言类似问题,可参考:Per Loop vs. Per Iteration Bindings
17.2. 无法在 Alpine Linux 中运行(通过设置 CGO_ENABLED=0 解决)
有下面 Golang 程序(prog1.go):
package main
import (
"fmt"
"net"
)
func main() {
fmt.Println("Hello Go")
fmt.Println(net.LookupHost("bing.com"))
}
在 Debian 中编译了上面程序后,复制到 Alpine Linux 中却无法运行,会提示 not found 错误。
在 Alpine Linux 中使用 ldd 发现有些库找不到:
$ ldd prog1 /lib64/ld-linux-x86-64.so.2 (0x7fe3b69cc000) Error loading shared library libresolv.so.2: No such file or directory (needed by prog1) libpthread.so.0 => /lib64/ld-linux-x86-64.so.2 (0x7fe3b69cc000) libc.so.6 => /lib64/ld-linux-x86-64.so.2 (0x7fe3b69cc000) Error relocating prog1: __vfprintf_chk: symbol not found Error relocating prog1: __fprintf_chk: symbol not found
这是因为 Alpine Linux 的 C 库使用的是 musl(并没有使用大部分 Linux 发行版所使用的 glibc)。
解决上面问题的思路:让 Golang 程序不依赖于 C 库,直接静态链接 Golang 程序。
其中,Golang 程序默认就是静态链接的,只有当 Golang 程序中使用了 net 包和 os/user 包时才会调用 libc 中的函数(变为动态链接)。比如编译下面的 Golang 程序(prog2.go,它没有使用 net 和 os/user 包):
package main
import (
"fmt"
)
func main() {
fmt.Println("Hello, world!")
}
得到的就是静态链接的 Golang 程序。
$ go build prog2.go $ ldd prog2 not a dynamic executable
要强制静态链接前面的 Golang 程序 prog1.go,可以采用下面的方法:
$ CGO_ENABLED=0 go build prog1.go # 方法 1,通过禁止 CGO 来使用纯 Go 版本的 net 和 os/user 库 $ go build -tags netgo,osusergo prog1.go # 方法 2,通过指定 build tag 来使用纯 Go 版本的 net 和 os/user 库
这样编译出来的 prog1 不再依赖于 libc 库了,从 Debian 复制到 Alpine Linux 中后,可以正常执行了。
17.3. 调试技巧:输出各个 Goroutine 的调用栈
默认地,发送 SIGQUIT, SIGILL, SIGTRAP, SIGABRT, SIGSTKFLT, SIGEMT, or SIGSYS 信号给 Golang 进程,Golang 进程会退出,并且输出各个 Goroutine 的调用栈。
如何让进程不退出的情况下,输出各个 Goroutine 的调用栈呢?利用 runtime.Stack 可以实现,它会得到所有 Goroutine 的调用栈。比如我们定制 SIGQUIT 信号的处理函数,让其输出各个 Goroutine 的调用栈,如:
func main() {
go handleSignals()
// other code...
}
func handleSignals() {
sigs := make(chan os.Signal, 1)
signal.Notify(sigs, syscall.SIGQUIT)
buf := make([]byte, 1<<20) // 1M
for {
sig := <-sigs
switch sig {
case syscall.SIGQUIT:
stacklen := runtime.Stack(buf, true)
log.Printf("=== received SIGQUIT ===\n*** goroutine dump...\n%s\n*** end\n", buf[:stacklen])
}
}
}
这样,发送 SIGQUIT 信号给 Golang 进程,会输出各个 Goroutine 的调用栈,且不会退出程序。
17.4. stack 格式说明(panic 输出格式)
当程序发生 panic 时,默认会打印出 stack 信息。注:你也可以使用 debug.PrintStack() 打印出 stack 信息。
下面通过一个例子来说明 stack 输出所包含的信息。
1: package main 2: 3: func main() { 4: slice := make([]string, 2, 4) 5: Example(slice, "hello", 10) 6: } 7: 8: func Example(slice []string, str string, i int) { 9: panic("Want stack trace") 10: }
上面程序会输出 stack 信息:
panic: Want stack trace goroutine 1 [running]: main.Example(0x2080c3f50, 0x2, 0x4, 0x425c0, 0x5, 0xa) /Users/cig01/test/a.go:9 +0x39 main.main() /Users/cig01/test/a.go:5 +0x72 exit status 2
在上面输出中源码行号(如 9 和 5)后面的数字(即“+0x39”和“+0x72”)表示“The address of the assembly instruction relative to the start of the function.”,即当前汇编指令相对于函数入口处的偏移。
下面我们重点关注函数 Example 的参数,它在声明时是 3 个参数,但 stack 输出中竟然有 6 个参数:
// Declaration main.Example(slice []string, str string, i int) // 源码中是3个参数 // Stack trace main.Example(0x2080c3f50, 0x2, 0x4, 0x425c0, 0x5, 0xa) // stack输出中有6个参数
这是因为:
- Slices are three words (a pointer to a backing array, a length, and a capacity)
- Strings are two words (a pointer to string data and a length)
图 2 和 3 直观地演示了 slice 和 string 展开为多个参数的过程。
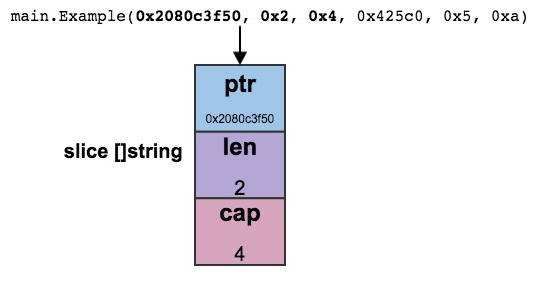
Figure 2: 1 个 slice 参数在 stack 输出中展开为 3 个参数

Figure 3: 1 个 string 参数在 stack 输出中展开为 2 个参数
17.4.1. String, Slice, Interface 类型的参数都会展开为多个参数
前面介绍了 String 和 Slice 类型的参数在输出 stack 时会展开为多个参数。除此外,Interface 类型的参数也会展开为多个参数,具体地说会展开为两个参数:a pointer to the type and a pointer to the value. 参见:13.2
下面的例子演示了 Interface 类型的参数在输出 stack 时会展开为 2 个参数。
package main
import "fmt"
/* 定义接口,其名为geometry,它包含两个方法 */
type geometry interface {
area() float64 // 计算面积
perimeter() float64 // 计算周长
}
/* 定义长方形,你还可以定义圆形等 */
type rect struct {
width, height float64
}
/* 实现长方形的接口函数 */
func (r rect) area() float64 {
return r.width * r.height
}
func (r rect) perimeter() float64 {
return 2*r.width + 2*r.height
}
func measure(g geometry) { // 其参数是一个接口
fmt.Println(g)
fmt.Println(g.area())
fmt.Println(g.perimeter())
panic("Just panic")
}
func main() {
r := rect{width: 3, height: 4}
measure(r) // 输出长方形的面积和周长
}
上面程序输出:
{3 4}
12
14
panic: Just panic
goroutine 1 [running]:
main.measure(0x10d2500, 0xc420084010) // measure参数变为两个(但源码中是一个接口)
/Users/cig01/test/1.go:28 +0x183
main.main()
/Users/cig01/test/1.go:33 +0x6b
exit status 2
17.5. new 和 make 的区别
new 用于分配内存和初始化对象,并返回对象的指针。这和 C++ 的 new 含义是类似的,参考节 7.2 。
make 用来为 slice,map 或 chan 类型分配内存和初始化对象(注:make 只能用在这三种引用类型上),和 new 不同的是,make 返回值的类型和它参数的类型一样,也就是说 make 总是返回 slice,map 或 chan 这三种引用类型。
下面是关于 new 和 make 的一些例子:
package main
import (
"fmt"
"reflect"
)
func main() {
// new 总是返回指针
var pint = new(int)
fmt.Println(reflect.TypeOf(pint)) // 输出 *int
var ps = new([]int)
fmt.Println(reflect.TypeOf(ps)) // 输出 *[]int
var pm = new(map[string]int)
fmt.Println(reflect.TypeOf(pm)) // 输出 *map[string]int
var pc = new(chan int)
fmt.Println(reflect.TypeOf(pc)) // 输出 *chan int
// make 只能用于 slice, map, chan 这三种引用类型,返回类型和参数一样
var s = make([]int, 3, 5) // 创建 slice,length 为 3,capacity 为 5
fmt.Println(reflect.TypeOf(s)) // 输出 []int
var m = make(map[string]int) // 创建 map
fmt.Println(reflect.TypeOf(m)) // 输出 map[string]int
var c = make(chan int) // 创建不带缓冲的 channel
fmt.Println(reflect.TypeOf(c)) // 输出 chan int
}
17.6. i++ 是语句(不是表达式)
在 Go 中 ++ , -- 是语句而不是表达式。所以 a=b++, return x++ 等写法会提示错误,语句无法放到表达式位置。如:
// 下面程序是错误的!不能通过编译
package main
import "fmt"
func main() {
a := 10
b := a++ // syntax error: unexpected ++ at end of statement
fmt.Printf("%d%d", a++) // syntax error: unexpected ++, expecting comma or )
fmt.Printf("%d", b)
}
参考:Why are ++ and -- statements and not expressions? And why postfix, not prefix?