Java
Table of Contents
- 1. Java 简介
- 2. Java 基本程序结构
- 3. 对象和类
- 4. 继承
- 5. 接口
- 6. 嵌套类
- 7. 异常处理
- 8. 泛型程序设计
- 9. Java Collections Framework
- 10. Java I/O 操作
- 11. Java Tips
1. Java 简介
Java was originally developed by James Gosling at Sun Microsystems.
Java 语法可看作是一个“纯净”版的 C++,这里没有头文件、没有指针,没有操作符重载,没有虚基类等等。
参考:
Core Java, Volume I -- Fundamentals(本文主要摘自该书)
Core Java, Volume II -- Advanced Features
The Java™ Tutorials: http://docs.oracle.com/javase/tutorial/index.html
Java Language and Virtual Machine Specifications: https://docs.oracle.com/javase/specs/
Java Platform, Standard Edition Tools Reference: http://docs.oracle.com/javase/8/docs/technotes/tools/unix/index.html
1.1. Java SE 版本变迁
Java SE 版本变迁如表 1 所示。
| Java Version | Release Date | New features | Number of classes and interfaces |
|---|---|---|---|
| JDK 1.0 | January 21, 1996 | The language itself | 211 |
| JDK 1.1 | February 19, 1997 | Inner classes | 477 |
| J2SE 1.2 | December 8, 1998 | None | 1524 |
| J2SE 1.3 | May 8, 2000 | None | 1840 |
| J2SE 1.4 | February 6, 2002 | Assertions | 2723 |
| J2SE 5.0 | September 30, 2004 | Generic classes, enhanced for loop, varargs, autoboxing, metadate, enumerations, static import | 3279 |
| Java SE 6 | December 11, 2006 | None | 3793 |
| Java SE 7 | July 28, 2011 | Switch with strings, diamond operator, binary literals, try-with-resources, exception handling enhancements | 4024 |
| Java SE 8 | March 18, 2014 | Lambda Expressions, improved Type Inference, repeating annotations, method parameter reflection | 4240 |
1.2. Java EE 版本变迁
Java EE 版本变迁如表 2 所示。Java EE API 如图 1 所示(以 Java EE 5 为例)。
| Java EE | Release Date |
|---|---|
| J2EE 1.2 | December 12, 1999 |
| J2EE 1.3 | September 24, 2001 |
| J2EE 1.4 | November 11, 2003 |
| Java EE 5 | May 11, 2006 |
| Java EE 6 | December 10, 2009 |
| Java EE 7 | June 12, 2013 |
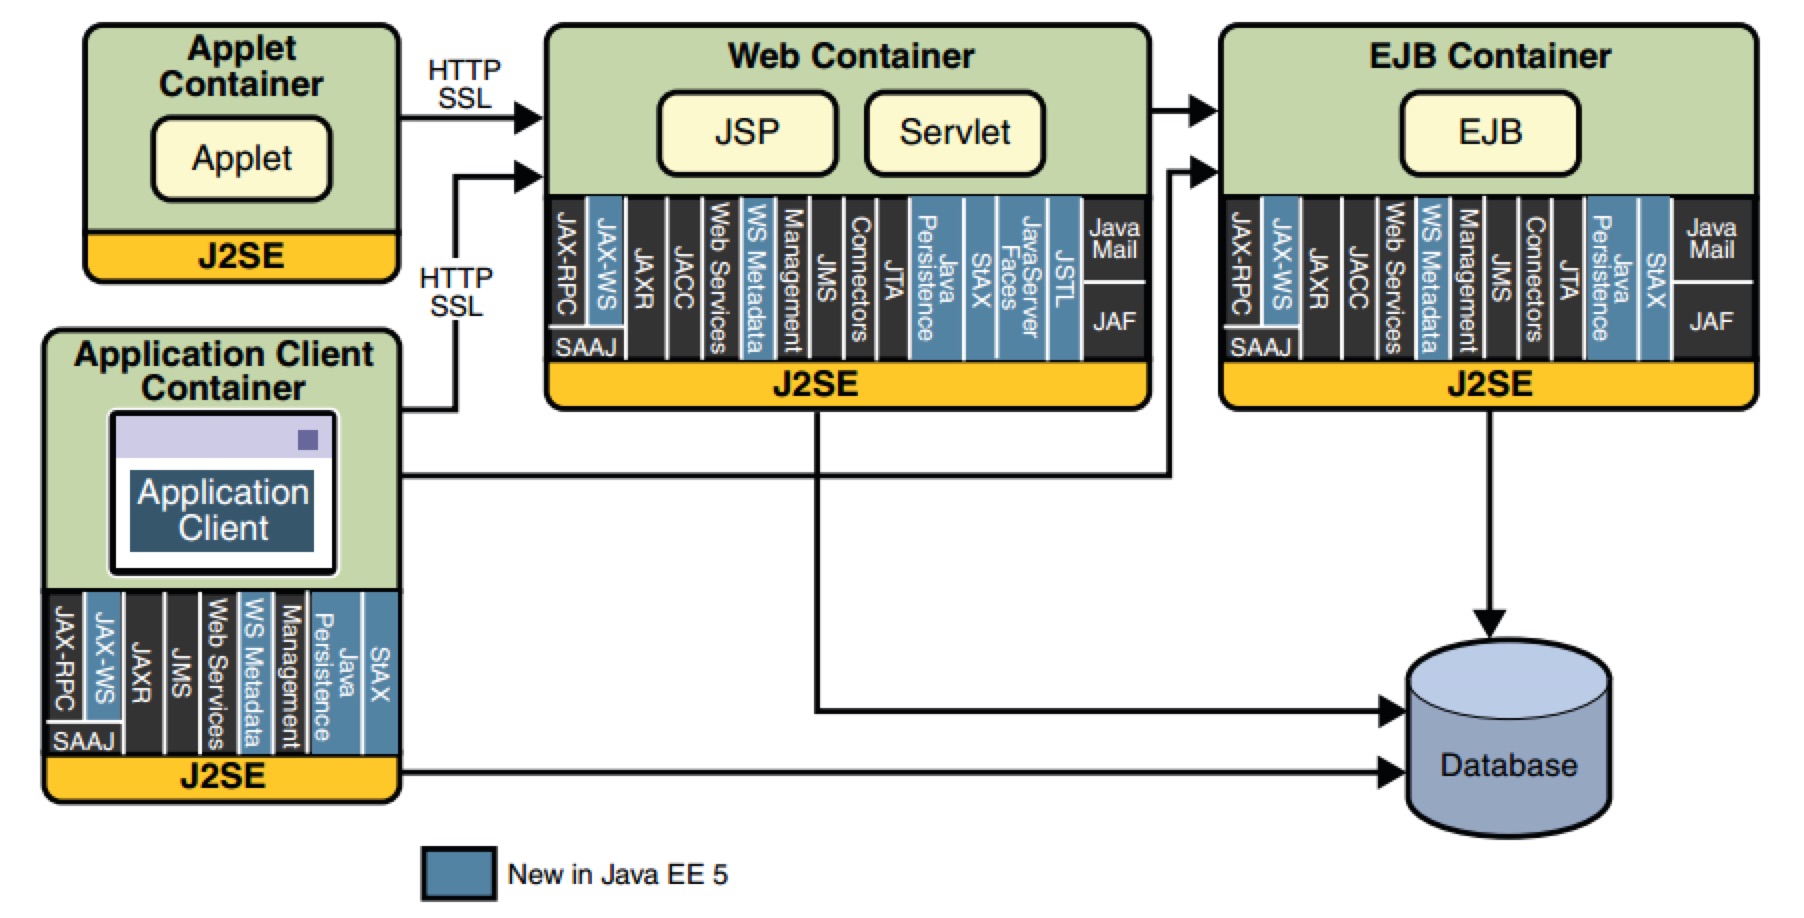
Figure 1: Java EE 5 APIs
Reference:
Java EE 版本变迁:http://en.wikipedia.org/wiki/Java_EE_version_history
Java EE at a Glance: http://www.oracle.com/technetwork/java/javaee/overview/index.html
Java EE 的各种实现:https://en.wikipedia.org/wiki/Java_Platform,_Enterprise_Edition#Certified_application_servers
2. Java 基本程序结构
Java 和 C++ 的语法比较类似,但去掉了一些复杂的用法。
2.1. Hello World 程序
// file FirstSample.java         // 文件名必须和类名一致
public class FirstSample {
    public static void main(String[] args) {
        System.out.println("Hello World!");
    }
}
下面方法编译运行:
$ javac FirstSample.java    # 会生成FirstSample.class
$ java FirstSample
Hello World!
2.2. 两大类型(基本类型和引用类型)
There are two kinds of types in the Java programming language: primitive types and reference types.
参考:
The Java Language Specification, Java SE 8 Edition, 4.1. The Kinds of Types and Values: https://docs.oracle.com/javase/specs/jls/se8/html/jls-4.html#jls-4.1
2.2.1. 基本数据类型(Primitive Types)
在 Java 中,有 8 种基本数据类型,包括 4 种整型,2种浮点型,字符类型和 boolean 类型,如表 3 所示。
| 类型 | 说明 | 默认值 |
|---|---|---|
| byte | 1 字节 | 0 |
| short | 2 字节 | 0 |
| int | 4 字节 | 0 |
| long | 8 字节 | 0 |
| float | 4 字节 | 0.0F |
| double | 8 字节 | 0.0D |
| char | 2 字节 | '\u0000' |
| boolean | true/false | false |
说明 1:Java 中的类型与平台无关(如所有平台 int 均为 4 字节),没有无符号类型(unsigned)。
说明 2:Java 中整型值和 boolean 类型值之间不能相互转换。这可以防止不小心把 x==0 写为了 x=0。
int x = 1;
if (x = 0) {}     // 编译出错,因为整数表达式 x = 0 不能转换为布尔值。
2.2.2. 引用类型(Reference Types)
引用类型有类引用类型、接口引用类型、数组引用类型。
所有引用类型的变量的默认值都为 null。
String s;                        // 类引用类型
java.lang.Runnable myThread;     // 接口引用类型
int[] arr;                       // 数组引用类型
参考:https://docs.oracle.com/javase/specs/jls/se8/html/jls-4.html#jls-4.3
2.3. 变量
Java 是强类型语言,必须为每个变量声明一种类型。变量名是以字母开头的由字母或数字构成的序列。
声明一个局部变量后,必须用赋值语句对局部变量进行显式初始化。没有初始化就使用局部变量不能通过编译。如:
int i;
System.out.println(i);   // error: variable i might not have been initialized
说明:和 C/C++ 不同,Java 中不区分变量的声明与定义。
2.3.1. final 修饰的变量为常量
final 修饰的变量为常量,赋值后不能再修改。习惯上常量名使用大写。
final int MY_NUMBER = 100;
说明:const 是 Java 中的保留字,但目前还未使用。
2.4. 数组(属于引用类型)
数组是一种数据结构,用来存储同一类型值的集合。
声明数组变量时,要指定数组类型(数据元素类型后紧跟[])和数组变量的名字。如:
int[] a; // 也可以这样写 int a[]; 但Java程序员不喜欢这种风格。
上面语句只声明了数组变量 a,并没有将 a 初始化为一个真正的数组。应该使用 new 运算符创建数组。如:
int[] a = new int[100]; // 也可以这样写 int a[] = new int[100]; 但不推荐。
说明 1:如果没有显示初始化,创建数组时其元素会被设置为其对应类型的“默认值”:数值类型为 0,布尔值为 false,对象引用为 null。
说明 2:数组长度不要求是常量,如 new int[n] 会创建一个长度为 n 的数组。
说明 3:数组长度可以为 0,如 new int[0] 是合法的。在编写一个返回数组的方法时,如果碰巧结果为空,则这种语法形式显得非常有用。
说明 4:和 C/C++ 一样,数组起始元素的下标为 0。
2.4.1. 数组初始化和匿名数组
创建数组也可以不用 new 运算符。Java 中提供了一种创建数组对象并同时赋予初始值的简写方式。如下所示:
int[] a = {1, 2, 3};                // 相当于 int[] a = new int[] {1, 2, 3};
String[] myStringArray = {"AA", "BB", "CC"};
使用上面这种形式时,不需调用 new。
Java 中,可用下面方式初始化匿名数组:
new int[] {1, 2, 3};
使用匿名数组可以在不创建新变量的情况下重新初始化一个数组。
如:
a = new int[] {4, 5, 6};
上面语句相当于:
int[] anonymous = new int[] {4, 5, 6};
a = anonymous;
2.4.2. 数组拷贝
在 Java 中,可以将一个数组变量拷贝给另一个数组变量。这时两个变量引用同一个数组,如:
int[] a = {1, 2, 3};
int[] b = a;
b[1] = 8;               // now a[1] is also 8
要把数组中的所有值拷贝到一个新的数组中去,可以使用 Arrays.copyOf 方法,如:
int[] a = {1, 2, 3};
int[] b = Arrays.copyOf(a, a.length);
b[1] = 8;               // now a[1] is still 2
java.util.Arrays.copyOf 会创建一个新的数组。System.arraycopy 方法可以在两个已存在的数组间复制元素。
public class TestArray {
  public static void main(String[] args) {
    int[] a = {1, 2, 3};
    int[] b = {5, 6, 7, 8, 9};

    System.arraycopy(a, 0, b, 1, 3);
    System.out.println(java.util.Arrays.toString(b));   // 会输出 [5, 1, 2, 3, 9]

    b = java.util.Arrays.copyOf(a, a.length);
    System.out.println(java.util.Arrays.toString(b));   // 会输出 [1, 2, 3]
  }
}
2.4.3. 运行时边界检查
Java 中的[]运算符被预定义为检查数组边界。
int[] a = {1, 2, 3};
System.out.println(a[10]);  // 编译正常,但运行时报异常java.lang.ArrayIndexOutOfBoundsException
2.5. 运算符
Java 中的运算符与 C/C++ 中的基本相同。
为消除歧义,增加了 >>> 位运算符,它总是用 0 填充高位;而 >> 总是用符号位填充高位。没有 <<< 运算符。
2.6. 控制流程
Java 的控制流程结构和 C/C++ 的基本一样,只有很少的例外情况。如没有 goto 语句,但 break 语句可以带标号,利用标号可以实现从较深的内层循环跳出。
2.6.1. block
A block is a group of zero or more statements between balanced braces and can be used anywhere a single statement is allowed.
注意:块内不能覆盖外层定义的变量。这点和 C/C++ 不同,C/C++ 中允许内层块覆盖外层的定义的变量。
public static void main(String[] args) {
    int n = 1;
    {
        int n = 2;    // 编译出错!块内不能覆盖外层定义的变量!
    }
}
2.6.2. enhanced for loop
除了常规的 for 循环外,在 Java 5 中还引入了 enhanced for loop,它类似于 C# 中的 foreach。
enhanced for loop 实例:
// Returns the sum of the elements of a
int sum(int[] a) {
    int result = 0;
    for (int i : a)      // enhanced for loop
        result += i;
    return result;
}
2.6.3. break
The break statement has two forms: labeled and unlabeled.
带标号的 break 实例:
class BreakWithLabelDemo {
    public static void main(String[] args) {

        int[][] arrayOfInts = {
            { 32, 87, 3, 589 },
            { 12, 1076, 2000, 8 },
            { 622, 127, 77, 955 }
        };
        int searchfor = 12;

        int i;
        int j = 0;
        boolean foundIt = false;

    search:
        for (i = 0; i < arrayOfInts.length; i++) {
            for (j = 0; j < arrayOfInts[i].length; j++) {
                if (arrayOfInts[i][j] == searchfor) {
                    foundIt = true;
                    break search;                              // labeled break
                }
            }
        }

        if (foundIt) {
            System.out.println("Found " + searchfor + " at " + i + ", " + j);
        } else {
            System.out.println(searchfor + " not in the array");
        }
    }
}
参考:http://docs.oracle.com/javase/tutorial/java/nutsandbolts/branch.html
2.6.4. switch case
Unlike if-then and if-then-else statements, the switch statement can have a number of possible execution paths. A switch works with the byte, short, char, and int primitive data types. It also works with enum types, the String class, and a few special classes that wrap certain primitive types: Character, Byte, Short, and Integer.
说明:对 String 类型的 switch 支持是在 Javs SE 7 中加入的。
// Note: Only work with Java SE 7 or higher.
public String getTypeOfDayWithSwitchStatement(String dayOfWeekArg) {
     String typeOfDay;
     switch (dayOfWeekArg) {
         case "Monday":
             typeOfDay = "Start of work week";
             break;
         case "Tuesday":
         case "Wednesday":
         case "Thursday":
             typeOfDay = "Midweek";
             break;
         case "Friday":
             typeOfDay = "End of work week";
             break;
         case "Saturday":
         case "Sunday":
             typeOfDay = "Weekend";
             break;
         default:
             throw new IllegalArgumentException("Invalid day of the week: " + dayOfWeekArg);
     }
     return typeOfDay;
}
参考:http://stackoverflow.com/questions/338206/why-cant-i-switch-on-a-string
3. 对象和类
Java 是完全面向对象的。
对象是面向对象技术的关键概念,对象有三个主要特性:
- 对象的行为(behavior)
- 可以对对象施加哪些操作(方法)?
- 对象的状态(state)
- 当施加操作(方法)时,对象如何响应?
- 对象标识(identity)
- 如何辨别具有相同行为与状态的不同对象?
封装是与对象相关的一个重要概念。从形式上看,封装是将数据和行为组合在一起,并对对象的使用者隐藏了数据的实现方式。
对象中的数据称为实例域(instance field),操纵数据的过程为为方法(method)。对于特定的对象都有一组特定的实例域值,这些值的集合就是对象的当前状态。可以通过对象的方法向对象发送消息,从而改变对象的状态。
实现封装的关键是不要让类的方法直接访问其他类的数据。程序仅通过对象的方法与对象数据进行交互。封装给对象赋予了“黑盒”特征,这是提高重用性和可靠性的关键。
3.1. 定义类
类是构造对象的模板或蓝图。由类构造对象的过程称为创建类的实例(instance)。
在 Java 中,类定义的基本形式为:
class ClassName {
    filed1
    filed2
    ...
    constructor1
    constructor2
    ...
    method1
    method2
    ...
}
下面看一个非常简单的 Employee 类:
class Employee {
    // instance fields
    private String name;
    private double salary;
    private Date hireDay;

    // constructor
    public Employee(String n, double s, int year, int month, int day) {
        name = n;
        salary = s;
        GregorianCalendar calendar = new GregorianCalendar(year, month - 1, day);  // GregorianCalendar uses 0 for January
        hireDay = calendar.getTime();
    }

    // a method
    public String getName() {
        return name;
    }

    // a method
    public double getSalary() {
        return salary;
    }

    // a method
    public Date getHireDay() {
        return hireDay;
    }

    // more methods ...
}
注意:和 C++ 不同, 在 Java 中,所有方法都必须在类的内部定义。
3.1.1. 类声明语法
ClassDeclaration:
  NormalClassDeclaration
  EnumDeclaration

NormalClassDeclaration:
  {ClassModifier} class Identifier [TypeParameters] [Superclass] [Superinterfaces] ClassBody

ClassModifier:
  (one of) Annotation public protected private abstract static final strictfp
参考:
Java Language Specification: https://docs.oracle.com/javase/specs/jls/se8/html/jls-8.html#jls-8.1
3.1.2. Acess Levels for Members
对 Java 类成员的访问可以用表 4 所示的修饰符进行控制。
| Modifier | Class | Package | Subclass | World |
|---|---|---|---|---|
| public | Y | Y | Y | Y |
| protected | Y | Y | Y | N |
| no modifier | Y | Y | N | N |
| private | Y | N | N | N |
3.2. 构造器(所有的 Java 对象都在堆中)
构造器与类同名,没有返回值。所有的 Java 对象都是在堆中构造的,构造器总是伴随着 new 操作符的执行被调用。
Employee staff = new Employee("James Bond", 100000, 1950, 1, 1);   // 构造器总是伴随着new操作符一起使用。
// Empoyee staff("James Bond", 100000, 1950, 1, 1);                // valid in C++, but invalid in Java
3.2.1. 默认构造器
没有参数的构造器被称为默认构造器。
如可以给 Employee 类编写下面的默认构造器:
public Employee() {
    name = "";
    salary = 0;
    hireDay = new Date();
}
如果一个类没有编写构造器,那么系统会提供一个默认构造器。这个构造器将所有实例域设置为默认值:数值类型为 0,布尔值为 false,对象引用为 null。
3.2.2. 域的默认初始化
如果在构造器中没有显式地给域赋予初值。那么就会自动地赋为“默认值”:数值类型为 0,布尔值为 false,对象引用为 null。
3.2.3. 构造器调用另一个构造器(this 的特殊用法)
关键字 this 引用方法的隐式参数。除此外,this 还有另外的用法。
如果构造器的第一个语句形如 this(...),这个构造器将调用同一个类的另一个构造器。 如:
public A(double s) {
    this("Test", s);       // calls A(String, double)
    // others
}
注:C++ 中,一个构造器不能调用其它构造器。
3.2.4. 没有析构器,没有 delete
所有的 Java 对象都在堆中,Java 有自动的垃圾回收器,不需要人工回收内存,所以 Java 不支持析构器,也没有 delete 操作符(Java 中 delete 不是保留字)。
3.3. 在类定义时初始化域
可以在类定义时,直接将一个值赋给某个域。如:
public class A {
    private int i = -1;
}
这个赋值操作会在执行构造器前先执行。 当一个类的所有构造器都希望把相同的值赋予某个域时,这种方式非常方便。
初始值不一定是常量,可以调用方法对域进行初始化。如:
public class A {
    private int i = fun1();
}
3.4. 初始化块(initialization block)
除了在构造器中设置域的值,和在类定义时初始化域的值。还可在初始化块(类定义时用大括号包围的部分)中设置。
有两种初始化块:普通初始化块和 static 初始化块。
普通初始化块在构造类的对象时会被执行,static 初始化块在类初始化时会被执行(即仅执行一次)。
public class Test {

    static int staticVariable;
    int nonStaticVariable;

    // Static initialization block:
    // Runs once (when the class is initialized).
    static {
        System.out.println("Static initalization.");
        staticVariable = 5;
    }

    // Instance initialization block:
    // Runs before the constructor each time you instantiate an object
    {
        System.out.println("Instance initialization.");
        nonStaticVariable = 7;
    }

    public Test() {
        System.out.println("Constructor.");
    }

    public static void main(String[] args) {
        new Test();
        new Test();
    }
}
上面代码会输出:
Static initalization.
Instance initialization.
Constructor.
Instance initialization.
Constructor.
参考:
http://stackoverflow.com/questions/3987428/what-is-an-initialization-block
3.5. 方法
3.5.1. 方法传参方式(by value)
我们知道,C语言中函数采用值传递的方式,而 C++ 中函数既有值传递方式,又有引用传递方式。
在 Java 中,总是采用值传递方式来传递方法参数。也就是说,方法得到的是所有参数值的一个拷贝。 在方法内部直接对方法参数值进行重新赋值并不会改变方法外部的实参。
Java 中有两种类型变量:基本类型(Primitive types)和引用类型(Reference types),下面分别说明方法参数为这两种类型时的传递情况:
Primitive arguments, such as an int or a double, are passed into methods by value. This means that any changes to the values of the parameters exist only within the scope of the method. When the method returns, the parameters are gone and any changes to them are lost.
Reference data type parameters, such as objects, are also passed into methods by value. This means that when the method returns, the passed-in reference still references the same object as before. However, the values of the object's fields can be changed in the method, if they have the proper access level.
参考:http://docs.oracle.com/javase/tutorial/java/javaOO/arguments.html
3.5.2. 方法重载(overloading)
Java 中允许重载方法(包括构造器方法)。
要判断两个方法是否是重载方法,只要看方法的签名是否相同。 方法的签名是指方法名称及参数的类型。
public class DataArtist {

    public void draw(String s) {
        ...
    }
    public void draw(int i) {
        ...
    }
    public void draw(double f) {
        ...
    }
    public void draw(int i, double f) {
        ...
    }
}
3.5.3. 对象的默认引用(this)
在方法内,this 表示当前实例的引用。
public class Point {
    public int x = 0;
    public int y = 0;

    //constructor
    public Point(int x, int y) {
        this.x = x;
        this.y = y;
    }
}
3.5.4. 参数 null 检测(Objects.requireNonNull)
Java 7 之前,对参数进行 null 检测的例子如下:
public Foo(Bar bar, Baz baz) {
    if (bar == null) {
        throw new NullPointerException("bar must not be null");
    }
    if (baz == null) {
        throw new NullPointerException("baz must not be null");
    }
    this.bar = bar;
    this.baz = baz;
}
在 Java 7 中,使用 Objects.requireNonNull 可简化上面代码为:
public Foo(Bar bar, Baz baz) {
    this.bar = Objects.requireNonNull(bar, "bar must not be null");
    this.baz = Objects.requireNonNull(baz, "baz must not be null");
}
3.6. 枚举类型(enum)
Java 5 中引入了枚举类型(Enum Types)。下面是一个典型的例子:
public enum Size { SMALL, MEDIUM, LARGE, EXTRA_LAGRE };
实际上,上面声明定义的类型是一个类,它刚好有 4 个实例。
下面是关于枚举类型的简单测试例子:
public class Test {
    public enum WeekDay {                     // 定义枚举类型,首字母大写(因为它是类)
        SUNDAY, MONDAY, TUESDAY, WEDNESDAY, THURSDAY, FRIDAY, SATURDAY  // 枚举实例可看作常量,一般用大写
    };

    public static void main(String[] args) {
        WeekDay today = WeekDay.SUNDAY;

        if (today == WeekDay.SUNDAY) {        // 用 == 可以测试枚举类型的相等性,也可以写为 WeekDay.SUNDAY.equals(today)
            System.out.println("today is Sunday");
        } else {
            System.out.println("today is not Sunday");
        }

        switch (today) {                      // switch case支持枚举类型
        case SUNDAY:                          // 无需(也不能)写为 case WeekDay.SUNDAY:
            System.out.println("today is Sunday");
            break;
        case SATURDAY:
            System.out.println("today is Saturday");
            break;
        default:
            break;
        }
    }
}
下面是复杂一些的枚举例子,每个可选值关联了两个属性(mass 和 radius):
public enum Planet {
    MERCURY (3.303e+23, 2.4397e6),
    VENUS   (4.869e+24, 6.0518e6),
    EARTH   (5.976e+24, 6.37814e6),
    MARS    (6.421e+23, 3.3972e6),
    JUPITER (1.9e+27,   7.1492e7),
    SATURN  (5.688e+26, 6.0268e7),
    URANUS  (8.686e+25, 2.5559e7),
    NEPTUNE (1.024e+26, 2.4746e7);  // When there are fields and methods, the list of enum constants must end with a semicolon.

    private final double mass;   // in kilograms
    private final double radius; // in meters
    Planet(double mass, double radius) {
        this.mass = mass;
        this.radius = radius;
    }
    private double mass() { return mass; }
    private double radius() { return radius; }

    // universal gravitational constant  (m3 kg-1 s-2)
    public static final double G = 6.67300E-11;

    double surfaceGravity() {
        return G * mass / (radius * radius);
    }
    double surfaceWeight(double otherMass) {
        return otherMass * surfaceGravity();
    }

    public static void main(String[] args) {
        if (args.length != 1) {
            System.err.println("Usage: java Planet <earth_weight>");
            System.exit(-1);
        }
        double earthWeight = Double.parseDouble(args[0]);
        double mass = earthWeight/EARTH.surfaceGravity();
        for (Planet p : Planet.values())
           System.out.printf("Your weight on %s is %f%n",
                             p, p.surfaceWeight(mass));
    }
}
下面是上面代码的运行例子:
$ java Planet 175
Your weight on MERCURY is 66.107583
Your weight on VENUS is 158.374842
Your weight on EARTH is 175.000000
Your weight on MARS is 66.279007
Your weight on JUPITER is 442.847567
Your weight on SATURN is 186.552719
Your weight on URANUS is 158.397260
Your weight on NEPTUNE is 199.207413
3.7. 包(package)
Java 中使用包来组织类。使用包的主要目的是确保类名的唯一性,减少冲突。
Sun 公司建议将公司的因特网域名以逆序的形式作为包名。
注意:从编译器角度来看,嵌套的包之间没有任何关系。如,java.util 包与 java.util.jar 包没有任何关系,每一个包都拥有独立的类集合。
3.7.1. 导入包(import 语句)
要使用包中的类,可以在类名前面添加完整的包名。如:
java.util.Date today = new java.util.Date();
还有一种更简便的方法是使用 import 语句导入包中的一个类。
import java.util.Date;       // 导入包java.util中的类Date

// ...
Date today = new Date();
也可以使用 import 语句来导入一个包中的所有类(使用星号*)。
import java.util.*;          // 导入包java.util中的所有类

// ...
Date today = new Date();
说明:一个 import 语句最多导入一个包,如不能使用 import java.*或 import java.*.*导入以 java 为前缀的所有包。
3.7.2. 静态导入包(import static 语句)
利用静态导入 import static 语句可以使你的代码更加简单。
比如,利用静态导入,可以把代码中 Math.cos 或 Math.PI 省写为 cos 或 PI 。
import java.lang.Math.*;

double r = Math.cos(Math.PI * theta);
上面代码也可以写为:
import static java.lang.Math.*;

double r = cos(PI * theta);         // 前面使用了import static,这里可省掉Math前缀
不过,一般情况下,你需要谨慎使用 import static 语句,因为它可能带来冲突。
3.7.3. 将类放入包中(package 语句)
如果没有在源文件中放置 package 语句,这源文件中的类就被放置在一个默认包(default package)中。默认包是一个没有名字的包。
要想将一个类放入包中,可以使用 package 语句加包名,如:
package com.test;

public class Foo {
    public static void main(String[] args) {
        System.out.println("This is Foo!");
    }
}
注意:如果使用包,则必须把相应的类文件放入和包名对应的目录结构中。
如上例中 Foo.java 应该放入到 com/test 目录中(如果不这么做,编译可正常通过,但在运行时会提示找不到类)。
.
└── com
    └── test
        ├── Foo.class
        └── Foo.java
编译运行如下:
$ javac com/test/Foo.java
$ java com.test.Foo
This is Foo!
3.8. 包作用域
如果没有指定 public 或 private,这个部分(类、方法或变量)可以被同一个包内所有的方法访问,这就是包作用域,又称为默认作用域。
3.9. Java 中的修饰符总结
| Modifier | Used on | Meaning |
|---|---|---|
| abstract | class | The class contains unimplemented methods and cannot be instantiated. |
| interface | All interfaces are abstract. The modifier is optional in interface declarations. | |
| method | No body is provided for the method; it is provided by a subclass. The signature is followed by a semicolon. The enclosing class must also be abstract. | |
| final | class | The class cannot be subclassed. |
| method | The method cannot be overridden (and is not subject to dynamic method lookup). | |
| field | The field cannot have its value changed. static final fields are compile-time constants. | |
| variable | A local variable, method parameter, or exception parameter cannot have its value changed ( Java 1.1 and later). Useful with local classes. | |
| native | method | The method is implemented in some platform-dependent way (often in C). No body is provided; the signature is followed by a semicolon. |
| none (package) | class | A non-public class is accessible only in its package. |
| interface | A non-public interface is accessible only in its package. | |
| member | A member that is not private, protected, or public has package visibility and is accessible only within its package. | |
| private | member | The member is accessible only within the class that defines it. |
| protected | member | The member is accessible only within the package in which it is defined and within subclasses. |
| public | class | The class is accessible anywhere its package is. |
| interface | The interface is accessible anywhere its package is. | |
| member | The member is accessible anywhere its class is. | |
| strictfp | class | All methods of the class are implicitly strictfp ( Java 1.2 and later). |
| method | All floating-point computation done by the method must be performed in a way that strictly conforms to the IEEE 754 standard. In particular, all values, including intermediate results, must be expressed as IEEE float or double values and cannot take advantage of any extra precision or range offered by native platform floating-point formats or hardware ( Java 1.2 and later). This modifier is rarely used. | |
| static | class | An inner class declared static is a top-level class, not associated with a member of the containing class (Java 1.1 and later). |
| method | A static method is a class method. It is not passed an implicit this object reference. It can be invoked through the class name. | |
| field | A static field is a class field. There is only one instance of the field, regardless of the number of class instances created. It can be accessed through the class name. | |
| initializer | The initializer is run when the class is loaded, rather than when an instance is created. | |
| synchronized | method | The method makes non-atomic modifications to the class or instance, so care must be taken to ensure that two threads cannot modify the class or instance at the same time. For a static method, a lock for the class is acquired before executing the method. For a non-static method, a lock for the specific object instance is acquired. |
| transient | field | The field is not part of the persistent state of the object and should not be serialized with the object. Used with object serialization; see java.io.ObjectOutputStream. |
| volatile | field | The field can be accessed by unsynchronized threads, so certain optimizations must not be performed on it. This modifier can sometimes be used as an alternative to synchronized. This modifier is very rarely used. |
| Modifier | Class | Variable | Method | Constructor | Free-Floating Block |
|---|---|---|---|---|---|
| public | yes | yes | yes | yes | no |
| protected | no | yes | yes | yes | no |
| none or package or default | yes | yes | yes | yes | yes |
| private | no | yes | yes | yes | no |
| final | yes | yes | yes | no | no |
| abstract | yes | no | yes | no | no |
| static | no | yes | yes | no | yes |
| native | no | no | yes | no | no |
| transient | no | yes | no | no | no |
| volatile | no | yes | no | no | no |
| synchronized | no | no | yes | no | yes |
| strictfp | yes | no | yes | yes | no |
参考:
http://docstore.mik.ua/orelly/java-ent/jnut/ch03_14.htm
http://www.javacamp.org/javaI/modifier.html
3.10. Object 内置方法 hashCode 和 equals
Java 中的类都继承于 java.lang.Object ,这个类有一些内置方法,如 toString, wait, notify, hashCode, equals 等等,这里重点讲一下 hashCode 和 equals 方法。
3.10.1. 何时应该覆盖 equals 方法
Object 的 equals 方法仅当两者引用同一个对象时,才认为它们是相等的。即采用下面的实现:
public boolean equals(Object obj) {
    return (this == obj);
}
什么时候应该覆盖 equals 呢? 如果类具有自己特有的“逻辑相等”概念(不同于对象等同的概念),而且超类还没有覆盖 equals 以实现期望的行为,这时我们就需要覆盖 equals 方法。这通常属于“值类(value class)”的情形。值类仅仅是一个表示值的类,例如 Integer 或者 Date 。程序员在利用 equals 方法来比较值对象的引用时,希望知道它们在逻辑上是否相等,而不是想了解它们是否指向同一个对象。
3.10.1.1. 覆盖 equals 时请遵守通用约定
在覆盖 equals 方法的时候,你必须要遵守它的通用约定。下面是约定的内容,来自 Object 的规范(JavaSE6):
- 自反性(reflexive)。对于任何非 null 的引用值 x,
x.equals(x)必须返回true。 - 对称性(symmetric)。对于任何非 null 的引用值 x 和 y,当且仅当
y.equals(x)返回true时,x.equals(y)必须返回true。 - 传递性(transitive)。对于任何非 null 的引用值 x、y 和 z,如果
x.equals(y)返回true,并且y.equals(z)也返回true,那么x.equals(z)也必须返回true。 - 一致性(consistent)。对于任何非 null 的引用值 x 和 y,只要 equals 的比较操作在对象中所用的信息没有被修改,多次调用
x.equals(y)就会一致地返回true,或者一致地返回false。 - 对于任何非 null 的引用值 x,
x.equals(null)必须返回false。
不要忽视这些规定。如果你不熟悉这些规定,可以参考“Effective Java 第二版”第 8 条,覆盖 equals 时请遵守通用约定。
3.10.2. 何时应该覆盖 hashCode 方法
Object 的 hashCode 方法返回看起来随机的整数,可以简单地认为它返回了该对象的内存地址。
在每个覆盖了 equals 方法的类中,也必须覆盖 hashCode 方法。 如果不这样做的话,就会违反 Object.hashCode 的通用约定(下面的第二条约定),从而导致该类无法结合所有基于散列的集合一起正常运作,这样的集合包括 HashMap、HashSet 和 Hashtable。
下面是 hashCode 方法需要遵守的约定,摘自 Object 规范(JavaSE6):
- 在应用程序的执行期间,只要对象的
equals方法的比较操作所用到的信息没有被修改,那么对这同一个对象调用多次,hashCode方法都必须始终如一地返回同一个整数。在同一个应用程序的多次执行过程中,每次执行所返回的整数可以不一致。 - 如果两个对象根据
equals方法比较是相等的,那么调用这两个对象中任意一个对象的hashCode方法都必须产生同样的整数结果。 - 如果两个对象根据
equals方法比较是不相等的,那么调用这两个对象中任意一个对象的hashCode方法,则不一定要产生不同的整数结果。但是程序员应该知道,给不相等的对象产生截然不同的整数结果,有可能提高散列表的性能。
为什么覆盖了 equals 方法,但没有覆盖 hashCode 会导致 HashMap、HashSet 和 Hashtable 无法正常工作呢?下面以 HashMap 为例进行说明。HashMap 采用“分离链接法”解决冲突,实际上是一个数组和链表的结合体,利用数组来模拟一个个桶以快速存取不同 hashCode 的 key 对象(即可认为 key 对象的 hashCode 值就是数组下标),对于相同 hashCode 的不同 key 对象,则再调用其 equals 方法从链表中提取出和 key 对象所相对应的 value 对象。
如果你只是覆盖了 equals 而没有重新定义 hashCode ,在读取 HashMap 的时候,除非你使用一个与你保存时引用完全相同的对象作为 key 值,否则你将得不到该 key 所对应的值。
下面是一个合法(但很不好)的 hashCode 写法:
// The worst possible legal hash function - never use!
@Override public int hashCode { return 42; }
任何类都可以采用上面的写法,因为它确保了相等的对象总是具有同样的散列码。但它也极为恶劣,因为它使得每个对象都具有同样的散列码。因此,每个对象都被映射到同一个散列桶中,使散列表退化为一个链表。它使得本该线性时间运行的程序变成了以平方级时间在运行,失去了 \(O(1)\) 时间复杂度。对于规模很大的散列表而言,这会关系到散列表能否正常工作。
4. 继承
利用继承,人们可以基于已存在的类构造新的类。继承已存在的类就是复用这些类的方法和域,在此基础上,还可以添加一些新的方法和域,以满足新的需求。
4.1. 继承基本用法(Java 中所有继承都是公有继承)
Java 中用关键字 extends 表示继承,且所有继承都是公有继承。
备注:C++ 中用冒号(:)表示继承,除公有继承外,还有私有继承和保护继承。
// file Manager.java
public class Manager extends Employee {
  private double bonus;

  public Manager(String n, double s, int year, int month, int day) {
    super(n, s, year, month, day);              // 可用super调用超类的构造器
    bonus = 0;
  }

  public void setBonus(double b) { bonus = b; }

  public double getSalary () {
    double baseSalary = super.getSalary();       // super不能省略,否则会有自己调用自己的死循环
    return baseSalary + bonus;
  }
}
用下面类来测试 Manager:
// file ManagerTest.java
public class ManagerTest {
  public static void main(String[] args) {
    Manager boss = new Manager("Carl Cracker", 80000, 1987, 12, 15);
    boss.setBonus(5000);

    Employee[] staff = new Employee[3];
    staff[0] = boss;
    staff[1] = new Employee("Harry Hacker", 50000, 1989, 10, 1);
    staff[2] = new Employee("Tommy Tester", 40000, 1990, 3, 15);

    for (Employee e: staff) {
      System.out.println(e.getName() + " " + e.getSalary());     //e.getSalary()会进行动态绑定
    }
  }
}
/* 程序会输出:
Carl Cracker 85000.0
Harry Hacker 50000.0
Tommy Tester 40000.0
*/
4.1.1. super 关键字
super 关键字有两个用途:一是调用超类的方法(参见 getSalary),二是调用超类的构造器(参见 Manager 构造器)。
备注 1:C++ 中要调用超类方法可以使用超类名加上作用域操作符(::),如 Java 中 super.getSalary()对应于 C++ 中的 Employee::getSalary。
备注 2:C++ 的构造函数中,使用初始化列表语法调用超类的构造函数。如在 C++ 中,Manager 的构造函数如下所示:
Manager::Manager(String n, double s, int year, int month, int day) : Employee(n, s, year, month, day) {
  bonus = 0;
}
4.1.2. 多态和动态绑定(Java 默认行为)
一个对象变量可以指示多种实际类型的现象被称为多态(polymorphism)。在运行时能够自动地选择调用哪个方法的现象称为动态绑定(dynamic binding)。
上面例子中,尽管 e 是 Employee 类型,但实际上既可以引用 Employee 类型的对象,也可以引用 Manager 类型的对象(这是多态)。当 e 引用 Employee 对象时,e.getSalary()调用的是 Employee 类中的 getSalary 方法;当 e 引用 Manager 对象时,e.getSalary()调用的是 Manager 类中的 getSalary 方法(这是动态绑定)。Java 虚拟机知道 e 实际引用的对象类型,因此能够正确地调用相应的方法。
说明:C++ 中需要把方法设置为虚方法才能启用动态绑定。动态绑定是 Java 的默认行为。Java 中如果不希望方法进行动态绑定,可以将方法标记为 final。
4.1.3. 不能将超类的引用赋给子类变量
不能将超类的引用赋给子类变量。
例如,Employee 是超类,Manager 是子类:
Employee foo = new Manager("Carl Cracker", 80000, 1987, 12, 15);           // OK
Manager bar = new Employee("Harry Hacker", 50000, 1989, 10, 1);            // 编译报错。不能将超类的引用赋给子类变量
Manager bar = (Manager) new Employee("Harry Hacker", 50000, 1989, 10, 1);  // 编译通过,运行时会报java.lang.ClassCastException异常
4.2. 阻止继承(final 类和方法)
要想一个类不能被继承,可以将它设置为 final。Java 中的 String 类就是 final 类。也可以只将类中的某个(些)方法声明为 final,这样,子类中不能覆盖这个(些)方法。
注:final 也可以修饰域。对于 final 域,构造对象之后就不允许改变它的值。
4.3. 抽象类(不能实例化)
abstract class Person {                      // 抽象类
    public abstract String getDescription(); // 抽象方法(有声明,但无实现)。往往在子类中实现
}
抽象类不能被实例化。
Java 中,含有抽象方法的类必须标记为抽象类。但一个类不含抽象方法,也可以将它标记为抽象类。
扩展抽象类可以有两种选择。一种是在子类中定义部分抽象方法或不定义抽象方法,这样就必须将子类也标记为抽象类;另一种是定义全部的抽象方法,这样子类就不是抽象的了。
备注:C++ 中包含有纯虚函数的类为抽象类。
5. 接口
在 Java 中,接口不是类,它是对类的一组需求描述,这些类必须遵守接口描述的统一格式进行定义。
In the Java programming language, an interface is a reference type, similar to a class, that can contain only constants, method signatures, default methods, static methods, and nested types. Method bodies exist only for default methods and static methods. Interfaces cannot be instantiated—they can only be implemented by classes or extended by other interfaces.
参考:https://docs.oracle.com/javase/tutorial/java/IandI/createinterface.html
5.1. 接口定义
接口用关键字 interface 定义。接口中的方法都为 public,且可以省略 public 关键字(实践中往往省略它们,使代码看起来更简洁)。
public interface Moveable {
    void move(double x, double y);  // 也可写为:public void move(double x, double y);
                                    // 也可写为:public abstract void move(double x, double y);
}
接口中的方法不能直接在接口中实现(可认为它们都是 abstract 方法)。
如,下面接口的定义不能编译成功:
public interface Moveable {
    // ERROR !
    void move(double x, double y) { return; };   // 编译出错,方法不能在接口中实现。
}
注意:接口中的 default Methods 和 static Methods 可以直接在接口中实现,后文将介绍。
5.1.1. 接口不可以包含实例域但可以包含 public static final 的域(公有静态常量)
接口不可以包含实例域。接口中可以包含 public static final 的域,且这些关键字都可以省略(实践中往往省略它们,使代码看起来更简洁)。
// file Moveable.java
public interface Moveable {
    int AAA = 100;                        // 编译成功,接口中的域默认为public static final,这些关键字都可以省略,
                                          // 所以 int AAA = 100; 也可以完整地写为: public static final int AAA = 100;
    //int BBB;                            // 编译出错,接口中不能包含实例域。
    //private static final int CCC = 100; // 编译出错,接口中的域应该为public static final
}
5.1.2. 接口可以包含 Default Methods(Java 8 中引入了 Default Methods)
Default methods enable us to add new functionalities to interfaces without breaking the classes that implements that interface.
下面是使用 Default methods 的例子:
interface InterfaceA {
    default void fun1() { // 用 default 关键字表明这个方法是Default method
        System.out.println("This is default method in InterfaceA");
    }
}

class ClassA implements InterfaceA {
}

class ClassB implements InterfaceA {
    @Override
    public void fun1() {  // 覆盖了 InterfaceA 中的 Default method
        System.out.println("Override default method in InterfaceA");
    }
}

public class Test {
    public static void main(String[] args) {
        new ClassA().fun1(); // 输出 This is default method in InterfaceA
        new ClassB().fun1(); // 输出 Override default method in InterfaceA
    }
}
在 Java 8 之前,接口与其实现类之间的耦合度很高,当为接口添加新方法时,这个接口的所有实现类都必须修改代码实现这个新方法。Default Methods 可解决这个问题,为接口添加新的 Default Methods 后,已有的接口实现不用做修改。
比如,Java 8 中为 Iterable 接口增加了下面两个 Default Methods: forEach 和 spliterator 。由于增加的方法都是 Default Methods,所以不用修改已有的 Iterable 接口实现类。
参考:
https://blog.idrsolutions.com/2015/01/java-8-default-methods-explained-5-minutes/
https://docs.oracle.com/javase/tutorial/java/IandI/defaultmethods.html
5.1.3. 接口可以包含 static 方法(从 Java 8 开始)
在 Java 8 之前的版本,接口中不可以包含 static 方法。从 Java 8 开始,接口中可以包含 static 方法。
参考:http://stackoverflow.com/questions/512877/why-cant-i-define-a-static-method-in-a-java-interface
5.2. 类可以实现接口(implements)
用关键字 implements 可以实现一个接口。如果类实现某个接口,则必须实现这个接口里的所有方法,否则编译器会报错。
如:
// file Animal.java
interface Animal {
    void eat();
    void travel();
}
类 MammalInt 实现上面定义的接口 Animal:
/* File name : MammalInt.java */
public class MammalInt implements Animal{

    public void eat() {
        System.out.println("Mammal eats");
    }

    public void travel() {
        System.out.println("Mammal travels");
    }

    public static void main(String args[]) {
        Animal m = new MammalInt();
        m.eat();
        m.travel();
    }
}
我们知道每个类只能拥有一个直接超类,但却可以可以实现多个接口。使用逗号将实现的各个接口名分隔开即可。如:
class Employee implements Cloneable, Comparable {
    // somethings.
}
5.2.1. 接口不能实现接口
接口不能实现接口,要“扩展”接口应该使用关键字 extends,参见后文。
类似下面的代码会编译出错:
public interface B implements A {   // 编译出错,接口不能实现接口。
}
5.3. 接口可以继承接口(extends)
使用关键字 extends,接口可以继承一个或多个接口。如:
// file A.java
public interface A {
    void methodA();
}
// file B.java
public interface B {
    void methodB();
}
// file C.java
public interface C extends A, B {
    void methodC();
}
参考:https://docs.oracle.com/javase/tutorial/java/IandI/nogrow.html
5.4. 接口和抽象类
接口不能被实例化,和抽象类相似。
和抽象类相比,使用接口的好处在于一个类可以实现多个接口,而一个类只能继承一个抽象类。
6. 嵌套类
在类内部定义的类,称为嵌套类。
class OuterClass {
    ...
    static class StaticNestedClass {  // static nested class
        ...
    }
    class InnerClass {                // non-static nested class
        ...
    }
}
嵌套类分为两类:一类是 static 嵌套类,另一类是非 static 嵌套类。非 static 嵌套类又称为内部类(inner class)。
注:有的书籍把嵌套类(不管是不是 static 的)都称为内部类。
参考:https://docs.oracle.com/javase/tutorial/java/javaOO/nested.html
注:C++ 中也有嵌套类,但 C++ 的这种嵌套是一种类之间的关系,而不是对象之间的关系。C++ 的嵌套类和 Java 中的“static 嵌套类”比较类似。
为什么使用嵌套类(嵌套类有哪些优点)?
- It is a way of logically grouping classes that are only used in one place: If a class is useful to only one other class, then it is logical to embed it in that class and keep the two together. Nesting such "helper classes" makes their package more streamlined.
- It increases encapsulation: Consider two top-level classes, A and B, where B needs access to members of A that would otherwise be declared private. By hiding class B within class A, A's members can be declared private and B can access them. In addition, B itself can be hidden from the outside world.
- It can lead to more readable and maintainable code: Nesting small classes within top-level classes places the code closer to where it is used.
6.1. Static 嵌套类
和 static 方法类似,static 嵌套类关联外围类,而不是外围类的对象实例,所以 static 嵌套类无法访问外围类的对象实例。
当嵌套类不需要访问外围类对象的时候,应该使用 static 嵌套类。
Static 嵌套类可使用下面方式进行实例化:
OuterClass.StaticNestedClass nestedObject = new OuterClass.StaticNestedClass();
6.2. Inner Classes(非 Static 嵌套类,可以访问外围类对象)
内部类可以访问实例化它的外围类的对象。
class Outer_Demo {
  //private variable of the outer class
  private int num = 175;

  //inner class
  public class Inner_Demo{
    public int getNum(){
      System.out.println("This is the getnum method of the inner class");
      return num;   // 内部类可以访问外围类的成员num
    }
  }
}

public class My_class2{
  public static void main(String args[]){
    Outer_Demo outer=new Outer_Demo();                   //实例化外围类
    Outer_Demo.Inner_Demo inner=outer.new Inner_Demo();  //实例化内部类
    System.out.println(inner.getNum());
  }
}
上面程序运行,将输出:
This is the getnum method of the inner class
175
参考:
http://www.tutorialspoint.com/java/java_innerclasses.htm
https://docs.oracle.com/javase/tutorial/java/javaOO/innerclasses.html
6.2.1. Local Classes(方法内定义的类)
Local classes are classes that are defined in a block, which is a group of zero or more statements between balanced braces. You typically find local classes defined in the body of a method.
参考:https://docs.oracle.com/javase/tutorial/java/javaOO/localclasses.html
6.2.2. Anonymous Classes(使用广泛,如绑定监听器时)
匿名类和局部类类似,只是匿名类没有名字。
匿名类通常的语法格式为:
new SupperType(construction parameters)
{
    inner class methods and data
}
其中, SupperType 可以是接口,于是匿名类就要实现这个接口;SupperType 也可以是一个类,于是匿名类就要扩展它。
匿名类的例子:
import javafx.application.Application;
import javafx.event.ActionEvent;
import javafx.event.EventHandler;
import javafx.scene.Scene;
import javafx.scene.control.Button;
import javafx.scene.layout.StackPane;
import javafx.stage.Stage;

public class HelloWorld extends Application {

  @Override
  public void start(Stage primaryStage) {
    Button btn = new Button();
    btn.setText("Say 'Hello World'");
    btn.setOnAction(new EventHandler<ActionEvent>() {   // 这里有个匿名类

        @Override
        public void handle(ActionEvent event) {
          System.out.println("Hello World!");
        }
      });

    StackPane root = new StackPane();
    root.getChildren().add(btn);

    Scene scene = new Scene(root, 300, 250);

    primaryStage.setTitle("Hello World!");
    primaryStage.setScene(scene);
    primaryStage.show();
  }

  public static void main(String[] args) {
    launch(args);
  }
}
参考:https://docs.oracle.com/javase/tutorial/java/javaOO/anonymousclasses.html
6.3. Lambda Expressions(Java 8 中引入)
Java 8 中引入了 Lambda Expressions,详情可参考:https://docs.oracle.com/javase/tutorial/java/javaOO/lambdaexpressions.html
Lambda Expressions 的基本语法为:
(parameters) -> expression
(parameters) -> { statements; }  // 多个参数之间用逗号分开

parameters -> expression         // 如果只有一个参数,则参数外层括号可省略
parameter -> { statements; }     // 如果只有一个参数,则参数外层括号可省略
下面是 Lambda Expressions 的例子:
interface LambdaFunction {  // It's a functional interface because it contains only one abstract method. A functional interface can define as many default and static methods as it requires.
    void call();
}

class LambdaTest {          // 下面是Lambda Expression的例子
    public static void main(String []args) {
        LambdaFunction lambdaFunction = () -> System.out.println("Hello world");
        lambdaFunction.call();
    }
}
下面是使用 Lambda Expression 或 Method Reference(后方将介绍)遍历 List 的例子:
String[] array = {"Jack", "Tom", "Jones"};
List<String> players =  Arrays.asList(array);

// Java 8以前的风格
for (String player : players) {
     System.out.println(player);
}

// Java 8风格(使用lambda expression)
players.forEach((String item) -> System.out.println(item));
players.forEach((item) -> System.out.println(item));        // 参数类型可省,同上
players.forEach(item -> System.out.println(item));          // 单参数外层括号可省,同上

// Java 8风格(使用method reference)
players.forEach(System.out::println);
6.3.1. Lambda Expressions 可简化“函数接口”的实现
如果一个接口中只包含一个抽象方法(可以包括任意个 default 方法和 static 方法),那么这个接口又称为函数接口(functional interface)。JDK 中函数接口有很多,比如 Runnable , Callable, Comparator, ActionListener 等等。
注意:判断一个接口是否为函数接口时,需要统计抽象方法的个数,java.lang.Object 的公有方法(如 toString 等)不能统计在内。如 Comparator 接口中的抽象方法有 compare 和 equals,但 equals 属于 java.lang.Object 的公有方法,不统计在内,所以 Comparator 接口是一个函数接口。
Lambda Expressions 可简化“函数接口”的实现。比如创建线程时,我们常常这样:
public class HelloRunnable {
  public static void main(String[] args) {
    Thread thread = new Thread(new Runnable() { //Runnable是一个函数接口(只包含一个抽象方法)

      @Override
      public void run() {
        System.out.println("Hello from a thread!");
      }
    });
    thread.start();
  }
}
如果使用 Lambda Expressions,则代码更简单,如:
public class HelloRunnable {
  public static void main(String[] args) {
    Thread thread = new Thread(() -> {   // 这是Lambda Expressions
      System.out.println("Hello from a thread!");
    });
    thread.start();
  }
}
6.3.2. 方法引用(Method References, 即::)
方法引用(Method References)可以看作是 Lambda Expressions 的简化形式,详情可参考:https://docs.oracle.com/javase/tutorial/java/javaOO/methodreferences.html
下面是方法引用的例子:
String[] stringArray = { "Barbara", "James", "Mary", "John"};
Arrays.sort(stringArray, String::compareToIgnoreCase);        // 方法引用的例子
Arrays.sort(stringArray, (a, b) -> a.compareToIgnoreCase(b)); // Lambda Expressions(功能同上)

Arrays.stream(stringArray).forEach(System.out::println);                 // 方法引用的例子
Arrays.stream(stringArray).forEach((item) -> System.out.println(item));  // Lambda Expressions(功能同上)
7. 异常处理
在 C 语言中,函数往往通过返回值来表明是否出错,处理错误的常用方式是检查函数返回值。这种方式有一些不足:如程序员可能忘记(或懒得)检查返回值,这导致程序某种情况下出现错误;如果每个函数都检测返回值,程序的主要逻辑代码被错误处理代码所包围,这时代码难以阅读。
和 C++ 类似,Java 中可以使用异常来处理错误。
7.1. 异常分类及层次
An exception is represented by an instance of the class Throwable (a direct subclass of Object) or one of its subclasses.
参考:The Java® Language Specification, Java SE 8 Edition, 11.1.1. The Kinds of Exceptions
Java 中异常类的层次如下所示:
              +-------------+
              |  Throwable  |
              +-------------+
              /             \
             /               \
            /                 \
     +--------+             +------------+
     | Error  |             | Exception  |
     +--------+             +------------+
       / | \                 /    |     \
     \________/           \________/     \
      unchecked           checked         \
                                       +-------------------+
                                       | RuntimeException  |
                                       +-------------------+
                                           /     |     \
                                       \___________________/
                                             unchecked
所有异常都是由 Throwable 继承而来,下一层分为两个分支:Error 和 Exception。
- Error 类层次结构描述了 Java 运行时系统的内部错误和资源耗尽错误。 应用程序不应该抛出这种类型的对象。 如果出现了这样的内部错误,除了安全地终止程序外,再也无能为力了。这种情况很少出现。
- Exception 类分解为两个分支:一个是 RuntimeException,另一个是除 RuntimeException 外的其它异常(如 I/O 错误 FileNotFoundException 等)。派生于 RuntimeException 的异常的例子有:错误的类型转换、数组访问越界(IndexOutOfBoundsException)、访问空指针(NullPointerException)等。
参考:
这里有一个完整的异常层次列表:https://www.cs.colorado.edu/~main/javasupp/throwable.html
7.1.1. 应避免 RuntimeException 发生
RuntimeException 异常是我们应该在程序中避免的,如应该通过检测数组下标是否越界来避免 ArrayIndexOutOfBoundsException,应该通过在使用变量之前检测是否为空来避免 NullPointerException 异常的发生。“如果出现 RuntimeException 异常,那么就一定是你的问题”是一条很有道理的规则。
7.1.2. unchecked 异常和 checked 异常
Java 语言规范将派生于“Error 类”或“RuntimeException 类”的所有异常称为 unchecked 异常。
除 unchecked 异常外,所有其他的异常称为 checked 异常。编译器检查(显然是编译阶段)是否为所有的 checked 异常提供了异常处理器,这是“checked 异常”这个名字的由来。
例如,FileNotFoundException 是一个 checked 异常,下面例子中的 FileReader 可能抛出 FileNotFoundException,但没有提供了异常处理器,编译器检查会检查出这个问题,并在编译时报错。
$ cat Test.java
import java.io.*;
import java.io.FileReader;

public class Test {

  public static void main(String args[]){
    File file = new File("/path/to/file.txt");
    FileReader fr = new FileReader(file);     // may throws FileNotFoundException
  }
}

$ javac Test.java
Test.java:8: error: unreported exception FileNotFoundException; must be caught or declared to be thrown
    FileReader fr = new FileReader(file);     // may throws FileNotFoundException
                    ^
1 error
解决办法是为 checked 异常提供异常处理器。如:
import java.io.*;
import java.io.FileReader;

public class Test {

  public static void main(String args[]){
    File file = new File("/path/to/file.txt");

    try {
      FileReader fr = new FileReader(file);     // may throws FileNotFoundException
    } catch (FileNotFoundException ex) {
      System.out.println("FileNotFoundException caught !");
    }
  }
}
7.1.2.1. checked 异常强制你提供异常处理器
checked 异常是有争议的,它强制你提供异常处理器,使代码变得繁琐。很多语言如 C#/Kotlin 并没有 checked 异常,它一样工作得很好。
7.2. 声明异常(throws 关键字)
如果方法中存在没有异常处理器的 checked 异常(如 IOException),你必须在方法首部用 throws 关键字声明这个 checked 异常,以表明“期望它的调用者处理它”。
public void writeList() throws IOException {
    // 下一行可能 throw IOException (checked exception)
    PrintWriter out = new PrintWriter(new FileWriter("OutFile.txt"));
    for (int i = 0; i < SIZE; i++) {
        // 下一行可能 throw IndexOutOfBoundsException (unchecked exception)
        out.println("Value at: " + i + " = " + list.get(i));
    }
    out.close();
}
说明:你可以在方法首部用 throws 关键字声明没有异常处理器的 unchecked 异常(如 IndexOutOfBoundsException),如:
// 上面函数 writeList 也可以声明为下面形式,但不推荐这么做!
public void writeList() throws IOException, IndexOutOfBoundsException {
    ......
}
但不推荐这么做。因为 unchecked 异常(如 IndexOutOfBoundsException)完全在我们的控制之下,如果你特别关心 IndexOutOfBoundsException 这样的错误,你应该花时间在程序中修正它,而不是声明这个错误会发生。
参考:https://docs.oracle.com/javase/tutorial/essential/exceptions/declaring.html
7.3. 抛出异常(throw 关键字)
用 throw 关键字可以抛出异常,如:
public Object pop() {
    Object obj;

    if (size == 0) {
        throw new EmptyStackException();  // unchecked exception
    }

    obj = objectAt(size - 1);
    setObjectAt(size - 1, null);
    size--;
    return obj;
}
参考:https://docs.oracle.com/javase/tutorial/essential/exceptions/throwing.html
7.4. 捕获异常
如果某个异常发生的时候没有在任何地方进行捕获,那么程序会终止执行。
要捕获一个异常,必须使用 try/catch 语句块。基本格式如下:
try {
    code
} catch (ExceptionType1 name) {
    handler for this type
} catch (ExceptionType2 name) {
    handler for this type
}
如果在 try 语句块中的任何代码抛出了一个在 catch 子句中说明的异常类,那么(1)程序将跳过 try 语句块的其余代码;(2)程序将执行 catch 子句中的处理器代码。
如果在 try 语句块中的代码没有抛出任何异常,那么程序将跳过 catch 子句。
如果方法中的任何代码抛出了一个在 catch 子句中没有声明的异常类型,那么这个方法就会立刻退出(期待调用者为这种类型的异常设计了 catch 子句)。
说明:从 Java 7 开始,可以一次捕获多个异常。如下面代码:
catch (IOException ex) {
     logger.log(ex);
     throw ex;
} catch (SQLException ex) {
     logger.log(ex);
     throw ex;
}
在 Java 7 中可以写为:
catch (IOException | SQLException ex) {
    logger.log(ex);
    throw ex;
}
7.4.1. finally 子句
不管是否有异常被捕获,finally 子句中的代码都会被执行。 这在需要回收一个本地资源时很有用(如关闭数据库连接)。
说明:finally 子句中包含 return 语句时,finally 子句中的 return 会覆盖原始的 return 语句。
public int f(int n)   {
  try {
    int r = n * n;
    return r;
  } finally {
    if (n == 2) return 0;
  }
}
上面例子中,如果调用 f(2),那么会返回 0,而不是 4。
7.4.1.1. finally 可能导致原有异常丢失
static String readFirstLine(String path) throws IOException {
    BufferedReader br = new BufferedReader(new FileReader(path));
    try {
        return br.readLine();
    } finally {
        if (br != null) br.close();   // 若readLine和close都抛出异常,那么readLine的异常会丢失
    }
}
最好的解决办法是 finally 子句中执行清除操作的方法(如 close 等)不要抛出异常。但 BufferedReader 的设计并没有这样做。
7.5. 创建异常类
在程序中,很可能会遇到任何标准异常类都没有能够充分地描述清楚的问题。在这种情况下,创建自己的异常类就是一件顺理成章的事情了。创建异常类很简单,只需要定义一个派生于 Exception(或者 Exception 的子类)的类。
习惯上,定义的类应该至少包含两个构造器,一个默认构造器;另一个是带有详细描述信息的构造器(超类 Throwable 的 toString 方法将会打印出这些详细信息)。
// 自定义异常类的例子:
class FileFormatException extends IOException {
    public FileFormatException() {
        super();
    }

    public FileFormatException(String msg) {
        super(msg);
    }
}
7.6. try-with-resources(可确保资源被正确关闭)
The try-with-resources statement is a try statement that declares one or more resources. A resource is an object that must be closed after the program is finished with it. The try-with-resources statement ensures that each resource is closed at the end of the statement. Any object that implements java.lang.AutoCloseable, which includes all objects which implement java.io.Closeable, can be used as a resource.
try-with-resources 是在 Java 7 中新增加的。使用实例:
static String readFirstLineFromFile(String path) throws IOException {
    try (BufferedReader br = new BufferedReader(new FileReader(path))) {
        return br.readLine();
    }
}
在 Java 7 之前,和上面代码功能相同的代码为:
static String readFirstLineFromFileWithFinallyBlock(String path)
                                                     throws IOException {
    BufferedReader br = new BufferedReader(new FileReader(path));
    try {
        return br.readLine();
    } finally {
        if (br != null) br.close();
    }
}
7.6.1. Java 9 中增强了 try-with-resources 语句
Java 9 中对 try-with-resources 语句进行了增强。
如,下面的代码:
// work in Java 7+
try (Resource r1 = resource1; Resource r2 = resource2; ...) {
    ...
}
在 Java 9 中还可以写为:
// work in Java 9+
Resource r1 = resource1;
Resource r2 = resource2;
...
try (resource1; resource2; ...) {
    ...
}
8. 泛型程序设计
泛型程序设计(Generic programming)意味着缩写的代码可以被很多不同类型的对象所重用。使用泛型机制编写的程序代码要比那些杂乱地使用 Object 变量,然后再进行强制类型转换的代码具有更好的安全性和可读性。
8.1. 泛型类实例
泛型类是指具有一个或多个“类型参数”的类。“类型参数”用尖括号括起来,放在类名的后面。
下面是一个泛型类的例子。T为类型参数。
public class Pair<T>                         // 泛型类
{
    private T first;
    private T second;
    public Pair() { first = null; second = null; }
    public Pair(T first, T second) { this.first = first; this.second = second; }
    public T getFirst() { return first; }      // 泛型方法
    public T getSecond() { return second; }
    public void setFirst(T newValue) { first = newValue; }
    public void setSecond(T newValue) { second = newValue; }
}
用具体的类型替换类型参数就可以实例化泛型类型。如:
Pair<String> // 实例化泛型类型
8.1.1. 多个“类型参数”
泛型类可以有多个类型参数。例如,可以定义 Pair 类,其中第一个域和第二个域使用不同的类型,如:
public class Pair<T, U> {...}
8.1.2. “类型参数”的约定名字
“类型参数”有一些约定名字(仅是约定而已,你可以不遵守)。
E - Element
K - Key
N - Number
T - Type
V - Value
S,U,V etc. - 2nd, 3rd, 4th types
8.2. 泛型接口
接口也可以使用泛型的。如:
public interface List <E> {
    void add(E x);
    Iterator<E> iterator();
}

public interface Iterator<E> {
    E next();
    boolean hasNext();
}
8.3. 泛型方法
可以定义一个带有“类型参数”的方法,称为泛型方法。
如:
class ArrayAlg
{
  public static <T> T getMiddle(T... a)    // 泛型方法(定义在普通类中)
  {
    return a[a.length/2];
  }
}
普通类中定义的泛型方法在其返回类型前面有尖括号和类型参数(注:泛型类中定义的泛型方法其返回类型前面不需要尖括号和类型参数)。
当调用一个泛型方法时,在方法名前加上尖括号,并放入具体的类型。如:
String middle = ArrayAlg.<String>getMiddle("ABC", "XYZ", "IJK");    // 调用泛型方法。方法名前的尖括号中放入具体的类型。
String middle = ArrayAlg.getMiddle("ABC", "XYZ", "IJK");            // 同上。不产生歧义时,泛型方法名前的<String>可以省略。
说明:Java 中为什么不像 C++ 那样将类型参数放在方法名后面呢?这是因为 C++ 的作法可能会导致语法分析的歧义。例如,g(f<a, b>(c))可能理解为“用 f<a, b>(c)的结果调用 g”,或者理解为“用两个布尔值 f<a 和 b>(c)调用 g”。
8.4. 类型参数的限定(使用 extends)
有时,想要对类或方法的“类型参数”加以约束。请看下面例子。
class ArrayAlg
{
    public static <T> T min(T[] a)     // almost correct
    {
        if (a == null || a.length == 0) return null;
        T smallest = a[0];
        for (int i = 1; i < a.length; i++)
            if (smallest.compareTo(a[i]) > 0) smallest = a[i];
        return smallest;
    }
}
上面例子中,变量 smallest 的类型为 T,它可以是任何一个类的对象。那怎么确保 T 所属的类一定有 compareTo 方法呢?
解决这个问题的方法是将 T 限制为实现了 Comparable 接口的类。可以通过对类型参数 T 设置相应的限定来实现。如:
public static <T extends Comparable> T min(T[] a) {...}
现在,泛型方法 min 只能被实现了 Comparable 接口的类(如 String,Date 等)的数组调用。
说明:Comparable 是一个接口,为什么在这里使用关键字 extends,而不是 implements 呢?下面符号:
<T extends BoundingType>
表示 T 应该是 BoundingType 的子类型。T和 BoudingType 可以是类,也可以是接口。选择关键字 extends 的原因是它更接近子类的概念。
8.4.1. 指定多个限定
一个类型参数或通配符(后文将介绍通配符)可以有多个限定。多个限定之间用“&”分隔。如:
<T extends Comparable & Serializable>
这些限定中,最多只能有一个是“类名”。当有“类名”时,必须把“类名”指定为列表中的第一个。如:
Class A { /* ... */ }
interface B { /* ... */ }
interface C { /* ... */ }

class D <T extends A & B & C> { /* ... */ }    // OK. 类名(有的话)必须指定为列表中的第一个
class D <T extends B & A & C> { /* ... */ }    // compile-time error
8.5. 通配符类型(Wildcard Types)
A wildcard describes a family of types.
There are 3 different flavors of wildcards:
(1) "?" - the unbounded wildcard. It stands for the family of all types.
(2) "? extends Type" - a wildcard with an upper bound. It stands for the family of all types that are subtypes of Type , type Type being included.
(3) "? super Type" - a wildcard with a lower bound. It stands for the family of all types that are supertypes of Type , type Type being included.
参考:http://www.angelikalanger.com/GenericsFAQ/FAQSections/TypeArguments.html#FAQ101
8.5.1. 无限定通配符
如何编写一个打印 List 各个元素的函数呢?
public static void printList1(List<Object> list) {
    for (Object elem : list)
        System.out.println(elem);
}
上面这个函数是无法打印 List<Integer>, List<String>等的,因为它们并不是 List<Object>的子类型。
要打印 List<Integer>, List<String>等,可以用“无限定通配符”来实现。
public static void printList2(List<?> list) {          // 无限定通配符
    for (Object elem : list)
        System.out.println(elem);
}

public static <T> void printList3(List<T> list) {      // 同上
    for (Object elem : list)
        System.out.println(elem);
}
测试代码:
List<Integer> li = Arrays.asList(1, 2, 3);
List<String>  ls = Arrays.asList("one", "two", "three");
printList2(li);
printList3(li);
printList2(ls);
printList3(ls);
8.5.2. “有限定类型参数”和“有限定通配符”的区别
“有限定类型参数”和“有限定通配符”的区别如表 7 所示。
| Syntax | |
|---|---|
| type parameter bound | TypeParameter extends Class & Interface 1 & ... & Interface N |
| wildcard bound (upper bound) | ? extends SuperType |
| wildcard bound (lower bound) | ? super SubType |
“有限定类型参数”和“有限定通配符”区别的总结:
(1) A wildcard can have only one bound, while a type parameter can have several bounds.
(2) A wildcard can have a lower or an upper bound, while there is no such thing as a lower bound for a type parameter.
很多时候,“有限定类型参数”和“有限定通配符”实现的功能是相同的。如:
public <T extends Animal> void takeThing(ArrayList<T> list)   // “有限定类型参数”
public void takeThing(ArrayList<? extends Animal> list)       // “有限定通配符”(功能同上)
8.6. 类型擦除(Type Erasure)
Java 泛型的实现采取了“伪泛型”的策略,即 Java 在语法上支持泛型,但是在编译阶段会进行所谓的“类型擦除”(Type Erasure),将所有的泛型表示(尖括号中的内容)都替换为具体的类型(其对应的原生态类型),就像完全没有泛型一样。
参考:https://docs.oracle.com/javase/tutorial/java/generics/erasure.html
9. Java Collections Framework
What Is a Collections Framework?
A collections framework is a unified architecture for representing and manipulating collections. All collections frameworks contain the following:
- Interfaces: These are abstract data types that represent collections. Interfaces allow collections to be manipulated independently of the details of their representation. In object-oriented languages, interfaces generally form a hierarchy.
- Implementations: These are the concrete implementations of the collection interfaces. In essence, they are reusable data structures.
- Algorithms: These are the methods that perform useful computations, such as searching and sorting, on objects that implement collection interfaces. The algorithms are said to be polymorphic: that is, the same method can be used on many different implementations of the appropriate collection interface. In essence, algorithms are reusable functionality.
Figure 2: The core collection interfaces (the hierarchy consists of two distinct trees - a Map is not a true Collection)
参考:
http://docs.oracle.com/javase/tutorial/collections/index.html
http://docs.oracle.com/javase/tutorial/collections/interfaces/index.html
9.1. Summary of collections
| Interfaces | Single threaded implementations | Concurrent implementations |
|
List |
ArrayList - generic array-based LinkedList - do not use Vector - deprecated |
CopyOnWriteArrayList - seldom updated, often traversed |
|
Queue or Deque |
ArrayDeque - generic array-based Stack - deprecated PriorityQueue - sorted retrieval operations |
ArrayBlockingQueue - bounded blocking queue ConcurrentLinkedDeque/ConcurrentLinkedQueue - unbounded linked queue (CAS) DelayQueue - queue with delays on each element LinkedBlockingDeque/LinkedBlockingQueue - optionally bounded linked queue (locks) LinkedTransferQueue - may transfer elements w/o storing PriorityBlockingQueue - concurrent PriorityQueue SynchronousQueue - Exchanger with Queue interface |
|
Map |
HashMap - generic map EnumMap - enum keys Hashtable - deprecated IdentityHashMap - keys compared with == LinkedHashMap - keeps insertion order TreeMap - sorted keys WeakHashMap - useful for caches |
ConcurrentHashMap - generic concurrent map ConcurrentSkipListMap - sorted concurrent map |
|
Set |
HashSet - generic set EnumSet - set of enums BitSet - set of bits/dense integers LinkedHashSet - keeps insertion order TreeSet - sorted set |
ConcurrentSkipListSet - sorted concurrent set CopyOnWriteArraySet - seldom updated, often traversed |
9.1.1. Collections.synchronizedXXX
当有多个线程会同时操作 ArrayList 时,我们需要手动同步。比如下面是 10 个线程同时操作 ArrayList 的例子(没有进行同步):
 1: import java.util.ArrayList;
 2: import java.util.Collections;
 3: import java.util.List;
 4: import java.util.concurrent.ExecutorService;
 5: import java.util.concurrent.Executors;
 6: import java.util.concurrent.TimeUnit;
 7:
 8: public class SyncArrayListTest {
 9:     public static void main(String[] args) throws InterruptedException {
10:         List<Integer> list = new ArrayList<>();
11:         Collections.addAll(list, new Integer[10000]);
12:         System.out.println("initial size: " + list.size());
13:
14:         final ExecutorService e = Executors.newFixedThreadPool(10);
15:         int size = list.size();
16:         for (int i = 0; i < size; i++) {
17:             e.execute(() -> {
18:                 list.remove(0);
19:             });
20:         }
21:         e.shutdown();
22:         e.awaitTermination(1000, TimeUnit.SECONDS);
23:         System.out.println(list.size());   // 期待为0,但没有同步,很可能不是0
24:     }
25: }
运行上面程序,你可能得到(每次运行结果可能都不一样):
initial size: 10000
162
这个问题很容易修复,把操作 ArrayList 的地方用 synchronized 保护起来即可。即把第 18 行修改(方式一)为:
                synchronized (list) {
                    list.remove(0);
                }
经过上面修改后,每次运行你都会得到:
initial size: 10000
0
还有另外一种同步方式,使用 Collections.synchronizedList() 。即把第 10 行修改(方式二)为:
List<Integer> list = Collections.synchronizedList(new ArrayList<>());
说明:使用 Collections.synchronizedList() 包装 ArrayList 对象后,新 ArrayList 对象上的 add/remove/get/set 等方法都是线程安全的。 但如果你要用迭代器(或者 for 语句)遍历整个 ArrayList 对象时,你仍然需要显式地使用 synchronized 进行同步,关于这点在 Collections.synchronizedList() 的文档中明确地提到了。 即应该这样使用:
List list = Collections.synchronizedList(new ArrayList());
      ...
synchronized (list) {
    Iterator i = list.iterator(); // Must be in synchronized block
    while (i.hasNext())
        foo(i.next());
}
除 synchronizedList() 外,Collections 中还有其它 synchronizedXXX 方法,如:
- synchronizedCollection(Collection<T> c)
- synchronizedList(List<T> list)
- synchronizedMap(Map<K,V> m)
- synchronizedNavigableMap(NavigableMap<K,V> m)
- synchronizedNavigableSet(NavigableSet<T> s)
- synchronizedSet(Set<T> s)
- synchronizedSortedMap(SortedMap<K,V> m)
- synchronizedSortedSet(SortedSet<T> s)
9.1.2. Tips: 遍历 Collection 时删除元素(必须用迭代器的 remove 方法)
Iterator.remove is the only safe way to modify a collection during iteration; the behavior is unspecified if the underlying collection is modified in any other way while the iteration is in progress.
摘自:http://docs.oracle.com/javase/tutorial/collections/interfaces/collection.html
测试实例:
import java.util.ArrayList;
import java.util.Iterator;
import java.util.List;

public class IteratingTest {

    public static void main(String[] args) {

        /* 这⾥以List为例,HashMap等其它Collection也⼀样 */
        List<String> list = new ArrayList<String>();
        list.add("Test1");
        list.add("Test2");
        list.add("Test3");
        list.add("Test4");
        list.add("Test5");

        /* 下面用法是正确的 */
        Iterator<String> it = list.iterator();
        while (it.hasNext()) {
            if (it.next().equals("Test1")) {
                it.remove();         // 遍历Collection时删除元素,只能使用Iterator.remove()方法
            }
        }

        /* 下面用法是错误的!!! */
        for (String item : list) {
            if (item.equals("Test2")) {
                list.remove(item);   // 错误用法!可能出现ConcurrentModificationException异常
                                     // 有时(如删除最后一个元素Test5)没有异常,但不要这样使用
            }
        }
    }
}
参考:
http://stackoverflow.com/questions/223918/iterating-through-a-collection-avoiding-concurrentmodificationexception-when-re
http://stackoverflow.com/questions/6092642/how-to-remove-a-key-from-hashmap-while-iterating-over-it
9.1.3. 实例:使用 LinkedHashMap 实现 LRU Cache
下面使用 LinkedHashMap 实现 LRU Cache 的例子:
import java.util.LinkedHashMap;
import java.util.Map;

public LRUCache<K, V> extends LinkedHashMap<K, V> {
  private int cacheSize;

  public LRUCache(int cacheSize) {
    // 默认LinkedHashMap按“插入顺序”排序,可通过它的一个构造函数定制其行为:
    // LinkedHashMap(int initialCapacity, float loadFactor, boolean accessOrder)
    // 设置其第3个参数(accessOrder)为true可指定为按“访问”顺序排序
    super(16, 0.75, true);
    // 如果上一行写为 super(16, 0.75, false); 或者 super(16, 0.75); 则实现的是
    // FIFO Cache(策略为:如果数据先进入缓存中,则先淘汰它)
    this.cacheSize = cacheSize;
  }

  // 默认返回false,即不删除旧数据;下面重写这个方法,当大于指定大小时删除旧数据
  protected boolean removeEldestEntry(Map.Entry<K, V> eldest) {
    return size() >= cacheSize;
  }
}
注:上面类不是线程安全的,并发使用时需要加锁。
10. Java I/O 操作
必看的 Java I/O 相关基础资料:
http://docs.oracle.com/javase/tutorial/essential/io/index.html
10.1. Java I/O 简介
在 Java 中,可以从中读入字节序列的对象称为“输入流(可用 read 方法操作)”;可以向其中写入字节序列的对象称为“输出流(可用 write 方法操作)”。
由于面向字节的流不便于处理 Unicode 字符。Java 单独实现了一套处理 Unicode 字符流的 API。
Java 中有两套 I/O 相关 API,一套是面向字节的,另一套面向 Unicode 字符的(需要用户指定编码,若不指定则采用默认编码)。 默认编码可以这样得到 System.getProperty("file.encoding")。Linux 下测试时得到的默认编码是 UTF-8。
面向字节的 API 的基类为 InputStream 和 OutputStream。
面向 Unicode 字符的 API 的基类为 Reader 和 Writer。
10.1.1. 两套 I/O 类的继承层次
两套 I/O 类中“和读相关的类”(即 InputStream 和 Reader)的主要继承层次和类中的接口和方法如图 3 和图 4 所示。
Figure 3: InputStream hierarchy
Figure 4: Reader hierarchy
说明:上面并不是一个完整的继承层次,一些不常用的类没有展示在图中。
参考:
http://www.programcreek.com/2012/05/java-io-class-hierarchy-diagram/
10.1.2. InputStream 实例:按字节读文件
read 和 write 方法在执行时都将阻塞,直到字节确实被读入或写出。 这意味着如果流不能被立即访问(通常是因为网络连接忙),那么当前线程将被阻塞。
InputStream 接口中有个 available 方法,它可以检查当前可用于读入的字节数。为了避免阻塞,我们在调用 read 前可以先测试 available,如:
byte[] buf = new byte[BUF_LEN];
if (in.available() > 0) {
    in.read(buf, 0, buf.length);
}
下面是一个 InputStream 实例,按字节读文件:
import java.io.BufferedInputStream;
import java.io.FileInputStream;
import java.io.IOException;
import java.io.InputStream;

public class BufferedInputStreamDemo {
   public static void main(String[] args) throws Exception {

      InputStream inStream = null;
      BufferedInputStream bis = null;

      try{
         // open input stream test.txt for reading purpose.
         inStream = new FileInputStream("/tmp/1.txt");

         // input stream is converted to buffered input stream
         bis = new BufferedInputStream(inStream);

         // read until a single byte is available
         while( bis.available() > 0 )
         {
            // get the number of bytes available
            Integer nBytes = bis.available();
            System.out.println("Available bytes = " + nBytes );

            // read next available character
            char ch =  (char)bis.read();

            // print the read character.
            System.out.println("The character read = " + ch );
         }
      }catch(Exception e){
         e.printStackTrace();
      }finally{

         // releases any system resources associated with the stream
         if(inStream!=null)
            inStream.close();
         if(bis!=null)
            bis.close();
      }
   }
}
假设文件“/tmp/1.txt”的内容如下:
ABCDE
则上面程序会输出:
Available bytes = 5
The character read = A
Available bytes = 4
The character read = B
Available bytes = 3
The character read = C
Available bytes = 2
The character read = D
Available bytes = 1
The character read = E
例子摘自:http://www.tutorialspoint.com/java/io/bufferedinputstream_available.htm
10.2. Java I/O 中的设计模式
参考:《Java 与模式,第 27 章 设计模式在 Java I/O 库中的应用》
Java I/O 中主要应用的装饰者模式和适配器模式,其中 装饰者模式(Decorator Pattern)是 Java I/O 所使用的基本模式。
例如:BufferedInputStream 中有个 readline 方法。PushbackInputStream 中有 unread 方法。BufferedInputStream 和 PushbackInputStream 都扩展了 InputStream 的功能,是它的不同装饰者。
下面简单介绍一下装饰者模式。
适用性(以下情况适用 Decorator 模式)
- 需要扩展一个类的功能,或给一个类添加附加职责。
- 需要动态的给一个对象添加功能,这些功能可以再动态的撤销。
- 需要增加由一些基本功能的排列组合而产生的非常大量的功能,从而使继承关系变的不现实。
- 当不能采用生成子类的方法进行扩充时。一种情况是,可能有大量独立的扩展,为支持每一种组合将产生大量的子类,使得子类数目呈爆炸性增长。另一种情况可能是因为类定义被隐藏,或类定义不能用于生成子类。
优点
- Decorator 模式与继承关系的目的都是要扩展对象的功能,但是 Decorator 可以提供比继承更多的灵活性。
- 通过使用不同的具体装饰类以及这些装饰类的排列组合,设计师可以创造出很多不同行为的组合。
缺点
- 这种比继承更加灵活机动的特性,也同时意味着更加多的复杂性。
- 装饰模式会导致设计中出现许多小类,如果过度使用,会使程序变得很复杂。
- 装饰模式是针对抽象组件(Component)类型编程。但是,如果你要针对具体组件编程时,就应该重新思考你的应用架构,以及装饰者是否合适。当然也可以改变 Component 接口,增加新的公开的行为,实现“半透明”的装饰者模式。在实际项目中要做出最佳选择。
10.3. File I/O(NIO.2)
Java NIO(New Input/Output)——新的输入/输出 API 包——是 2002 年引入到 J2SE 1.4 里的。Java NIO 的目标是提高 Java 平台上的 I/O 密集型任务的性能。过了十年,很多 Java 开发者还是不知道怎么充分利用 NIO,更少的人知道在 Java SE 7 里引入了更新的输入/输出 API(NIO.2)。
10.3.1. 优先使用 java.nio.file 而不是 java.io.File
用 java.nio.file(NIO.2)和 java.io.File 都可以实现 File I/O 基本功能,如检测文件是否存在,删除文件,复制文件,移动文件等等。Java SE 7 的 NIO.2 克服了 java.io.File 中的一些缺点,应该优先使用。
表 8 是 java.nio.file(NIO.2)和 java.io.File 的一个不完全对比,摘自:https://docs.oracle.com/javase/tutorial/essential/io/legacy.html
| java.io.File Functionality | java.nio.file Functionality |
|---|---|
| java.io.File | java.nio.file.Path |
| java.io.RandomAccessFile | The SeekableByteChannel functionality. |
| File.canRead, canWrite, canExecute | Files.isReadable, Files.isWritable, and Files.isExecutable. |
| File.isDirectory(), File.isFile(), and File.length() | Files.isDirectory(Path, LinkOption...), Files.isRegularFile(Path, LinkOption...), and Files.size(Path) |
| File.lastModified() and File.setLastModified(long) | Files.getLastModifiedTime(Path, LinkOption...) and Files.setLastMOdifiedTime(Path, FileTime) |
| The File methods that set various attributes: setExecutable, setReadable, setReadOnly, setWritable | These methods are replaced by the Files method setAttribute(Path, String, Object, LinkOption...). |
| new File(parent, "newfile") | parent.resolve("newfile") |
| File.renameTo | Files.move |
| File.delete | Files.delete |
| File.createNewFile | Files.createFile |
| File.deleteOnExit | Replaced by the DELETE_ON_CLOSE option specified in the createFile method. |
| File.createTempFile | Files.createTempFile |
| File.exists | Files.exists and Files.notExists |
| File.compareTo and equals | Path.compareTo and equals |
| File.getAbsolutePath and getAbsoluteFile | Path.toAbsolutePath |
| File.getCanonicalPath and getCanonicalFile | Path.toRealPath or normalize |
| File.toURI | Path.toURI |
| File.isHidden | Files.isHidden |
| File.list and listFiles | Path.newDirectoryStream |
| File.mkdir and mkdirs | Path.createDirectory |
| File.listRoots | FileSystem.getRootDirectories |
| File.getTotalSpace, File.getFreeSpace, File.getUsableSpace | FileStore.getTotalSpace, FileStore.getUnallocatedSpace, FileStore.getUsableSpace, FileStore.getTotalSpace |
10.3.2. 实例:读入整个文件到 String
使用 Files.readAllBytes 可以读入整个文件。如把整个文件保存到 String 中:
String content = new String(Files.readAllBytes(Paths.get(filePath)), StandardCharsets.UTF_8);
10.4. 读写文本文件
参考:Java 核心技术(原书第 8 版)卷 II:高级特性,第 1.2.1 和 1.2.2 节
10.4.1. 写文本文件(PrintWriter)
写文本文件,地道的用法是用 PrintWriter。如:
//file test1.java
import java.io.*;

public class test1 {
  public static void main(String[] args) {
    try {
      PrintWriter out = new PrintWriter("file123");
      out.println("first line.");
      out.println("next line.");
      out.close();
    }
    catch (IOException ex) {
      ex.printStackTrace();
    }
  }
}
10.4.2. 读文本文件(使用 BufferedReader 而不使用 Scanner)
一般地,读文本文件,常用的方法是使用 Scanner。如:
// file test2.java
import java.io.*;
import java.util.Scanner;

public class test2 {
  public static void main(String[] args) {
    try {
      Scanner s = new Scanner(new File("file123"));
      //s.useDelimiter("xxx"); //默认以空格作为分割符,也可指定其它分隔符。

      while (s.hasNext()) {
        System.out.println(s.next());
      }
    }
    catch (IOException ex) {
      ex.printStackTrace();
    }
  }
}
如果文件 file123 由前面那个程序产生,则这个程序会输出:
$ java test2
first
line.
next
line.
说明:Scanner 是 Java 5.0 才引入的,在这之前可以使用 BufferedReader 读文件,不过 BufferedReader 中没有读入数字的方法。
Scanner 使用指定(或默认)字符集来处理文本,如果文本中夹杂着一些“非法”字符,Scanner 可能会出错且没有任何错误提示。 有网友遇到类似问题,比如:
http://stackoverflow.com/questions/29351077/a-bug-in-java-util-scanner
http://stackoverflow.com/questions/8330695/java-scanner-not-going-through-entire-file
总之,为了使程序的通用性更好,读文本时请不要使用 Scanner!(可以使用 BufferedReader)
10.4.3. 读写文件文件实例
10.4.3.1. 实例:判断文本文件是否包含指定行
public boolean containsLineInFile(String fileName, String lineToSearch){
  File file = new File(fileName);
  try {
    Scanner scanner = new Scanner(file);
    while (scanner.hasNextLine()) {
      if(scanner.nextLine().equals(lineToSearch)) {
        return true;
      }
    }
  } catch(FileNotFoundException e) {
    e.printStackTrace();
  }
  return false;
}
10.4.3.2. 实例:删除文本文件中的某行内容
public void removeLineFromFile(String file, String lineToRemove) {

  try {

    File inFile = new File(file);

    if (!inFile.isFile()) {
      System.out.println("Parameter is not an existing file");
      return;
    }

    //Construct the new file that will later be renamed to the original filename.
    File tempFile = new File(inFile.getAbsolutePath() + ".tmp");

    BufferedReader br = new BufferedReader(new FileReader(file));
    PrintWriter pw = new PrintWriter(new FileWriter(tempFile));

    String line = null;

    //Read from the original file and write to the new
    //unless content matches data to be removed.
    while ((line = br.readLine()) != null) {

      if (!line.trim().equals(lineToRemove)) {

        pw.println(line);
        pw.flush();
      }
    }
    pw.close();
    br.close();

    //Delete the original file
    if (!inFile.delete()) {
      System.out.println("Could not delete file");
      return;
    }

    //Rename the new file to the filename the original file had.
    if (!tempFile.renameTo(inFile))
      System.out.println("Could not rename file");

  }
  catch (FileNotFoundException ex) {
    ex.printStackTrace();
  }
  catch (IOException ex) {
    ex.printStackTrace();
  }
}
参考:
http://stackoverflow.com/questions/1377279/find-a-line-in-a-file-and-remove-it
10.4.3.3. 实例:更新 csv 文件部分内容
假设一个文件的格式如下,想更新其部分内容怎么办?
 1 adam 20 M
 2 betty 49 F
 3 charles 9 M
 4 david 22 M
 5 ethan 41 M
 6 faith 23 F
 7 greg 22 M
 8 heidi 63 F
想把第 1 列为 2 的那行(即第 2 行),更新为:2 betty-updated 499 F
public static void main(String args[]) {
  try {
    FileInputStream fstream = new FileInputStream("d:/new6.txt");
    // Get the object of DataInputStream
    DataInputStream in = new DataInputStream(fstream);
    BufferedReader br = new BufferedReader(new InputStreamReader(in));
    String strLine;
    StringBuilder fileContent = new StringBuilder();
    //Read File Line By Line
    while ((strLine = br.readLine()) != null) {
      // Print the content on the console
      System.out.println(strLine);
      String tokens[] = strLine.split("\\s");
      if (tokens.length > 0) {
        // Here tokens[0] will have value of ID
        if (tokens[0].equals("2")) {
          tokens[1] = "betty-updated";
          tokens[2] = "499";
          String newLine = tokens[0] + " " + tokens[1] + " " + tokens[2] + " " + tokens[3];
          fileContent.append(newLine);
          fileContent.append("\n");
        } else {
          // update content as it is
          fileContent.append(strLine);
          fileContent.append("\n");
        }
      }
    }
    // Now fileContent will have updated content , which you can override into file
    FileWriter fstreamWrite = new FileWriter("d:/new6.txt");
    BufferedWriter out = new BufferedWriter(fstreamWrite);
    out.write(fileContent.toString());
    out.close();
    //Close the input stream
    in.close();
  } catch (Exception e) {//Catch exception if any
    System.err.println("Error: " + e.getMessage());
  }
}
参考:
http://stackoverflow.com/questions/11100381/to-edit-a-specific-line-in-a-textfile-using-java-program
10.4.4. 读写 key=value 格式的配置文件
对于 Key1=Value1 这种格式的文件,没有必要自己分析,Java 中有内置的类处理。如:
import java.io.FileInputStream;
import java.io.IOException;
import java.io.InputStream;
import java.util.Properties;

public class App {
  public static void main(String[] args) {

    Properties prop = new Properties();
    InputStream input = null;

    try {

      input = new FileInputStream("1.txt");

      // load a properties file
      prop.load(input);

      // get the property value and print it out
      System.out.println(prop.getProperty("database"));
      System.out.println(prop.getProperty("dbuser"));
      System.out.println(prop.getProperty("dbpassword"));

    } catch (IOException ex) {
      ex.printStackTrace();
    } finally {
      if (input != null) {
        try {
          input.close();
        } catch (IOException e) {
          e.printStackTrace();
        }
      }
    }

  }
}
参考:
Java Properties file examples: http://www.mkyong.com/java/java-properties-file-examples/
11. Java Tips
11.1. JDK 中的内置工具
OpenJDK 中内置了很多实用的小工具,如调试器 jdb ,java 进程查看程序 jps 等等。
/usr/lib/jvm/java-7-openjdk-amd64/bin/jcmd
/usr/lib/jvm/java-7-openjdk-amd64/bin/xjc
/usr/lib/jvm/java-7-openjdk-amd64/bin/javap
/usr/lib/jvm/java-7-openjdk-amd64/bin/jrunscript
/usr/lib/jvm/java-7-openjdk-amd64/bin/jdb
/usr/lib/jvm/java-7-openjdk-amd64/bin/jsadebugd
/usr/lib/jvm/java-7-openjdk-amd64/bin/jmap
/usr/lib/jvm/java-7-openjdk-amd64/bin/jhat
/usr/lib/jvm/java-7-openjdk-amd64/bin/jconsole
/usr/lib/jvm/java-7-openjdk-amd64/bin/jstat
/usr/lib/jvm/java-7-openjdk-amd64/bin/wsgen
/usr/lib/jvm/java-7-openjdk-amd64/bin/javah
/usr/lib/jvm/java-7-openjdk-amd64/bin/jinfo
/usr/lib/jvm/java-7-openjdk-amd64/bin/jstatd
/usr/lib/jvm/java-7-openjdk-amd64/bin/native2ascii
/usr/lib/jvm/java-7-openjdk-amd64/bin/javadoc
/usr/lib/jvm/java-7-openjdk-amd64/bin/rmic
/usr/lib/jvm/java-7-openjdk-amd64/bin/javac
/usr/lib/jvm/java-7-openjdk-amd64/bin/schemagen
/usr/lib/jvm/java-7-openjdk-amd64/bin/jarsigner
/usr/lib/jvm/java-7-openjdk-amd64/bin/idlj
/usr/lib/jvm/java-7-openjdk-amd64/bin/jps
/usr/lib/jvm/java-7-openjdk-amd64/bin/jstack
/usr/lib/jvm/java-7-openjdk-amd64/bin/extcheck
/usr/lib/jvm/java-7-openjdk-amd64/bin/serialver
/usr/lib/jvm/java-7-openjdk-amd64/bin/appletviewer
/usr/lib/jvm/java-7-openjdk-amd64/bin/wsimport
/usr/lib/jvm/java-7-openjdk-amd64/bin/jar
参考:
JDK 内置工具使用:http://blog.csdn.net/fenglibing/article/details/6411999
11.1.1. jconsole/jvisualvm(Java 性能分析器)
从 Java 5 开始引入了 JConsole,它是一个 Java 性能分析器。
用 jconsole pid 即可查看本地 Java 进程的的相关信息(它还可以查看远程机器上的 Java 进程信息),其界面如图 5 所示。
Figure 5: Java jconsole
从 Java 6 开始引入了 JVisualVM(它在 Java 9 中被拿掉了),它也是 Java 性能分析器。
参考:
Java SE Monitoring and Management Guide, Using JConsole
jvisualvm - Java Virtual Machine Monitoring, Troubleshooting, and Profiling Tool
11.2. 程序名没有存储在 args 数组中
C/C++ 中,程序名存储在 args 数组中。而 Java 中,程序名并没有存储在 args 数组中。
public class Testargs {
    public static void main(String[] args) {
        for (String s: args) {
            System.out.println(s);
        }
    }
}
测试如下:
$ javac Testargs.java
$ java Testargs arg1 arg2
arg1
arg2
可知,程序名并没有存储在 args 数组中,java 或 Testargs 并不会被输出。
11.3. 什么是 JavaBean
A JavaBean is just a standard:
- All properties private (use getters/setters)
- A public no-argument constructor
- Implements Serializable.
That's it. It's just a convention.
参考:
http://stackoverflow.com/questions/3295496/what-is-a-javabean-exactly
http://www.tutorialspoint.com/jsp/jsp_java_beans.htm
11.4. Java 的四种引用类型(strong, soft, weak, phantom)
强引用:它是 Java 中默认的引用类型,即使用 A obj=new A(); 这种用法得到的引用。当内存不够用时,JVM 宁愿抛出 OutOfMemoryError,也不会将强引用对象进行回收。
软引用(可方便实现 cache): 软引用不会保证对象一定不会被回收,只能最大可能保证。 如果内存有剩余,那么软引用对象不会被回收,如果内存不足,那么 gc 会回收软引用对象。这种特性可以用来实现缓存技术。
import java.lang.ref.SoftReference;

public class SoftTest{
    public static void main(String[] args) {
        Object ref = new Object();           //ref是Object对象的强引用

        //将一个软引用指向对象,此时Object对象有两个引用
        SoftReference<Object> sf = new SoftReference<Object>(ref);

        ref = null;        //去除对象的强引用
        System.gc();       //gc只有在内存不足是才会回收软引用对象
    }
}
弱引用: 和软引用不同的是,gc 一旦发现弱引用就一定会回收它,不管内存是否充足。
不过,需要注意的是,gc 可能要运行多次才能找到弱引用对象。
弱引用也可以用来实现 cache,它适应于重建 cache 的代价很小的场景,我们一旦发现对象被回收,马上重建它即可。
import java.lang.ref.WeakReference;

public class WeakTest {
    public static void main(String[] args) throws InterruptedException {
        MyObj ref = new MyObj(); // ref是Object对象的强引用

        // 将一个弱引用指向对象,此时Object对象有两个引用
        WeakReference<MyObj> wf = new WeakReference<MyObj>(ref);

        System.out.println(wf.get());   // 输出MyObj@6d06d69c或其它类似值

        ref = null;  // 去除对象的强引用
        System.gc(); // 运行gc,发现弱引用对象,就会进行回收

        System.out.println(wf.get());    // 输出null
    }
}

class MyObj{ }
虚引用(又称幽灵引用,PhantomReference):虚引用主要用来跟踪对象被垃圾回收的活动,比如 Netty 中 ResourceLeakDetector 的实现就使用了虚引用。
参考:
http://blog.csdn.net/mxbhxx/article/details/9111711
http://paddy-w.iteye.com/blog/986796
http://stackoverflow.com/questions/299659/what-is-the-difference-between-a-soft-reference-and-a-weak-reference-in-java
https://community.oracle.com/blogs/enicholas/2006/05/04/understanding-weak-references
11.5. Java 8 新功能:Stream
A stream is a sequence of elements supporting sequential and parallel aggregate operations.
Using stream, you can process data in a declarative way similar to SQL statements. For example, consider the following SQL statement:
SELECT max(salary), employee_id, employee_name FROM Employee
The above SQL expression automatically returns the maximum salaried employee's details, without doing any computation on the developer's end. Using collections framework in Java, a developer has to use loops and make repeated checks. Another concern is efficiency; as multi-core processors are available at ease, a Java developer has to write parallel code processing that can be pretty error-prone.
To resolve such issues, Java 8 introduced the concept of stream that lets the developer to process data declaratively and leverage multicore architecture without the need to write any specific code for it.
Stream 还带来了编程风格的改变,更像函数式编程风格了。
double[] data = {7, 6, 8, 4, 2, 7, 6, 7, 6, 5};
double total1 = Arrays.stream(data).reduce(0, Double::sum);   // 求和
double total2 = Arrays.stream(data).sum();                    // 和上相同

double total3 = Arrays.stream(data).parallel().reduce(0, Double::sum);   // 求和(数据量非常大时可能更快)
double total4 = Arrays.stream(data).parallel().sum();                    // 和上相同
又如:
List<String> myList =
        Arrays.asList("a1", "a2", "b1", "c2", "c1");

myList.stream()
    .filter(s -> s.startsWith("c"))
    .map(String::toUpperCase)
    .sorted()
    .forEach(System.out::println);

    // 输出:
    // C1
    // C2
参考:
https://www.tutorialspoint.com/java8/java8_streams.htm
https://docs.oracle.com/javase/8/docs/api/java/util/stream/package-summary.html
11.6. Java 8 新功能:Optional 类(优雅避免 NullPointerException)
下面通过一个对比例子来说明使用 Optional 类可以不用检测 null 值也不会出现 NullPointerException:
| 不使用 Optional 类(下面的 MobileService 实现很不优雅,各种 null 检测) | 使用 Optional 类(MobileService 的实现变得优雅) |
|
public class ScreenResolution { private int width; private int height; public ScreenResolution(int width, int height) { this.width = width; this.height = height; } public int getWidth() { return width; } public int getHeight() { return height; } } |
public class ScreenResolution { private int width; private int height; public ScreenResolution(int width, int height) { this.width = width; this.height = height; } public int getWidth() { return width; } public int getHeight() { return height; } } |
|
public class DisplayFeatures { private String size; // In inches private ScreenResolution resolution; public DisplayFeatures(String size, ScreenResolution resolution) { this.size = size; this.resolution = resolution; } public String getSize() { return size; } public ScreenResolution getResolution() { return resolution; } } |
public class DisplayFeatures { private String size; // In inches /*!*/ private Optional public DisplayFeatures(String size, /*!*/ Optional this.size = size; this.resolution = resolution; } public String getSize() { return size; } /*!*/ public Optional return resolution; } } |
|
public class Mobile { private long id; private String brand; private String name; private DisplayFeatures displayFeatures; // Likewise we can see Memory Features, CameraFeatures etc. public Mobile(long id, String brand, String name, DisplayFeatures displayFeatures) { this.id = id; this.brand = brand; this.name = name; this.displayFeatures = displayFeatures; } public long getId() { return id; } public String getBrand() { return brand; } public String getName() { return name; } public DisplayFeatures getDisplayFeatures() { return displayFeatures; } } |
public class Mobile { private long id; private String brand; private String name; /*!*/ private Optional // Like wise we can see MemoryFeatures, CameraFeatures etc. public Mobile(long id, String brand, String name, /*!*/ Optional this.id = id; this.brand = brand; this.name = name; this.displayFeatures = displayFeatures; } public long getId() { return id; } public String getBrand() { return brand; } public String getName() { return name; } /*!*/ public Optional return displayFeatures; } } |
|
public class MobileService { public int getMobileScreenWidth(Mobile mobile) { if (mobile != null) { DisplayFeatures dfeatures = mobile.getDisplayFeatures(); if (dfeatures != null) { ScreenResolution resolution = dfeatures.getResolution(); if (resolution != null) { return resolution.getWidth(); } } } return 0; } } |
public class MobileService { /*!*/ public int getMobileScreenWidth(Optional /*!*/ return mobile.flatMap(Mobile::getDisplayFeatures) /*!*/ .flatMap(DisplayFeatures::getResolution) /*!*/ .map(ScreenResolution::getWidth).orElse(0); /*!*/ /*!*/ /*!*/ /*!*/ /*!*/ /*!*/ /*!*/ /*!*/ } } |
|
// test class public class MobileTesterWithoutOptional { public static void main(String[] args) { ScreenResolution resolution = new ScreenResolution(750, 1334); DisplayFeatures dfeatures = new DisplayFeatures("4.7", resolution); Mobile mobile = new Mobile(2015001, "Apple", "iPhone 6s", dfeatures); MobileService mService = new MobileService(); int width = mService.getMobileScreenWidth(mobile); System.out.println("Apple iPhone 6s Screen Width = " + width); ScreenResolution resolution2 = new ScreenResolution(0, 0); DisplayFeatures dfeatures2 = new DisplayFeatures("0", resolution2); Mobile mobile2 = new Mobile(2015001, "Apple", "iPhone 6s", dfeatures2); int width2 = mService.getMobileScreenWidth(mobile2); System.out.println("Apple iPhone 16s Screen Width = " + width2); } } |
// test class public class MobileTesterWithOptional { public static void main(String[] args) { ScreenResolution resolution = new ScreenResolution(750, 1334); DisplayFeatures dfeatures = new /*!*/ DisplayFeatures("4.7", Optional.of(resolution)); Mobile mobile = new /*!*/ Mobile(2015001, "Apple", "iPhone 6s", Optional.of(dfeatures)); MobileService mService = new MobileService(); /*!*/ int width = mService.getMobileScreenWidth(Optional.of(mobile)); System.out.println("Apple iPhone 6s Screen Width = " + width); /*!*/ /*!*/ /*!*/ Mobile mobile2 = new /*!*/ Mobile(2015001, "Apple", "iPhone 6s", Optional.empty()); /*!*/ int width2 = mService.getMobileScreenWidth(Optional.of(mobile2)); System.out.println("Apple iPhone 16s Screen Width = " + width2); } } |
11.7. Java 的对象没有子对象,只有指向其他对象的“指针”
In C++, an object can contain object directly as fields, whereas in Java objects can only hold references to those objects. That is, in C++, if you declare an object that has a string as a member, the storage space for that string is built directly into the space for the object itself, while in Java you just get space for a reference to some other String object stored elsewhere.
如下,类 A 的对象不会直接包含一个 String 类型的 s,B 类型的 b,数组类型的 arr,在类 A 的对象中仅会包含他们的引用(这和 C++ 很不同)。
public class A {
    private String s;   // 引用类型
    private B b;        // 引用类型
    int[] arr;          // 引用类型
}
在 Java 中,除基本类型外,其它都是引用类型。
11.8. Java 中创建对象的几种方式
Java 中创建对象的四种方式:
(1) 用 new 语句创建对象,这是最常见的创建对象的方法。
(2) 运用反射手段,调用 java.lang.Class 或者 java.lang.reflect.Constructor 类的 newInstance()实例方法。(Class 中的 newInstance()方法在初始化对象时使用的是没有参数的默认构造器,如果类没有默认构造器就会抛出异常;而 Constructor 类的 newInstance()方法更加强大,可以接受构造器的参数。)
(3) 调用对象的 clone()方法。
(4) 运用反序列化手段,调用 java.io.ObjectInputStream 对象的 readObject()方法。
参考:
Java 创建对象的四种方法:http://www.2cto.com/kf/201301/186080.html