Rust
Table of Contents
- 1. Rust 简介
- 2. 基本语法简介
- 3. Ownership
- 4. 结构体
- 5. 枚举
- 6. Package, Crates, Modules
- 7. 常见集合
- 8. 错误处理
- 9. Attribute(#)
- 10. Generic Types
- 11. Traits
- 12. Dynamic Dispatch
- 13. Lifetimes(单引号)
- 14. 函数式语法特性
- 15. 智能指针
- 16. Patterns
- 17. 其它主题
- 18. 测试
- 19. Rust 标准库
- 20. Tips
1. Rust 简介
Rust 是由 Mozilla 主导开发的通用、编译型编程语言。设计准则为“安全、并发、实用”,支持函数式、并发式、过程式以及面向对象的编程风格。
Rust 语言原本是 Mozilla 员工 Graydon Hoare 的私人项目,而 Mozilla 于 2009 年开始赞助这个项目,并且在 2010 年首次揭露了它的存在。也在同一年,其编译器源代码开始由原本的 OCaml 语言转移到用 Rust 语言,进行 bootstrapping 工作,称做 rustc,并于 2011 年实际完成。
Rust 受到了 Cyclone(C 的一种安全方言,一种命令式语言)的重大影响,包含来自 C++ 的面向对象特性的一些方面。但是,它也包含来自 Haskell 和 OCaml 等语言的函数特性。结果,我们获得了一种支持多模式编程(命令、函数和面向对象)的类似 C 的语言,如图 1 所示(摘自:https://www.ibm.com/developerworks/cn/opensource/os-developers-know-rust/index.html)。
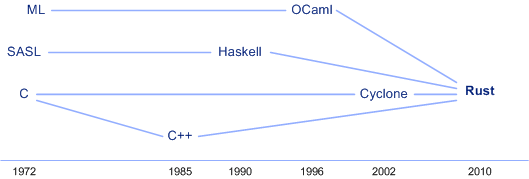
Figure 1: 影响了 rust 的一些语言
1.1. Hello World
下面是 Rust 版本的 Hello World 程序:
fn main() {
    println!("Hello, world!");
}
例子中的 println! 是一个宏,用于输出字符串,编译运行(假定上面程序文件名为 main.rs)如下:
$ rustc main.rs
$ ./main
Hello, world!
1.2. rustup(Rust 安装器)
rustup 是 Rust 安装器,可以帮助我们安装不同版本的 Rust 工具链(Toolchains),并在不同版本的 Rust 工具链之间自由切换。
所谓 Toolchain 就是指一套 Rust 编译器,它可以包含很多组件(Component),下面是一些组件(Component)的例子:
- rustc: 编译器
- cargo: 包管理器
- rustfmt: 源码格式化工具
- rust-std: 标准库
- clippy: 一个 lint 工具
表 1 是 rustup 的一些使用实例。
| 命令 | 说明 |
|---|---|
| rustup toolchain list | 查看安装了哪些工具链 |
| rustup toolchain install 1.47.0 | 安装指定的工具链,这里是安装 rust 1.47.0 |
| rustup toolchain uninstall 1.47.0 | 卸载指定的工具链,这里是卸载 rust 1.47.0 |
| rustup default 1.47.0-x86_64-apple-darwin | 设置「默认工具链」为 1.47.0-x86_64-apple-darwin |
| rustup component list | 查看当前工具链下安装了哪些 Component |
| rustup component add rust-docs | 安装组件 rust-docs 到当前工具链 |
| rustup update | 更新 toolchain 和 rustup 工具本身 |
1.3. Cargo(Rust 包管理器)
Cargo 是 Rust 的包管理器(网站 https://crates.io/ 中可以在线浏览其官方仓库),使用它可以创建 Rust 项目,管理项目依赖,编译项目等等。常用命令如表 2 所示。
| cargo 命令 | 说明 |
|---|---|
| cargo new | 创建新项目 |
| cargo init | 在当前目录中创建新项目。cargo new dir1 相当于 mkdir dir1; cargo init |
| cargo build | 编译项目,会生成二进制文件 |
| cargo run | 运行项目 |
| cargo check | 检测有没有语法错(不生成二进制文件),比命令 cargo build 快很多 |
| cargo doc | 生成文档,生成的文档保存在 target/doc 目录中 |
下面是 cargo 使用实例:
$ cargo new hello_cargo           # 创建名为 hello_cargo 的项目
     Created binary (application) `hello_cargo` project
$ find hello_cargo
hello_cargo
hello_cargo/Cargo.toml
hello_cargo/src
hello_cargo/src/main.rs
$ cd hello_cargo
$ cargo build                     # 编译项目
   Compiling hello_cargo v0.1.0 (file:///projects/hello_cargo)
    Finished dev [unoptimized + debuginfo] target(s) in 1.08s
$ cargo run                       # 运行项目
    Finished dev [unoptimized + debuginfo] target(s) in 0.03s
     Running `target/debug/hello_cargo`
Hello, world!
生成的文件 Cargo.toml,其内容如下:
[package]
name = "hello_cargo"
version = "0.1.0"
authors = ["Your Name <you@example.com>"]

[dependencies]
1.4. 是否提交 Cargo.lock 到仓库
如果目标是 binary,则要提交到仓库;如果目标是 library,则不提交到仓库。因为 library 的 Cargo.lock 文件就算提交到仓库,被其它项目依赖时,也不会使用 library 的 Cargo.lock 文件,因为如果项目使用依赖库的 Cargo.lock 时,很可能会有冲突。
2. 基本语法简介
2.1. 变量绑定
Rust 中使用 let 进行变量绑定。默认地, 变量一旦赋完值就不能再修改,除非使用 mut 关键字声明变量。 如:
fn main() {
    let x = 5;
    // x = 10;        // x 不能再修改,这行会报错
    println!("The value of x is: {}", x);

    let mut y = 5;
    y = 10;           // 可以修改 y,因为声明时使用了 mut 关键字
    println!("The value of y is: {}", y);
}
定义变量时,在变量名后增加冒号及类型名称就可以对变量进行类型声明。由于有类型推导系统,很多时候我们可以省略类型声明。如:
let x: i32 = 5; // x 是 i32 类型。也可以省写为 let x = 5;
2.1.1. const(常量,会被内联)
使用 let 声明的变量默认是不能修改的,但 let 并不能声明“全局常量”,换句话说,它只能在函数体内使用。
Rust 提供了 const 关键字用于声明常量。对于 const 声明的常量,必需显式地指定其类型(如下面例子中的 u32 )。 如:
const MAX_POINTS: u32 = 100_000; // 一般,常量名全为大写,且使用下划线分开
可以使用字面量或者 const 函数对 const 常量进行初始化,如:
const fn get_value1() -> u32 {
    1
}

fn get_value2() -> u32 {
    2
}

const X0: u32 = 0;                 // 使用 literal 初始化 const 常量
const X1: u32 = get_value1();      // 使用另一个 const 函数初始化 const 常量
// const X2: u32 = get_value2();   // 注:不能使用非 const 函数初始化 const 常量

fn main() {
    println!("X0: {}", X0);
    println!("X1: {}", X1);
}
编译器一般会对 const 常量进行内联,如果你对同一个 const 常量多次取地址,不保证得到的结果是相同的。
2.1.1.1. Constants with Destructors
常量可以包含析构器,也就是说:当值超过作用域后, drop 函数(参考节 15.3)会自动执行。如:
struct TypeWithDestructor(i32);

impl Drop for TypeWithDestructor {
    fn drop(&mut self) {
        println!("Dropped. Held {}.", self.0);
    }
}

const ZERO_WITH_DESTRUCTOR: TypeWithDestructor = TypeWithDestructor(0);

fn create_and_drop_zero_with_destructor() {
    let x = ZERO_WITH_DESTRUCTOR;
    // x gets dropped at end of function, calling drop.
    // prints "Dropped. Held 0.".
}

fn main() {
    create_and_drop_zero_with_destructor();
}
2.1.2. static(全局变量)
可以使用 static 声明全局变量。默认不能修改,除非附加 mut 关键字,访问 mut 修饰的 static 变量需要加上 unsafe 。如:
const fn get_value1() -> u32 {
    1
}

static X0: u32 = 0;                 // 使用 literal 初始化 static 常量
static mut X1: u32 = get_value1();  // 使用另一个 const 函数初始化 static 常量

fn main() {
    println!("X0: {}", X0);

    unsafe {
        println!("X1: {}", X1);     // 访问 static mut 变量,需要使用 unsafe 包围
    }
}
static 变量具备 static 生命周期,在整个程序运行期间都可访问,程序结束也不会调用 drop 。如果你对同一个 static 变量多次取地址,一定会得到相同的地址。
2.1.2.1. const VS. static
const 和 static 这两者比较相似,它们的对比可参考:https://rust-lang.github.io/rfcs/0246-const-vs-static.html
2.1.3. 变量在使用前必需初始化
和大多数其它语言不同,Rust 中变量在使用前必需初始化。如:
let x: i32;
// x = 5;                              // 把这行最前面的注释打开,下一行就不报错了
println!("The value of x is: {}", x);  // 前面只声明了 x ,但没有给它赋值,直接使用 x 会报错
2.1.4. Scope 和 Shadowing
变量绑定的作用域是它所在的块,可以用 {} 开启一个块。
fn main() {
    let x: i32 = 17;
    {
        let y: i32 = 3;   // y 只在当前块中有效
        println!("The value of x is {} and value of y is {}", x, y);
    }
    println!("The value of x is {} and value of y is {}", x, y); // 编译出错,y 已经无效了
}
一个变量可以被 shadowed,如:
fn main() {
    let x: i32 = 8;
    {
        println!("{}", x); // Prints "8"
        let x = 12;        // 块里新定义了变量 x ,外层块的 x 被 shadowed
        println!("{}", x); // Prints "12"
    } // 这个块结束后,外层的 x 重新有效
    println!("{}", x); // Prints "8"
    let x= 42;         // 相当于重新定义了变量 x,第 2 行定义的 x 不再有效
    println!("{}", x); // Prints "42"
}
再看一个变量被 shadowed 的例子:
let spaces = "   ";          // spaces 是字符串类型
let spaces = spaces.len();   // 前一个 spaces 变量被 shadowed,等号左边的新变量 spaces 是整形
上面例子中,定义了两个变量 spaces,它们的类型可以完全不同。如果只有一个变量,那它类型是不能改变的:
let mut spaces = "   ";
spaces = spaces.len();       // 编译出错,不能改变 spaces 的类型
2.2. 注释
Rust 中采用了 C++ 风格的注释语法,即 // 表示行注释, /* */ 表示块注释,也支持嵌套的块注释。
2.2.1. 在注释中写文档
注释中写文档,支持下面形式:
///                     Outer line doc
/**       */            Outer block doc
//!                     Inner line doc
/*!       */            Inner block doc
Outer 和 Inner 的区别为:
pub struct Person {
    //! 这种风格的注释是 Inner doc,表示对它的外围环境(即 Person)的注释

    /// 这种风格的注释是 Outer doc,表示对它平级的下一行(即 name)的注释
    name: String,
}
/// 最为常用,下面是它的使用例子:
/// A human being is represented here
pub struct Person {
    /// A person must have a name, no matter how much Juliet may hate it
    name: String,
}

impl Person {
    /// Returns a person with the name given them
    ///
    /// # Arguments
    ///
    /// * `name` - A string slice that holds the name of the person
    ///
    /// # Examples
    ///
    /// ```
    /// // You can have rust code between fences inside the comments
    /// // If you pass --test to `rustdoc`, it will even test it for you!
    /// use doc::Person;
    /// let person = Person::new("name");
    /// ```
    pub fn new(name: &str) -> Person {
        Person {
            name: name.to_string(),
        }
    }

    /// Gives a friendly hello!
    ///
    /// Says "Hello, [name]" to the `Person` it is called on.
    pub fn hello(& self) {
        println!("Hello, {}!", self.name);
    }
}

fn main() {
    let john = Person::new("John");

    john.hello();
}
参考:
https://doc.rust-lang.org/book/ch14-02-publishing-to-crates-io.html#making-useful-documentation-comments
https://doc.rust-lang.org/rust-by-example/meta/doc.html
2.3. 数据类型
2.3.1. 标量类型
2.3.1.1. 整数和浮点数
Rust 中整数类型如表 3 所示。
| Length | Signed | Unsigned |
|---|---|---|
| 8-bit | i8 | u8 |
| 16-bit | i16 | u16 |
| 32-bit | i32 | u32 |
| 64-bit | i64 | u64 |
| 128-bit | i128 | u128 |
| arch | isize | usize |
其中,整数类型 isize 和 usize 的长度依赖于所运行的机器架构,如果运行于 32 位机器上,则它们是 32 位的;运行于 64 位机器上,则它们是 64 位的。
Rust 有两种浮点类型 f32 和 f64 ,分别对应 IEEE-754 标准中的单精度和双精度浮点数。
如果没有特意指定类型,整数默认使用 i32 ,浮点数默认使用 f64 :
let x = 42;       // x has type i32
let y = 1.0;      // y has type f64
表 4 是整数字面量的一些例子。
| Number literals | Example |
|---|---|
| Decimal | 98_222 |
| Hex | 0xff |
| Octal | 0o77 |
| Binary | 0b1111_0000 |
| Byte (u8 only) | b'A' |
2.3.1.2. 布尔类型
Rust 中布尔类型为 bool ,有两个字面量 true 和 false :
fn main() {
    let t = true;

    let f: bool = false; // with explicit type annotation
}
2.3.1.3. 字符
Rust 中的字符类型为 char ,字符字面量使用单引号 ' 包围,如:
fn main() {
    let a: char = 'z';
    let b = '↖';         // char 不一定是 ASCII 字符,可以是 Unicode 字符
}
2.3.2. 复合类型
Rust 有两种复合类型:Tuple 和数组。
2.3.2.1. Tuple
Tuple 类型的语法是小括号中用逗号分开各个成分(各成分可以是不同类型),如:
fn main() {
    let x: (i32, f64, u8) = (500, 6.4, 1);   // x 是 Tuple 类型

    let five_hundred = x.0;       // 使用点号加索引可以访问 Tuple 的某个成分
    let six_point_four = x.1;
    let one = x.2;
}
2.3.2.2. 数组
Array 是相同类型元素的集合,其长度是固定的,不能改变。如果需要可变长度的数组,可以使用标准库中的 Vec 。
Array 用中括号表示,如:
let a = [1, 2, 3, 4, 5];
let first = a[0];          // 访问数组中索引为0的元素
let second = a[1];         // 访问数组中索引为1的元素
let num = a.len();         // len() 可返回数组的元素个数
我们可以显式地声明元素类型和数量,如上面例子中的 a 也可以写为:
let a: [i32; 5] = [1, 2, 3, 4, 5];
如果我们想创建一个数组,数组中每个元素都相同,可以采用下面语法:
let b = [3, 3, 3, 3, 3];  // 方式一,表示数组的每个元素都是3,共有5个元素
let b = [3; 5];           // 方式二,同上
为了安全起见,Rust 中数组的越界访问会报“运行时”错误:
fn main() {
    let a = [1, 2, 3, 4, 5];

    let element = a[10];       // 越界了,可以编译通过,但运行时会报错

    println!("The value of element is: {}", element);
}
通过 Slice(参考节 3.3)可以访问数据的一部分内容,而不用复制元素。如:
let a = [0, 1, 2, 3, 4];
let s1 = &a[1..4];           // 一个slice,包含 1, 2, and 3
2.3.3. 字符串字面量和 Byte 字符串字面量
Rust 中字符串字面量是 Slice 类型(参考节 3.3),记为 &str ;Byte 字符串是 u8 数组的 Slice。字符串字面量和 Byte 字符串字面量如表 5 所示。
| Item | 实例 | Rust 类型 | 说明 |
|---|---|---|---|
| 字符串 | "hello" | &str |
|
| Raw 字符串 | r#"hello"# | 同上 | # 可以省略或者写多个。如 r"hello" 或者 r##"hello"## 等都是一样的 |
| Byte 字符串 | b"hello" | &[u8; 5] |
|
| Raw byte 字符串 | br#"hello"# | 同上 | # 可以省略或者写多个。如 br"hello" 或者 br##"hello"## 等都是一样的 |
注:Raw 表示不转义,如 r"hello\n" 中的 \n 不是换行符,而是两个字符。
2.3.4. 类型转换
使用关键字 as 可以进行类型转换,如:
let x: i32 = 10;

let y = x as i64;        // 从 i32 转换到 i64
2.4. 函数
Rust 中使用关键字 fn 来声明函数:
fn main() {
    another_function(5, 6);
}

fn another_function(x: i32, y: i32) {
    println!("The value of x is: {}", x);
    println!("The value of y is: {}", y);
}
Rust 语言不支持函数重载(Overload),也就是说如果有两个函数的参数不同,但函数名相同,编译器会报错。
2.4.1. 语句 VS. 表达式(以“分号”结尾的是语句)
Rust 中,“语句”和“表达式”的不同。
Statements are instructions that perform some action and do not return a value. Expressions evaluate to a resulting value. Rust 中,“语句”不会返回值,而“表达式”会返回值。
表达式后面不能加分号,如果表达式后面紧跟一个分号,则表达式会变为“语句”,不再返回值了。 如:
1 + 3            // 这是表达式,会返回 4
fun1(1)          // 函数调用也是表达式
{                // {}块也是表达式,它返回块内最后一个表达式
    let x = 3;
    x + 1        // 这是块内的最后一个表达式(表达式后面不能加分号)
}

// 如果表达式后面增加分号,会变为语句
1 + 3;           // 这是语句
{} 块是表达式,它返回块内最后一个表达式:
fn main() {
    let x = 5;

    let y = {
        let x = 3;
        x + 1        // {}块内最后一个表达式
    };

    println!("The value of y is: {}", y); // y 为 4
}
2.4.2. 函数体由语句和表达式组成
Rust 中,函数体由语句和函数结尾可选的表达式组成。 -> 后面紧要类型用于声明函数返回值类型。函数体内可以使用 return 返回值,没有 return 则默认返回函数体内最后一个表达式的值。如:
// 下面函数会返回 7
fn fun1() -> i32 {
    println!("this is fun1"); // 这是语句
    3 + 4                     // 最后一个表达式(没有加分号),函数默认返回函数体内最后一个表达式的值
                              // 相当于 return 3 + 4
                              //   写为 return 3 + 4; 也行(有分号)
}
上面函数体的最后一个表达式 3 + 4 后面不能加上分号,因为表达式增加分号后会变为“语句”。
fn fun1() -> i32 {
    println!("this is fun1");
    3 + 4;                    // 编译会出错。去掉分号,或者显式增加return语句即可通过编译
}
再看一个例子:
// 这个函数返回 5
fn five() -> i32 {
    5                 // 为上合法函数,函数默认返回函数体内最后一个表达式的值
}
2.5. 控制流
2.5.1. if 表达式
if 语法如下:
fn main() {
    let x = 5;

    if x == 5 {
        println!("x is five!");
    } else if x == 6 {
        println!("x is six!");
    } else {
        println!("x is not five or six :(");
    }
}
在前面章节中介绍过,“语句”不会返回值,而“表达式”会返回值。 Rust 中, if 是表达式,不是语句。 我们可以把 if 表达式返回的值直接赋给其它变量,如:
let x = 5;
let y = if x == 5 { 10 } else { 15 };
2.5.2. 循环
Rust 中有三种循环结构: loop, while 和 for 。
2.5.2.1. loop
下面是 loop 的实例:
fn main() {
    loop {                   // 这是一个死循环,将一直执行loop中的语句
        println!("again!");
    }
}
可以使用 break 从 loop 中跳出来:
fn main() {
    let mut counter = 0;

    let result = loop {
        counter += 1;

        if counter == 10 {
            break counter * 2;            // break可以跳出loop
        }
    };

    println!("The result is {}", result);  // result为20
}
2.5.2.2. while
下面是 while 的一个实例:
fn main() {
    let mut number = 3;

    while number != 0 {
        println!("{}!", number);

        number -= 1;
    }

    println!("LIFTOFF!!!");
}
2.5.2.3. for
for 语法如下:
for var in expression {
    code
}
下面是 for 的几个实例:
fn main() {
    // 实例 1
    for x in 0..11 {       // a..b 表示 range,包含 a,不包含 b
        println!("{}", x); // 输出 0 到 10
    }

    // 实例 2
    for x in 0..=10 {      // a..=b 表示 range,包含 a,且包含 b
        println!("{}", x); // 输出 0 到 10
    }

    // 实例 3
    for (index, value) in (5..10).enumerate() {
        println!("index = {} and value = {}", index, value);
    }

    // 实例 4
    let a = [10, 20, 30, 40, 50];
    for element in a.iter() {
        println!("the value is: {}", element);
    }

    // 实例 5
    for (index, value) in a.iter().enumerate() {
        println!("index = {} and value = {}", index, value);
    }
}
2.5.2.4. 为循环指定 label,直接跳到外层循环
当有循环嵌套时,可以为循环指定 label(名称随便取,只要以 ' 开头即可),直接跳到外层循环,比如:
fn main() {
    'outer: loop {
        println!("Entered the outer loop");

        'inner: loop {
            println!("Entered the inner loop");

            // This would break only the inner loop
            //break;

            // This breaks the outer loop
            break 'outer;
        }

        println!("This point will never be reached");
    }

    println!("Exited the outer loop");
}
上面例子中,外层 loop 循环加了标记 'outer ,而内层 loop 循环加了标记 'inner ,在内层循环中直接 break 出了外层循环。
同样的,while 和 for 循环都支持指定 label。
2.5.3. match
Rust 中的关键字 match 类似于其它语言的 switch 。下面是 match 的使用例子:
fn main() {
    let number = 13;

    println!("Tell me about {}", number);
    match number {
        // Match a single value
        1 => println!("One!"),
        // Match several values
        2 | 3 | 5 | 7 | 11 => println!("This is a prime"),
        // Match an inclusive range
        13..=19 => println!("A teen"),
        // Handle the rest of cases
        _ => println!("Ain't special"),
    }
}
2.5.3.1. Destructuring
- Destructuring Tuples
在
match中,可以把 Tuples 中匹配的值取出赋值给其他变量,如:
fn main() { let triple = (0, -2, 3); // TODO ^ Try different values for `triple` println!("Tell me about {:?}", triple); // Match can be used to destructure a tuple match triple { // Destructure the second and third elements (0, y, z) => println!("First is `0`, `y` is {:?}, and `z` is {:?}", y, z), (1, ..) => println!("First is `1` and the rest doesn't matter"), // `..` can be the used ignore the rest of the tuple _ => println!("It doesn't matter what they are"), // `_` means don't bind the value to a variable } } - Destructuring Enums
在
match中,可以把 Enums 中匹配的值取出赋值给其他变量,如:
// `allow` required to silence warnings because only // one variant is used. #[allow(dead_code)] enum Color { // These 3 are specified solely by their name. Red, Blue, Green, // These likewise tie `u32` tuples to different names: color models. RGB(u32, u32, u32), HSV(u32, u32, u32), HSL(u32, u32, u32), CMY(u32, u32, u32), CMYK(u32, u32, u32, u32), } fn main() { let color = Color::RGB(122, 17, 40); // TODO ^ Try different variants for `color` println!("What color is it?"); // An `enum` can be destructured using a `match`. match color { Color::Red => println!("The color is Red!"), Color::Blue => println!("The color is Blue!"), Color::Green => println!("The color is Green!"), Color::RGB(r, g, b) => println!("Red: {}, green: {}, and blue: {}!", r, g, b), Color::HSV(h, s, v) => println!("Hue: {}, saturation: {}, value: {}!", h, s, v), Color::HSL(h, s, l) => println!("Hue: {}, saturation: {}, lightness: {}!", h, s, l), Color::CMY(c, m, y) => println!("Cyan: {}, magenta: {}, yellow: {}!", c, m, y), Color::CMYK(c, m, y, k) => println!("Cyan: {}, magenta: {}, yellow: {}, key (black): {}!", c, m, y, k), // Don't need another arm because all variants have been examined } } - Destructuring Pointers
fn main() { // Assign a reference of type `i32`. The `&` signifies there // is a reference being assigned. let reference = &4; match reference { // If `reference` is pattern matched against `&val`, it results // in a comparison like: // `&i32` // `&val` // ^ We see that if the matching `&`s are dropped, then the `i32` // should be assigned to `val`. &val => println!("Got a value via destructuring: {:?}", val), } // To avoid the `&`, you dereference before matching. match *reference { val => println!("Got a value via dereferencing: {:?}", val), } // What if you don't start with a reference? `reference` was a `&` // because the right side was already a reference. This is not // a reference because the right side is not one. let _not_a_reference = 3; // Rust provides `ref` for exactly this purpose. It modifies the // assignment so that a reference is created for the element; this // reference is assigned. let ref _is_a_reference = 3; // Accordingly, by defining 2 values without references, references // can be retrieved via `ref` and `ref mut`. let value = 5; let mut mut_value = 6; // Use `ref` keyword to create a reference. match value { ref r => println!("Got a reference to a value: {:?}", r), } // Use `ref mut` similarly. match mut_value { ref mut m => { // Got a reference. Gotta dereference it before we can // add anything to it. *m += 10; println!("We added 10. `mut_value`: {:?}", m); }, } }参考:https://doc.rust-lang.org/rust-by-example/flow_control/match/destructuring/destructure_pointers.html
- Destructuring Structures
在
match中,可以把结构体中匹配的值取出赋值给其他变量,如:
fn main() {
    struct Foo {
        x: (u32, u32),
        y: u32,
    }

    // Try changing the values in the struct to see what happens
    let foo = Foo { x: (1, 2), y: 3 };

    match foo {
        Foo { x: (1, b), y } => println!("First of x is 1, b = {},  y = {} ", b, y),

        // you can destructure structs and rename the variables,
        // the order is not important
        Foo { y: 2, x: i } => println!("y is 2, i = {:?}", i),

        // and you can also ignore some variables:
        Foo { y, .. } => println!("y = {}, we don't care about x", y),
        // this will give an error: pattern does not mention field `x`
        //Foo { y } => println!("y = {}", y),
    }
}
2.5.3.2. Guards
match 匹配时可以使用 if 添加过滤条件,如:
fn main() {
    let pair = (2, -2);

    println!("Tell me about {:?}", pair);
    match pair {
        (x, y) if x == y => println!("These are twins"),
        // The ^ `if condition` part is a guard
        (x, y) if x + y == 0 => println!("Antimatter, kaboom!"),
        (x, _) if x % 2 == 1 => println!("The first one is odd"),
        _ => println!("No correlation..."),
    }
}
2.5.3.3. Binding(@)
使用 @ 可以把 match 中的具体匹配值绑定到符号 @ 前指定的变量中:
// A function `age` which returns a `u32`.
fn age() -> u32 {
    15
}

fn main() {
    println!("Tell me what type of person you are");

    match age() {
        0             => println!("I haven't celebrated my first birthday yet"),
        // Could `match` 1 ..= 12 directly but then what age
        // would the child be? Instead, bind to `n` for the
        // sequence of 1 ..= 12. Now the age can be reported.
        n @ 1  ..= 12 => println!("I'm a child of age {:?}", n), // 具体的匹配值绑定到了 n
        n @ 13 ..= 19 => println!("I'm a teen of age {:?}", n),
        // Nothing bound. Return the result.
        n             => println!("I'm an old person of age {:?}", n),
    }
}
这种变量绑定也可以用于枚举变量 Option 中,比如:
fn some_number() -> Option<u32> {   // Option 是枚举
    Some(42)
}

fn main() {
    match some_number() {
        // Got `Some` variant, match if its value, bound to `n`,
        // is equal to 42.
        Some(n @ 42) => println!("The Answer: {}!", n), // 绑定 42 到变量 n
        // Match any other number.
        Some(n)      => println!("Not interesting... {}", n),
        // Match anything else (`None` variant).
        _            => (),
    }
}
3. Ownership
3.1. What Is Ownership
3.1.1. Ownership Rules
Ownership Rules:
- Each value in Rust has a variable that’s called its owner.
- There can only be one owner at a time.
- When the owner goes out of scope, the value will be dropped.
3.1.2. 栈和堆
数据可以保存在“栈”上,也可以保存在“堆”中。 Rust 中,节 2.3.1 中介绍的类型(整数、浮点数、布尔类型、字符),它们都有固定的大小,这些类型的数据全部保存在“栈”中,Tuple 和数组如果其元素类型都是整数/浮点数/布尔类型/字符,则也保存在“栈”中。其它类型(如 String 类型)的数据,保存在“堆”中。尽量“栈”中不直接保存字符串等数据,不过“栈”中还是会保存指向堆内存数据(如字符串)的指针。
在开始后面的介绍前,先简单地介绍一下 String 类型。
对于字段串常量,它们编译进了可执行程序的 text 段中,它们是只读的。
let s = "hello"; // hello 在可执行程序的text段中
String 类型的变量保存在“堆”中,离开作用域后,它们将被自动释放(调用 drop 方法),这有点类型于 C++ 的 Resource Acquisition Is Initialization (RAII)。
{
    let mut s = String::from("hello");

    s.push_str(", world!"); // push_str() appends a literal to a String

    println!("{}", s);      // This will print `hello, world!`
} // 离开了作用域,s 不再有效,其 drop 方法会被调用
3.1.3. Ways Variables and Data Interact: Move
前面介绍过,整数等简单类型是直接保存在“栈”上的。考虑下面代码:
let mut x = 5;
let mut y = x;
这时,我们有两个变量 x 和 y ,它们都等于 5。它们都在“栈”上,所以“栈”中有两个整数 5。
再考虑 String 的版本:
let s1 = String::from("hello");
let s2 = s1;
这时,会发生什么呢?字符串"hello"的 owner 从 s1 移到了 s2 ,如图 2 所示。
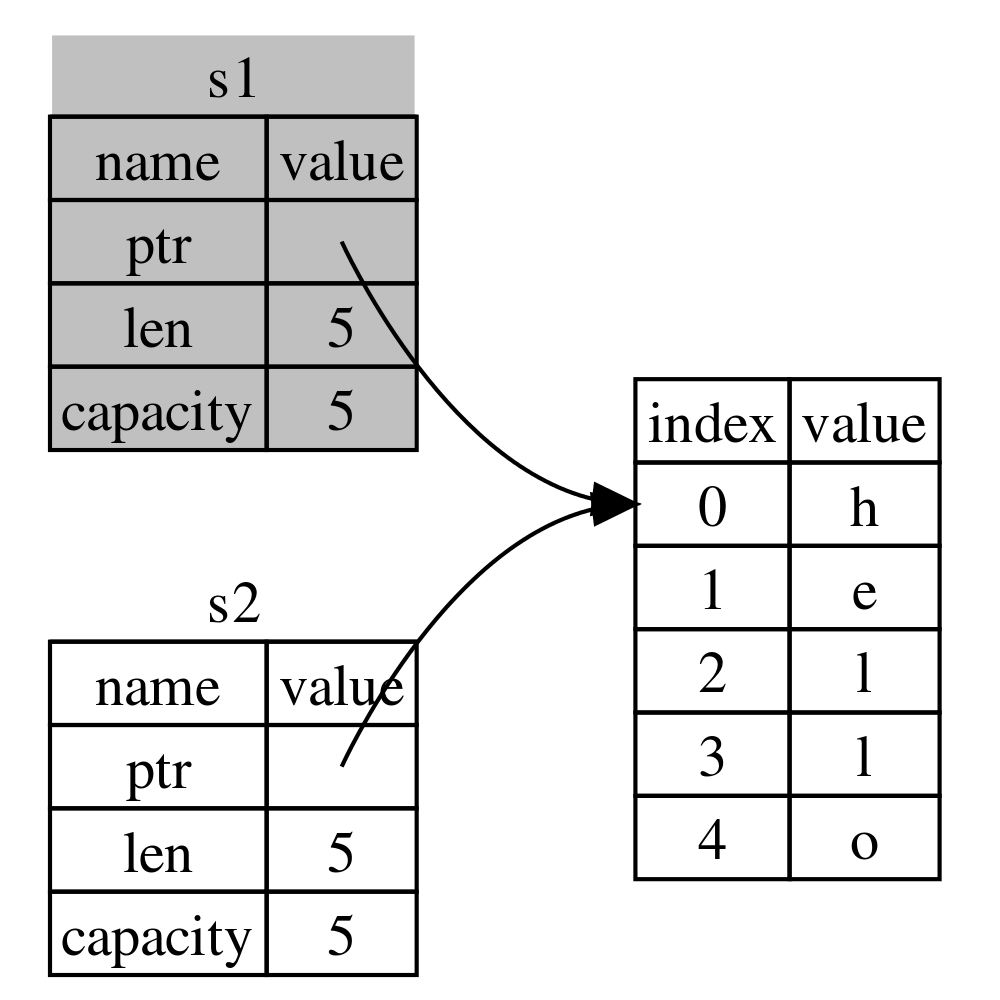
Figure 2: Move 语义
从此, s1 不再有效(它的 drop 方法也不会被调用)。即下面代码会报错:
let s1 = String::from("hello");
let s2 = s1;

println!("{}, world!", s1);     // 会报错,s1 不再有效,不能再访问 s1 了,"hello" 的 owner 从 s1 移到了 s2
Rust 采用这种策略的目的是为了更安全。 如果 s1 和 s2 都有效,那么当它们超过作用域时, s1 和 s2 的 drop 方法都会被调用,这将导致内存释放两次(double free),这是内存安全漏洞的一个重要来源。
3.1.4. Ways Variables and Data Interact: Clone
如果我们调用 clone 方法(深拷贝),则 s1 和 s2 都有效:
let s1 = String::from("hello");
let s2 = s1.clone();

println!("s1 = {}, s2 = {}", s1, s2);
则如图 3 所示。
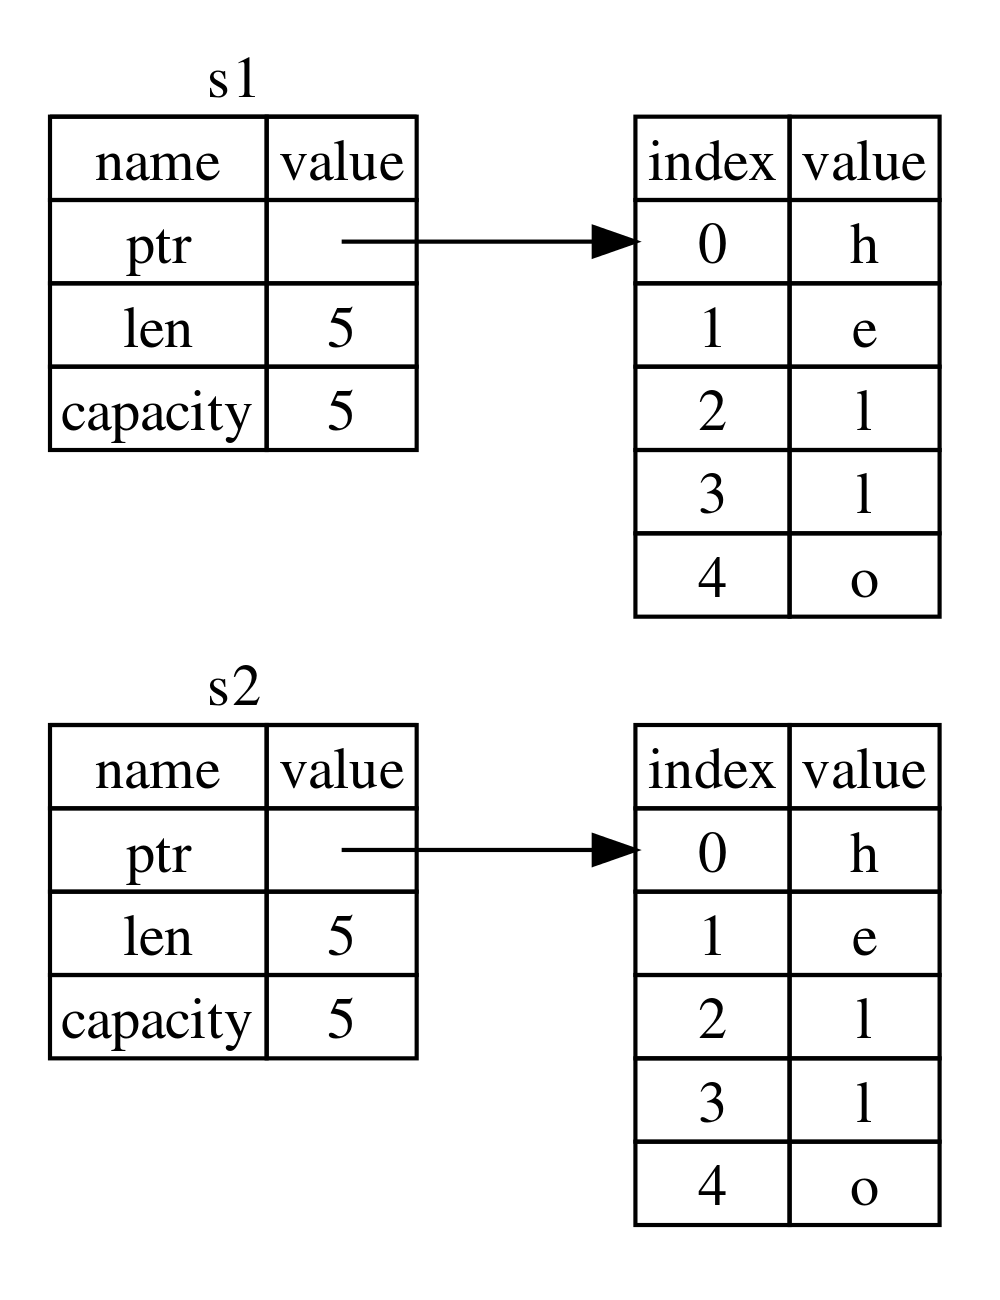
Figure 3: Clone 语义
3.1.5. Stack-Only Data: Copy
保存在栈上的数据,进行赋值时不会转移 owner,而是会在栈上 Copy 另一份独立的数据:
let x = 5;                        // x 是 i32 类型,直接保存在栈上
let y = x;                        // 会在栈上复制 x

println!("x = {}, y = {}", x, y); // 前面尽管把 x 赋值给了 y,但我们还可以访问 x
在节 3.1.2 中介绍过,保存在栈上(赋值时不会发生 move)的数据类型有下面这些:
- 节 2.3.1 中介绍的 4 种类型(整数、浮点数、布尔类型、字符);
- Tuple 和数组如果其元素类型都是“整数/浮点数/布尔类型/字符”时,也保存在“栈”中。
下面是对 Tuple 和数组的简单测试:
fn main() {
    // 下面测试一下Tuple 和数组如果其元素类型都是“整数/浮点数/布尔类型/字符”时的情况
    let a = [1, 2, 3, 4, 5];   // a 是数组,元素属于“整数/浮点数/布尔类型/字符”
    let b = a;                 // 不会 move;a 在后面还可以访问
    println!("{:?}", a);       // 还可以访问 a
    println!("{:?}", b);

    let x: (i32, f64, u8) = (500, 6.4, 1);  // x 是 Tuple,元素属于“整数/浮点数/布尔类型/字符”
    let y = x;                              // 不会 move;x 在后面还可以访问
    println!("{:?}", x);                    // 还可以访问 x
    println!("{:?}", y);

    // 下面测试一下Tuple 和数组有元素类型不是“整数/浮点数/布尔类型/字符”时的情况
    let a1 = [String::from("hello"), String::from("world")]; // a1 是数组,但元素不属于“整数/浮点数/布尔类型/字符”
    let b1 = a1;                            // 会发生 move,转换 owner;a1 在后面不能再使用了
    // println!("{:?}", a1);                // 不能再访问 a1 了,这行会报错
    println!("{:?}", b1);

    let x1: (i32, f64, String) = (500, 6.4, String::from("hello"));  // x1 是 Tuple,但有元素不属于“整数/浮点数/布尔类型/字符”
    let y1 = x1;                                 // 会发生 move,转换 owner;x1 在后面不能再使用了
    // println!("{:?}", x1);                     // 不能再访问 x1 了,这行会报错
    println!("{:?}", y1);
}
其实,还有一些数据也会保存在栈上, 所有实现了 Copy trait 的数据都会保存在栈上(赋值时会复制出一份新的,不会有 Ownership 的转移)。 标准库中有很多实现了 Copy trait 的结构体,比如 Ipv4Addr 等等。
3.1.5.1. 为结构体实现 Copy trait
如果结构体的所有成员都是保存在栈上的类型(上一节有介绍),那么可以为这些结构体指定 Copy trait,这时它的赋值会不会发生 move(不会转移资源的 owner)。如:
#[derive(Copy, Clone)]              // 注:指定 Copy 的同时必须指定 Clone
struct Point {
    x: i32,
    y: i32,
}

fn main() {
    let a = Point{
        x: 10,
        y: 20
    };
    let b = a;                       // 由于 Point 指定了 Copy,所以这里不会 move;后面还可以访问变量 a
    println!("{}, {}", a.x, a.y);    // 如果 Point 没有指定 Copy,则上一行会发生 move,这里不能再访问 a
    println!("{}, {}", b.x, b.y);
}
3.1.6. Ownership and Functions
调用函数时,参数会发生 move 还是 copy?这和普通赋值是一样的。即如果参数是整数/浮点数/布尔类型/字符等类型(保存在“栈”中),则发生 copy(ownership 不变),如果是 String 等类型(保存在“堆”中),则发生 move(ownership 改变了)。如:
fn main() {
    let s = String::from("hello");  // s comes into scope

    takes_ownership(s);             // s's value moves into the function...
                                    // ... and so is no longer valid here

    let x = 5;                      // x comes into scope

    makes_copy(x);                  // x would move into the function,
                                    // but i32 is Copy, so it’s okay to still
                                    // use x afterward

} // Here, x goes out of scope, then s. But because s's value was moved, nothing
  // special happens.

fn takes_ownership(some_string: String) { // some_string comes into scope
    println!("{}", some_string);
} // Here, some_string goes out of scope and `drop` is called. The backing
  // memory is freed.

fn makes_copy(some_integer: i32) { // some_integer comes into scope
    println!("{}", some_integer);
} // Here, some_integer goes out of scope. Nothing special happens.
如果函数返回 String 等类型(保存在“堆”中)的数据,也会传递 ownership 给函数外那个接收函数返回值所对应的变量:
fn main() {
    let s1 = gives_ownership();         // gives_ownership moves its return
                                        // value into s1

    let s2 = String::from("hello");     // s2 comes into scope

    let s3 = takes_and_gives_back(s2);  // s2 is moved into
                                        // takes_and_gives_back, which also
                                        // moves its return value into s3
} // Here, s3 goes out of scope and is dropped. s2 goes out of scope but was
  // moved, so nothing happens. s1 goes out of scope and is dropped.

fn gives_ownership() -> String {             // gives_ownership will move its
                                             // return value into the function
                                             // that calls it

    let some_string = String::from("hello"); // some_string comes into scope

    some_string                              // some_string is returned and
                                             // moves out to the calling
                                             // function
}

// takes_and_gives_back will take a String and return one
fn takes_and_gives_back(a_string: String) -> String { // a_string comes into
                                                      // scope

    a_string  // a_string is returned and moves out to the calling function
}
把变量作为参数调用函数时,会发生 ownership 的转移,如果我们在函数调用完成后还要使用该变量指向的内容,那么我们不得不让函数返回这个变量(这也会发生 ownership 的转移)。如:
fn main() {
    let s1 = String::from("hello");

    let (s2, len) = calculate_length(s1);         // calculate_length 会拿走s1对字符串"hello"的ownership
                                                  // 如果后面还要使用字符串"hello"时,则我们可以让calculate_length再返回字符串
                                                  // 由于s1对"hello"没有ownership了,后面还使用"hello"时只能使用s2了

    println!("The length of '{}' is {}.", s2, len);
}

fn calculate_length(s: String) -> (String, usize) {  // 返回tuple
    let length = s.len(); // len() returns the length of a String

    (s, length)
}
这样写代码多少有些麻烦,后面介绍的 Reference 将解决这个问题。
3.2. References and Borrowing
上一节中,调用函数 calculate_length 时会把字符串的 ownership 传到函数中,后面还要使用字符串时,我们不得不在函数 calculate_length 中返回了字符串(转移出 ownership),这很麻烦。下面介绍 Reference 将解决这个问题,直接看代码:
fn main() {
    let s1 = String::from("hello");

    let len = calculate_length(&s1);                 // &s1 会创建一个 s1 的引用

    println!("The length of '{}' is {}.", s1, len);  // s1 还拥有字符串的ownership
}

fn calculate_length(s: &String) -> usize { // s is a reference to a String
    s.len()
} // Here, s goes out of scope. But because it does not have ownership of what
  // it refers to, nothing happens.
上面例子中, 语法 &s1 会创建一个 s1 的引用,它并不会得到字符串的 ownership。 如图 4 所示。
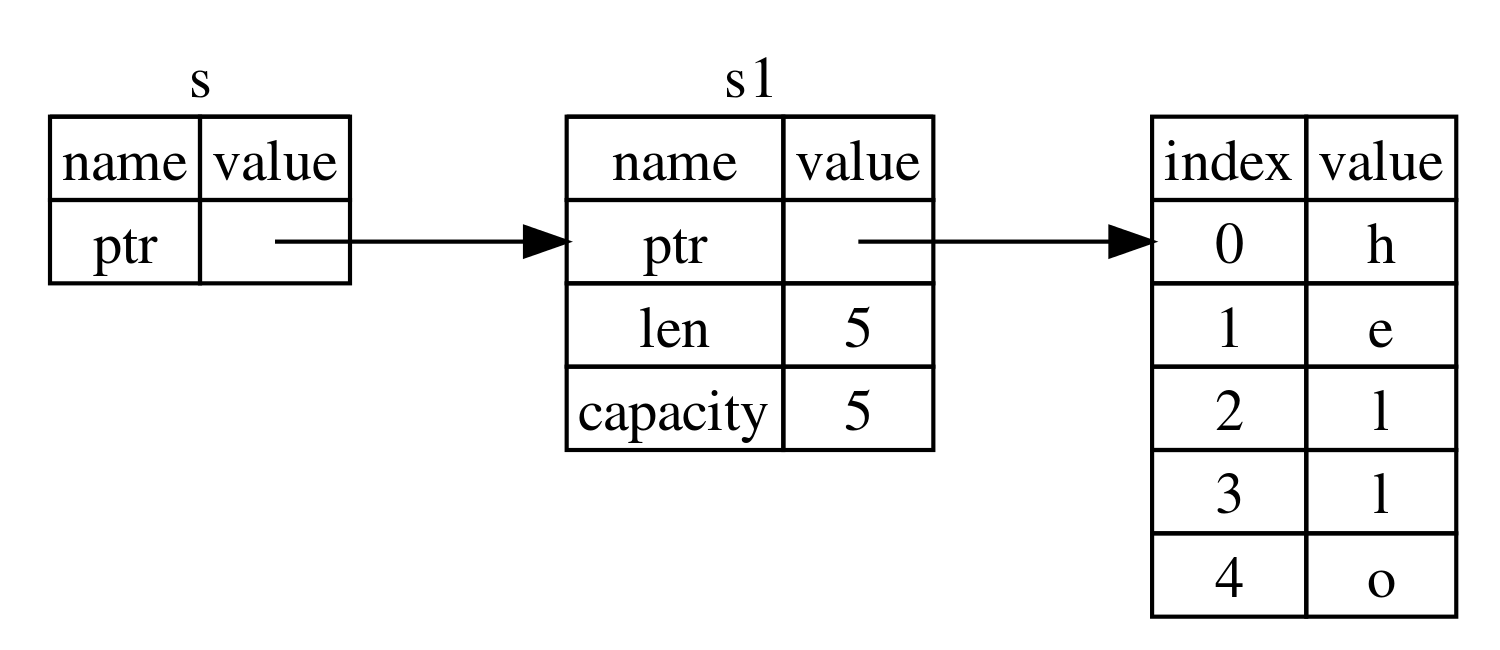
Figure 4: Reference
这样,函数 calculate_length 不用返回字符串,字符串的 ownership 从来没有转移到函数内。
当函数参数是 Reference 类型时,我们称这样的参数声明为 Borrow(借用)。 在现在生活中,某人拥有一个东西时,别人可以借用它,用完以后就要还回去。
3.2.1. 只读引用,可修改引用
引用默认是只读的,不能通过引用进行修改操作。请看代码:
fn main() {
    let s = String::from("hello");

    change(&s);
}

fn change(some_string: &String) {
    some_string.push_str(", world");   // 会报错!引用默认是只读的,不能在函数内修改字符串
}
如果要通过引用进行修改操作,需要增加 &mut 。比如,要在函数 change 内修改字符串,则应该写为:
fn main() {
    let mut s = String::from("hello");

    change(&mut s);
}

fn change(some_string: &mut String) {
    some_string.push_str(", world");
}
“可修改引用”有一个限制:同一个 Scope 内,对一个数据的“可修改引用”只能有一个。 下面代码会报错:
fn main() {
    let mut s = String::from("hello");

    let r1 = &mut s;                     // r1 是 s 的可修改引用
    let r2 = &mut s;                     // 编译失败

    println!("{}, {}", r1, r2);
}
Rust 中这个严格限制的目的是为了安全。试想,如果通过两个引用 r1 和 r2 都可以修改 s ,则存在“data race”,我可以自己都不知道到底通过哪个引用到字符串进行了修改。
下面代码合法的(r1 有效时 r2 还没有,r2 有效时 r1 已经失效了),可以通过编译:
let mut s = String::from("hello");

{
    let r1 = &mut s;

} // r1 goes out of scope here, so we can make a new reference with no problems.

let r2 = &mut s;
3.2.1.1. 新类型引用创建后,旧类型引用不再有效
有两种引用类型:只读引用、可修改引用。
可修改引用创建后,之前的只读引用不再有效:
fn main() {
    let mut s = String::from("hello");

    let r1 = &s;                   // immutable borrow(只读借)
    let r2 = &s;                   // immutable borrow(只读借),创建多个只读引用是允许的
    println!("{} and {}", r1, r2);

    let r3 = &mut s;               // mutable borrow(可修改借)。从下一行起,不能再使用只读引用r1和r2了(编译器会报错)
    println!("{}", r3);
}
只读引用创建后,之前的可修改引用不再有效:
fn main() {
    let mut s = String::from("hello");

    let r3 = &mut s;                // mutable borrow(可修改借)
    println!("{}", r3);

    let r1 = &s;                    // immutable borrow(只读借)。从下一行起,不能再使用可修改引用r3了(编译器会报错)
    let r2 = &s;
    println!("{} and {}", r1, r2);
}
3.2.2. 危险的引用(编译器会拒绝)
下面代码是危险的:
// 编译会出错
fn main() {
    let reference_to_nothing = dangle();
}

fn dangle() -> &String {
    let s = String::from("hello");  // s is a new String

    &s                     // we return a reference to the String, s
} // Here, s goes out of scope, and is dropped. Its memory goes away.
  // Danger!
函数 dangle 中,函数结束后 s 指向的内存会释放。返回 s 的引用会指向已经释放的内存。这种情况,Rust 编译器会报错。
3.3. Slice(不拥有 ownership)
前面介绍过, Reference 不会拥有 ownership。下面介绍另一种不会拥有 ownership 的类型:Slice。
有了 Slice,我们可以安全地访问数组的一部分内容,而不用复制元素。 Slice 的语法为 &array[starting_index..ending_index] ,如:
let a = [0, 1, 2, 3, 4];
let s1 = &a[1..4];           // 一个slice,包含 1, 2, and 3

let s2 = &a[0..4];           // 一个slice,包含 0, 1, 2, and 3
let s2 = &a[..4];            // 同上。如果开始索引为0,则开始索引可以省略

let s3 = &a[1..5];           // 一个slice,包含 1, 2, 3, and 4
let s3 = &a[1..];            // 同上。如果结束索引为数组元素个数,则结束索引可以省略

let s4 = &a[0..5];           // 一个slice,包含 0, 1, 2, 3, and 4
let s4 = &a[..];             // 同上。
Slice 的类型记为 &[T] ,其中 T 为数组元素的类型。上面例子中, s 的类型为 &[i32] 。
3.3.1. String Slices
上节介绍过,i32 数组 Slice 的类型记数为 &[i32] ;字符串 Slice 的类型不使用这样的记法, 字符串 Slice 的类型记为 &str 。 下面是字符串 Slice 的例子:
let s = String::from("hello world");

let world = &s[6..11];            // world 的类型为 &str

println!("{}", world);            // world

let sub_world: String = world.chars().skip(2).collect(); // 跳过前 2 个 chars
println!("{}", sub_world);        // rld

let sub_world: String = world.chars().take(4).collect(); // 只取 4 个 chars
println!("{}", sub_world)         // worl
如图 5 所示。
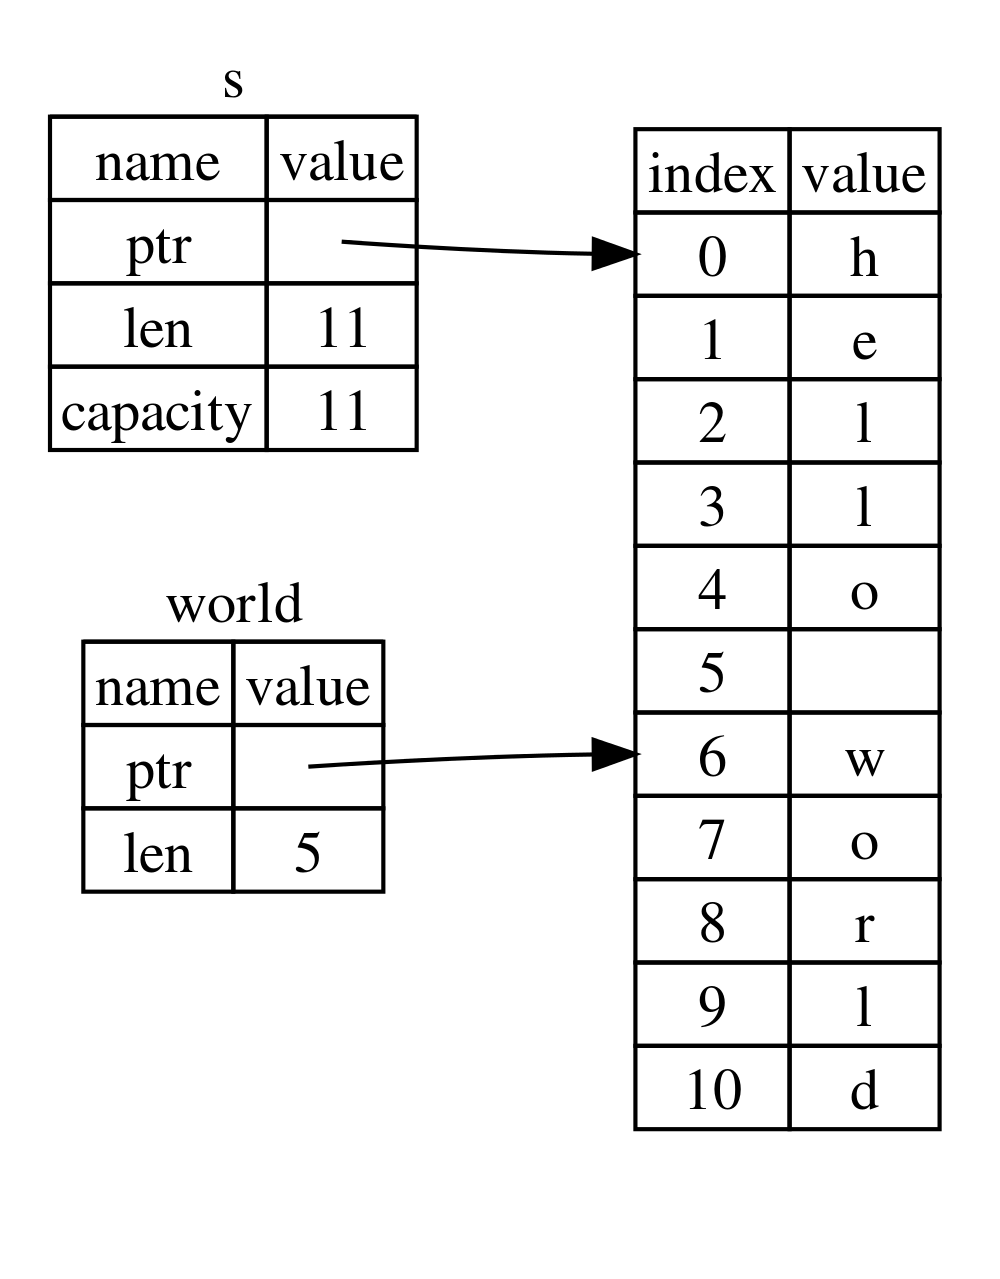
Figure 5: world 是字符串 Slice
下面函数 first_word 返回字符串的第一个单词,它的返回类型是“字符串 Slice”:
fn first_word(s: &String) -> &str {         // 返回类型是字符串Slice
    let bytes = s.as_bytes();

    for (i, &item) in bytes.iter().enumerate() {
        if item == b' ' {
            return &s[0..i];
        }
    }

    &s[..]
}
Slice 是安全的。下面是很危险的 s.clear(); 执行完后, word 指向的内存已经释放了,为安全起见编译下面代码时,会报错:
fn main() {
    let mut s = String::from("hello world");

    let word = first_word(&s);

    s.clear();                              // 会报错,编译器发现后面会用到word

    println!("the first word is: {}", word);
}
3.3.1.1. String Literals Are Slices
字符串字面量的类型是 Slice。
let s = "Hello, world!"; // s 的类型是 &str
上面代码中, s 的类型是 &str 。
3.3.1.2. 函数参数类型推荐使用 &str
前面介绍的函数 first_word ,其参数类型是“字符串引用”:
fn first_word(s: &String) -> &str // 不够通用
如果我们它改为字符串 Slice:
fn first_word(s: &str) -> &str // 更加通用,推导形式
把参数类型从“字符串引用”改为“字符串 Slice”,可以使这个函数会更加通用 :因为传参时,如果变量是 String 类型,则传参时写为 &my_string[..] 或者 my_string.as_str() 即可方便地转为 Slice;如果变量本身是 &str 类型,则直接传参即可。(如果函数的参数类型是“字符串引用”,即 &String ,则不能传递 &str 类型的参数了)
fn first_word(s: &str) -> &str {               // 参数和返回值都是字符串Slice
    let bytes = s.as_bytes();

    for (i, &item) in bytes.iter().enumerate() {
        if item == b' ' {
            return &s[0..i];
        }
    }

    &s[..]
}

fn main() {
    let my_string = String::from("hello world");

    // first_word works on slices of `String`s
    let word = first_word(&my_string[..]);         // or my_string.as_str()

    let word = first_word(&my_string);             // A &String can be implicitly converted into a &str by Deref coercion

    let my_string_literal = "hello world";

    // first_word works on slices of string literals
    let word = first_word(&my_string_literal[..]);

    // Because string literals *are* string slices already,
    // this works too, without the slice syntax!
    let word = first_word(my_string_literal);
}
上面例子中,提到了 &String 类型可以通过 Deref coercion 隐式地转换为 &str ,关于 Deref coercion 可参考:https://doc.rust-lang.org/book/ch15-02-deref.html#implicit-deref-coercions-with-functions-and-methods
4. 结构体
Rust 中结构体使用关键字 struct 来定义,结构体名采用驼峰命名约定,如:
struct Point {               // 定义了名为 Point 的结构体
    x: i32,
    y: i32,
}

fn main() {
    let origin = Point {
        x: 0,
        y: 0 }; // origin: Point

    println!("The origin is at ({}, {})", origin.x, origin.y);
}
使用点号可以访问结构体中的字段,要修改结构体字段要在绑定变量时指定 mut ,如:
struct Point {
    x: i32,
    y: i32,
}

fn main() {
    let mut point = Point {        // 后面会修改字段,这里要使用 mut
        x: 0,
        y: 0 };

    point.x = 5;
    println!("The point is at ({}, {})", point.x, point.y);
}
绑定变量时我们只能对整个结构体指定 mut ,而不能对某一个字段指定 mut ,下面语法是错误的:
struct Point {
    mut x: i32,    // 错误,无法通过编译
    y: i32,
}
4.1. 结构体赋值简写
4.1.1. 变量名和结构体字段名相同时
考虑下面代码:
struct User {
    username: String,
    email: String,
    sign_in_count: u64,
    active: bool,
}

fn main() {
    let email = String::from("someone@example.com");
    let username = String::from("someusername123");

    let user1 = User {
        email: email,       // 前面的 email 是字段名,后面的 email 是变量名
        username: username, // 前面的 username 是字段名,后面的 username 是变量名
        active: true,
        sign_in_count: 1,
    };

    println!("{}, {}, {}, {}", user1.email, user1.username,
             user1.active, user1.sign_in_count);
}
如果使用变量对结构体字段进行赋值,这两个名称恰好相同时,可以简写。上面代码中 user1 可以简写为:
let user1 = User {
        email,               // 相当于 email: email,
        username,            // 相当于 username: username,
        active: true,
        sign_in_count: 1,
    };
4.1.2. 使用结构体变量对另一个结构体变量赋值
考虑下面代码:
let user2 = User {
    email: String::from("another@example.com"),
    username: String::from("anotherusername567"),
    active: user1.active,
    sign_in_count: user1.sign_in_count,
};
可以简写为:
let user2 = User {
    email: String::from("another@example.com"),
    username: String::from("anotherusername567"),
    ..user1
};
语法 ..user1 表示对 user2 中剩下没指定的字段都使用 user1 中的对应字段进行赋值。
4.2. Tuple struct
不指定字段名称的结构体称为“Tuple struct”。如:
struct Color(i32, i32, i32);     // Color 没有字段名
struct Point(i32, i32, i32);     // Point 也没有字段名

fn main() {
    let black = Color(0, 0, 0);
    let origin = Point(0, 0, 0);

    println!("{}", black.0);       // 需要使用索引来访问结构体中的字段
    println!("{}", black.1);
    println!("{}", black.2);
    println!("{}", origin.0);
    println!("{}", origin.1);
    println!("{}", origin.2);
}
注:尽管 Color 和 Point 的结构相同,但 black 和 origin 是两个完全不同的类型。
4.3. Unit-like struct(没有字段的结构体)
可以定义一个结构体,没有任何字段。如:
struct Electron {}     // use empty braces...
struct Proton;         // ...or just a semicolon

// Use the same notation when creating an instance.
let x = Electron {};   // 不能省略 {},因为定义时没有省略 {}。也就是说这样写 let x = Electron; 会报错
let y = Proton;        // 这里加上 {} 也行。也就是说如果这样写 let y = Proton {}; 也可以通过编译
没有字段的结构体表达的是空 Tuple,即 () ,它们被称为‘unit’。
4.4. Method(方法)
Method(方法)和函数类似,也是用关键字 fn 声明。方法和函数不同的地方在于,它定义在结构体(或者枚举,或者 trait 对象)上,其第一个参数固定为 self ,表示被调用时的结构体实例。
定义方法时,使用关键字 impl 来指定绑定在哪个结构体上。如:
struct Rectangle {
    width: u32,
    height: u32,
}

impl Rectangle {
    fn area(&self) -> u32 {                           // 这是结构体 Rectangle 上的方法
        self.width * self.height
    }

    fn can_hold(&self, other: &Rectangle) -> bool {   // 这也是结构体 Rectangle 上的方法
        self.width > other.width && self.height > other.height
    }
}

fn main() {
    let rect1 = Rectangle { width: 30, height: 50 };

    println!(
        "The area of the rectangle is {} square pixels.",
        rect1.area()
    );
}
impl 块可以拆开书写,如上面的 impl 块可以拆为下面两个 impl 块:
impl Rectangle {
    fn area(&self) -> u32 {
        self.width * self.height
    }
}

impl Rectangle {
    fn can_hold(&self, other: &Rectangle) -> bool {
        self.width > other.width && self.height > other.height
    }
}
4.4.1. Self 关键字
关键字 Self(第一字母是大写)可用在结构体方法中表示结构体本身,如:
struct Foo{
    a: i32,
    b: i32,
}

impl Foo {
    fn new() -> Self {    // 这个 Self 可以换为 Foo
        Self {            // 这个 Self 也可以换为 Foo
            a: 100,
            b: 100,
        }
    }
}

fn main() {
    assert_eq!(Foo::new().a, Foo{a: 100, b: 100 }.a);
    assert_eq!(Foo::new().b, Foo{a: 100, b: 100 }.b);
}
4.5. Associated Items(和结构体类型绑定,不和实例绑定)
4.5.1. Associated Constants(关联常量)
Associated Constants(关联常量)和结构体类型绑定,不和某一个具体的实例绑定。如:
trait ConstantIdDefault {
    const ID: i32 = 1;                      // 这是 Associated Constants
}

struct Struct;
struct OtherStruct;

impl ConstantIdDefault for Struct {}

impl ConstantIdDefault for OtherStruct {
    const ID: i32 = 5;                      // 这是 Associated Constants
}

fn main() {
    assert_eq!(1, Struct::ID);
    assert_eq!(5, OtherStruct::ID);
}
4.5.2. Associated Functions(关联函数)
在 impl 块中定义的函数,如果第一个参数不是 self ,则被称为 Associated Functions(关联函数)。
关联函数没有 self 参数,不和某个具体的结构体实例绑定,所以关联函数是函数,而不是方法。前面使用过的 String::from 是一个关联函数。
关联函数往往用于构造结构体实例。如:
struct Rectangle {
    width: u32,
    height: u32,
}

impl Rectangle {
    fn square(size: u32) -> Rectangle {    // 第一个参数不是 self,它是关联函数
        Rectangle { width: size, height: size }
    }
}

impl Rectangle {
    fn area(&self) -> u32 {        // 第一个参数是 self,它是方法
        self.width * self.height
    }
}

fn main() {
    let rect1 = Rectangle { width: 30, height: 50 };
    println!("The area of the rectangle is {} square pixels.", rect1.area());

    let sq = Rectangle::square(3);
    println!("The area of the rectangle is {} square pixels.", sq.area());
}
5. 枚举
使用关键字 enum 可以定义枚举。如:
enum IpAddrKind {
    V4,
    V6,
}
上面代码定义了一种新数据类型 IpAddrKind 。假设函数 route 接收这种类型的参数:
fn route(ip_kind: IpAddrKind) { }
则可以这样调用函数 route :
route(IpAddrKind::V4);
route(IpAddrKind::V6);
可以为枚举直接关联数据,如:
enum IpAddr {
    V4(u8, u8, u8, u8),
    V6(String),
}

let home: IpAddr = IpAddr::V4(127, 0, 0, 1);
let loopback: IpAddr = IpAddr::V6(String::from("::1"));
下面再看一个为枚举关联数据的例子:
enum Message {    // Rust enum 有三种风格
    Quit,                        // 风格一:不关联数据
    Move { x: i32, y: i32 },     // 风格二:关联匿名结构体
    Write(String),               // 风格三:关联 tuple,这里是 String
    ChangeColor(i32, i32, i32),  // 风格三:关联 tuple,这里是三个 i32
}
5.1. C-like enum
可以使用 enum 定义 C 风格的枚举,使用 as 可以把 C 风格的枚举转换为整数,如:
// enum with implicit discriminator (starts at 0)
enum Number {
    Zero,
    One,
    Two,
}

// enum with explicit discriminator
enum Weekday {
    Monday = 1,       // 注:默认从 0 开始,这里明确指定为从 1 开始
    Tuesday,
    Wednesday,
    Thursday,
    Friday,
    Saturday,
    Sunday,
}

fn main() {
    // `enums` can be cast as integers.
    println!("zero is {}", Number::Zero as i32);
    println!("one is {}", Number::One as i32);

    println!("monday is {}", Weekday::Monday as i32);
    println!("tuesday is {}", Weekday::Tuesday as i32);
}
参考:https://doc.rust-lang.org/rust-by-example/custom_types/enum/c_like.html
5.2. Option 枚举(用于代替其它语言中的 Null 值)
和很多其它语言不一样,Rust 中没有 Null 值。
5.2.1. Null 值的缺陷
为什么 Rust 中不引入 Null 值呢?主要原因是 Null 有下面缺陷:如果在非 Null 值的地方使用了 Null 值,那么程序会出错。
Null 的发明者 Tony Hoare(这位牛人是快速排序算法的发明者,图灵奖获得者)在 2009 的演讲 Null References: The Billion Dollar Mistake 中提到他设计 Null 是错误的。
5.2.2. Option<T> (Some, None)
Rust 标准库中定义了下面枚举:
enum Option<T> {
    Some(T),
    None,
}
<T> 是泛型语法,后文将介绍。枚举 Option<T> 定义在标准库中,使用时可以直接省略前缀 Option:: ,直接使用 Some(T) 或者 None 即可:
let some_number = Some(5);
let some_string = Some("a string");

let absent_number: Option<i32> = None;
5.3. 控制流操作符 match 用于枚举
在节 2.5.3 中介绍了 match 操作符,这里再介绍一下它用于枚举时的例子:
enum Coin {
    Penny,
    Nickel,
    Dime,
    Quarter,
}

fn value_in_cents(coin: Coin) -> u8 {
    match coin {
        Coin::Penny => {
            println!("Lucky penny!");
            1
        },
        Coin::Nickel => 5,
        Coin::Dime => 10,
        Coin::Quarter => 25,
    }
}

fn main() {
    let c = Coin::Penny;
    value_in_cents(c);
}
Rust 要求 match 中必须处理枚举的所有情况,如果少写一个,则不会通过编译。 如:
fn value_in_cents(coin: Coin) -> u8 {
    match coin {
        Coin::Penny => {
            println!("Lucky penny!");
            1
        },
        Coin::Nickel => 5,
        Coin::Dime => 10,         // 编译会报错,少了 Coin::Quarter
     }
}
5.3.1. 在枚举 Option<T> 上使用 match
考虑下面代码:
fn plus_one(x: Option<i32>) -> Option<i32> {
    match x {
        None => None,
        Some(i) => Some(i + 1),
    }
}

let five = Some(5);
let six = plus_one(five);
let none = plus_one(None);
Some(5) 为什么可以匹配到 match 语句 Some(i) => Some(i + 1), 呢?因为变量 i 会绑定 Some(T) 中的 T ,这个例子中就是数字 5。
5.3.2. _ 占位符
前面提到过,Rust 要求 match 中必须处理枚举的所有情况,如果少写一个,则不会通过编译。
如果枚举的可选值很多,而我们关心的却很少。则一一列出所有枚举情况会很繁琐。这时可以使用 _ 表示其它的情况。如:
let some_u8_value = 0u8;

match some_u8_value {        // u8 的可能值为 0-255
    1 => println!("one"),
    2 => println!("two"),
    3 => println!("three"),
    _ => (),                 // _ 这里表示除1,2,3外的其它情况,即 0, 4-255
}
上面代码中, () 是空 Tuple,表示什么都不做。
5.4. 更简单的控制流操作 if let
在枚举上使用 match 时,很多时候我们仅关心枚举中的少数情况。如:
let some_u8_value = Some(0u8);
match some_u8_value {
    Some(3) => println!("three"),
    _ => (),
}
Rust 中提供了 if let 可以简化上面代码,即:
if let Some(3) = some_u8_value {       // 和前面的代码块功能一样
    println!("three");
}
if let 也支持 else 语句。即下面代码:
let mut count = 0;
match coin {
    Coin::Quarter(state) => println!("State quarter from {:?}!", state),
    _ => count += 1,
}
可以写为等价形式:
let mut count = 0;
if let Coin::Quarter(state) = coin {
    println!("State quarter from {:?}!", state);
} else {
    count += 1;
}
5.5. let else 是 if else 的补充
let else 的语法如下:
let PATTERN: TYPE = EXPRESSION else DIVERGING_BLOCK;
If the pattern match from the assigned expression succeeds, its bindings are introduced into the surrounding scope. If it does not succeed, it must diverge (e.g. return or break).
下面代码:
let (each, binding) = match expr {
    pattern => (each, binding),
    _ => {
        /* diverging expr */
    }
};
可以写为等价形式:
let pattern = expr else {
    /* diverging expr */
};
当一个枚举不是 Option/Result 时, let else 可简化对这个枚举的不期望情况的处理,如代码(未使用 let else):
impl ActionView {
    pub(crate) fn new(history: &History<Action>) -> Result<Self, eyre::Report> {
        let mut iter = history.iter();
        let event = iter
            .next()
            // RFC comment: ok_or_else works fine to early return when working with `Option`.
            .ok_or_else(|| eyre::eyre!("Entity has no history"))?;

        if let Action::Register {
            actor: String,
            x: Vec<String>
            y: u32,
            z: String,
        } = event.action().clone() {
            let created = *event.created();
            let mut view = ActionView {
                registered_by: (actor, created),
                a: (actor.clone(), x, created),
                b: (actor.clone(), y, created),
                c: (z, created),
                d: Vec::new(),

                e: None,
                f: None,
                g: None,
            };
            for event in iter {
                view.update(&event)?;
            }

            // more lines omitted

            Ok(view)
        } else {
            // RFC comment: Far away from the associated conditional.
            Err(eyre::eyre!("must begin with a Register action"));
        }
    }
}
可以改写为(使用 let else):
impl ActionView {
    pub(crate) fn new(history: &History<Action>) -> Result<Self, eyre::Report> {
        let mut iter = history.iter();
        let event = iter
            .next()
            // RFC comment: ok_or_else works fine to early return when working with `Option`.
            .ok_or_else(|| eyre::eyre!("Entity has no history"))?;

        let Action::Register {
            actor: String,
            x: Vec<String>
            y: u32,
            z: String,
        } = event.action().clone() else {
            // RFC comment: Directly located next to the associated conditional.
            return Err(eyre::eyre!("must begin with a Register action"));
        };

        let created = *event.created();
        let mut view = ActionView {
            registered_by: (actor, created),
            a: (actor.clone(), x, created),
            b: (actor.clone(), y, created),
            c: (z, created),
            d: Vec::new(),

            e: None,
            f: None,
            g: None,
        };
        for event in iter {
            view.update(&event)?;
        }

        // more lines omitted

        Ok(view)
    }
}
5.6. 更简单的控制流操作 while let
和上一节介绍的 if let 类似, while let 也可简化 match 代码。如:
fn main() {
    // Make `optional` of type `Option<i32>`
    let mut optional = Some(0);

    // Repeatedly try this test.
    loop {
        match optional {
            // If `optional` destructures, evaluate the block.
            Some(i) => {
                if i > 9 {
                    println!("Greater than 9, quit!");
                    optional = None;
                } else {
                    println!("`i` is `{:?}`. Try again.", i);
                    optional = Some(i + 1);
                }
                // ^ Requires 3 indentations!
            },
            // Quit the loop when the destructure fails:
            _ => { break; }
            // ^ Why should this be required? There must be a better way!
        }
    }
}
使用 while let 可以让上面代码更简洁:
fn main() {                        // 这个代码和前面的代码等价
    // Make `optional` of type `Option<i32>`
    let mut optional = Some(0);

    // This reads: "while `let` destructures `optional` into
    // `Some(i)`, evaluate the block (`{}`). Else `break`.
    while let Some(i) = optional {
        if i > 9 {
            println!("Greater than 9, quit!");
            optional = None;
        } else {
            println!("`i` is `{:?}`. Try again.", i);
            optional = Some(i + 1);
        }
        // ^ Less rightward drift and doesn't require
        // explicitly handling the failing case.
    }
    // ^ `if let` had additional optional `else`/`else if`
    // clauses. `while let` does not have these.
}
6. Package, Crates, Modules
Rust 中 Package, Crates, Modules 的关系如下:
- Package 由一个或者多个 Crates 组成;每个 Package 都对应一个 Cargo.toml 文件,用于描述如何编译这些 Crates;
- 对于 Crates,有两种类型:“Binary Crate”和“Library Crate”。 1 个 Package 可以包含任意多个 Binary Crate,但最多包含 1 个 Library Crate。 此外,1 个 Package 必须至少包含 1 个 Crate(可以是 Binary Crate 也可以是 Library Crate)。比如,1 个 Package 可以同时包含 1 个 Binary Crate 和 1 个 Library Crate;一个 Package 也可以只包含 1 个 Binary Crate(或者 1 个 Library Crate);一个 Package 也可以包含 3 个 Binary Crate 和 1 个 Library Crate。但 1 个 Package 不能包含 3 个 Library Crate。
- 对于每个 Crate,有一个称为 Crate Root 的源文件,用于指定编译器开始编译的起点。 对于 Binary Crate,其 Crate Root 默认为
src/main.rs;对于 Library Crate,其 Crate Root 默认为src/lib.rs。 - 一个 Crate 可以包含多个 Modules,关键字
mod用于定义 Modules。
6.1. 使用外部 Crate(在 Cargo.toml 中配置依赖库)
要使用外部 Crate,我们先要在 Cargo.toml 的 dependencies 中增加依赖库。比如,下面例子中,我们增加了外部依赖 regex :
[package]
name = "hello_world"
version = "0.1.0"
authors = ["Your Name <you@example.com>"]
edition = "2018"

[dependencies]
regex = "1.4"
下面是在 src/main.rs 中直接使用 Crate regex 的例子:
// extern crate regex;       // 在 Rust 2018 edition 中,crate root 中不再需要这行代码了

use regex::Regex;

fn main() {
    let re = Regex::new(r"^\d{4}-\d{2}-\d{2}$").unwrap();
    println!("Did our date match? {}", re.is_match("2018-01-01"));
}
注:在 Rust 2015 edition 中,要在 crate root 中用 extern crate regex 引入外部库(或者在 rustc 编译器中使用 --extern 指定);而在 Rust 2018 版本中,一般不需要显式地使用 extern crate 了,直接使用 use 即可,参考:https://doc.rust-lang.org/reference/items/extern-crates.html
6.1.1. Overriding 依赖库
如果发现某个依赖库(或者依赖库的依赖库)有 bug,我们想进行一下临时的修复。这时可以在 Cargo.toml 中使用 patch 来 Overriding 依赖库。
下面是 Overriding 在 crates.io 中发布的依赖库 uuid:
[package]
name = "my-library"
version = "0.1.0"

[dependencies]
uuid = "1.0"

[patch.crates-io]
uuid = { path = "../path/to/uuid" }  # 强制使用本地版本
如果依赖库没有在 crates.io 中发布,而直接在 git 中发布的,则可以这样 Overriding 它:
[patch."https://github.com/your/repository"]
my-library = { path = "../my-library/path" }  # 强制使用本地版本
除了在文件 Cargo.toml 中使用 patch 来 Overriding 依赖库外;还可以在文件 .cargo/config.toml 中使用 paths 来 Overriding 依赖库,这里不详细介绍。
参考:https://doc.rust-lang.org/cargo/reference/overriding-dependencies.html
6.2. Modules
Rust 中模块是函数、结构体、 impl 块、或者其它模块的集合。 Rust 中和模块相关的关键字有:
mod创建一个新模块;usebrings a path into scope;pub将模块的元素设置为公有的(默认是私有的)。
下面是模块的简单例子:
mod bits {
   fn pos(bit: u32) -> u32 {
      1 << bit
   }

   pub fn decimal(bit: u32) {
      println!("Bits decimal {}", pos(bit));
   }

   pub fn hex(bit: u32) {
      println!("Bits decimal 0x{:x}", pos(bit));
   }
}

fn main( ) {
   bits::decimal(8);
   bits::hex(8);
}

// Bits decimal 256
// Bits decimal 0x100
6.2.1. use 关键字
使用 use 关键字可以把模块中的条目引入到当前作用域中,这样使用起来更加方便,如:
mod deeply {
    pub mod nested {
        pub fn function() {
            println!("called `deeply::nested::function()`");
        }
        pub fn function1() {
            println!("called `deeply::nested::function1()`");
        }
        pub fn function2() {
            println!("called `deeply::nested::function2()`");
        }
    }
}

use deeply::nested::{
    function,        // 可以直接使用 function 来代替 deeply::nested::function了,更方便
    function1,       // 可以直接使用 function1 来代替 deeply::nested::function1 了,更方便
};

fn main() {
    // Easier access to `deeply::nested::function` and `deeply::nested::function1`
    function();
    function1();

    deeply::nested::function2();  // 这里不使用 use 也行,只是需要输入完整的 path
}
在使用 use 的同时,可以使用 as 关键字把引入的条目换个名字,如:
// Bind the `deeply::nested::function` path to `other_function`.
use deeply::nested::function as other_function;

fn function() {
    println!("called `function()`");
}

mod deeply {
    pub mod nested {
        pub fn function() {
            println!("called `deeply::nested::function()`");
        }
    }
}

fn main() {
    // Easier access to `deeply::nested::function`
    other_function();

    println!("Entering block");
    {
        // This is equivalent to `use deeply::nested::function as function`.
        // This `function()` will shadow the outer one.
        use deeply::nested::function;

        // `use` bindings have a local scope. In this case, the
        // shadowing of `function()` is only in this block.
        function();

        println!("Leaving block");
    }

    function();
}
参考:https://doc.rust-lang.org/reference/items/use-declarations.html
6.2.2. pub use(re-exporting)
使用 pub use 可以 Re-export 一个名称,它可以简化代码。
mod quux {
    pub use self::foo::bar;         // 使用了 pub use 重新导入,这样 quux 中的 bar 相当于 foo::bar
    pub use self::foo::bar as bar2; // 使用 pub use 时,换了一个名称,这样 quux 中的 bar2 相当于 foo::bar

    pub mod foo {
        pub fn bar() {
            println!("run bar")
        }
        pub fn baz() {
            println!("run baz")
        }
    }
}

fn main() {
    quux::bar();              // 使用时更简单了,不用指定 quux::foo::bar();
    quux::bar2();
    quux::foo::bar();
    quux::foo::baz();
}
参考:https://doc.rust-lang.org/reference/items/use-declarations.html
6.2.3. self, super, crate 关键字
使用 self (当前模块), super (父模块), crate (根模块)等关键字,可以帮助消除歧义,如:
fn function() {
    println!("called `function()`");
}

mod cool {
    pub fn function() {
        println!("called `cool::function()`");
    }
}

mod my {
    fn function() {
        println!("called `my::function()`");
    }

    mod cool {
        pub fn function() {
            println!("called `my::cool::function()`");
        }
    }

    pub fn indirect_call() {
        // Let's access all the functions named `function` from this scope!
        print!("called `my::indirect_call()`, that\n> ");

        // The `self` keyword refers to the current module scope - in this case `my`.
        // Calling `self::function()` and calling `function()` directly both give
        // the same result, because they refer to the same function.
        self::function();
        function();

        // We can also use `self` to access another module inside `my`:
        self::cool::function();

        // The `super` keyword refers to the parent scope (outside the `my` module).
        super::function();

        // This will bind to the `cool::function` in the *crate* scope.
        // In this case the crate scope is the outermost scope.
        {
            use crate::cool::function as root_function;
            root_function();
        }
    }
}

fn main() {
    my::indirect_call();
}
6.2.4. 由目录结构约定的模块(mod.rs)
假设当前目录结构为:
|-- my
|   `-- mod.rs
`-- split.rs
文件 split.rs 的内容如下:
// This declaration will look for a file named `my.rs` or `my/mod.rs` and will
// insert its contents inside a module named `my` under this scope
mod my;

fn main() {
    my::function();
}
文件中 mod my 表示在 split.rs 所在目录中寻找名为 my.rs 或者 my/mod.rs 的文件,把找到的文件作为模块 my 插入到当前文件(split.rs)中。由于这里 my.rs 不存在,所以 my/mod.rs 的内容将作为模块 my 插入到 split.rs 中。
在这个例子中,my/mod.rs 的内容可以是:
pub fn function() {
    println!("called `function()`");
}
6.3. pub(in path), pub(crate), pub(super), and pub(self)
默认,Rust 中什么都是私有的,但有两个例外情况:
By default, everything in Rust is private, with two exceptions: Associated items in a pub Trait are public by default; Enum variants in a pub enum are also public by default.
指定 pub 关键字可以把其变为公开的, pub 还支持下面的用法:
pub(in path)makes an item visible within the provided path. path must be an ancestor module of the item whose visibility is being declared. Starting with the 2018 edition, paths for pub(in path) must start withcrate,self, orsuper.pub(crate)makes an item visible within the current crate.pub(super)makes an item visible to the parent module. This is equivalent to pub(in super).pub(self)makes an item visible to the current module. This is equivalent to pub(in self) or not using pub at all.
下面是 pub 的使用实例:
pub mod outer_mod {
    pub mod inner_mod {
        // This function is visible within `outer_mod`
        pub(in crate::outer_mod) fn outer_mod_visible_fn() {}
        // Same as above, this is only valid in the 2015 edition.
        pub(in outer_mod) fn outer_mod_visible_fn_2015() {}

        // This function is visible to the entire crate
        pub(crate) fn crate_visible_fn() {}

        // This function is visible within `outer_mod`
        pub(super) fn super_mod_visible_fn() {
            // This function is visible since we're in the same `mod`
            inner_mod_visible_fn();
        }

        // This function is visible only within `inner_mod`,
        // which is the same as leaving it private.
        pub(self) fn inner_mod_visible_fn() {}
    }
    pub fn foo() {
        inner_mod::outer_mod_visible_fn();
        inner_mod::crate_visible_fn();
        inner_mod::super_mod_visible_fn();

        // This function is no longer visible since we're outside of `inner_mod`
        // Error! `inner_mod_visible_fn` is private
        //inner_mod::inner_mod_visible_fn();
    }
}

fn bar() {
    // This function is still visible since we're in the same crate
    outer_mod::inner_mod::crate_visible_fn();

    // This function is no longer visible since we're outside of `outer_mod`
    // Error! `super_mod_visible_fn` is private
    //outer_mod::inner_mod::super_mod_visible_fn();

    // This function is no longer visible since we're outside of `outer_mod`
    // Error! `outer_mod_visible_fn` is private
    //outer_mod::inner_mod::outer_mod_visible_fn();

    outer_mod::foo();
}

fn main() { bar() }
参考:https://doc.rust-lang.org/reference/visibility-and-privacy.html
7. 常见集合
7.1. HashMap
和 vector 类似,Rust 中 HashMap 所有的键必须是相同类型,值也必须都是相同类型。
下面是 HashMap 的使用实例:
use std::collections::HashMap;

fn main() {
    let mut scores = HashMap::new();
    scores.insert(String::from("Blue"), 10);
    scores.insert(String::from("Yellow"), 50);

    // 遍历 HashMap
    for (key, value) in scores.iter() {  // scores.iter() 写为 &scores 也行
        println!("{}: {}", key, value);
    }

    // contains_key 检测是否包含某个 key
    let team_name = String::from("Blue");
    if scores.contains_key(&team_name) {
        println!("Contains key {}", &team_name);
    } else {
        println!("Do not contains key {}", &team_name);
    }

    // get 获取某个 key 对应的 value
    let score = scores.get(&team_name);
    println!("Get {}: {}", &team_name, score.unwrap());

    // insert 插入(注:key 和 value 都会 Copy 进去,如果没实现 Copy trait 则会移动 key 和 value 的所有权)
    scores.insert(String::from("Blue"), 25);

    // or_insert 仅当没有 key 时,才插入
    scores.entry(String::from("Yellow")).or_insert(40);

    // 再次遍历 HashMap
    for (key, value) in scores.iter() {
        println!("{}: {}", key, value);
    }
}
8. 错误处理
Rust 把错误分为两类:Recoverable and Unrecoverable errors.
像文件找不到等错误属于“可恢复的错误”,而像数组越界等属于“不可恢复的错误”。
Rust 中没有异常机制。Rust 使用类型 Result<T, E> 表达“可恢复的错误”;遇到“不可恢复的错误”时,调用宏 panic! 终止程序执行。
8.1. 可恢复的错误(Result 枚举)
Rust 使用类型 Result<T, E> 表达“可恢复的错误”,其定义如下:
enum Result<T, E> {
    Ok(T),
    Err(E),
}
T 和 E 是泛型参数。
Result 和 Option 都是枚举:
Result is a richer version of the Option type that describes possible error instead of possible absence.
比如标准库中的 File::open 会返回 Result<T, E> ,我们可以进行相应的错误处理:
use std::fs::File;

fn main() {
    let f = File::open("hello.txt");

    let f = match f {
        Ok(file) => file,
        Err(error) => {
            panic!("Problem opening the file: {:?}", error)
        },
    };
}
上面的错误处理比较简单,一旦有错就调用 painc。我们可以根据错误类型进行更精细地控制,如文件不存在就创建,其它错误才 panic:
use std::fs::File;
use std::io::ErrorKind;

fn main() {
    let f = File::open("hello.txt");

    let f = match f {
        Ok(file) => file,
        Err(error) => match error.kind() {
            ErrorKind::NotFound => match File::create("hello.txt") {
                Ok(fc) => fc,
                Err(e) => panic!("Problem creating the file: {:?}", e),
            },
            other_error => panic!("Problem opening the file: {:?}", other_error),
        },
    };
}
8.1.1. 使用 unwrap 或者 expect 简化代码
如果我们想出现错误时,就调用 panic! 。这时,我们可以使用 Result<T, E> 类型上的方法 unwrap 来简化代码。
比如,前面介绍过的代码:
use std::fs::File;

fn main() {
    let f = File::open("hello.txt");

    let f = match f {
        Ok(file) => file,
        Err(error) => {
            panic!("Problem opening the file: {:?}", error)
        },
    };
}
可以简写为:
use std::fs::File;

fn main() {
    let f = File::open("hello.txt").unwrap();
}
Result<T, E> 类型上还有一个方法 expect ,它和 unwrap 的区别在于方法 expect 接收一个参数用于定制 painc! 时打印的消息:
use std::fs::File;

fn main() {
    let f = File::open("hello.txt").expect("Failed to open hello.txt");
}
8.1.2. 传播错误(使用 ? 可以简化代码)
如果不想在当前函数中处理错误,则可以把错误返回出去。如:
use std::io;
use std::io::Read;
use std::fs::File;

fn read_username_from_file() -> Result<String, io::Error> {
    let f = File::open("hello.txt");

    let mut f = match f {
        Ok(file) => file,
        Err(e) => return Err(e),       // 有错就 return
    };

    let mut s = String::new();

    match f.read_to_string(&mut s) {
        Ok(_) => Ok(s),
        Err(e) => Err(e),              // 不用明确写 return,因是它是函数的最后一个表达式
    }
}
在 Result 实例后面加上 ? 可以简化传播错误的代码。
Result 加上 ? 的含义是:如果 Result 出错,就返回错误,不出错,就继续执行。
前面的代码可简化为:
use std::io;
use std::io::Read;
use std::fs::File;

fn read_username_from_file() -> Result<String, io::Error> {
    let mut f = File::open("hello.txt")?;  // ? 表示如果出错,就返回错误
    let mut s = String::new();
    f.read_to_string(&mut s)?;             // ? 表示如果出错,就返回错误
    Ok(s)
}
我们可以链式地使用 ? ,即前面代码还可以进一步简化为:
use std::io;
use std::io::Read;
use std::fs::File;

fn read_username_from_file() -> Result<String, io::Error> {
    let mut s = String::new();

    File::open("hello.txt")?.read_to_string(&mut s)?;

    Ok(s)
}
上面仅仅是演示 ? 的作用,对于把文件内容读取到变量中这样的通用需求,我们不用重新实现了,在内置函数 fs::read_to_string 已经实现了相同的功能:
use std::io;
use std::fs;

fn read_username_from_file() -> Result<String, io::Error> {
    fs::read_to_string("hello.txt")
}
9. Attribute(#)
Rust 中属性有两种形式(一个有感叹号,另一个没有感叹号):
# ! [ Attr ]      // 有感叹号,称为 InnerAttribute,影响范围是声明属性时的范围
# [ Attr ]        // 没有感叹号,称为 OuterAttribute,只影响属性的下一个条目,影响范围更小
属性的应用场景有:
- conditional compilation of code
- set crate name, version and type (binary or library)
- disable lints (warnings)
- enable compiler features (macros, glob imports, etc.)
- link to a foreign library
- mark functions as unit tests
- mark functions that will be part of a benchmark
下面是属性的一些例子:
// General metadata applied to the enclosing module or crate.
#![crate_type = "lib"]                   // 范围是整个 module

// A function marked as a unit test
#[test]                                  // 范围是下一个函数
fn test_foo() {
    /* ... */
}

// A conditionally-compiled module
#[cfg(target_os = "linux")]              // 范围是下一个 mod
mod bar {
    /* ... */
}

// A lint attribute used to suppress a warning/error
#[allow(non_camel_case_types)]           // 范围是下一个 type
type int8_t = i8;

// Inner attribute applies to the entire function.
fn some_unused_variables() {
  #![allow(unused_variables)]            // 范围是整个函数

  let x = ();
  let y = ();
  let z = ();
}
上面例子中的 crate_type/test/cfg/allow 都是内置属性,内置属性的完整列表可以参考:https://doc.rust-lang.org/reference/attributes.html#built-in-attributes-index
9.1. 内置属性 derive
使用属性 derive 可以自动为结构体添加新的 items。
比如,在结构体 Foo 上设置 #[derive(PartialEq)] :
#[derive(PartialEq)]
struct Foo<T> {
    a: i32,
    b: T,
}
#[derive(PartialEq)] 相当于自动生成了下面代码:
impl<T: PartialEq> PartialEq for Foo<T> {
    fn eq(&self, other: &Foo<T>) -> bool {
        self.a == other.a && self.b == other.b
    }

    fn ne(&self, other: &Foo<T>) -> bool {
        self.a != other.a || self.b != other.b
    }
}
9.2. 内置属性 cfg 和 cfg_attr
内置属性 cfg 和 cfg_attr 用于条件编译。下面是 cfg 的使用例子:
// The function is only included in the build when compiling for macOS
#[cfg(target_os = "macos")]
fn macos_only() {
  // ...
}

// This function is only included when either foo or bar is defined
#[cfg(any(foo, bar))]
fn needs_foo_or_bar() {
  // ...
}
cfg_attr 的语法为:
Syntax
CfgAttrAttribute :
   cfg_attr ( ConfigurationPredicate , CfgAttrs? )

CfgAttrs :
   Attr (, Attr)* ,?
表示当 ConfigurationPredicate 为真时,会引入后面的属性。下面是 cfg_attr 的使用例子:
#[cfg_attr(feature = "magic", sparkles, crackles)]
fn bewitched() {}

// When the `magic` feature flag is enabled, the above will expand to:
#[sparkles]
#[crackles]
fn bewitched() {}
参考:https://doc.rust-lang.org/reference/conditional-compilation.html
10. Generic Types
Rust 支持泛型,语法是 <T> ,直接看例子:
struct Point<T> {
    x: T,
    y: T,
}

impl<T> Point<T> {
    fn x(&self) -> &T {
        &self.x
    }
}

fn main() {
    let p1 = Point { x: 5, y: 10 };     // p1 类型为 Point<i32>,也可以完整地写为 let p1 = Point::<i32> { x: 5, y: 10 };
    let p2 = Point { x: 1.1, y: 2.1 };  // p2 类型为 Point<f64>,也可以完整地写为 let p2 = Point::<f64> { x: 1.1, y: 2.1 };

    println!("p1.x = {}", p1.x());      // p1.x = 5
    println!("p2.x = {}", p2.x());      // p2.x = 1.1
}
再看一个例子:
struct Point<T, U> {
    x: T,
    y: U,
}

impl<T, U> Point<T, U> {
    fn mixup<V, W>(self, other: Point<V, W>) -> Point<T, W> {
        Point {
            x: self.x,
            y: other.y,
        }
    }
}

fn main() {
    let p1 = Point { x: 5, y: 10.4 };               // p1 类型为 Point<i32, f64>
    let p2 = Point { x: "Hello", y: 'c'};           // p2 类型为 Point<i32, char>

    let p3 = p1.mixup(p2);

    println!("p3.x = {}, p3.y = {}", p3.x, p3.y);   // p3.x = 5, p3.y = c
}
10.1. 函数泛型例子
考虑下面代码:
fn largest_i32(list: &[i32]) -> i32 {
    let mut largest = list[0];

    for &item in list.iter() {
        if item > largest {
            largest = item;
        }
    }

    largest
}

fn largest_char(list: &[char]) -> char {
    let mut largest = list[0];

    for &item in list.iter() {
        if item > largest {
            largest = item;
        }
    }

    largest
}

fn main() {
    let number_list = vec![34, 50, 25, 100, 65];

    let result = largest_i32(&number_list);
    println!("The largest number is {}", result);

    let char_list = vec!['y', 'm', 'a', 'q'];

    let result = largest_char(&char_list);
    println!("The largest char is {}", result);
}
上面代码中函数 largest_i32 和 largest_char 的实现基本相同,有代码冗余。使用泛型可以简化代码:
fn largest<T: PartialOrd + Copy>(list: &[T]) -> T {
    let mut largest = list[0];  // 要进行复制,必需声明类型 T 满足 Trait Copy

    for &item in list.iter() {
        if item > largest {     // 要使用比较操作,必需声明类型 T 满足 Trait PartialOrd
            largest = item;
        }
    }

    largest
}

fn main() {
    let number_list = vec![34, 50, 25, 100, 65];

    let result = largest(&number_list);
    println!("The largest number is {}", result);

    let char_list = vec!['y', 'm', 'a', 'q'];

    let result = largest(&char_list);
    println!("The largest char is {}", result);
}
上面代码中, PartialOrd 和 Copy 是内置 Trait(后文将介绍)。
10.2. 不用担心运行时性能
Rust 的泛型没有运行时的性能问题,它的展开是在编译时进行的。如代码:
fn main() {
    let integer = Some(5);    // Option<i32>
    let float = Some(5.0);    // Option<f64>
}
可以认为在编译时会展开为:
enum Option_i32 {
    Some(i32),
    None,
}

enum Option_f64 {
    Some(f64),
    None,
}

fn main() {
    let integer = Option_i32::Some(5);
    let float = Option_f64::Some(5.0);
}
11. Traits
Rust 中,Trait 用于告诉编译器 不同的类型之间有哪些公共的行为。 它有点像其它语言的 Interface(接口)。
11.1. 定义 Trait
使用关键字 trait 来定义 Trait,如:
trait Summary {
    const NAME: &'static str;           // trait 中可以定义 const

    fn summarize(&self) -> String;      // 只有声明,没有实现
}
要在某个类型上实现 Trait,使用 impl TraitName for TypeName 即可,如:
struct NewsArticle {
    headline: String,
    location: String,
    author: String,
    content: String,
}

// 在 NewsArticle 上实现 Summary
impl Summary for NewsArticle {
    const NAME: &'static str = "news_article";

    fn summarize(&self) -> String {
        format!("{}, by {} ({})", self.headline, self.author, self.location)
    }
}

struct Tweet {
    username: String,
    content: String,
    reply: bool,
    retweet: bool,
}

// 在 Tweet 上实现 Summary
impl Summary for Tweet {
    const NAME: &'static str = "tweet";

    fn summarize(&self) -> String {
        format!("{}: {}", self.username, self.content)
    }
}
当实现完 Trait 后,我们可以像调用普通方法一样去调用 Trait 中的方法,如:
let tweet = Tweet {
    username: String::from("horse_ebooks"),
    content: String::from("of course, as you probably already know, people"),
    reply: false,
    retweet: false,
};

println!("1 new tweet: {}", tweet.summarize());

// 1 new tweet: horse_ebooks: of course, as you probably already know, people
可以在声明 Trait 时,提供方法的“默认的实现”,如:
trait Summary {
    fn summarize(&self) -> String {     // 这是方法 summarize 的默认实现,可以被 override
        String::from("(Read more...)")
    }
}
11.2. Trait 作为参数
当把 Trait 作为参数时,参数类型的声明形式为 impl TraitName ,如:
fn notify(item: impl Summary) {
    println!("Breaking news! {}", item.summarize());
}
上面的写法其实是下面形式的语法糖:
fn notify<T: Summary>(item: T) {          // 同上面代码
    println!("Breaking news! {}", item.summarize());
}
类似地,写法:
fn notify(item1: impl Summary, item2: impl Summary) {
是下面形式的语法糖:
fn notify<T: Summary>(item1: T, item2: T) {
11.2.1. 同时指定多个 Trait (+)
如果某个参数要同时满足多个 Trait 的约定,则可以使用 + ,如:
fn notify(item: impl Summary + Display) { // item 同时满足 Summary 和 Display
可以认为上面代码是下面形式的语法糖:
fn notify<T: Summary + Display>(item: T) {
11.2.2. 使用 where 让代码更清晰
考虑下面代码:
fn some_function<T: Display + Clone, U: Clone + Debug>(t: T, u: U) -> i32 {
它看起来很乱,我们可以使用 where 语句使它更加清晰:
fn some_function<T, U>(t: T, u: U) -> i32           // 同上面代码
    where T: Display + Clone,
          U: Clone + Debug
{
11.3. 返回值是 Trait(返回 Box 更方便)
返回值也可以是 Trait,指定为 impl TraitName 即可,比如:
fn returns_summarizable() -> impl Summary {  // 返回 Trait
    Tweet {
        username: String::from("horse_ebooks"),
        content: String::from("of course, as you probably already know, people"),
        reply: false,
        retweet: false,
    }
}
不过,就算返回值是 impl TraitName ,也只能返回同一种类型,下面代码(返回 NewsArticle 或者 Tweet,类型是不同的)目前无法通过编译:
fn returns_summarizable(switch: bool) -> impl Summary {  // 注:无法通过编译
    if switch {
        NewsArticle {
            headline: String::from("Penguins win the Stanley Cup Championship!"),
            location: String::from("Pittsburgh, PA, USA"),
            author: String::from("Iceburgh"),
            content: String::from("The Pittsburgh Penguins once again are the best
            hockey team in the NHL."),
        }
    } else {
        Tweet {
            username: String::from("horse_ebooks"),
            content: String::from("of course, as you probably already know, people"),
            reply: false,
            retweet: false,
        }
    }
}
从语义上看起来应该是合理的,可以认为这是编译器实现时的限制。目前 Rust 编译器需要准确地知道函数返回值所占的大小,所以只能返回一个确定的类型。前面例子中函数 returns_summarizable 只能仅返回 NewsArticle ,或者仅返回 Tweet ,这个决定需要在编译时就能确实,而不能是运行时才能确定的。
如果我们确实想让 returns_summarizable 在运行时决定返回哪类对象,一个简单的解决办法就是返回 Box 对象对其进行封装,这样返回值就能在编译时确定大小了。 比如这个例子就是 Box<dyn Summary> (至于为什么这里还有个 dyn ,可以参考 RFC 2113 Feature Name: dyn-trait-syntax),下面是完整的例子:
trait Summary {
    fn summarize(&self) -> String;
}

struct NewsArticle {
    headline: String,
    location: String,
    author: String,
    content: String,
}

impl Summary for NewsArticle {
    fn summarize(&self) -> String {
        format!("NewsArticle: {}, by {} ({})", self.headline, self.author, self.location)
    }
}

struct Tweet {
    username: String,
    content: String,
    reply: bool,
    retweet: bool,
}

impl Summary for Tweet {
    fn summarize(&self) -> String {
        format!("Tweet: {}: {}", self.username, self.content)
    }
}

fn returns_summarizable(switch: bool) -> Box<dyn Summary> {    // 使用 Box 封装
    if switch {
        Box::new(NewsArticle {
            headline: String::from("Penguins win the Stanley Cup Championship!"),
            location: String::from("Pittsburgh, PA, USA"),
            author: String::from("Iceburgh"),
            content: String::from("The Pittsburgh Penguins once again are the best
            hockey team in the NHL."),
        })
    } else {
        Box::new(Tweet {
            username: String::from("horse_ebooks"),
            content: String::from("of course, as you probably already know, people"),
            reply: false,
            retweet: false,
        })
    }
}

fn main() {
    let obj = returns_summarizable(true);
    println!("{}", obj.summarize());
}
12. Dynamic Dispatch
dyn 是 Rust 语言中的一个关键字,用于表示动态派发(Dynamic Dispatch)的类型。在 Rust 中,存在两种类型的多态:静态多态和动态多态。静态多态是通过泛型实现的,可以在编译时确定具体的类型,而动态多态是通过 trait objects 实现的,只有在运行时才能确定具体的类型。
要创建一个 trait object,可以通过 &dyn Trait 或 Box<dyn Trait> 来定义:
&dyn Trait: 用于借用(引用)一个实现了某个 trait 的对象。Box<dyn Trait>: 用于拥有(所有权)一个实现了某个 trait 的对象。
下面是 dyn 的使用例子:
// 定义一个 Trait
trait Shape {
    fn area(&self) -> f64;
    fn name(&self) -> &str;
}

struct Circle {
    radius: f64,
}

impl Shape for Circle {
    fn area(&self) -> f64 {
        std::f64::consts::PI * self.radius * self.radius
    }

    fn name(&self) -> &str {
        "Circle"
    }
}

struct Rectangle {
    width: f64,
    height: f64,
}

impl Shape for Rectangle {
    fn area(&self) -> f64 {
        self.width * self.height
    }

    fn name(&self) -> &str {
        "Rectangle"
    }
}

// 打印 Shape 的信息,它的参数是 Trait Object
fn print_shape_info(shape: &dyn Shape) {
    println!("Shape: {}, Area: {}", shape.name(), shape.area());
}

fn main() {
    let circle = Circle { radius: 5.0 };
    let rectangle = Rectangle { width: 4.0, height: 7.0 };

    // 使用 Trait Objects
    print_shape_info(&circle);  // Shape: Circle, Area: 78.53981633974483
    print_shape_info(&rectangle);  // Shape: Rectangle, Area: 28

    // 使用 Box<dyn Shape> 保存不同类型的对象
    let shapes: Vec<Box<dyn Shape>> = vec![
        Box::new(circle),
        Box::new(rectangle),
    ];

    for shape in shapes {
        println!("Shape: {}, Area: {}", shape.name(), shape.area());
    }
}
上面的 print_shape_info 函数采用的动态派发机制,也可以使用泛型函数来实现(Rust 的泛型函数属于静态派发,在编译时就知道具体类型了),比如:
fn print_shape_info<T: Shape>(shape: &T) {    // 泛型函数版本
    println!("Shape: {}, Area: {}", shape.name(), shape.area());
}
13. Lifetimes(单引号)
Rust 中,每个引用都有 lifetime(生命周期),生命周期就是“引用的有效范围”。 引入 lifetime 的目的是“防止悬挂引用(dangling references)”。
A lifetime is a construct the compiler (or more specifically, its borrow checker) uses to ensure all borrows are valid.
让我们通过一个例子来了解 lifetime:
 1: // 下面代码无法通过编译!
 2: fn main() {
 3:     let r;                // ---------+-- 'a
 4:                           //          |
 5:     {                     //          |
 6:         let x = 5;        // -+-- 'b  |
 7:         r = &x;           //  |       |
 8:     }                     // -+       |
 9:                           //          |
10:     println!("r: {}", r); //          |
11: }                         // ---------+
我们把 r 的 lifetime 记为 'a ,把 x 的 lifetime 记为 'b ,显然 'b 会短于 'a 。在 Rust 编译阶段,编译器会检测出 r 所关联的内存(代码第 7 行)的 lifetime 是 'b ,而 'b 的 lifetime 却短于 'a ,这时编译器会报错(如果不报错 r 的话,运行到第 9 行时, r 会引用到一个已经无效的内存)。
在大部分情况下,生命周期是隐式的,可以自动推导出来,这和类型类似(大部分情况下,类型也是可以自动推导出来的)。
仅当不能唯一地确定类型时,Rust 才要求显式地指定类型;引用的生命周期也一样, 仅当不能自动推导出生命周期时,才要求显式地指定引用的生命周期。 注:在 pre-1.0 版本的 Rust 中,必须显式指定每个引用的 lifetime,这很繁琐。
13.1. 必须显式指定 Lifetime 的例子
考虑下面代码:
fn longest(x: &str, y: &str) -> &str {      // 不能通过编译、编码时无法确定返回引用的 lifetime
    if x.len() > y.len() {
        x
    } else {
        y
    }
}

fn main() {
    let string1 = String::from("long string is long");
    let result;
    {
        let string2 = String::from("xyz");
        result = longest(string1.as_str(), string2.as_str());
    }
    println!("The longest string is {}", result);
}
编译上面代码,会报错:
error[E0106]: missing lifetime specifier
 --> test.rs:1:33
  |
1 | fn longest(x: &str, y: &str) -> &str {
  |                                 ^ expected lifetime parameter
  |
  = help: this function's return type contains a borrowed value, but the signature does not say whether it is borrowed from `x` or `y`

error: aborting due to previous error

For more information about this error, try `rustc --explain E0106`.
编译器无法自动确定返回值的 lifetime,因为这个函数可能返回 x ,也可能返回 y ,编译时无法确定返回引用的 lifetime 是和参数 x 的 lifetime 相同还是和参数 y 的 lifetime 相同。这时,需要显式地指定返回引用的 lifetime:
fn longest<'a>(x: &'a str, y: &'a str) -> &'a str {  // 三者(x、y、返回引用)的 lifetime 相同
    if x.len() > y.len() {
        x
    } else {
        y
    }
}
上面代码中, 'a 就是指定 lifetime,上面的写法表明“参数 x 和 y 和返回引用的“形式 lifetime”相同”。当然 'a 也可以全部换为 'b 等其它字符。
需要说明的是,当我们给函数参数/返回值指定某个 lifetime 时,并不会改变“传入的实际参数/实际返回值”本身的 lifetime。只是告诉编译器拒绝不满足要求的代码。
为函数参数/返回值指定的 lifetime 属于 function signature 的一部分(而不是 function body 的一部分),和形式参数和实际参数的概念类似,函数也有“形式 lifetime”和“实际 lifetime”的概念。
以前面的 longest 函数为例,当我们传入一个实际的引用给 longest 时,怎么确定这个函数的“实际 lifetime”呢? 函数 longest 的“实际 lifetime”是实参 x 的 lifetime 和 y 的 lifetime 中那个较短的 lifetime。 由于返回值也被标记为 'a ,所以返回值的 lifetime 也是实参 x 的 lifetime 和 y 的 lifetime 中那个较短的 lifetime。
让我们看个例子:
// 正常运行
// Using the longest function with references to String values that have different concrete lifetimes
fn main() {
    let string1 = String::from("long string is long");

    {
        let string2 = String::from("xyz");
        let result = longest(string1.as_str(), string2.as_str()); // 两个参数的“实际 lifetime”不一样,longest 会选择较短的 lifetime 作为函数的“实际 lifetime”
        println!("The longest string is {}", result);
    }
}
看一个不能运行的例子(由于返回值的 lifetime 是两个实际参数较短的 lifetime,也就是和 string2 的 lifetime 相同,把返回值赋值给 lifetime 更长的 result 会报错):
// 不能运行
// Attempting to use result after string2 has gone out of scope
fn main() {
    let string1 = String::from("long string is long");
    let result;
    {
        let string2 = String::from("xyz");
        result = longest(string1.as_str(), string2.as_str());
    }
    println!("The longest string is {}", result);
}
13.2. 结构体中指定 Lifetime
如果结构体的字段是 Reference,那么必须为它显式地指定 Lifetime,如:
#[derive(Debug)]              // make it can be format by {:?}
struct ImportantExcerpt<'a> {
    part: &'a str,            // holds a string slice, which is a reference
}

fn main() {
    let novel = String::from("Call me Ishmael. Some years ago...");
    let first_sentence = novel.split('.').next().expect("Could not find a '.'");
    let i = ImportantExcerpt {
        part: first_sentence,
    };
    println!("{:?}", i);
}
This annotation means an instance of ImportantExcerpt can’t outlive the reference it holds in its part field. 即:ImportantExcerpt 实例(即上面代码中的变量 i )的 lifetime 不能超过 part 字段所关联的数据(即上面代码中的变量 first_sentence )的 lifetime。换句话说,就是 part 字段所关联的数据的 lifetime 需要超过 ImportantExcerpt 实例的 lifetime。
13.3. Static Lifetime
下面介绍 'static Lifetime 的两个使用场景。
13.3.1. 整个程序运行期间可用
'static 是一个特别的 Lifetime,它意味着 Reference 在整个程序运行期间可用。所有的 string literal 都具备 'static Lifetime:
let s: &'static str = "I have a static lifetime.";
string literal 直接存储在可执行程序的二进制文件中。
13.3.2. Trait bound 中的 static
As a trait bound, it means the type does not contain any non-static references. Eg. the receiver can hold on to the type for as long as they want and it will never become invalid until they drop it.
It's important to understand this means that any owned data always passes a 'static lifetime bound, but a reference to that owned data generally does not:
use std::fmt::Debug;

fn print_it( input: impl Debug + 'static ) {                // input 使用了 'static Trait bound
    println!( "'static value passed in is: {:?}", input );
}

fn main() {
    // i is owned and contains no references, thus it's 'static:
    let i = 5;
    print_it(i);

    let s = "hello world".to_string();
    // print_it(&s);          // 这里会报错,因为 &s only has the lifetime defined by the scope of main()
    print_it(s);              // 这里不会报错,因为 s is owned。

    // oops, &i only has the lifetime defined by the scope of
    // main(), so it's not 'static:
    //print_it(&i);
}
参考:https://doc.rust-lang.org/rust-by-example/scope/lifetime/static_lifetime.html
14. 函数式语法特性
14.1. 闭包(一对||)
Rust 支持闭包,下面是闭包的使用例子:
fn main() {
    let add_one = |x| x + 1;     // add_one 是闭包
    assert_eq!(2, add_one(1));

    let color = "green";
    let print_color = || println!("`color`: {}", color);    // print_color 是闭包
    print_color();
}
闭包的参数在一对 | 之间,后面的表达式是闭包体。
闭包还可以写为其它形式,下面源码中的 3/4/5/6 行都是合法的闭包:
fn main() {
    fn  add_one_v1   (x: u32) -> u32 { x + 1 }      // add_one_v1 是函数
    let add_one_v2 = |x: u32| -> u32 { x + 1 };     // 闭包形式1,指定了参数和返回值类型
    let add_one_v3 = |x|             { x + 1 };     // 闭包形式2,合法,因为{}也是表达式
    let add_one_v4 = |x: u32|          x + 1  ;     // 闭包形式3,指定了参数类型
    let add_one_v5 = |x|               x + 1  ;     // 闭包形式4

    assert_eq!(2, add_one_v1(1));
    assert_eq!(2, add_one_v2(1));
    assert_eq!(2, add_one_v3(1));
    assert_eq!(2, add_one_v4(1));
    assert_eq!(2, add_one_v5(1));
}
14.1.1. 闭包和它们的环境
和函数相比,闭包有一个更高级的特性:闭包可以捕获闭包定义环境中的变量,如:
let num = 5;
let add_num = |x: i32| x + num;         // 捕获环境中的变量 num

assert_eq!(10, add_num(5));
14.1.1.1. move
考虑下面代码:
fn main() {
    let mut num = 5;

    {
        let mut add_num = |x: i32| num += x;
        add_num(5);
    }

    println!("num={}", num);    // 输出 num=10(闭包中对 num 的修改在环境中生效了)
}
上面代码中的 num 会被闭包修改为 10。
如果我们不想让闭包中对 num 的修改在环境中生效,怎么办?
我们可以在定义闭包时增加 move 关键字,这表示闭包捕获环境中的变量时会复制它;如果变量没有复制语义(没有实现 Copy Trait),则会获得其 ownership。
下面例子中,变量 num 会复制到闭包中,闭包内部对 num 的修改不会影响到环境中的 num 变量:
fn main() {
    let mut num = 5;

    {
        let mut add_num = move |x: i32| num += x;   // 和上面代码的唯一区别:增加了 move
        add_num(5);
    }

    println!("num={}", num);    // 输出 num=5(闭包运行时会先复制 num,这样闭包中对 num 的修改不会影响到环境中)
}
再看一个例子:
fn main() {
    let x = vec![1, 2, 3];

    let equal_to_x = move |z| z == x;         // x 是 vector,它没有复制语义,增加 move 会使闭包获得 x 的 ownership

    //println!("can't use x here: {:?}", x);  // 编译出错!因为 x 的 ownership 被闭包拿走了,不能在 main 中再使用了

    let y = vec![1, 2, 3];

    assert!(equal_to_x(y));
}
14.1.1.2. Fn, FnMut, FnOnce
闭包从环境中捕获变量的方式有三种,它们直接对应函数的三种获取参数的方式:“获取所有权”,“可变借用”和“不可变借用”。
闭包这三种捕获变量的方式对应于下面三个 Trait:
- FnOnce 表示“获取所有权”。其名称的 Once 部分代表了闭包不能多次获取相同变量的所有权的事实;
- FnMut 表示“可变借用”。获取可变的借用值,所以可以改变其环境;
- Fn 表示“不可变借用”。从其环境获取不可变的借用值。
参考:https://doc.rust-lang.org/rust-by-example/fn/closures/input_parameters.html
14.2. 迭代器
迭代器允许你对一个序列进行某些处理。下面是迭代器的使用例子:
fn main() {
    let v1 = vec![1, 2, 3];

    let v1_iter = v1.iter();

    for val in v1_iter {
        println!("Got: {}", val);
    }
}
参考:
https://doc.rust-lang.org/book/ch13-02-iterators.html
https://doc.rust-lang.org/std/iter/trait.Iterator.html
https://upsuper.github.io/rust-cheatsheet/
15. 智能指针
指针(pointer)是个通用概念,一个变量是指针是说它的值是内存地址。Rust 中最常见的指针是 3 中介绍的引用(reference)。引用以 & 符号为标志并借用了他们所指向的数据。
智能指针(smart pointers)是一类数据结构,它们的表现类似指针,拥有额外的元数据和功能。智能指针的概念起源于 C++,并存在于其他语言中。
Rust 中,普通引用和智能指针的一个额外的区别是引用是一类只“借用”数据的指针;相反,在大部分情况下,智能指针“拥有”他们指向的数据。其实,我们已经接触过一些智能指针,如 String 和 Vec<T> 等都是智能指针,只是我们一般并不这么称呼它们。它们属于智能指针因为它们拥有一些数据并允许你修改它们。它们也带有元数据(比如他们的容量)和额外的功能或保证(String 的数据总是有效的 UTF-8 编码)。
智能指针通常使用结构体实现。 智能指针区别于常规结构体的显著特性在于其实现了 Deref 和 Drop trait。Deref trait 允许智能指针结构体实例表现的像引用一样,这样就可以编写既用于引用、又用于智能指针的代码。Drop trait 允许我们自定义当智能指针离开作用域时运行的代码。
下面是标准库中的一些智能指针:
- Box<T> for allocating values on the heap
- Rc<T>, a reference counting type that enables multiple ownership
- Ref<T> and RefMut<T>, accessed through RefCell<T>, a type that enforces the borrowing rules at runtime instead of compile time
15.1. Box<T>
最简单直接的智能指针是 box,其类型是 Box<T>。 box 允许你将一个值放在堆上而不是栈上,留在栈上的则是指向堆数据的指针。
Box 往往用于下面场景中:
- 当有一个在编译时未知大小的类型,而又想要在需要确切大小的上下文中使用这个类型值的时候,如节 11.3 中介绍的场景
- 当有大量数据并希望在确保数据不被拷贝的情况下转移所有权的时候
- 当希望拥有一个值并只关心它的类型是否实现了特定 trait,而不是其具体类型的时候,即 Trait Object
下面是 Box 的一个例子:
fn main() {
    let b = Box::new(5);         // 5 会保存在堆上
    println!("b = {}", b);
}
15.2. Deref Trait(把智能指针对常规引用)
实现 Deref trait 允许我们重载解引用运算符(dereference operator),即 * 。通过这种方式实现 Deref trait 的智能指针可以被当作常规引用来对待,可以编写操作引用的代码并用于智能指针。
下面是对常规引用使用解引用运算符的例子:
fn main() {
    let x = 5;
    let y = &x;

    assert_eq!(5, x);
    assert_eq!(5, *y);   // y 是常规引用,*y 表示对它进行解引用
}
Box 实现了 Deref Trait,所以可以像常规引用一样,使用 * 来解引用,如:
fn main() {
    let x = 5;
    let y = Box::new(x);

    assert_eq!(5, x);
    assert_eq!(5, *y);    // y 是智能指针 Box 实例,也能使用 * 来解引用
}
15.2.1. 自定义智能指针
下面我们看个自定义智能指针的例子:
use std::ops::Deref;

struct MyBox<T>(T);             // 这是个 Tuple struct,仅有一个字段

impl<T> MyBox<T> {
    fn new(x: T) -> MyBox<T> {
        MyBox(x)
    }
}

impl<T> Deref for MyBox<T> {    // 通过实现 Deref trait 将某类型像引用一样处理
    type Target = T;            // 这是 Associated type

    fn deref(&self) -> &T {
        &self.0                 // 返回了 Tuple struct 中的首个字段的引用
    }
}

fn main() {
    let x = 5;
    let y = MyBox::new(x);

    assert_eq!(5, x);
    assert_eq!(5, *y);
}
在 Deref 中, type Target = T; 语法定义了用于此 trait 的关联类型,关于关联类型可参考节 17.1.1 。
为什么 deref 方法返回“值的引用”呢?这是因为:如果 deref 方法直接返回“值”而不是“值的引用”,其值(的所有权)将被移出 self,在这里以及大部分使用解引用运算符的情况下我们并不希望获取 MyBox<T> 内部值的所有权。
15.3. Drop Trait(自动清理代码)
对于智能指针模式来说第二个重要的 trait 是 Drop,它允许我们在值要离开作用域时执行一些代码。例如,Box<T> 自定义了 Drop 用来释放 box 所指向的堆空间。尽管可以为任何类型提供 Drop trait 的实现,不过,Drop 几乎总是用于实现智能指针。
指定在值离开作用域时应该执行的代码的方式是实现 Drop trait。Drop trait 要求实现一个叫做 drop 的方法,它的参数是一个 self 的可变引用。 为了能够看出 Rust 何时调用 drop ,让我们暂时使用 println! 语句实现 drop :
struct CustomSmartPointer {
    data: String,
}

impl Drop for CustomSmartPointer {
    fn drop(&mut self) {
        println!("Dropping CustomSmartPointer with data `{}`!", self.data);
    }
}

fn main() {
    let c = CustomSmartPointer { data: String::from("my stuff") };
    let d = CustomSmartPointer { data: String::from("other stuff") };
    println!("CustomSmartPointers created.");
}
在 main 的结尾,两个 CustomSmartPointer 的实例 c 和 d 都会离开作用域,Rust 会调用放置于 drop 方法中的代码。运行上面程序会得到下面的输出:
CustomSmartPointers created.
Dropping CustomSmartPointer with data `other stuff`!
Dropping CustomSmartPointer with data `my stuff`!
可以看到 "...other stuff" 比 "...my stuff" 先输出,也就是说 d 实例的 drop 会“先于” c 实例的 drop 被调用,为什么这样呢?这是因为 变量以被创建时相反的顺序被丢弃,所以 d 在 c 之前被丢弃。
15.3.1. 通过 std::mem::drop 提早丢弃值
有办法在离开作用域之前就“提早”执行 drop 方法吗?答案是有的,使用 std::mem::drop 即可,它位于 prelude 中,可直接使用。如:
struct CustomSmartPointer {
    data: String,
}

impl Drop for CustomSmartPointer {
    fn drop(&mut self) {
        println!("Dropping CustomSmartPointer with data `{}`!", self.data);
    }
}

fn main() {
    let c = CustomSmartPointer { data: String::from("some data") };
    println!("CustomSmartPointer created.");
    drop(c);                                      // 这是调用 std::mem::drop,会提早执行 c 的 drop 方法
    println!("CustomSmartPointer dropped before the end of main.");
}
下面代码会输出:
CustomSmartPointer created.
Dropping CustomSmartPointer with data `some data`!
CustomSmartPointer dropped before the end of main.
15.4. Rc<T> 引用计数智能指针
大部分情况下所有权是非常明确的:可以准确地知道哪个变量拥有某个值。然而,有些情况单个值可能会有多个所有者。例如,在图数据结构中,多个边可能指向相同的节点,而这个节点从概念上讲为所有指向它的边所拥有。节点直到没有任何边指向它之前都不应该被清理。
为了启用多所有权,Rust 有一个叫做 Rc<T> 的类型。 其名称为“引用计数”(Reference Counted)的缩写。
Reference count of an Rc increases by 1 whenever an Rc is cloned, and decreases by 1 whenever one cloned Rc is dropped out of the scope. When an Rc's reference count becomes zero, which means there are no owners remained, both the Rc and the value are all dropped.
Cloning an Rc never performs a deep copy. Cloning creates just another pointer to the wrapped value, and increments the count.
下面是使用 Rc<T> 的一个例子:
use std::rc::Rc;

fn main() {
    let rc_examples = "Rc examples".to_string();
    {
        println!("--- rc_a is created ---");

        let rc_a: Rc<String> = Rc::new(rc_examples);
        println!("Reference Count of rc_a: {}", Rc::strong_count(&rc_a));

        {
            println!("--- rc_a is cloned to rc_b ---");

            let rc_b: Rc<String> = Rc::clone(&rc_a);
            println!("Reference Count of rc_b: {}", Rc::strong_count(&rc_b));
            println!("Reference Count of rc_a: {}", Rc::strong_count(&rc_a));

            // Two `Rc`s are equal if their inner values are equal
            println!("rc_a and rc_b are equal: {}", rc_a.eq(&rc_b));

            // We can use methods of a value directly
            println!("Length of the value inside rc_a: {}", rc_a.len());
            println!("Value of rc_b: {}", rc_b);

            println!("--- rc_b is dropped out of scope ---");
        }

        println!("Reference Count of rc_a: {}", Rc::strong_count(&rc_a));

        println!("--- rc_a is dropped out of scope ---");
    }

    // Error! `rc_examples` already moved into `rc_a`
    // And when `rc_a` is dropped, `rc_examples` is dropped together
    // println!("rc_examples: {}", rc_examples);
    // TODO ^ Try uncommenting this line
}
注意:Rc<T> 只能用于单线程场景,多线程场景可以使用 Atomically Reference Counted,即 Arc<T> 。
15.5. Cell<T>, RefCell<T>
Cell 和 RefCell 可以实现 Interior mutability 设计模式。
Interior mutability is a design pattern in Rust that allows you to mutate data even when there are immutable references to that data.
下面通过一个例子来演示一下“Interior mutability”设计模式:
use std::cell::Cell;

fn main() {
    let x: Cell<i32> = Cell::new(1);
    let y: &Cell<i32> = &x;           // 同 let y = x.borrow();
    let z: &Cell<i32> = &x;           // 同 let z = x.borrow();

    x.set(2);
    y.set(3);
    z.set(4);

    println!("{}", x.get());          // 输出 4
    println!("{}", y.get());          // 输出 4
    println!("{}", z.get());          // 输出 4
}
上面代码中, 尽管 y 和 z 都是“不可修改”引用(immutable reference),但我们可以通过它们“修改”底层数据,即例子中通过 y.set(3) 和 z.set(4) 修改底层数据,这就是“Interior mutability”设计模式。
上面代码实现的意图和下面代码类似(但由于编译器的借用检查,下面代码取消注释会无法通过编译):
fn main() {
    let mut x = 1;
    let mut y = &mut x;
    // let mut z = &mut x;  // 这里会报错,因为同一个 Scope 内,对数据的“可修改引用”只能有一个

    // x = 2;               // 这里会报错,x 不能再访问了
    *y = 3;
    // *z = 4;

    // println!("{}", x);
    println!("{}", y);
    // println!("{}", z);
}
15.5.1. Cell<T> API 介绍
抛开“Interior mutability”概念,我们可以简单地理解 Cell<T> 就是一个容器,它可以保存一个类型为 T 的值,并且提供了一些 API 为访问这个值。 Cell<T> API 如表 6 所示。
| Cell<T> API | 说明 |
|---|---|
| get() | 把容器中值复制出来,仅 T 实现了 Copy trait 才可以调用 |
| set() | 用参数中指定的值替换容器中的值,“被替换的值”被 drop 掉,函数无返回值 |
| replace() | 用参数中指定的值替换容器中的值,“被替换的值”返回给调用者 |
| take() | 用类型的默认值替换容器中的值,“被替换的值”返回给调用者,仅 T 实现了 Default trait 才可以调用 |
| into_inner() | 容器被消耗掉(后面不再可访问),返回容器中数据给调用者 |
下面是 Cell<T> API 的一些例子:
use std::cell::{RefCell, Cell};
//use std::borrow::{Borrow, BorrowMut};

fn main() {
    #[derive(Debug, Default)]
    struct S { a: i32};

    let c = Cell::new(S { a: 100});
    // println!("{:?}", x.get());       // 这里会报错,S 没有实现 Copy trait,不能调用 get

    c.set(S { a: 200} );                // 设置新值 S { a: 200},drop 旧值S { a: 100 }

    let old = c.replace(S { a: 300} );  // 设置新值S { a: 300},返回旧值 S { a: 200 }
    println!("{:?}", old);              // 输出 S { a: 200 }

    let x = c.take();                   // 设置新值为“类型默认值”,返回旧值 S { a: 300 }
    println!("{:?}", x);                // 输出 S { a: 300 }

    let y = c.take();                   // 上一次 take 后,Cell 中的值已经变为了“类型默认值”,这里再 take 得到的是“类型默认值”
    println!("{:?}", y);                // 输出 S { a: 0 }

    let z = c.into_inner();             // Cell 被消耗掉(后面不再可访问),返回 Cell 中数据给调用者
    println!("{:?}", z);                // 输出 S { a: 0 }

    // println!("{:?}", x.take());      // 这里会报错,一旦调用过 into_inner 后,x 不再可访问了
}
15.5.2. RefCell<T>
使用 Cell<T> 时,没有办法获得容器中数据的指针,通过 get() 或者 take() 方法接触到的都是“值”。有时,我们想获得容器中数据的指针,这时可以使用 RefCell<T>, 通过下面两个方法可以获得容器中数据的指针:
pub fn borrow(&self) -> Ref<T>                 // 获得底层数据的中读引用
pub fn borrow_mut(&self) -> RefMut<T>          // 获得底层数据的可修改引用
需要说明的是,RefCell<T> 会记下来当前有多少个活跃的对底层数据的只读引用和可修改引用(通过 Ref<T> 和 RefMut<T>),在运行时检测引用的要求(这个要求和普通引用在“编译时”的要求一致):
- 对底层数据的只读引用(通过 Ref<T>)可以有多个;
- 对底层数据的可修改引用(通过 RefMut<T>)只能有一个,只读引用和可修改引用不能同时存在。
如果不满足这个要求,则在运行时会 panic。
use std::cell::{RefCell, Ref, RefMut};

fn main() {
    #[derive(Debug, Default)]
    struct S { a: i32};

    let c = RefCell::new(S { a: 100});

    {
        let x: Ref<S> = c.borrow();            // 调用 borrow(),Ref<S> 计算加 1
        println!("{:?}", *x);
        let y: Ref<S> = c.borrow();            // 调用 borrow(),Ref<S> 计算加 1
        println!("{:?}", y);
        // let z: RefMut<S> = c.borrow_mut();  // 运行时 panic,只读引用和可修改引用不能同时存在
    } // 超过了作用域,x,y 对应的计数都会减去

    let z: RefMut<S> = c.borrow_mut();         // 前面的借用都超过了作用域,这里不会报错
    println!("{:?}", z);
}
注: RefCell<T> 有 panic 风险,而 Cell<T> 不会 panic。
16. Patterns
Patterns 是 Rust 中一种特殊的语法。模式不仅用于将值与结构匹配,也可将内部的值绑定给变量,模式还用于变量定义,函数和方法的参数定义,闭包的参数定义等。
参考:
https://doc.rust-lang.org/stable/reference/patterns.html
https://doc.rust-lang.org/book/ch18-00-patterns.html
16.1. Pattern 可出现的位置
Pattern 可出现在下面位置:
- let 语句
- 函数和闭包参数
- match 表达式
- if let 表达式
- let else 表达式
- while let 表达式
- for 表达式
下面将一一介绍它们。
16.1.1. let 语句
我们已经大量使用 let 了,如:
let x = 5; // 其实 x 在这里也是一种模式
模式用于 let 中的正式形式为:
let PATTERN = EXPRESSION;
下面我们看几个将元组与模式进行匹配的例子:
let (x, y, z) = (1, 2, 3);     // x, y, z 分别为 1, 2, 3
let (x, _, z) = (1, 2, 3);     // _ 表示忽略模式中的值。x, z 分别为 1, 3
let (x, ..)   = (1, 2, 3);     // .. 表示忽略所剩部分的值。x 为 1
16.1.2. 函数和闭包参数
函数(或者闭包)参数也可以是模式,如:
fn foo(x: i32) {
    // code goes here
}

fn main() {}
上面代码中,函数 foo 的参数 x 是一个模式。
再看一个复杂些的函数参数的例子:
fn print_coordinates(&(x, y): &(i32, i32)) {
    println!("Current location: ({}, {})", x, y);
}

fn main() {
    let point = (3, 5);
    print_coordinates(&point);       // Current location: (3, 5)
}
值 &(3, 5) 可以匹配上模式 &(x, y) ,从而 x 为 3,y 为 5。
16.1.3. match 表达式
在节 2.5.3 中已经介绍了一些 match 表达式的例子。
16.1.5. while let 表达式
在节 5.6 中已经介绍了一些 while let 表达式的例子。
16.1.6. for 表达式
for 循环是 Rust 中最常见的循环结构,for 可以获取一个模式。在 for 循环中,模式是 for 关键字直接跟随的值,正如 for x in y 中的 x 就是模式。
fn main() {
    let v = vec!['a', 'b', 'c'];

    for (index, value) in v.iter().enumerate() {     // (index, value) 是模式
        println!("{} is at index {}", value, index);
    }
}
16.2. Refutable 和 Irrefutable
模式有如下两种:
- refutable:可反驳的,也就是说匹配是“可能失败”或者“一定失败”的
- irrefutable:不可反驳的,也就是说匹配是“一定成功”的
下面是这两种模式的例子:
let (x, y) = (1, 2);                // "(x, y)" is an irrefutable pattern

if let (a, 3) = (1, 2) {            // "(a, 3)" is refutable, and will not match
    panic!("Shouldn't reach here");
} else if let (a, 4) = (3, 4) {     // "(a, 4)" is refutable, and will match
    println!("Matched ({}, 4)", a);
}
let 语句、函数参数和 for 表达式只能接受“不可反驳”的模式(不接受“可反驳”模式),因为通过不匹配的值程序无法进行有意义的工作。if let 表达式和 while let 表达式可以接受“可反驳”和“不可反驳”的模式,编译器会对“不可反驳”模式给出警告(因为“不可反驳”模式一定成功,没必要用 if let 或者 while let,旧版本的编译器直接拒绝 if let 和 while let 中使用“不可反驳”模式)。 通常我们无需担心可反驳和不可反驳模式的区别,不过在熟悉可反驳性的概念后,当在错误信息中看到时就知道如何应对了。
下面看 let 语句不能接受“可反驳”模式的例子:
fn main() {
    let some_option_value: Option<i32> = None;
    let Some(x) = some_option_value;           // 这里,编译器会报错!let 语句不能接受“可反驳”模式
    // 上式中,Some(x) 是“可反驳”的模式,因为 some_option_value 可能是 Some 也可以是 None,从而 Some(x) 匹配可能成功,也可能失败
}
使用 if let 可以解决上面问题:
fn main() {
    let some_option_value: Option<i32> = None;

    if let Some(x) = some_option_value {        // if let 接受“可反驳”的模式
        println!("{}", x);
    }
}
下面看一个 if let 接受“不可反驳”模式的例子(这种用法需要避免使用,编译器会警告):
fn main() {
    if let x = 5 {             // 这是个“不可反驳”模式,编译器会警告,应该简化为 let x = 5
        println!("{}", x);
    };
}
16.3. 模式的语法
模式的语法比较多:
Syntax
Pattern :
      PatternWithoutRange
   | RangePattern

PatternWithoutRange :
      LiteralPattern
   | IdentifierPattern
   | WildcardPattern
   | RestPattern
   | ObsoleteRangePattern
   | ReferencePattern
   | StructPattern
   | TupleStructPattern
   | TuplePattern
   | GroupedPattern
   | SlicePattern
   | PathPattern
   | MacroInvocation


RangePattern :
   RangePatternBound ..= RangePatternBound

ObsoleteRangePattern :
   RangePatternBound ... RangePatternBound

RangePatternBound :
      CHAR_LITERAL
   | BYTE_LITERAL
   | -? INTEGER_LITERAL
   | -? FLOAT_LITERAL
   | PathInExpression
   | QualifiedPathInExpression
16.3.1. 字面值模式
字面值模式的语法为:
Syntax
LiteralPattern :
      BOOLEAN_LITERAL
   | CHAR_LITERAL
   | BYTE_LITERAL
   | STRING_LITERAL
   | RAW_STRING_LITERAL
   | BYTE_STRING_LITERAL
   | RAW_BYTE_STRING_LITERAL
   | -? INTEGER_LITERAL
   | -? FLOAT_LITERAL
下面是字面值模式的一个例子:
fn main() {
    for i in -2..5 {
        match i {
            -1 => println!("It's minus one"),
            1 => println!("It's a one"),
            2|4 => println!("It's either a two or a four"),
            _ => println!("Matched none of the arms"),
        }
    }
}
16.3.2. 标识符模式
标识符模式的语法为:
Syntax
IdentifierPattern :
      ref? mut? IDENTIFIER (@ Pattern ) ?
标识符模式会绑定匹配上的值到一个变量中。下面是标识符模式的一些例子:
let x = 4;                                                // 匹配的值绑定到了变量 x
let mut y = 5;                                            // 匹配的值绑定到了变量 y


let x = 2;
match x {
    e @ 1 ..= 5 => println!("got a range element {}", e), // 匹配的值绑定到了变量 e 中
    _ => println!("anything"),
}
16.3.2.1. ref 关键字
标识符模式匹配时默认会 copy(如果没有实现 Copy Trait 则会 move)匹配的值。 比如:
 1: fn main() {
 2:     #[derive(Debug)]
 3:     struct E {
 4:         f: u32,
 5:     }
 6:
 7:     let a: E = E{f: 3};
 8:     let b: E = a;             // 由于 E 没有实现 Copy Trait,所以这一行会发生 move(转移 ownership),从此后 a 不再可用
 9:     println!("b = {:?}", b);
10:     println!("a = {:?}", a);  // 这行会报错,因为 a 已经没有数据的 ownership 了
11: }
上面代码的第 8 行(即 let b = a; )是个标识符模式匹配,由于 E 没有实现 Copy Trait,所以数据的 ownership 会从 a 转移到 b,从此后 a 不再可用。如果我们想让 a 在第 8 行后还可以使用,有 2 种可选方法:
- 对
E实现 Copy Trait - 把第 8 行修改为
let b: &E = &a;
我们再看一个 Option 的例子:
 1: fn main() {
 2:     #[derive(Debug)]
 3:     struct E {
 4:         f: u32,
 5:     }
 6:
 7:     let a: Option<E> = Some(E{f: 3});
 8:     match a {
 9:         None => (),
10:         Some(value) => {      // 标识符模式匹配时默认会 copy(如果没有实现 Copy trait 则会 move)匹配的值
11:             println!("value = {:?}", value);
12:         },
13:     }
14:
15:     println!("a = {:?}", a);  // 这行会报错,因为 a 已经没有数据的 ownership 了
16: }
上面代码的第 10 行,由于 E 没有实现 Copy Trait,所以数据的 ownership 会转移到 value 变量上,从此后 a 不再可用。如果我们想让 a 在第 10 行后还可以使用,也有 2 种可选方法:
- 对
E实现 Copy Trait - 使用
ref关键字,即把第 10 行修改为Some(ref value) => {
下面是这 2 种方法的例子(仅采用其中的某 1 种方法第 15 行就可以通过编译了):
 1: fn main() {
 2:     #[derive(Copy, Clone, Debug)]      // 方法1:为 E 实现 Copy
 3:     struct E {
 4:         f: u32,
 5:     }
 6:
 7:     let a: Option<E> = Some(E{f: 3});
 8:     match a {
 9:         None => (),
10:         Some(ref value) => {           // 方法2:使用 ref,这样,value 的类型将变为 &E
11:             println!("{:?}", value);
12:         },
13:     }
14:
15:     println!("{:?}", a);
16: }
这里, ref value 表示的就是 &value 的意思,不过 &value 在这个场景下不是合法的语法,我们只能使用 ref value 。
16.3.2.2. Binding modes(如果匹配值是引用类型,则自动转换为 ref 绑定)
如果匹配值是引用类型,则自动转换为 ref 绑定。
考虑下面代码:
let x: &Option<i32> = &Some(3); // x 是引用类型
if let Some(y) = x { // 相当于 Some(ref y)
// y was converted to `ref y` and its type is &i32
}
由于匹配值 x 是引用类型,即 &Option<i32> ,模式 Some(y) 会自动转换为 Some(ref y) ,当然显式地写为 Some(ref y) 也没问题。
16.3.3. Wildcard 模式(_)
如果不关心某个值,可以使用 _ 模式,如:
fn main() {
let x = 20;
let (a, _) = (10, x); // 忽略 x
assert_eq!(a, 10);
}
16.3.4. Rest 模式(..)
如果不关心连续多个值,则可以使用 .. 模式,如:
fn main() {
let words = vec!["a", "b", "c", "d"];
let slice = &words[..];
match slice {
[] => println!("slice is empty"),
[one] => println!("single element {}", one),
[head, "b", tail @ ..] => println!("head={}, second=b, tail={:?}", head, tail), // 输出 head=a, second=b, tail=["c", "d"]
rest => println!("{:?}", rest),
}
let tuple = (1, 2, 3, 4, 5);
match tuple {
(1, .., y, z) => println!("y={}, z={}", y, z), // 输出 y=4, z=5
(.., 5) => println!("tail must be 5"),
(..) => println!("matches everything else"),
}
}
16.3.5. Range 模式
Range 模式用于匹配范围,它有两种形式: a..b (不包含 b)或者 a..=b (包含 b)。Range 模式只能用于匹配下面值:
- Integer types (u8, i8, u16, i16, usize, isize, etc.).
- Character types (char).
下面是 Range 模式的例子:
fn main() {
let ph = 10;
let result = match ph {
0..=6 => "acid",
7 => "neutral",
8..=14 => "base",
_ => unreachable!(),
};
println!("{}", result);
let c = 'f';
let valid_variable = match c {
'a'..='z' => true,
'A'..='Z' => true,
'α'..='ω' => true,
_ => false,
};
println!("{}", valid_variable)
}
16.3.6. Reference 模式
Reference 模式的语法为:
Syntax ReferencePattern : (&|&&) mut? PatternWithoutRange
Reference patterns dereference the pointers that are being matched and, thus, borrow them.
下面是 Reference 模式的例子(参考节 2.5.3.1.3):
fn main() {
let reference: &i32 = &4;
match reference {
&val => println!("Got a value via destructuring: {:?}", val), // val 的类型是 i32,如果省略 val 前的 &,则 val 类型是 &i32
}
// To avoid the `&`, you can dereference before matching.
match *reference {
val => println!("Got a value via dereferencing: {:?}", val), // val 的类型是 i32
}
}
16.3.7. Struct 模式
Struct 模式匹配所有满足子模式的 struct 值。对于 Struct 的字段,可以指定字段名字或者下标。如:
fn main() {
struct Point {
x: u32,
y: u32,
}
let s = Point {x: 10, y: 20};
match s {
Point {x: 10, y: 20} => (), // 使用“字段名字”
Point {y: 10, x: 20} => (), // order doesn't matter
Point {x: 10, ..} => (),
Point {..} => (),
}
struct PointTuple (
u32,
u32,
);
let t = PointTuple(10, 20);
match t {
PointTuple {0: 10, 1: 20} => (), // Tuple struct 可以使用“字段下标”
PointTuple {1: 10, 0: 20} => (), // order doesn't matter
PointTuple {0: 10, ..} => (),
PointTuple {..} => (),
}
}
Struct 模式可以用于绑定匹配值到变量(即 destructure),如:
fn main() {
struct Point {
x: u32,
y: u32,
}
let s = Point {x: 10, y: 20};
let Point{x: v1, y: v2} = s; // 会把 s 解构,v1 会绑定 10,v2 会绑定 20
println!("v1 = {}, v2 = {}", v1, v2); // v1 = 10, v2 = 20
let Point{x, y} = s; // 同上面,只是绑定的变量和字段同名,这时可简写
println!("x = {}, y = {}", x, y); // x = 10, y = 20
}
Struct 模式的匹配和绑定可以混合在一起,如:
fn main() {
struct Point {
x: u32,
y: u32,
}
let s = Point { x: 10, y: 20 };
match s {
Point {x, y: 20 } => { // Point { x: x, y: 20 } 的缩写
// ^ ^
// | |
// 用于绑定 用于匹配
println!("x={}", x)
}
Point { .. } => (),
}
}
16.3.7.1. Partially Move
在节 16.3.2.1 中介绍了,标识符模式匹配时默认会 copy(如果没有实现 Copy Trait 则会 move)匹配的值,如果使用 ref 则会以引用方式绑定匹配的值。对于结构体模式,如果有些字段使用了 ref ,而有些字段没有使用 ref ,则会造成 Partially Move,如:
fn main() {
#[derive(Debug)]
struct Person {
name: String,
hobby: String,
}
let person = Person {
name: String::from("Alice"),
hobby: String::from("Swimming"),
};
// `name` is moved out of person, but `hobby` is referenced
let Person {name, ref hobby } = person; // person.name 失去了 ownership;而 person.hobby 没有失去 ownership
println!("The person's name is {}", name); // name 变量类型为 String
println!("The person's hobby is {}", hobby); // hobby 变量类型为 &String
// Error! borrow of partially moved value: `person` partial move occurs
// println!("The person struct is {:?}", person); // person 存在 Partially Move,不能整体访问
// println!("The person's name from person struct is {}", person.name); // 不能再访问 person.name 了
// `person` cannot be used but `person.hobby` can be used as it is not moved
println!("The person's hobby from person struct is {}", person.hobby); // 还可以访问 person.hobby
}
16.3.8. Tuple 模式
Tuple 模式可以用于匹配和绑定匹配值到变量(即 destructure),如:
fn main() {
let a = (1, 3, String::from("hello rust"));
if let (x, y @ 2...5, z) = a {
println!("{:?}, {:?}, {:?}", x, y, z);
}
}
16.3.9. Grouped 模式
当有歧义时,可以增加一对小括号来避免歧义,这称为 Grouped 模式,如:
fn main() {
let int_reference = &3;
match int_reference {
&(0..=5) => (), // &0..=5 有歧义,无法通过编译,需要增加小括号
_ => (),
}
}
16.3.10. Slice 模式
下面是 Slice 模式的例子:
fn main() {
let arr = [1, 2, 3];
match arr {
[1, _, _] => "starts with one",
[a, b, c] => "starts with something else",
};
}
17. 其它主题
17.1. Advanced Traits
17.1.1. 关联类型(占位符类型)
关联类型(Associated Types)是一个将类型占位符与 trait 相关联的方式,这样 trait 的方法签名中就可以使用这些“占位符类型”。trait 的实现者会针对特定的实现在这个类型的位置指定相应的具体类型。如此可以定义一个使用多种类型的 trait,直到实现此 trait 时都无需知道这些类型具体是什么。
一个使用关联类型的 trait 的例子是标准库提供的 Iterator trait。它有一个叫做 Item 的关联类型来替代遍历的值的类型:
pub trait Iterator {
type Item; // Item 是关联类型(占位符类型)
fn next(&mut self) -> Option<Self::Item>; // 返回 Option<Self::Item>
}
这类似于泛型,使用泛型也能实现类似功能:
// 下面是 Iterator 的假想定义
pub trait Iterator<T> { // 泛型 T
fn next(&mut self) -> Option<T>; // 返回 Option<T>
}
“关联类型”相对于“泛型”的好处在于:某些情况下它会使代码更加清晰可读,参考:https://github.com/rust-lang/rfcs/blob/master/text/0195-associated-items.md
我们也可以对关联类型指定限制,如:
use std::fmt::Debug;
pub trait Iterator {
type Item:Debug; // Item:Debug 表示关联类型 Item 需要实现 Debug
fn next(&mut self) -> Option<Self::Item>;
}
17.1.2. 默认泛型类型参数
当使用泛型类型参数时,可以为泛型指定一个默认的具体类型。语法是在声明泛型类型时使用 <PlaceholderType=ConcreteType> 。如:
pub trait Container<XXX=String> { // XXX=String 就是默认泛型类型参数
fn get_data(&self) -> XXX;
}
struct A {
data: i32,
}
impl Container<i32> for A {
fn get_data(&self) -> i32 {
println!("A data is {}", self.data);
self.data
}
}
struct B {
data: String,
}
impl Container for B { // 相当于 Container<String>,但 String 这里可省略
fn get_data(&self) -> String {
println!("B data is {}", self.data);
self.data.clone()
}
}
fn main() {
let a = A{data: 100};
let b = B{data: String::from("Hello")};
assert_eq!(100, a.get_data());
assert_eq!("Hello", b.get_data());
}
17.1.3. 运算符重载(Operator Overloading)
在 Rust 中,许多运算符可以通过 Traits 进行重载。
运算符是方法调用的语法糖。例如, a + b 中的 + 运算符其实是调用的 add 方法,相当于 a.add(b) ,这里的 add 方法是 Trait Add 的一部分。
因此,如果某个结构体实现了 Trait Add,那么可以直接对结构体对象使用 + 运算符了,比如:
use std::ops::Add;
#[derive(Debug, Copy, Clone, PartialEq)]
struct Point {
x: i32,
y: i32,
}
impl Add for Point { // 首先,为 Point 实现了 Trait Add
type Output = Self;
fn add(self, other: Self) -> Self {
Self {
x: self.x + other.x,
y: self.y + other.y,
}
}
}
fn main() {
let point1 = Point { x: 1, y: 0 };
let point2 = Point { x: 2, y: 3 };
let point3 = point1 + point2; // 然后,可以在 Point 对象上使用 + 运算符了
assert_eq!(point3, Point { x: 3, y: 3 });
}
当然我们可以用范型进行更好的实现,比如:
use std::ops::Add;
#[derive(Debug, Copy, Clone, PartialEq)]
struct Point<T> {
x: T,
y: T,
}
// Notice that the implementation uses the associated type `Output`.
impl<T: Add<Output = T>> Add for Point<T> {
type Output = Self;
fn add(self, other: Self) -> Self::Output {
Self {
x: self.x + other.x,
y: self.y + other.y,
}
}
}
fn main() {
let point1 = Point { x: 1, y: 0 };
let point2 = Point { x: 2, y: 3 };
let point3 = point1 + point2;
assert_eq!(point3, Point { x: 3, y: 3 });
}
17.2. Advanced Types
17.2.1. 类型别名
Rust 中使用 type 可以给已有的类型创建别名。比如:
fn main() {
type Kilometers = i32; // 使用 type 给 i32 类型创建别名 Kilometers
let x: i32 = 5;
let y: Kilometers = 5;
println!("x + y = {}", x + y); // y 类型是 Kilometers,由于基本类型是 i32,所以可以直接和其它 i32 变量做加法
}
参考:
https://doc.rust-lang.org/book/ch19-04-advanced-types.html
https://doc.rust-lang.org/reference/items/type-aliases.html
17.2.2. 永远不返回的类型
Rust 中有一个特别的类型 ! ,它表示永远不会返回。下面是它的一个例子:
use std::thread::sleep;
fn bar() -> ! { // 这个函数永远不会返回,其返回类型是 !
loop {
sleep(std::time::Duration::from_secs(1));
println!("and ever");
}
}
fn main() {
bar();
}
17.3. PhantomData
在标准库 std::slice::Iter 及 std::rc::Rc 等定义中可以看到 std::marker::PhantomData,它是什么意思?
PhantomData 并不会占用空间,它的目的是告诉编译器一些额外信息。
PhantomData 使用场景 1:
假设 Iter 是为 &'a [T] 而定义的:
pub struct Iter<'a, T: 'a> {
ptr: std::ptr::NonNull<T>,
end: *const T,
_marker: std::marker::PhantomData<&'a T>, // 如果没有这一行,则无法通过编译。因为 'a 没有出现在字段中
}
PhantomData 使用场景 2:
pub struct Rc<T: ?Sized> {
ptr: NonNull<RcBox<T>>,
phantom: PhantomData<RcBox<T>>, // 这一行的目的是告诉编译器,在 drop Rc<T> 时同时要 drop RcBox<T>
}
17.4. FFI(Foreign Function Interface)
Rust 代码可以 C 代码交互。下面通过例子介绍一下如何在 Rust 中调用 C 动态库中的函数。
首先,准备测试用的动态库 libfoo.so(如果是 Mac 平台则其名为 libfoo.dylib)。假设这个动态库是通过下面 C 源码编译出来的:
#include <math.h>
int my_c_function_1(int a, int b) {
return a+b;
}
double my_c_function_2(double x) {
return sqrt(x);
}
编译动态库 libfoo.so 的步骤:
$ gcc -c -fPIC 1.c $ gcc -shared -o libfoo.so 1.o
然后,准备 Rust 项目:
$ cd ${HOME}/test/
$ cargo new rust-call-c # 创建 Rust 项目
$ cd rust-call-c
$ cp /path/to/libfoo.so . # 把 libfoo.so 复制到项目的根目录 ${HOME}/test/rust-call-c 中
把项目中 src/main.rs 文件的内容修改为下面内容:
use std::ffi::{c_double, c_int};
#[link(name = "foo")]
extern "C" { // 需要把 libfoo.so 中的 C 函数用 Rust 语法声明下,才能在 Rust 中调用
fn my_c_function_1(a: c_int, b: c_int) -> c_int;
fn my_c_function_2(x: c_double) -> c_double;
}
fn main() {
let r = unsafe { my_c_function_1(1, 2) };
println!("result of my_c_function_1 {}", r);
let r = unsafe { my_c_function_2(2.441) };
println!("result of my_c_function_2 {}", r)
}
现在直接使用 cargo build 编译上面项目时,会提示错误:
ld: library not found for -lfoo
为了解决这个错误,需要告诉链接器在哪个目录中搜索动态库 libfoo.so,这有两种方法。
方法一、设置环境变量 LIBRARY_PATH,如:
$ export LIBRARY_PATH=. # 告诉链接器在当前目录(即项目根目录)中搜索动态库
方法二、在项目根目录中创建文件 build.rs,其内容如下:
fn main() {
println!("cargo:rustc-link-search=.");
}
假设我们采用方法一,则编译和测试项目的步骤为:
$ export LIBRARY_PATH=. # 设置链接时动态库的搜索目录 $ cargo build # 编译项目 $ ./target/debug/rust-call-c result of my_c_function_1 3 result of my_c_function_2 1.56236999459155
18. 测试
下面介绍 Rust 单元测试的例子。
如文件 src/lib.rs:
pub fn add_two(a: i32) -> i32 {
println!("argument a = {}", a);
a + 2
}
#[cfg(test)]
mod tests {
use super::*;
#[test]
fn add_two_and_two() {
assert_eq!(4, add_two(2));
}
#[test]
fn add_three_and_two() {
assert_eq!(5, add_two(3));
}
#[test]
fn one_hundred() {
assert_eq!(102, add_two(100));
}
}
运行 cargo test 可执行测试用例。不过,默认不会显示 stdout/stderr 中内容,如果要显示 stdout/stderr 中内容,则需要在 -- 后面增加 --nocapture 。通过 --package 和 --lib 可以指定运行哪个测试用例。例如:
$ cargo test # 执行测试用例,不会显示 stdout/stderr 中内容 $ cargo test -- --nocapture # 执行测试用例,并且显示 stdout/stderr 中内容 $ cargo test --package example-rust --lib tests::add_two_and_two -- --nocapture # 执行指定的测试用例,并且显示 stdout/stderr 中内容
19. Rust 标准库
Rust 标准库提供了一些核心类型(如 Vec、Option)、标准宏、I/O 和多线程等等相关设施。参考:https://doc.rust-lang.org/std/
20. Tips
20.1. lint 工具(clippy)
Rust 中可以使用 clippy 作为 lint 工具。下面是它的安装和使用方法:
$ rustup component add clippy # 安装 clippy $ cargo clippy # 使用 clippy
20.1.1. 在代码中禁用某条检测规则
可以使用 #[allow(clippy::xxx)] 在代码中禁用检测规则 xxx。比如有代码:
fn main() {
let vec = vec!['a', 'b', 'c'];
for i in 0..vec.len() {
println!("{}", vec[i]);
}
}
执行 cargo clippy 后,会提示下面问题:
$ cargo clippy
warning: the loop variable `i` is only used to index `vec`.
--> src/main.rs:3:14
|
3 | for i in 0..vec.len() {
| ^^^^^^^^^^^^
|
= note: `#[warn(clippy::needless_range_loop)]` on by default
= help: for further information visit https://rust-lang.github.io/rust-clippy/master/index.html#needless_range_loop
help: consider using an iterator
|
3 | for <item> in &vec {
| ^^^^^^ ^^^^
warning: 1 warning emitted
如果我们想忽略这个 needless_range_loop 警告,则可以在问题代码上面增加 #[allow(clippy::needless_range_loop)] ,即:
fn main() {
let vec = vec!['a', 'b', 'c'];
#[allow(clippy::needless_range_loop)] // disable clippy lint
for i in 0..vec.len() {
println!("{}", vec[i]);
}
}
这样,对这个问题代码不再会有警告了。
20.2. 整理 Cargo.toml
20.2.1. 找出 Cargo.toml 中未使用的依赖(machete)
20.2.2. 对 dependencies 进行排序
使用第三方工具 sort 可以对 Cargo.toml 中下面内容进行排序:
["dependencies"] ["dev-dependencies"] ["build-dependencies"] ["workspace.members"] ["workspace.exclude"]
下面是安装和使用 cargo-sort 的方法:
$ cargo install cargo-sort # 安装 cargo-sort $ cargo sort --workspace # 对 workspace 中所有 Cargo.toml 中的依赖进行排序