Shell
Table of Contents
- 1. Shell
- 2. Bash 简介
- 3. Parameter and Variable
- 4. Loops and Branches
- 5. Pipeline
- 6. Test
- 7. Shell Expansion
- 8. Function
- 9. I/O 重定向
- 10. Here document
- 11. Process Substitution (
>(cmd)or<(cmd)) - 12. Bash 内置命令
- 13. Bash 的选项
- 14. Useful Examples
- 14.1. 检测指定路径下的程序是否正在运行
- 14.2. 检测某程序是否在 PATH 中
- 14.3. 分析 CSV 格式文件
- 14.4. 删除除某些文件外的所有文件
- 14.5. 求字符串长度
- 14.6. 字符串转大小写
- 14.7. 算术运算
- 14.8. 清空文件内容
- 14.9. 写入随机内容
- 14.10. 生成指定范围的随机数字
- 14.11. 实现进度条效果
- 14.12. 并行执行任务(推荐 xargs -P num)
- 14.13. Co-processes
- 14.14. 获取 CPU 核数
- 14.15. 获取操作系统类型
- 14.16. 获取脚本所在目录的全路径
- 14.17. 相对路径转为绝对路径
- 14.18. 捕获正则表达式中的 group
- 14.19. 退出脚本时杀死子进程
- 15. Tips & Tricks
- 15.1. Bash Pitfalls
- 15.2. 自动补全
- 15.3. 使用$()而不是``进行“命令替换”
- 15.4.
$(())与$()还有${}的区别 - 15.5. ()和{}的区别
- 15.6. 临时禁用 alias
- 15.7. read -a 和 readarray 的区别
- 15.8. 更新当前行和之前行的内容(echo -e "\033[nA")
- 15.9. 测试交互式和非交互式 shell
- 15.10. 输入上个命令的最后参数
- 15.11. bashdb (bash 调试器)
- 15.12. 只检查语法而不执行 (-n 选项)
- 15.13. 显示执行的命令 (-x 选项)
- 15.14. 用 shellcheck 检测语法
- 15.15. 改变当前用户的登录 shell (chsh)
- 15.16. 编写移植性更好的脚本
- 16. 其它 Shell
1. Shell
Shell 是用户和操作系统之间的接口。UNIX shell 历史悠久,主要分支如图 1 所示。Bash 是使用最为广泛的 Shell,本文主要介绍 Bash。
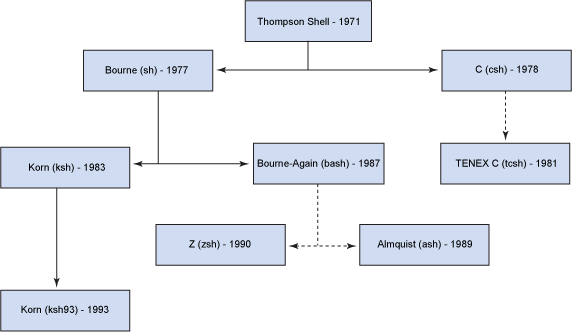
Figure 1: UNIX shell 家族树
参考:
http://www.ibm.com/developerworks/aix/library/au-speakingunix_commandline/
http://en.wikipedia.org/wiki/Comparison_of_command_shells
2. Bash 简介
Bash is the GNU Project's shell. Bash is the Bourne Again SHell. Bash is an sh-compatible shell that incorporates useful features from the Korn shell (ksh) and C shell (csh). It is intended to conform to the IEEE POSIX P1003.2/ISO 9945.2 Shell and Tools standard.
Advanced Bash-Scripting Guide: http://www.tldp.org/LDP/abs/html/index.html
Advanced Bash-Scripting Guide (Reference Cards): http://www.tldp.org/LDP/abs/html/refcards.html
Bash Reference Manual: http://www.gnu.org/software/bash/manual/bashref.html
Bash Reference Cards: http://www.tldp.org/LDP/abs/html/refcards.html
New Features in Bash 3: http://www.tldp.org/LDP/abs/html/bashver3.html
New Features in Bash 4: http://www.tldp.org/LDP/abs/html/bashver4.html
3. Parameter and Variable
A parameter is an entity that stores values. It can be a name, a number, or one of the special characters listed below. A variable is a parameter denoted by a name. A variable has a value and zero or more attributes. Attributes are assigned using the declare or typeset builtin command.
在 bash 中,术语 Parameter 是一个比术语 Variable 更通用的概念。 如 $1, $!, $var1 等都是 Parameter,其中 $1 是 Positional Parameter, $! 是 Special Parameter, $var1 才是 Variable(变量)。
用下面形式可对变量赋值:
name=[value]
说明 1:如果变量的值包含空格,应该把值放入引号中,如 name="A B"或 name='A B'。
说明 2: 紧接等号前后的字符不能是空格! 如果是空格会怎么样呢?请看下面:
#  "VARIABLE =value"
#           ^
#% Script tries to run "VARIABLE" command with one argument, "=value".

#  "VARIABLE= value"
#            ^
#% Script tries to run "value" command with
#+ the environmental variable "VARIABLE" set to "".
要引用一个变量,在变量名前加个符号 $ 即可,如 $name ,变量名也可以放入大括号中,如 ${name} ,两者一样。
3.1. Bash 采用动态作用域
Dynamic scoping means that variable lookups occur in the scope where a function is called, not where it is defined.
#!/bin/bash

#### bash动态作用域测试
value=1
function foo () {
    echo $value;
}
function bar () {
    local value=2;
    foo;
}

bar         # 由于bash采用动态作用域,这里会输出2,而不是1。
3.2. 双引号和单引号
双引号中的变量引用会被替换为变量的值。单引号中的内容都是字面量。
不用引号时,变量中的连续多个空格仅会保留一个。
#!/usr/bin/env bash

var1='A B   C'
echo "$var1"     # output: A B   C
echo '$var1'     # output: $var1
echo $var1       # output: A B C
3.3. ANSI-C Quoting and Locale-Specific Translation
Bash 中 $'string' (和转义相关)和 $"string" (和 i18n 相关)有特殊含义。
其中,$'string' 称为 ANSI-C Quoting,实例:
~$ echo 'ab\ncd'
ab\ncd
~$ echo "ab\ncd"
ab\ncd
$ echo $'ab\ncd'
ab
cd
参考:
http://wiki.bash-hackers.org/syntax/quoting
https://www.gnu.org/software/bash/manual/bashref.html#ANSI_002dC-Quoting
3.4. 用 declare/typeset 声明变量属性
declare 和 typeset 作用相同,都用来声明变量的属性。typeset 来自 ksh,要兼容 ksh 应该使用 typeset.
#!/usr/bin/env bash
var1=6/3
declare -i var2
var2=6/3

echo "var1 = $var1"       # output: var1 = 6/3
echo "var2 = $var2"       # output: var2 = 2
3.5. Positional and Special Parameter
Shell 中位置参数和特殊参数如表 1 所示。
| Parameter | Meaning |
|---|---|
| $0 | Filename of script |
| $1 - $9 | Positional parameters #1 - #9 |
| ${10} | Positional parameter #10 |
| $# | Number of positional parameters |
| "$*" | All the positional parameters (as a single word) |
| "$@" | All the positional parameters (as separate strings) |
| ${#*} | Number of positional parameters |
| ${#@} | Number of positional parameters |
| $? | Return value |
| $$ | Process ID (PID) of script |
| $- | Flags passed to script (using set) |
| $_ | Last argument of previous command |
| $! | Process ID (PID) of last job run in background |
3.5.1. $@和$*的区别
当执行下面命令时, ./my.sh p1 "p2 p3" p4
在脚本 my.sh 中,通过 $@ 和 $* 获取到的东西是相同的!都会得到 p1 p2 p3 p4
而如果放在双引号里,即使用 soft quote,则不同,如上面例子:
"$@" 会得到"p1" "p2 p3" "p4"这三个的词;
"$*" 会得到"p1 p2 p3 p4"这一个词。
下面是测试例子:
#!/bin/bash

myecho()
{
    echo "$1,$2,$3,$4"
}

fun1()
{
    myecho $@          # output: p1,p2,p3,p4
    myecho $*          # output: p1,p2,p3,p4
    myecho "$@"        # output: p1,p2   p3,p4,
                       #           ^       ^  ^
    myecho "$*"        # output: p1 p2   p3 p4,,,
                       #                      ^^^
    echo $#
    echo ${#@}
    echo ${#*}
}

fun1 p1 "p2   p3" p4
注: $@ 和 $* 的行为会受到 IFS 的影响。
参考:
http://wiki.bash-hackers.org/scripting/posparams
http://www.tldp.org/LDP/abs/html/internalvariables.html
3.6. 数组变量
下面是数组变量的使用实例:
$ my_array=(foo bar)                              # my_array 是数组变量
$ for i in "${my_array[@]}"; do echo "$i"; done   # 遍历 my_array
foo
bar
$ my_array+=(baz)                                 # 往数组中增加元素
$ for i in "${my_array[@]}"; do echo "$i"; done
foo
bar
baz
参考:
https://tldp.org/LDP/Bash-Beginners-Guide/html/Bash-Beginners-Guide.html#sect_10_02
https://linuxconfig.org/how-to-use-arrays-in-bash-script
4. Loops and Branches
参考:
http://www.gnu.org/software/bash/manual/bashref.html#Looping-Constructs
http://www.tldp.org/LDP/abs/html/loops.html
4.1. Loop (while)
while 语法如下:
while test-commands; do
  consequent-commands
done
只要 test-commands 返回零就执行 consequent-commands。其返回值是命令块中最后一个被执行的命令的返回值。如果命令块没有被执行则返回零。
下面是个无限循环的例子:
while true
do
  echo "Press [CTRL+C] to stop.."
  sleep 1
done
如果要写为一行,则可以这样:
while true; do echo 'Hit CTRL+C'; sleep 1; done
4.2. Loop (until)
until 语法如下:
until test-commands; do
  consequent-commands
done
只要 test-commands 返回非零值就执行 consequent-commands。
其返回值是命令块中最后一个被执行的命令的返回值。如果命令块没有被执行则返回零。
4.3. Loop (for)
for 语法如下:
# style 1
for arg [in list]; do
  commands
done

# style 2 (like C-style)
for (( expr1 ; expr2 ; expr3 )) ; do
  commands
done
第 1 种 for 循环形式,list 中的每个元素都会赋值给 arg 并执行一次命令块。省略 in list 时相当于 in "$@"。
其返回值是命令块中最后一个被执行的命令的返回值。如果对 list 的扩展没有得到任何元素,则不执行任何命令,并返回零。
下面是第 1 种形式的例子:
#!/bin/bash

fun1()
{
#   for循环中省略了in list,相当于
#   for var in "$@"
    for var
    do
        echo -n "$var "
    done
}

fun1 a b c d   # output: "a b c d "
第 2 种 for 循环形式,对算术表达式 expr1 进行求值,然后不断的对算术表达式 expr2 进行求值,直到其结果为零。每次求值时,如果 expr2 的值不是零,则执行一次命令块,并且计算算术表达式 exp3 的值。
其返回值是命令块中最后一个被执行的命令的返回值。如果表达式的值都是假的,则返回假。
下面是第 2 种形式的例子:
#!/bin/bash

for ((i=1; i<=100; i++)); do
    echo $i
done
4.3.1. 从 1 到 100,循环 100 次
方法 1:用 c 语言风格的 for 循环
for ((i=1; i<=100; i++)); do
    echo $i
done
方法 2:用 Extended Brace expansion,它是 bash 3 中引入的新功能
for i in {1..100}; do
    echo $i
done
方法 3:用 seq 命令(推荐使用,可移植性好)
for i in $(seq 1 100); do
    echo $i
done
4.4. Branch (if)
if 语法如下:
if test-commands; then
  consequent-commands;
[elif more-test-commands; then
  more-consequents;]
[else alternate-consequents;]
fi
如果 test-commands 返回 0,就会执行 consequent-commands。
4.5. Branch (case)
case 语法如下:
case word in
  [ [(] pattern [ | pattern ] ... ) list ;; ] ...
esac
pattern 左侧的小括号可省略,多个 pattern 可用 | 分隔。 如:
case word in
 ( pattern1 )
   commands
 ;;
 pattern2 | pattern3 )
   commands
 ;;
esac
4.5.1. Bash 4.0 中 case 新功能
在 Bash 4.0 中增强了 case 语句,引入了两个新的分支结束符 ;;& 和 ;& 。
;;& 表示当这个 pattern 满足后,执行对应的 command-list 后就不会退出 case,接着测试下面的分支。如:
case $a in
1) echo " 1 " ;;&
2) echo " 2 " ;;
3) echo " 3 " ;;
1 | 2 | 4) echo " 1 or 2 or 4 " ;;
5) echo " 5 " ;;
esac
当 a 为 1 时,会执行第 1 个和第 4 个 echo 语句。
;& 表示当这个 pattern 满足后,执行对应的 command-list 后,接着执行(不进行测试)下一个分支的 command-list。如:
case $a in
1) echo " 1 " ;&
2) echo " 2 " ;;
3) echo " 3 " ;;
1 | 2 | 4) echo " 1 or 2 or 4 " ;;
5) echo " 5 " ;;
esac
当 a 为 1 时,会执行第 1 个和第 2 个 echo 语句。
相对来说 ;;& 比较实用,而 ;& 用处不大。
4.6. Branch (select)
select 来自于 ksh,用来生成选择菜单,提示用户选择指定的选项。 语法几乎和 for 一样。
select 直到遇到 break 语句才结束。
select 使用 PS3 作为提示符。
#!/bin/bash

PS3='Choose your favorite vegetable: ' # Sets the prompt string.
                                       # Otherwise it defaults to #? .

select vegetable in "beans" "carrots" "potatoes" "onions" "rutabagas"
do
  echo
  echo "Your favorite veggie is $vegetable."
  break  # What happens if there is no 'break' here?
done
执行上面脚本时,会把 select 中 in 后的选项自动编号,提示用户选择。如:
$ bash test.sh
1) beans
2) carrots
3) potatoes
4) onions
5) rutabagas
Choose your favorite vegetable: 2

Your favorite veggie is carrots.
当然不用 select,用 read 和 case 也能实现类似的功能,如:
!#/bin/bash
echo "select the operation:"
echo "1) operation 1"
echo "2) operation 2"
echo "3) operation 3"

read n
case $n in
    1) commands for operation 1;;
    2) commands for operation 2;;
    3) commands for operation 3;;
    *) invalid option;;
esac
4.7. break 和 continue
break 和 continue 可用在 for, while, until 和 select 语句中。
The break command terminates the loop (breaks out of it), while continue causes a jump to the next iteration of the loop, skipping all the remaining commands in that particular loop cycle.
break 和 continue 后面都可以跟一个数字,表示要操作几层循环。
如,不跟数字时表示操作最里层循环:
#!/bin/bash
# break-levels.sh: Breaking out of loops.

# "break N" breaks out of N level loops.

for outerloop in 1 2 3 4 5
do
  echo -n "Group $outerloop:   "

  # --------------------------------------------------------
  for innerloop in 1 2 3 4 5
  do
    echo -n "$innerloop "

    if [ "$innerloop" -eq 3 ]
    then
      break  # Try   break 2   to see what happens.
             # ("Breaks" out of both inner and outer loops.)
    fi
  done
  # --------------------------------------------------------

  echo
done
上面例子会输出:
Group 1:   1 2 3
Group 2:   1 2 3
Group 3:   1 2 3
Group 4:   1 2 3
Group 5:   1 2 3
如果把前面例子中的 break 换成 break 2 ,则 break 会对 2 层循环(内层循环和外层循环)都有效,前面例子会输出:
Group 1: 1 2 3
5. Pipeline
管道语法为:
command1 | command2 | command3
前一个命令的 stdout 会作为后一个命令的 stdin。
管道中,每个命令都会在一个独立的“subshell”中执行。 如:
#!/usr/bin/env bash

a=1

grep foo file.txt | while IFS='' read -r line; do
    echo "Processing [$line]"
    a=2                           # 管道中执行 while,它会在 subshell 中执行,不会影响到父 shell
done

echo $a                           # bash 总是输出 1,zsh 可能输出 2(当 file.txt 中有关键字 foo 时)
zsh 和 bash 有点不同,zsh 管道中最后一个命令会在当前 shell 中执行。Bash 有一个选项可以让其和 zsh 类似:
shopt -s lastpipe # bash 中,让最后一个命令在当前 shell(而不是 subshell)中执行
参考:https://www.gnu.org/software/bash/manual/html_node/Pipelines.html
5.0.1. 实例:处理 grep 的每个输出
通过 grep 可能得到多行输出,可把它通过管道传给 while 对每一行进行处理,如:
grep foo file.txt | while IFS='' read -r line; do
    echo "Processing [$line]"
    # your code goes here
    # 管道中的 while 在 subshell 中执行,这里的修改不会影响父进程
done
如果想在 while 中对父进程的变量进行操作,则可以使用进程替换(参考节 11),如:
while IFS='' read -r line; do
    echo "Processing [$line]"
    # your code goes here
    # while 直接在当前进程中执行,修改会影响父进程
done < <(grep foo file.txt)
说明:
- read 前面指定
IFS=''表示“不删除 line 前后的空格”(默认会删除前后空格);如果你希望删除 line 前后空格,则可以不指定IFS=''。 - read 的
-r选项是 raw 的意思,表示“原封不动”地保留转义符\。
6. Test
参考:
http://wiki.bash-hackers.org/commands/classictest
http://wiki.bash-hackers.org/syntax/ccmd/conditional_expression
http://www.tldp.org/LDP/abs/html/tests.html
6.1. AND(&&) and OR(||)
&& 和 || 分别表示“和”和“或”。
如果使用 [[ ,则 && 和 || 可以在括号内或者括号外。
if [[ expression ]] && [[ expression ]] || [[ expression ]] ; then

They can also be used within a single [[ ]]:
if [[ expression && expression || expression ]] ; then

And, finally, you can group them to ensure order of evaluation:
if [[ expression && ( expression || expression ) ]] ; then
如果使用 [ ,则 && 和 || 只能在括号外,如果放在括号内则报语法错误。
if [ -n "$var" ] && [ -e "$var" ]; then
   echo "\$var is not null and a file named $var exists!"
fi
$ if [ -n "/tmp" && -d "/tmp"]; then echo true; fi # Does not work
-bash: syntax error near unexpected token `then'
6.2. test 和[和[[的区别
[ 和 test 是一样的,仅在用法的形式上有区别。它们都是 POSIX 要求的。
if test -z "$a"; then
    echo "test."
fi

## 相当于:
if [ -z "$a" ]; then
    echo "test."
fi
[[ 的功能更加强大,Bash,Korn shell 中可用。
比如, [[ 可支持把逻辑操作符 ||, && 等放入在 [[]] 中间,而 [ 不支持。
6.3. [[应用
6.3.1. 实例:测试字符串的开头或结束是否为某字符串
用 [[ 可以方便测试字符串的开头或结束是否为某字符串。如下面例子可测试变量 a 是否以字符 z 开头:
[[ $a == z* ]] # True if $a starts with an "z" (wildcard matching).
注:上面测试中,不要使用双引号包围 z*,如果使用了双引号包围 z*,则其含义是不同的:
[[ $a == "z*" ]] # True if $a is equal to z* (literal matching).
6.3.2. 实例:用正则表达式测试数字
正则匹配符 =~ 是在 bash v3 中引入的操作符。
注意:正则表达式不要用单引号包围,在 bash v3 中没有问题,但在 bash v4 中不会工作。
如测试数字时,不要这样使用(仅在 bash v3 中工作):
if [[ $line =~ '^[0-9]+$' ]]; ...
应该这样使用:
if [[ $line =~ ^[0-9]+$ ]]; ...
参考:http://stackoverflow.com/questions/218156/bash-regex-with-quotes
7. Shell Expansion
7.1. Brace Expansion
大括号里用逗号分隔的各个单词会被展开,如: cp file{,.bk} 相当于 cp file file.bk
7.2. Parameter Expansion
Bash 中参数展开(Parameter Expansion)如表 2 所示。
| 参数展开形式 | str 为 unset 时 | str 为 null 时 | str 为 non-null 时 | 备注 |
|---|---|---|---|---|
| var=${str:-expr} | var=expr | var=expr | var=$str | expr 可看作“默认值” |
| var=${str-expr} | var=expr | var= | var=$str | 同上 |
| var=${str:=expr} | str=expr; var=expr | str=expr; var=expr | str 不变; var=$str | expr 可看作“默认值” |
| var=${str=expr} | str=expr; var=expr | str 不变; var= | str 不变; var=$str | 同上 |
| var=${str:+expr} | var= | var= | var=expr | expr 可看作“其他值” |
| var=${str+expr} | var= | var=expr | var=expr | 同上 |
| var=${str:?expr} | expr 输出到 stderr | expr 输出到 stderr | var=$str | expr 可看作"error message" |
| var=${str?expr} | expr 输出到 stderr | var= | var=$str | 同上 |
注 1:一般情况下 str 的值不会被修改,仅当使用=时,才有可能修改 str 的值。
注 2:一般情况下会使用对应的带冒号形式。 使用冒号形式时,当 str 为 unset 或 null 时,其行为是相同的。
注 3:使用不带冒号的形式时,只检测 str 是不是设置过。str 为 null 或 non-null 的行为一样。
7.3. Substring Extraction
${string:position}
Extracts substring from $string at $position.
If the $string parameter is "*" or "@", then this extracts the positional parameters, starting at $position.
${string:position:length}
Extracts $length characters of substring from $string at $position.
If the $string parameter is "*" or "@", then this extracts a maximum of $length positional parameters, starting at $position.
#!/bin/bash

stringZ=abcABC123ABCabc
#       0123456789.....
#       0-based indexing.

echo ${stringZ:0}                            # abcABC123ABCabc
echo ${stringZ:1}                            # bcABC123ABCabc
echo ${stringZ:7}                            # 23ABCabc

echo ${stringZ:7:3}                          # 23A

# Is it possible to index from the right end of the string?

echo ${stringZ:-4}                           # abcABC123ABCabc
# Defaults to full string, as in ${parameter:-default}.
# However . . .

echo ${stringZ:(-4)}                         # Cabc
echo ${stringZ: -4}                          # Cabc
# Now, it works.
# Parentheses or added space "escape" the position parameter.

# Thank you, Dan Jacobson, for pointing this out.
用 GNU coreutils 中的工具 expr 也能实现类似的功能。
注意:bash 的 Substring Expansion 中第 1 个元素下标为 0,而 expr substr 的第 1 个元素下标为 1。
#!/bin/bash

stringZ=abcABC123ABCabc
#       123456789......
#       1-based indexing.

echo `expr substr $stringZ 1 2`              # ab
echo `expr substr $stringZ 4 3`              # ABC
参考:
http://www.tldp.org/LDP/abs/html/string-manipulation.html#AWKSTRINGMANIP
http://www.gnu.org/software/bash/manual/bashref.html#Shell-Parameter-Expansion
7.4. Substring Removal
Bash 支持从字符串中删除部分内容,如表 3 所示的。
| 参数形式 | 说明 |
|---|---|
| ${str#word} | 若$str 开头位置的数据匹配 word,则删除最短的匹配数据 |
| ${str##word} | 若$str 开头位置的数据匹配 word,则删除最长的匹配数据 |
| ${str%word} | 若$str 结尾位置的数据匹配 word,则删除最短的匹配数据 |
| ${str%%word} | 若$str 结尾位置的数据匹配 word,则删除最长的匹配数据 |
注 1:word 中支持'*' (Matches any string), '?' (Matches any single character), '[...]' (Matches any one of the enclosed characters)。
注 2:#从前往后删;%从后往前删;两个叠加就是匹配“最长”。
#!/bin/bash
stringZ=abcABC123ABCabc
#       |----|          shortest
#       |----------|    longest

echo ${stringZ#a*C}      # 123ABCabc
# Strip out shortest match between 'a' and 'C'.

echo ${stringZ##a*C}     # abc
# Strip out longest match between 'a' and 'C'.

# You can parameterize the substrings.
X='a*C'

echo ${stringZ#$X}      # 123ABCabc
echo ${stringZ##$X}     # abc
                        # As above.
7.4.1. 实例:实现 basename 功能(推荐)
下面是使用 Bash 的“Substring Removal”功能实现 basename :
$ s='/path/to/foo.txt'
$ echo ${s##*/}
foo.txt
注:上面的实现比 basename 要快很多( basename 是外部程序),当处理的文件名较多时更能体现优势。
7.4.2. 实例:检测字符串是否包含指定子字符串
方法一、下面函数可以检测字符串是否包含指定子字符串:
contains() {
    string="$1"
    substring="$2"
    if test "${string#*$substring}" != "$string"
    then
        return 0    # $substring is in $string
    else
        return 1    # $substring is not in $string
    fi
}

contains "abcd" "e" || echo "abcd does not contain e"
contains "abcd" "ab" && echo "abcd contains ab"
contains "abcd" "bc" && echo "abcd contains bc"
contains "abcd" "cd" && echo "abcd contains cd"
contains "abcd" "abcd" && echo "abcd contains abcd"
contains "" "" && echo "empty string contains empty string"
contains "a" "" && echo "a contains empty string"
contains "" "a" || echo "empty string does not contain a"
contains "abcd efgh" "cd ef" && echo "abcd efgh contains cd ef"
contains "abcd efgh" " " && echo "abcd efgh contains a space"
方法二、使用 grep:
var1='This is abc'
search_word='abc'

if grep -q "${search_word}" <<< "$var1"
then
  echo "Found '${search_word}'"
else
  echo "Not Found"
fi
关于 <<< 的说明可参考节 10.3 。
7.4.3. 实例:删除字符串第一个(或最后一个)字符
#!/bin/bash
string=abcABC

# 删除第一个字符
echo ${string#?}    # bcABC

# 删除最后一个字符
echo ${string%?}    # abcAB
7.5. Substring Replacement
Bash 支持从字符串中替换部分内容,如表 4 所示。
| 参数形式 | 说明 |
|---|---|
| ${string/substring/replacement} | Replace first match of $substring with $replacement. |
| ${string//substring/replacement} | Replace all matches of $substring with $replacement. |
| ${string/#substring/replacement} | If $substring matches front end of $string, substitute $replacement for $substring. |
| ${string/%substring/replacement} | If $substring matches back end of $string, substitute $replacement for $substring. |
7.5.1. 实例:批量删除文件名指定后缀
假设当前文件夹很多文件有 bak 后缀,如 1.c.bak,2.c.bak。如何批量去掉.bak 后缀,把它们变为 1.c,2.c 呢?
用 shell 的变量替换容易实现这个目的。如:
$ for i in `ls *.bak`; do mv $i ${i%.*}; done;
说明:
如果当前文件夹下在的文件名含特殊字符(如*,-等),那么上面命令会失败!比较保险的方法是:
$ for i in *.bak; do [ -e "$i" ] && mv -- $i ${i%.*}; done;
为什么这样写,请参考:http://mywiki.wooledge.org/BashPitfalls
8. Function
Bash 中函数有两种写法:
## Format 1
function func_name [()] {
command...
} [ redirections ]

## Format 2
func_name () {
command...
} [ redirections ]
推荐使用第 2 种形式,其兼容性更好。参见:http://pubs.opengroup.org/onlinepubs/9699919799/utilities/V3_chap02.html#tag_18_09_05
函数定义时不用声明参数,在函数体内可通过 $1, $2 等获取参数。调用函数时,用语法 func_name arg1 arg2 即可。
8.1. return
函数体内可以使用 return 语句返回,如果省略 return 语句,那么函数中最后一个命令的退出码将作为函数的返回码。
return 语句后面只能是 0 到 255 的整数(不能是字符串等其他内容),使用 $? 可以获得函数的返回值,如:
fun1() {
    # something
    return 2
}

fun1
retval=$?

echo $retval    # 2
return 不一定用在函数体内,可也以用在 sourced script 中。其帮助文档如下:
$ help return
return: return [n]
    Return from a shell function.

    Causes a function or sourced script to exit with the return value
    specified by N.  If N is omitted, the return status is that of the
    last command executed within the function or script.

    Exit Status:
    Returns N, or failure if the shell is not executing a function or script.
8.2. Recursion and local variables
在 man bash 的文档中,有这样的描述:
When local is used within a function, it causes the variable name to have a visible scope restricted to that function and its children.
#!/bin/bash

recurse1()
{
    local x=$1
    echo "rec1 hit1" $x
    if [ $1 -lt 3 ]; then
        recurse1 $(($1 + 1))
    fi
    echo "rec1 hit2" $x
    # 变量x是local的,递归调用时下层的recurse1不会修改它。
}

recurse2()
{
    x=$1
    echo "rec2 hit1" $x
    if [ $1 -lt 3 ]; then
        recurse2 $(($1 + 1))
    fi
    echo "rec2 hit2" $x
    # 变量x没有声明为local,递归调用时被下层的recurse2修改了。
    # 在这之后,引用x时应该注意它已经不是之前的值了。
}

recurse1 1
echo '---------------'

recurse2 1
echo '---------------'

#### Output:
## rec1 hit1 1
## rec1 hit1 2
## rec1 hit1 3
## rec1 hit2 3
## rec1 hit2 2
## rec1 hit2 1
## ---------------
## rec2 hit1 1
## rec2 hit1 2
## rec2 hit1 3
## rec2 hit2 3
## rec2 hit2 3
## rec2 hit2 3
## ---------------
说明:使用 typeset 也可以在函数体内定义局部变量,但这种写法已经是过时的。
8.3. Nested function
bash 中允许定义嵌套函数,它的用处不大。
#!/bin/bash

f1 ()
{

  f2 () # nested
  {
    echo "Function \"f2\", inside \"f1\"."
  }

}

f2  #  Gives an error message.
    #  Even a preceding "declare -f f2" wouldn't help.

echo

f1  #  Does nothing, since calling "f1" does not automatically call "f2".
f2  #  Now, it's all right to call "f2",
    #+ since its definition has been made visible by calling "f1".

    # Thanks, S.C.
8.4. 函数如何传递“指针”
在 bash 中定义了一个变量,如何通过调用一个函数来修改这个变量?如果在 C 语言中,则容易实现,把变量的地址传给函数能实现。
在 bash 中,可以通过 eval 实现。
#!/bin/bash
fun1() {
eval $1="bb"
}

var1="aa"
echo ${var1}
fun1 var1
echo ${var1}
执行上面脚本,会输出:
aa
bb
9. I/O 重定向
默认地,stdin 对应文件描述符为 0,stdout 对应文件描述符为 1,stderr 对应文件描述符为 2。
M>N
    # Redirect file descriptor "M" to file "N".
    # "M" is a file descriptor, which defaults to 1, if not explicitly set.
    # "N" is a filename.

M>&N
    # Redirect file descriptor "M" to another file descriptor "N".
    # "M" is a file descriptor, which defaults to 1, if not set.
    # "N" is another file descriptor.

[j]<>filename
      #  Open file "filename" for reading and writing,
      #+ and assign file descriptor "j" to it.
      #  If "filename" does not exist, create it.
      #  If file descriptor "j" is not specified, default to fd 0, stdin.

n<&-
Close input file descriptor n. If n is 0 (stdin), 0 can be omitted.

n>&-
Close output file descriptor n. If n is 1 (stdout), 1 can be omitted.
9.1. 文件描述符实例
#!/bin/bash

echo 1234567890 > File    # Write string to "File".
exec 3<> File             # Open "File" and assign fd 3 to it.
read -n 4 <&3             # Read only 4 characters.
echo -n . >&3             # Write a decimal point there.
exec 3>&-                 # Close fd 3.
cat File                  # ==> 1234.67890
9.2. stdout 和 stderr 重定向到另一文件
方法 1:
command >file1 2>&1
说明:不要写 command 2>&1 >file1,它仅相当于 command >file1,因为 2>&1 执行时 stdout 指向的是屏幕。
方法 2:
command &>file1
方法 3:
command >&file1
注:尽量不要用方法 3 的方式,它在形式上看起来很奇怪,因为只有用 fd 表示文件时才在文件前加符号&。
9.3. stdout 和 stderr 以追加方式重定向到另一文件
要把 stdout 和 stderr 以追加方式重定向到另一文件,可以使用下面两种方式中的一种:
command &>> file2          # 方式一
command >>file2 2>&1       # 方法二
10. Here document
A here document is a special-purpose code block. It uses a form of I/O redirection to feed a command list to an interactive program or a command, such as ftp, cat, or the ex text editor.
COMMAND <<EOF
...
...
EOF
其中,EOF 可以是其它字符。
10.1. 忽略 tabs
在 EOF 前加一个连字符,表示忽略 here document 中开头的 tabs(空格会保留)
cat <<-EOF
	"leading tab(s) would be removed."
EOF
10.2. 禁止变量解释
把 EOF 用单引号括起来,表示不解释 here documents 中的变量。
#!/bin/bash
a=test

cat <<EOF
echo ${a}
EOF

cat <<EOF
echo \${a}
EOF

cat <<'EOF'
echo ${a}
EOF
执行上面脚本会输出:
echo test
echo ${a}
echo ${a}
10.3. Here Strings (<<<)
11. Process Substitution (>(cmd) or <(cmd))
Process substitution feeds the output of a process (or processes) into the stdin of another process.
进程替换的功能是把一个进程的 stdout 回馈给另一个进程(即放入到其 stdin 中)。这和管道类似,但管道无法方便地同时处理多个命令的输出,而进程替换则可以。
进程替换语法:
>(command)
<(command)
进程替换实例 1:
diff <(command1) <(command2) # 查看两个命令输出的不同,(你不用把命令输出重定向到文件,然后比较文件了)
进程替换实例 2:
$ sort -k 9 <(ls /bin) <(ls /usr/bin) <(ls /usr/X11R6/bin)   #列出系统中3个'bin'目录的所有文件,且按文件名排序
2to3
2to3-
2to3-2.7
2to32.6
BuildStrings
CpMac
DeRez
GetFileInfo
MergePef
MvMac
R
......
zless
zmore
znew
zprint
zsh
12. Bash 内置命令
12.1. 查看内置命令的帮助
man bash 中有所有内置命令的说明,但内容太多,不易快速找到想要的内容。要精确找到内置命令的帮助文档,可用 help 命令,如: help test 可查看内置命令 test 的帮助文档;又如 help ulimit 可查看内置命令 ulimit 的帮助文档。
12.2. ulimit
ulimit 可用于控制 shell 以及其派生的子进程的资源使用。
有两种类型的限制 soft 限制和 hard 限制。其中 soft 限制是当前的限制;而 hard 限制是软限制的上限值,也就是说 soft 限制不能超过 hard 限制。
12.2.1. 查看限制
执行 ulimit -a 或者 ulimit -aS 可查看当前 shell 的所有 soft 限制,如:
$ ulimit -a                 # 查看 soft 限制,同 ulimit -aS
core file size          (blocks, -c) unlimited
data seg size           (kbytes, -d) unlimited
scheduling priority             (-e) 0
file size               (blocks, -f) unlimited
pending signals                 (-i) 30774
max locked memory       (kbytes, -l) 64
max memory size         (kbytes, -m) unlimited
open files                      (-n) 1024
pipe size            (512 bytes, -p) 8
POSIX message queues     (bytes, -q) 819200
real-time priority              (-r) 0
stack size              (kbytes, -s) 8192
cpu time               (seconds, -t) unlimited
max user processes              (-u) 30774
virtual memory          (kbytes, -v) unlimited
file locks                      (-x) unlimited
执行 ulimit -aH 可查看 hard 限制,如:
$ ulimit -aH                # 查看 hard 限制
core file size          (blocks, -c) unlimited
data seg size           (kbytes, -d) unlimited
scheduling priority             (-e) 0
file size               (blocks, -f) unlimited
pending signals                 (-i) 30774
max locked memory       (kbytes, -l) 64
max memory size         (kbytes, -m) unlimited
open files                      (-n) 262144
pipe size            (512 bytes, -p) 8
POSIX message queues     (bytes, -q) 819200
real-time priority              (-r) 0
stack size              (kbytes, -s) unlimited
cpu time               (seconds, -t) unlimited
max user processes              (-u) 30774
virtual memory          (kbytes, -v) unlimited
file locks                      (-x) unlimited
12.2.2. 临时修改限制
ulimit 后面加上限制值就可以临时修改限制,如:
$ ulimit -n 2048 # 临时限制最大打开文件数为 2048
12.2.3. 永久修改限制
在文件 /etc/security/limits.conf 中,可以修改对某个用户或者所有用户的限制,如:
root soft nofile 65535
root hard nofile 65535
 * soft nofile 65535
 * hard nofile 65535
在文件 /etc/sysctl.conf 中,也可以修改限制,它是系统级别的,如增加:
fs.file-max = 65535
关于 /etc/security/limits.conf 和 /etc/sysctl.conf 的不同,可参考:https://unix.stackexchange.com/questions/379336/whats-the-difference-between-setting-open-file-limits-in-etc-sysctl-conf-vs-e
12.2.4. 查看某进程当前的 Limit
在 Linux 系统中,可以通过查看 /proc/<PID>/limits 文件来知道进程的当前 Limit。如查看 PID 为 891267 的进程的当前 Limit:
$ cat /proc/891267/limits
Limit                     Soft Limit           Hard Limit           Units
Max cpu time              unlimited            unlimited            seconds
Max file size             unlimited            unlimited            bytes
Max data size             unlimited            unlimited            bytes
Max stack size            8388608              unlimited            bytes
Max core file size        unlimited            unlimited            bytes
Max resident set          unlimited            unlimited            bytes
Max processes             30774                30774                processes
Max open files            1024                 262144               files
Max locked memory         65536                65536                bytes
Max address space         unlimited            unlimited            bytes
Max file locks            unlimited            unlimited            locks
Max pending signals       30774                30774                signals
Max msgqueue size         819200               819200               bytes
Max nice priority         0                    0
Max realtime priority     0                    0
Max realtime timeout      unlimited            unlimited            us
12.3. . (a period)
$ . filename [arguments]
$ source filename [arguments]        # same as above
Read and execute commands from the filename argument in the current shell context. This builtin is equivalent to source.
12.4. set
set 有两个作用。一是用来打开或关闭 bash 的选项。二是用来设置位置参数。
用 set 打开或关闭 bash 的选项本文其它部分已经介绍,这里仅介绍它不常使用的设置位置参数的功能。
#!/bin/bash
fun1() {
set a b c d
echo $1 $2 $3 $4
}

fun1
上面例子中,不管给 fun1 传递什么参数,都会输出 a b c d,因为 set 重置了它的位置参数。
12.5. exec
exec 的语法格式为:
exec [-cl] [-a name] [file [redirection ...]]
exec 用 file 代替当前进程,并执行;如果 file 没有指定,则可以通过重定向来影响当前的 shell 环境。
即 exec 有两个功能。 一是在当前进程中执行命令。二是修改当前 shell 的文件描述符。
12.5.1. 代替当前进程并执行
如:
#!/bin/bash
# self-exec.sh

# Note: Set permissions on this script to 555 or 755,
#       then call it with ./self-exec.sh or sh ./self-exec.sh.

echo

echo "This line appears ONCE in the script, yet it keeps echoing."
echo "The PID of this instance of the script is still $$."
#     Demonstrates that a subshell is not forked off.

echo "==================== Hit Ctl-C to exit ===================="

sleep 1

exec $0   #  Spawns another instance of this same script
          #+ that replaces the previous one.

echo "This line will never echo!"  # Why not?
注:上例中需要用 Ctrl+C 中止。上例中输出的进程号不会变,因为 exec 总是在当前进程中执行。
12.5.2. 修改当前 shell 的文件描述符
如:
#!/bin/bash
# Redirecting stdin using 'exec'.


exec 6<&0          # Link file descriptor #6 with stdin.
                   # Saves stdin.

exec < data-file   # stdin replaced by file "data-file"

read a1            # Reads first line of file "data-file".
read a2            # Reads second line of file "data-file."

echo
echo "Following lines read from file."
echo "-------------------------------"
echo $a1
echo $a2

echo; echo; echo

exec 0<&6 6<&-
#  Now restore stdin from fd #6, where it had been saved,
#+ and close fd #6 ( 6<&- ) to free it for other processes to use.
#
# <&6 6<&-    also works.

echo -n "Enter data  "
read b1  # Now "read" functions as expected, reading from normal stdin.
echo "Input read from stdin."
echo "----------------------"
echo "b1 = $b1"

echo

exit 0
12.6. trap
trap 语法:
trap [COMMANDS] [SIGNALS]
可以捕捉信号,并执行指定的动作。
被捕捉的 SIGNALS,可以通过 kill -l 查看,即可直接写数字,也可以写名字。
如,下面两个语句的作用是一样的:
trap '' 1
trap '' SIGHUP
除了 kill -l 列出的信号外,还可以捕捉 EXIT(0), DEBUG, ERR
$ cat 1.sh
trap "echo Goodbye" EXIT
echo "hello"

$ bash 1.sh
hello
Goodbye
http://www.tldp.org/LDP/Bash-Beginners-Guide/html/sect_12_02.html
12.6.1. trap 中使用单引号
实例:
trap "echo Error on line $LINENO" ERR ##trap 'echo Error on line $LINENO' ERR
echo hello |grep 'abc'
在上面例子中,grep 找不到字符串 abc,所以会返回非 0。
我们期待脚本显示 Error on line 2,但实际却显示的是 Error on line 1,原因是在执行 trap 时,$LINENO 已经被展开,要想得到期待的结果,可以把 trap 中的双引号改为单引号。
http://unix.stackexchange.com/questions/39623/trap-err-and-echoing-the-error-line
12.7. read
12.7.1. 实例:遍历(一行一行地读入)文本文本
如何一行一行地读入文本文本?
#!/bin/bash

## 下面是错误的用法!!!
while read line; do
    echo "Text read $line"
done < filename
注:上面的代码有下面问题:
1、行首的空格被删除了。
2、最后一行行尾如果没有换行符,则最后一行可能读不出。
正确的写法为:
#!/bin/bash
while IFS='' read -r line || [[ -n $line ]]; do
    # 注:read 前增加 IFS='' 的目的是让 read 命令不删除行首和行尾的空格。
    # 在while循环体中或循环体结束后,IFS还是以前的值(往往为空格),所以,
    # 我们不用担心IFS被修改了。这里假定是Bash,Bourne shell的行为可能不一样。
    # || [[ -n $line ]] 的目的是处理“最后一行行尾如果没有换行符”的情况
    echo "Text read $line"
done < filename
如果文件内容已经读取到了变量中,则可以使用下面代码一行一行遍历这个变量(这里不用再关心“最后一行行尾如果没有换行符”的情况了):
contents=`cat filename`

echo "$contents" | while IFS='' read -r line; do
    echo "found line [$line]"
done
参考:http://stackoverflow.com/questions/10929453/bash-scripting-read-file-line-by-line
12.7.2. 实例:打印每行指定列
假设有个文本如下:
I MM 933
A QQ 33
X EE 21
如何打印每行第 3 列?
while read first second last; do
    echo $last
done <file
12.8. 处理命令行参数
12.8.1. shift
shift [N]
The positional parameters from $N+1 ... are renamed to $1 ... If N is not given, it is assumed to be 1.
#!/bin/bash

fun1() {
    echo $1
    echo $2
    echo $3
    echo $4
}

fun2() {
    echo $1
    echo $2

    shift 2     #把位置参数全部前移了两个!如之前的$3变成为$1。

    echo $1
    echo $2
}

fun1 1 2 3 4    #output 1 2 3 4
fun2 1 2 3 4    #output 1 2 3 4
如:假设某个脚本能接收-a, -b, -c 为选项,且-b 后能带自己的参数。
下面的例子能处理这个脚本的参数。
while [[ $1 == -* ]]; do
    case $1 in
        -a ) process option -a ;;
        -b ) process option -b
             $2 is the option’s argument
             shift ;;
        -c ) process option -c ;;
        * ) print 'usage: this-script [-a] [-b barg] [-c] args ...'
            exit 1 ;;
    esac
    shift   #这样,每次while中就可以仅测试$1了。
done
normal processing of arguments ...
12.8.2. getopts
getopts 是 bash(或 ksh 等)内置的非常强大的参数处理工具。用它可轻易地实现一些复杂的功能,如-ac 和-a -c 仅是两种不同的写法。
其语法格式为: getopts optstring name [arg]
optstring 中如果某个字母后带冒号表示这个字母是带有参数的选项。
optstring 中如果第一个字母是冒号表示采用“安静的错误报告”方式。
下面例子和前面例子实现相似的功能。
while getopts ":ab:c" opt; do
    case $opt in
        a ) process option -a ;;
        b ) process option -b
            $OPTARG is the option’s argument
        c ) process option -c ;;
        \? ) print 'usage: this-script [-a] [-b barg] [-c] args ...'
            exit 1 ;;
    esac
done
shift $(($OPTIND - 1))
normal processing of arguments ...
getopts stores in the variable OPTIND the number of the next argument to be processed. 所以 shift $(($OPTIND - 1)) 的作用相当于把剩下的位置参数设置为从$1 开始。
说明:getopt 和 getopts 的区别
getopt 是独立的可执行程序;getopts 是 bash(或 ksh 等)内置的命令,用来代替 getopt。
13. Bash 的选项
13.1. 打开/关闭/查看选项
查看选项,用 set -o 即可,如:
$ set -o
allexport      	off
braceexpand    	on
emacs          	on
errexit        	off
errtrace       	off
functrace      	off
hashall        	on
histexpand     	on
history        	on
ignoreeof      	off
interactive-comments	on
keyword        	off
monitor        	on
noclobber      	off
noexec         	off
noglob         	off
nolog          	off
notify         	off
nounset        	off
onecmd         	off
physical       	off
pipefail       	off
posix          	off
privileged     	off
verbose        	off
vi             	off
xtrace         	off
打开和关闭选项:
$ set -o option-name        # 打开选项
$ set +o option-name        # 关闭选项,如 set +o emacs 可关闭 emacs 风格的行内编辑器
打开一个选项,还有好几种方法,总结如下:
方法 1:set -o option-name
例如:
#!/bin/bash
set -o verbose              # 设置这个选项,每个命令在执行前会先显示出来。
方法 2:set -option-abbrev
直接用 option 的缩写,比较简单,例如:
#!/bin/bash
set -v                       # 和前面的作用一样。
方法 3:运行脚本时指定(注意:它又有好几种形式)
bash -v script-file
bash -o verbose script-file
bash --verbose script-file
方法 4:在脚本第一行 #! 头中指定
#!/bin/bash -v
注意:要使方法 4 有效,必须给脚本赋予可执行权限后直接执行,如 $ ./1.sh ,而不能把脚本作为 bash 参数执行,如 bash 1.sh 这样执行是不会生效的。
13.2. 建议使用 set -euo pipefail
建议 bash 脚本中使用:
#!/usr/bin/env bash

set -euo pipefail
它是下面 3 个选项的缩写:
set -e                  # 等价于 set -o errexit,表示如果某命令(有例外情况,后面介绍)的 exit code 不是 0,就退出脚本
set -u                  # 等价于 set -o nounset,表示如果使用没有定义的变量会输出错误,并退出脚本
set -o pipefail         # 表示管道中只要一个子命令失败,整个管道命令就失败
后面分别介绍一下这 3 个选项。
13.2.1. set -e
set -e 表示如果某命令(有例外情况,后面介绍)的 exit code 不是 0,就退出脚本
#!/usr/bin/env bash

set -e

grep abc /non/existent/file   # 文件不存在,grep 失败,返回非 0,由于设置了 set -e,从而整个脚本会退出

echo "never output"           # 这一行不会执行了
需要注意的是,如果命令在 until,while,if,list constructs 这 4 种结构中,则就算命令返回非 0,也不会退出脚本。如:
#!/usr/bin/env bash

set -e

if grep abc /non/existent/file; then      # 这个命令在 if 中,所以命令返回非 0 也不会退出脚本
    echo "found it"
fi

echo "reach here"             # 这一行会执行
13.2.2. set -u
set -u 表示如果使用没有定义的变量会输出错误,并退出脚本,如:
#!/usr/bin/env bash

set -u

echo $XXX                     # XXX 是没有定义的变量,使用它会导致退出脚本

echo "never output"           # 这一行不会执行了
执行上面脚本,会输出:
line 5: XXX: unbound variable
13.2.3. set -o pipefail
set -o pipefail 表示管道中只要一个子命令失败,整个管道命令就失败。
下面是不设置 set -o pipefail 的例子:
$ grep abc /non/existent/file | sort
grep: /non/existent/file: No such file or directory
$ echo $?                                             # 这里返回的是 sort 的退出码,0
0
下面是设置 set -o pipefail 的例子:
$ set -o pipefail
$ grep abc /non/existent/file | sort
grep: /non/existent/file: No such file or directory
$ echo $?                                             # 子命令失败,管理就提早失败
2
13.3. shopt 设置选项
bash 中还有很多选项可通过命令 shopt 来控制。
查看所有可用 shopt 设置的选项的当前状态:
$ shopt
打开选项(以 extglob 为例):
$ shopt -s extglob
关闭选项(以 extglob 为例):
$ shopt -u extglob
详细列表参见:
http://www.gnu.org/software/bash/manual/html_node/The-Shopt-Builtin.html
13.3.1. extglob (扩展的模式匹配操作符)
If the extglob shell option is enabled using the shopt builtin, several extended pattern matching operators are recognized. In the following description, a pattern-list is a list of one or more patterns separated by a ‘|’. Composite patterns may be formed using one or more of the following sub-patterns:
| Extended Globbing | Meaning |
|---|---|
| ?(pattern-list) | Matches zero or one occurrence of the given patterns |
| *(pattern-list) | Matches zero or more occurrences of the given patterns |
| +(pattern-list) | Matches one or more occurrences of the given patterns |
| @(pattern-list) | Matches one of the given patterns |
| !(pattern-list) | Matches anything except one of the given patterns |
实例 1:
列出以“ab”或者“xyz”开头的 jpg 或者 png 文件:
$ ls +(ab|xyz)*+(.jpg|.png)               # 使用 extglob
$ ls ab*.jpg ab*.png xyz*.jpg xyz*.png    # 和上相同,没有使用 extglob
实例 2:
#!/bin/bash

shopt -s extglob
var1="abc";
var2="def|abc|123";

if [[ $var1 = @($var2) ]]; then
    echo "1";
else
    echo "2";
fi
上面脚本运行会输出 2,因为变量 var2 中“包含了”变量 var1。
13.3.1.1. 实例:删除特定文件
假设当前文件夹中有下面文件:
$ ls
file1.bak file1.log file1.pdf file1.tmp file1.txt file2.log file2.txt
我们想删除“file1.*”,但要保留 file1.txt 和 file1.pdf。用下面的 extglob 即可实现:
$ rm file1.!(txt|pdf)
$ ls
file1.pdf file1.txt file2.log file2.txt
14. Useful Examples
14.1. 检测指定路径下的程序是否正在运行
下面代码片断将检测程序“/home/user1/my_app”是否正在运行:
 1:     exe_dir=/home/user1
 2:     running=0
 3:     for pid in $(pgrep my_app); do
 4:         full_path=$(readlink /proc/$pid/exe)
 5:         # 如果 /home/user1/my_app 启动后,改文件被删除或者被更新,则
 6:         # readlink /proc/$pid/exe 的输出会以 ' (deleted)' 结尾
 7:         # 下面将通过 sed 将尾部的 ' (deleted)' 删除
 8:         full_path=$(echo $full_path |sed 's/ (deleted)$//')
 9:         if [[ $full_path == ${exe_dir}/my_app ]]; then
10:             running=1
11:         fi
12:     done
13:     if [[ $running -eq 1 ]]; then
14:         echo "/home/user1/my_app is running"
15:     fi
注:pgrep 仅会检测进程名字的“前 15 个字符”,所以当程序名字超过 15 个字符时上面代码会失效。比如你检测的程序是 “/home/user1/my_ap012345678901234”,那么上面代码的第 3 行 pgrep my_ap0123456789 是找不到相关进程的!要修复这个问题,可以改为 pgrep my_ap0123456789 (只留前 15 个字符)。
14.2. 检测某程序是否在 PATH 中
用下面脚本可检测程序是否在 PATH 中。
if command -v foo >/dev/null 2>&1; then
    echo "foo exists."
fi
Command command is POSIX compliant, see here for its specification: http://pubs.opengroup.org/onlinepubs/9699919799/utilities/command.html
参考:http://stackoverflow.com/questions/592620/how-to-check-if-a-program-exists-from-a-bash-script
14.3. 分析 CSV 格式文件
在 while 循环中用 read 命令可以分析 CSV 格式文件。
说明:通过 IFS 可以指定 CSV 文件的分隔符,如果指定 IFS 在 read 命令前(如下面例子所示),则 IFS 只会影响 read 命令,不会影响到后面的代码。
#! /bin/bash

while IFS=: read user pass uid gid full home shell
do
    echo -e "$full :\n\
 Pseudo : $user\n\
 UID :\t $uid\n\
 GID :\t $gid\n\
 Home :\t $home\n\
 Shell :\t $shell\n\n"
done < /etc/passwd
参考:
http://stackoverflow.com/questions/10929453/read-a-file-line-by-line-assigning-the-value-to-a-variable
http://ccm.net/faq/1757-how-to-read-a-linux-file-line-by-line
http://unix.stackexchange.com/questions/18922/in-while-ifs-read-why-does-ifs-have-no-effect
14.4. 删除除某些文件外的所有文件
如何删除当前目录中除 *.iso 和 *.zip 外的所有文件?
方法 1:
$ shopt -s extglob     # 确认开启 extglob 选项
$ rm !(*.iso|*.zip)
注意:如果没有开启(在 shopt -s 输出中找不到 extglob),则可用 shopt -s extglob 开启 extglob 选项!
方法 2:
$ export GLOBIGNORE=*.zip:*.iso
$ rm *
$ unset GLOBIGNORE
方法 3 (这个方法比较通用,zsh 等中也能使用):
$ find . -type f -not \( -name '*.zip' -or -name '*.iso' \) -delete
参考:http://www.linuxeden.com/html/softuse/20140606/152379.html
14.5. 求字符串长度
在 bash 中求字符串长度有如下几种方法:
${#string}
`expr length $string`
`expr "$string" : '.*'`
测试如下:
#!/bin/bash
stringZ=abcABC123ABCabc

echo ${#stringZ}                 # 15
echo `expr length $stringZ`      # 15
echo `expr "$stringZ" : '.*'`    # 15
14.6. 字符串转大小写
使用 tr 可以把字符串转换为小写:
$ echo "ABc" | tr '[:upper:]' '[:lower:]'     # Posix 兼容
abc
使用 awk 也可以把字符串转换为小写:
$ echo "ABc" | awk '{print tolower($0)}'      # Posix 兼容
abc
如果使用 bash 4.0+,则可以这样把字符串转换为小写:
$ a=ABc
$ echo "${a,,}"                               # 仅 bash 4.0+ 才工作
abc
14.7. 算术运算
有多种方式可以进行算术运算。
方法 1:利用 expr ,如
$ expr 3 + 4         # 算术运算操作符(如加号)前后要有空格
7
$ expr 3 \* 4        # 乘法要用转义符
12
$ expr 4 / 2
2
方法 2:利用 $(()) ,如:
$ echo $((3+4))
7
$ echo $((3*4))
12
方法 3:利用 $[] (这种方法已经 deprecated,不推荐使用),如:
$ echo $[3+4]
7
$ echo $[3*4]
12
方法 4:利用 let ,如:
$ let a=3+4; echo $a
7
$ let a=3*4; echo $a
12
方法 5:利用外部程序 bc ,如:
$ echo "scale=2; 15/4" | bc     # 要使bc进行浮点运算,用15/4.0的技巧是无效的,必须先设置scale!
3.75
注:前面 4 种方法不支持浮点数!
14.8. 清空文件内容
下面是清空文件内容的几种方法。
方法 1:删除它,再 touch 它。
$ rm file
$ touch file
方法 2:
$ echo -n >file
方法 3:
$ : >file
方法 4:
$ >file
14.9. 写入随机内容
如果你不关心文件的内容,只关心文件大小,则可以这样产生随机文件:
$ dd if=/dev/urandom of=file.txt bs=2048 count=10
如果你想得到的文件由有意义的单词组成,则可以这样产生随机文件:
$ ruby -e 'a=STDIN.readlines;X.times do;b=[];Y.times do; b << a[rand(a.size)].chomp end; puts b.join(" "); end' < /usr/share/dict/words > file.txt
运行上面命令时,请把 X 替换为总行数(如 10),Y替换每行的单词数(如 3)。
参考:http://www.skorks.com/2010/03/how-to-quickly-generate-a-large-file-on-the-command-line-with-linux/
14.10. 生成指定范围的随机数字
变量 $RANDOM 可以得到闭区间 [0, 32767] 内的随机数字,如:
echo $RANDOM # 闭区间 [0, 32767] 内的随机数字
如果要得到指定范围内的数字,可以这样:
MAX=90
MIN=10
echo $(($RANDOM%$(($MAX-$MIN+1)) + $MIN))       # 闭区间 [10, 90] 内的随机数字
此外,也可以使用外部程序生成指定范围的随机数,如:
$ shuf -n 1 -i $MIN-$MAX          # Linux 系统中,最小值和最大值之间是连字符
$ jot -r 1 $MIN $MAX              # Mac OS, BSD 系统中,最小值和最大值之间是空格
14.11. 实现进度条效果
下面脚本可实现进度条效果。其思想很简单:每次更新输出时不换行,而是利用 \r 更新当前行。
#!/bin/bash
b=''
i=0
while [ $i -le  100 ]
do
    printf "progress:[%-50s]%d%%\r" $b $i
    sleep 0.1
    i=`expr 2 + $i`
    b=#$b
done
echo
14.12. 并行执行任务(推荐 xargs -P num)
利用 xargs 的 -P num 选项(指定最大并行数),可以并行地执行任务,具备简单的“线程池”功能。
第一步,把要执行的任务写入到一个文件(如 commands.txt)中,每行一个任务。
$ cat commands.txt
sleep 2; echo Hello world
sleep 2; echo Goodbye world
sleep 2; echo Goodbye cruel world
sleep 2; echo Goodbye cruel world world
第二步,执行下面语句(下面例子中,同时有 3 个任务在执行)。
$ cat commands.txt | xargs -I CMD -P 3 bash -c CMD # 当commands.txt比较复杂时可能出错
上面实例程序的一个可能输出(注:结果会乱序,且由于是并行执行的,多次运行的结果会不一样):
Goodbye world
Goodbye cruel world
Hello world
Goodbye cruel world world
特别说明:如果文件 commands.txt 中的命令包含单引号,且单引号意义重大(不可省略)。比如:
sleep 2; echo Hello world
sleep 2; echo Goodbye world
sleep 2; echo Goodbye cruel world
sleep 2; awk 'BEGIN {print "Goodbye cruel world world"}'
这时,需要用下面方式(重点是 -0 选项)并行执行任务:
$ cat commands.txt | tr '\n' '\0' | xargs -0 -I CMD -P 3 bash -c CMD # 正确用法
参考:
Easy parallelization with Bash in Linux
Make xargs execute the command once for each line of input
14.13. Co-processes
co-processes are a ksh feature (already in ksh88). zsh has had the feature from the start (early 90s), while it has just only been added to bash in 4.0 (2009).
参考:http://unix.stackexchange.com/questions/86270/how-do-you-use-the-command-coproc-in-bash
14.13.1. ksh co-processes 例子
先准备一个程序 to_upper.ksh,内容如下:
$ cat to_upper.ksh
#!/bin/ksh

typeset -u arg

while [ 1 ]
do
  read arg
  print $arg
done
$ chmod u+x to_upper.ksh
下面是在 ksh 中使用 co-processes 的例子:
$ ./to_upper.ksh |&           # In ksh, |& start a coprocess with a 2-way pipe to it
[1]     16145
$ print -p abcd
$ read -p line
$ echo $line
ABCD
$ print -p xyz
$ read -p line
$ echo $line
XYZ
参考:http://www.livefirelabs.com/unix_tip_trick_shell_script/feb_2004/02092004.htm
不用 co-processes,用“有名管道”也可以实现同样的功能,如下面例子在 bash 中也可以运行:
$ ./to_upper.ksh <in >out &
[2] 27462
$ exec 3> in 4< out
$ echo abcd >&3
$ read line <&4
$ echo $line
ABCD
$ echo xyz >&3
$ read line <&4
$ echo $line
XYZ
14.14. 获取 CPU 核数
有很多方法可以获取 CPU 核数,但没有一种方法是可移植的。
# 不同系统中,获取CPU核数的方法不同

Linux:
    1) getconf _NPROCESSORS_ONLN
    2) grep -c process /proc/cpuinfo

Solaris:
    1) psrinfo -p

OS X:
    1) getconf _NPROCESSORS_ONLN
    2) sysctl hw.ncpu

NetBSD:
    1) grep -c process /proc/cpuinfo
    2) sysctl hw.ncpu

OpenBSD:
    1) sysctl hw.ncpu

FreeBSD:
    1) sysctl hw.ncpu
14.15. 获取操作系统类型
如果在脚本中获取操作系统的类型呢?
在 Bash 中,可以通过测试变量 $OSTYPE 来得到操作系统的类型,但这种方法不通用,如在 ksh 中就不适应。
通用的可移植方法是测试命令 uname -s 的输出。
如:
if [ "$(uname -s)" = "Linux" ]; then
    echo "This is Linux"
fi
参考:
https://en.wikipedia.org/wiki/Uname
http://stackoverflow.com/questions/3466166/how-to-check-if-running-in-cygwin-mac-or-linux
14.16. 获取脚本所在目录的全路径
下面代码可获取脚本所在目录的全路径:
#!/bin/bash
DIR="$( cd "$(dirname "${BASH_SOURCE[0]}")" >/dev/null 2>&1 && pwd -P)" # 仅适应于 bash
不过上面脚本,仅在 Bash 下工作(因为变量 BASH_SOURCE 仅在 Bash 中存在)。
如果想在其它 Shell 中也工作,可以把 ${BASH_SOURCE[0]} 换为 $0 (不过这有缺点,后面会介绍),如:
DIR="$( cd "$(dirname "$0")" >/dev/null 2>&1 && pwd -P)" # 在 bash 下用 source 执行时有问题
注意,在 Bash 下如果用 source 命令来执行脚本(如 source /1.sh 或者 . /1.sh ),那么在 1.sh 中打印 $0 会输出 bash,而不是 1.sh。这会导致上面的方案在脚本用 source 执行的情况下工作不正常。
所以,没有一种 POSIX 兼容的方式能完美地“获取脚本所在目录的全路径”。如果你的脚本不会用 source 来执行,那么使用 $0 ;如果你的脚本仅在 Bash 下执行,那么使用 ${BASH_SOURCE[0]} 。
参考:
https://stackoverflow.com/questions/29832037/how-to-get-script-directory-in-posix-sh
https://stackoverflow.com/questions/59895/how-to-get-the-source-directory-of-a-bash-script-from-within-the-script-itself
14.17. 相对路径转为绝对路径
下面函数可以把相对路径转为绝对路径:
## 注:被测试的文件必须存在,否则下面的 cd 命令可能失败,导致错误结果
absolute_path() {
    fn=$1
    case "$fn" in
        # check $file_path if starts with /
        /*) fn_dirname=$(dirname "$fn") ;;
        *) fn_dirname=$(dirname "${PWD}/$fn") ;;
    esac
    fn_basename=$(basename "${PWD}/$fn")
    fn_absolute="$(cd "$fn_dirname"; pwd)/$fn_basename"
    ## If your want to resolve symbolic link, add -P (posix compatible) for pwd.
    # fn_absolute="$(cd "$fn_dirname"; pwd -P)/$fn_basename"
    echo "$fn_absolute"
}

file_name="path/to/your/file"

file_name_abs="$(absolute_path "$file_name")"
echo "$file_name_abs"
14.18. 捕获正则表达式中的 group
在 Shell 中如何捕获正则表达式中的 group 呢?使用 Shell 内置的正则不是很方便,下面介绍在 Shell 中使用 perl 来实现这个功能:
connection_string='mysql://root:123456@127.0.0.1:3306/db1'

host=$(echo $connection_string | perl -ne '/mysql:\/\/([a-zA-Z0-9]+):([^@]+)@([a-zA-Z0-9.]+):([0-9]+)\/([a-zA-Z0-9_-]+)/ and print $3')
port=$(echo $connection_string | perl -ne '/mysql:\/\/([a-zA-Z0-9]+):([^@]+)@([a-zA-Z0-9.]+):([0-9]+)\/([a-zA-Z0-9_-]+)/ and print $4')
user=$(echo $connection_string | perl -ne '/mysql:\/\/([a-zA-Z0-9]+):([^@]+)@([a-zA-Z0-9.]+):([0-9]+)\/([a-zA-Z0-9_-]+)/ and print $1')
password=$(echo $connection_string | perl -ne '/mysql:\/\/([a-zA-Z0-9]+):([^@]+)@([a-zA-Z0-9.]+):([0-9]+)\/([a-zA-Z0-9_-]+)/ and print $2')
database=$(echo $connection_string | perl -ne '/mysql:\/\/([a-zA-Z0-9]+):([^@]+)@([a-zA-Z0-9.]+):([0-9]+)\/([a-zA-Z0-9_-]+)/ and print $5')

statement='select * from test'
mysql --connect-timeout=5 --host=$host --port=$port --user=$user --password=$password --database=$database --execute="$statement"
14.19. 退出脚本时杀死子进程
如何在退出脚本时杀死子进程?
方法一:记录子进程 PID,退出时杀死子进程:
./subprocess.sh &
child_pid=$?
trap 'kill $child_pid' EXIT
方法二:利用 jobs -p 找到所有子进程,退出时杀死所有的子进程:
trap 'kill $(jobs -p)' EXIT
15. Tips & Tricks
15.1. Bash Pitfalls
总结了 40 多条日常 Bash 编程中,老手和新手都容易忽略的错误编程习惯。
参考:
http://mywiki.wooledge.org/BashPitfalls
http://kodango.com/bash-pitfalls-part-1
15.2. 自动补全
参考:
编写 Bash 补全脚本:http://kodango.com/bash-competion-programming
Linux 中 10 个有用的命令行补齐命令,英文原版:http://www.thegeekstuff.com/2013/12/bash-completion-complete/
An introduction to bash completion: http://www.debian-administration.org/article/317/An_introduction_to_bash_completion_part_2
15.2.1. compgen 和 complete
Bash 内置了两个补全命令: compgen 和 complete 。
compgen 根据不同的参数,生成匹配单词的候选补全列表( -W 指定完整的补全单词列表),例如:
$ compgen -W 'a1 a12 a123 b1 b12' -- a        # 输出单词列表中和前缀a匹配的单词
a1
a12
a123
$ compgen -W 'a1 a12 a123 b1 b12' -- a12      # 输出单词列表中和前缀a12匹配的单词
a12
a123
$ compgen -W 'a1 a12 a123 b1 b12' -- b        # 输出单词列表中和前缀b匹配的单词
b1
b12
complete 的作用是说明命令如何进行补全。它也可以使用 -W 参数指定候选的单词列表,如:
$ complete -W 'a1 a12 a123 b1 b12' tool1   # -W指定了使用<Tab>对tool1进行补全时的单词列表
$ tool1 a1<Tab>
a1    a12   a123
$ tool1 a12<Tab>
a12   a123
还可以通过 complete 的 -F 参数指定一个补全函数:
$ complete -F _tool1 tool1
这样,在键入 tool1 命令后,会调用_tool1 函数来生成补全的列表,完成补全的功能。
15.2.2. 实例:补全命令行选项
下面将介绍如何实现“补全命令行选项”的功能。
其基本步骤是把想要补全的“命令行选项”放入内置变量 COMPREPLY 中:
function _foo() {
    local cur prev opts

    COMPREPLY=()                             # COMPREPLY是内置变量,表示候选的补全结果,这里把它清空

    cur="${COMP_WORDS[COMP_CWORD]}"          # 当前输入单词。COMP_WORDS和COMP_CWORD是内置变量
    prev="${COMP_WORDS[COMP_CWORD-1]}"       # 上一个输入单词,这里暂时没用

    opts="--log -h --help -f --file -o --output"   # 这是你想要补全的命令行选项

    if [[ ${cur} == -* ]] ; then
        COMPREPLY=( $(compgen -W "${opts}" -- ${cur}) )
        return 0
    fi
}
complete -F _foo foo                         # 通过 -F 参数指定foo的补全函数为_foo
下面是“补全命令行选项”的测试:
$ foo -<Tab>                 # 输入“foo -”后按Tab键会出现选项补全提示
--file    --help    --log     --output  -f        -h        -o
现在看一个更复杂的例子,补全 --log 选项的参数为“warn/info/debug”:
function _foo() {
    local cur prev opts

    COMPREPLY=()

    cur="${COMP_WORDS[COMP_CWORD]}"
    prev="${COMP_WORDS[COMP_CWORD-1]}"       # 上一个输入单词

    opts="--log -h --help -f --file -o --output"

    case "${prev}" in
        --log)
            COMPREPLY=( $(compgen -o filenames -W "warn info debug" -- ${cur}) )  # compgen的-W参数指定了候选项
            ;;
    esac

    if [[ ${cur} == -* ]] ; then
        COMPREPLY=( $(compgen -W "${opts}" -- ${cur}) )
        return 0
    fi
}
complete -F _foo foo
下面是相关测试:
$ foo --log<Tab>
debug  info   warn
15.2.3. 实例:补全目录或指定后缀的文件
假设你开发了一个工具,它能把 txt 文件转换为 html 文件,工具名为 txt2html。你想定制 txt2html 的 tab 键自动补全功能,让其只补全目录或带有.txt 后缀的文件。执行一次下面命令即可:
complete -f -o plusdirs -X '!*.txt' txt2html # 为下次使用方便,可放入~/.bashrc中
如果你想补全目录或带有.txt 或.text 后缀的文件,可以执行下面命令:
complete -f -o plusdirs -X '!*.@(txt|text)' txt2html # 为下次使用方便,可放入~/.bashrc中
15.3. 使用$()而不是``进行“命令替换”
$() 和 `` 的作用一样,用来作 Command substitution(命令替换,其功能是把命令的 stdout 放到当前位置)。但 `` 是“过时的”用法,它有很多缺点(可参考:http://mywiki.wooledge.org/BashFAQ/082 ),所以请使用 $() 语法。
命令替换使用实例:
$ ls
file1.txt file2.txt file3.txt
$ files=$(ls *.txt)             # 也可以写为(过时的用法) files=`ls *.txt` ,变量files的内容为命令ls *.txt的输出
$ echo $files
file1.txt file2.txt file3.txt
需要说明的是:命令替换(即 $() 或 `` )是在 sub-shell 中执行,它们不能修改父 shell 中的变量,如:
a=100

func1() {
    a=200
    echo "ok"
}

x=$(func1)            # 这样调用 func1,并不会修改 a。因为它在 sub-shell 中执行
echo $a               # 输出 100

func1                 # 这样调用 func1,会修改 a
echo $a               # 输出 200
15.4. $(()) 与 $() 还有 ${} 的区别
$(()) 用来作整数运算( $[] 也可以用作整数运行,但已经过时,不推荐使用),称为 Arithmetic expansion。
$() 和 `` 的作用一样(用法 `` 已经过时,不推荐使用),用来作 Command substitution(命令替换)。
${} 用来引用变量,用来作 Parameter expansion(变量替换)。
15.5. ()和{}的区别
可以把一组命令放入()或{}中执行,含义不相同。
() 会启动一个子进程(subshell),不会对父进程的环境变量造成影响。
{} 在同一个进程中运行,它相当于“匿名函数”。
a=123
( a=321 )
echo "a = $a"   # output: a = 123

b=123
{ b=321; }
#      ^
echo "b = $b"    # output: b = 321
注意:{}中的最后一个命令后面必须有分号或换行符,否则会报语法错误。
参考:http://www.gnu.org/software/bash/manual/bashref.html#Command-Grouping
15.6. 临时禁用 alias
在需要执行的命令前面加个反斜杠字符即可,如禁用 ls 的 alias: \ls
15.7. read -a 和 readarray 的区别
read -a 和 readarray (mapfile)的区别
read -a
把输入内容按分隔符(空格或者跳格之类)分配给数组,连续的空格也算为 1 个分割。
readarray (mapfile)
把输入内容按行分配给数组。
15.8. 更新当前行和之前行的内容(echo -e "\033[nA")
如果要更新当前行的内容,可以使用 echo -e "\r" 回到当前行的行首,再输出内容。
$ echo -n "Old line"; sleep 2; echo -e "\rThis new line"
执行上面命令时,会输出:
Old line
过 2 秒后,上面的输出会更新为:
This new line
如果要更新之前行的内容,可以使用 echo -e "\033[nA" (它表示向上移动光标 n 行)。如:
$ echo -e "line1 ...\nline2 ..."; sleep 2; echo -en "\033[2A"; echo "line1 ... done"; echo "line2 ... done"  # 输出两行后,再更新它。推荐用法
$ echo -e "line1 ...\nline2 ..."; sleep 2; echo -en "\e[2A"; echo "line1 ... done"; echo "line2 ... done"    # 和上相同。但有些版本的echo不支持\e,不推荐
$ echo -e "line1 ...\nline2 ..."; sleep 2; tput cuu 2; echo "line1 ... done"; echo "line2 ... done"          # 和上相同。
执行上面命令时,会输出:
line1 ...
line2 ...
过 2 秒后,上面的输出会更新为:
line1 ... done
line2 ... done
参考:
https://en.wikipedia.org/wiki/Escape_character#ASCII_escape_character
man 5 terminfo
man tput
15.9. 测试交互式和非交互式 shell
如何测试交互式和非交互式 shell?
方法 1:
测试 $PS1 变量。
方法 2:
可以通过打印 $- 变量的值(代表着当前 shell 的选项标志),查看其中的“i”选项(表示 interactive shell)来区分交互式与非交互式 shell。
15.10. 输入上个命令的最后参数
bash 中,如何输入上个命令的最后参数?
有 3 个方法:
!$
$_
Alt + .(或者<Esc> .)
注:
最后 1 个方法最好用,因为它可以在运行前直观地看到将会运行什么,有机会修改它再运行。
在 tcsh 中仅方法 1 可用。
15.11. bashdb (bash 调试器)
bashdb 是一个 bash 调试器。
在 Debian 系列的操作系统中,可以这样安装:
sudo apt-get install bashdb
Learning the bash Shell 一书中介绍了一种实现 bash debugger 的方法,通过 bash 的 trap 接口实现的。
参考:
http://bashdb.sourceforge.net/
http://blog.csdn.net/yfkiss/article/details/8636758
15.12. 只检查语法而不执行 (-n 选项)
用 -n 选项可以只检查语法而不执行。bash 和 ksh 都支持。
bash -n 1.sh
ksh -n 1.sh
为什么是 -n ,因为它对应的 set -o 为 noexec,noexec 的第一个字母为 n
15.13. 显示执行的命令 (-x 选项)
要显示脚本中所执行的命令,可以在脚本中设置 set -x ,如:
#!/bin/bash

set -x         # bash
set -o xtrace  # 同上,这种写法POSIX兼容

# other command
也可以使用 -x 选项执行脚本,如 bash -x script.sh 。
15.14. 用 shellcheck 检测语法
用工具 shellcheck 可以检测 Shell 脚本中的一些不好用法。
在 Debian 系列系统中,可以用下面方法安装 shellcheck:
$ apt-get install shellcheck
15.15. 改变当前用户的登录 shell (chsh)
直接执行 chsh 会提示输入密码,输入密码后再输入想要设置的 shell 的全路径即可。
所有可用的 shell 可通过命令 cat /etc/shells 得到。
注:由于更改 shell 需要更大的权限,所以文件 /usr/bin/chsh 的 owner 会为 root,它的 setuid 或 setgid 位被置上。只有这样才能“使程序以 owner 的权限运行(即其 effective UID 为 root)”。
15.16. 编写移植性更好的脚本
推荐使用
#!/usr/bin/env bash
而不是
#!/bin/bash
说明:一般来说,/usr/bin/env 在“所有”系统上都存在。
16. 其它 Shell
16.1. KornShell
ksh 88 是商业软件,不开源。ksh 93于 2000 年已经开源,使用 EPL(Eclipse Public License)协议!
16.1.1. ksh 兼容性注意事项
16.1.1.1. 数组定义方式
PD KSH 中不支持下面方式定义数组:
array_name=( "XXX" "YYY" "ZZZ" )
下面的形式兼容性更好:
array_name[0]="XXX"
array_name[1]="YYY"
array_name[2]="ZZZ"
16.1.1.2. for 循环形式
不要使用类似 C 语言形式的 for 循环
for (( [ expr1 ] ; [ expr2 ] ; [ expr3 ] )) ;do ... ;done
PD KSH 不支持!
推荐使用下面的形式:
for vname in [ list ] ;do ... ;done
16.1.2. set -A 和 typeset -a
set -A 和 typeset -a 用法有点不同。
#!/bin/ksh
set -A array1 a b c d e f g
typeset -a array2=(a b c d e f g)  #和上条语句作用一样。

# 不要写为下面形式
#set -A array1=(a b c d e f g)     #语法错误。
#typeset -a array2 a b c d e f g   #声明了8个数组,并非所要。

echo ${array1[0]};  #输出a
echo ${array1[1]};  #输出b
echo ${array2[0]};  #输出a
echo ${array2[1]};  #输出b
说明:bash 中不支持 set -A 方式定义数组。
16.2. csh(tcsh)
Top Ten Reasons not to use the C shell
http://www.grymoire.com/Unix/CshTop10.txt
Some differences between BASH and TCSH
http://web.fe.up.pt/~jmcruz/etc/unix/sh-vs-csh.html
16.3. zsh
Zsh is an extended Bourne shell with a large number of improvements, including some features of bash, ksh, and tcsh.
参考:
使用 zsh 的九个理由:http://lostjs.com/2012/09/27/zsh/
24 Outstanding ZSH Gems:http://www.refining-linux.org/categories/13/Advent-calendar-2011/
zsh 入门:http://wiki.gentoo.org/wiki/Zsh/HOWTO
16.3.1. array 用法和 bash 中的区别
下面代码中 bash 中可运行,但 zsh 中不能运行。
typeset -a array=(a b c)
在 zsh 中应该写成两行。
typeset -a array
array=(a b c)
http://zshwiki.org/home/scripting/array
注意: zsh 中数组的第一个元素下标为 1。要使第一个元素下标从 0 开始可以通过 setopt KSH_ARRAYS 或者 setopt KSH_ZERO_SUBSCRIPT
16.3.1.1. setopt SH_WORD_SPLIT
考虑下面例子:
str="one two three"
arr=(${str})
echo ${arr[0]}
echo ${arr[1]}
echo ${arr[2]}
在 bash 中,会输出:
one
two
three
但在 zsh(设置了 setopt KSH_ARRAYS),会输出:
one two three
[blank line]
[blank line]
想要和 bash 中输出一样,应该在 zsh 中设置下面选项:
setopt SH_WORD_SPLIT
16.3.2. PATH 中~无效
如果我们想把用户 HOME 目录下 bin 子目录也加入到 PATH 中,可能这样写:
$ export PATH="$PATH:~/bin" # zsh 中符号 ~ 不会被展开,bash 中可以展开
假设设置完后, PATH 环境变量为:
$ echo $PATH
/usr/local/sbin:/usr/local/bin:/usr/sbin:/usr/bin:/sbin:/bin:~/bin
上面 PATH 环境变量中最后一部分 ~/bin 在 zsh 中是不会生效的,也就是说这种情况下 zsh 不会去寻找用户 HOME 目录下 bin 子目录中的可执行程序。
注:这个问题, bash 中不存在,即相同的设置下, bash 会去寻找用户 HOME 目录下 bin 子目录中的可执行程序。
为了避免这样的问题,建议直接使用 ${HOME} 代替 ~ ,即使用:
$ export PATH="$PATH:${HOME}/bin" # zsh 和 bash 中都生效
16.3.3. Tips & Tricks
16.3.3.1. 设置 M-DEL 停止在/处
把下面几行加入到.zshrc 中
# M-DEL should stop at / in zsh
# Refer to http://chneukirchen.org/dotfiles/.zshrc
WORDCHARS="*?_-.[]~&;$%^+"
_backward_kill_default_word() {
  WORDCHARS='*?_-.[]~=/&;!#$%^(){}<>' zle backward-kill-word
}
zle -N backward-kill-default-word _backward_kill_default_word
bindkey '\e=' backward-kill-default-word   # = is next to backspace
16.3.3.2. 设置 M-m 依次输入上个命令的各个参数
You probably know M-. to insert the last argument of the previous line. Sometimes, you want to insert a different argument. There are a few options: Use history expansion, e.g.!:-2 for the third word on the line before (use TAB to expand it if you are not sure), or use M-. with a prefix argument: M-2 M-.
Much nicer however is:
autoload -Uz copy-earlier-word
zle -N copy-earlier-word
bindkey "^[m" copy-earlier-word
Then, M-m will copy the last word of the current line, then the second last word, etc. But with M-. you can go back in lines too! Thus:
$ echo a b c
$ echo 1 2 3
$ echo <M-.><M-.><M-m>
$ echo b
Man, I wish I knew that earlier!
参考:http://chneukirchen.org/blog/archive/2013/03/10-fresh-zsh-tricks-you-may-not-know.html