Swift
Table of Contents
- 1. Swift
- 2. Swift 基本介绍
- 3. 基本数据类型
- 4. 组合数据类型
- 5. 操作符
- 6. 流程控制
- 7. 函数
- 8. Closures
- 9. 枚举
- 10. 结构体和类
- 11. 初始化(Initialization)
- 12. 协议(Protocol)
- 13. 扩展(Extension)
- 14. 错误处理
- 15. 类型转换(Type Casting)
- 16. Automatic Reference Counting (ARC)
- 17. Access Control
1. Swift
Swift 是苹果公司于 2014 年发布的编程语言。
参考:
The Swift Programming Language, LANGUAGE GUIDE
https://www.tutorialspoint.com/swift/swift_quick_guide.htm
1.1. Swift 历史版本
Swift 历史版本如表 1 所示。
| Date | Version |
|---|---|
| 2014-09-09 | Swift 1.0 |
| 2014-10-22 | Swift 1.1 |
| 2015-04-08 | Swift 1.2 |
| 2015-09-21 | Swift 2.0 |
| 2016-09-13 | Swift 3.0 |
| 2017-09-19 | Swift 4.0 |
| 2018-03-29 | Swift 4.1 |
| 2018-09-17 | Swift 4.2 |
| 2019-03-25 | Swift 5.0 |
| 2019-09-10 | Swift 5.1 |
| 2020-03-24 | Swift 5.2 |
| 2020-09-16 | Swift 5.3 |
| 2021-04-26 | Swift 5.4 |
1.2. Hello World
下面是 Swift 版本的 Hello World 程序:
print("Hello World!")
测试运行如下(假设文件名为 hello.swift):
$ swift hello.swift
Hello World!
使用 swiftc 可以把源码编译为可执行程序,再执行,如:
$ swiftc hello.swift -o hello
$ ./hello
Hello World!
2. Swift 基本介绍
2.1. 变量(var)和常量(let)
关键字 var 用于定义变量,而关键字 let 用于定义常量。
let maximumNumberOfLoginAttempts = 10     // 常量
var currentLoginAttempt = 0               // 变量
一般地,编译器可以推导出常量或常量的类型,所以往往你可以不显式地指定类型,也可以显式地指定类型,如:
let implicitInteger = 70           // 会推导出常量类型为Int
let implicitDouble = 70.0          // 会推导出常量类型为Double
let explicitDouble: Double = 70    // 明确指定类型为Double
2.2. 注释
Swift 采用了类似 C 语言的注释。块注释以 /* 开始, */ 结束;行注释以 // 开始。
2.3. 分号
Swift 不要求每个语句结尾都有分号,只有当一行有多个语句时才要求用分号分隔它们。
3. 基本数据类型
3.1. 数字类型
Swift 有下面数字类型:
Int8
UInt8
Int16
UInt16
Int32
UInt32
Int64
UInt64
Float
Double
3.2. Booleans 类型(Bool)
布尔类型用关键字 Bool 表示,它有两个字面量: true 和 false 。
3.3. Tuples 类型
Tuples 类型用于组合多个成分,它用 () 表示,各个成分之间用 , 分开,如:
let http404Error = (404, "Not Found")          // http404Error的类型为 (Int, String)

let (statusCode, statusMessage) = http404Error
print(statusCode)                              // 输出 404
print(statusMessage)                           // 输出 Not Found
如果不关心 Tuple 的某个成分,可以用 _ 表示,如:
let http404Error = (404, "Not Found")

let (justTheStatusCode, _) = http404Error
可以使用从零开始的索引来访问 Tuple 的成分,如:
let http404Error = (404, "Not Found")

print(http404Error.0)                           // 输出 404
print(http404Error.1)                           // 输出 Not Found
也可以对 Tuple 的成分进行命名,如:
let http404Error = (statusCode: 404, description: "Not Found")

print(http404Error.statusCode)                  // 输出 404
print(http404Error.description)                 // 输出 Not Found
3.3.1. Tuples 类型支持比较操作
可以使用“比较操作符”对 Tuples 类型变量进行测试,如:
(1, "zebra") < (2, "apple")   // true because 1 is less than 2; "zebra" and "apple" are not compared
(3, "apple") < (3, "bird")    // true because 3 is equal to 3, and "apple" is less than "bird"
(4, "dog") == (4, "dog")      // true because 4 is equal to 4, and "dog" is equal to "dog"
注意,如果有 Tuples 分成不支持比较,则不能进行 Tuples 类型的比较,如:
("blue", false) < ("purple", true) // Error because < can't compare Boolean values
3.4. Optionals 类型 (?)
Optional 类型的变量表达了两个可能:它可能包含某个类型的值,可能不包含任何值(即 nil)。
在类型后面加一个 ? 表示相应的 Optional 类型, 如:
var perhapsInt: Int?          // perhapsInt可能包含Int类型的值,也可能不包含任何值
var perhapsStr: String?       // perhapsStr可能包含String类型的值,也可能不包含任何值
通过测试其值是否等于 nil 可以检测 Optional 变量是否处于“不包含任何值”的状态,如:
 1: var myString: String?
 2:
 3: if myString != nil {
 4:    print(myString)
 5: } else {
 6:    print("myString has nil value")       // 会执行这一行,输出 myString has nil value
 7: }
 8:
 9: myString = "abcd";
10:
11: if myString != nil {
12:    print(myString)                       // 会执行这一行,输出 Optional("abcd")
13: } else {
14:    print("myString has nil value")
15: }
需要说明的是,上面代码中第 12 行输出的是 Optional("abcd"),而不是字符串"abcd"。想要获得 Optional 类型变量所包含的具体值,你需要对其进行 Unwrap 操作,详情请看下节内容。
3.4.1. Unwrapping (!)
要获得 Optional 类型变量所包含的具体值,你需要对其进行 Unwrap 操作,具体来说就是在使用变量时在其后面加一个感叹号 ! ,比如 myString! 即可获得 Optional 类型变量 myString 所包含的具体值:
var myString: String?

myString = "abcd";

if myString != nil {
   print(myString)                       // 输出 Optional("abcd")
   print(myString!)                      // 输出 abcd
} else {
   print("myString has nil value")
}
3.4.2. Implicitly Unwrapped Optional
我们知道,要获得 Optional 类型变量所包含的具体值,需要显式地进行 Unwrap 操作(即在变量后面加个 ! 符号),如:
let possibleString: String? = "An optional string."
let forcedString: String = possibleString!          // 需要一个感叹号,不方便
print(forcedString)
如果在声明 Optional 变量时,不使用 ? ,而使用 ! ,则表示它是一个 Implicitly Unwrapped Optional,当它赋值给其它变量时,不用再进行显式地 Unwrap 操作了,它会自动进行 Unwrap。 这样,使用更加方便:
let assumedString: String! = "An implicitly unwrapped optional string."
let implicitString: String = assumedString          // 不再需要一个额外的感叹号了,方便多了!
print(implicitString)
3.4.3. Optional Binding
“Optional Binding”是指下面语法:
if let constantName = someOptional {      // Optional Binding
   statements
}
它的作用是:测试 someOptional 是否包含某个类型的值,如果包含则把这个类型的值赋给另一个变量(或常量)。
下面是“Optional Binding”的例子:
var myString:String? = "Hello, Swift 4!"

if let yourString = myString {      // 注:不能写为 `myString!` 即无需Unwrap操作(不用感叹号)
   print(yourString)                // 输出 Hello, Swift 4!
} else {
   print("Your string does not have a value")
}
3.4.4. Optional Chaining
设 a 是 Optional ,代码 a?.uppercased() 表示 Optional Chaining,它的意思是当 a 为 nil 时直接返回 nil(不调用后面的 uppercased 了);当 a 为 String 时,调用后面的 uppercased:
func f1() -> String? {
    let a: String? = nil

    return a?.uppercased()  // 如果 a 是 nil,则 f1 返回 nil;如果 a 是 String,则 f1 返回其大写形式
}
参考:https://docs.swift.org/swift-book/LanguageGuide/OptionalChaining.html
3.5. Strings 和 Characters
3.5.1. 字符串常量
字符串常量用双引号引起来,如:
let someString:String = "Some string literal value"
“三引号”可以表示“多行字符串”(换行符会被保留),如:
let quotation = """
The White Rabbit put on his spectacles.  "Where shall I begin,
please your Majesty?" he asked.

"Begin at the beginning," the King said gravely, "and go on
till you come to the end; then stop."
"""

print(quotation)
需要说明的“开三引号”的后面不能马上接字符串内容,而是要换行后再写字符串内容;同样地,“闭三引号”不能直接写在字符串最后面,而是要换行后再写“闭三引号”。也就是下面是不正确的用法:
let quotation = """The White Rabbit put on his spectacles.  "Where shall I begin,
please your Majesty?" he asked.

"Begin at the beginning," the King said gravely, "and go on
till you come to the end; then stop.""""                     // 这是不正确的用法

print(quotation)
“闭三引号”前的空格会被忽略,如上面例子也可以写为:
let quotation = """
    The White Rabbit put on his spectacles.  "Where shall I begin,
    please your Majesty?" he asked.

    "Begin at the beginning," the King said gravely, "and go on
    till you come to the end; then stop."
    """

print(quotation)
3.5.2. 字符
字符也用双引号包围,如:
let c:Character = "a"

print(c)
let c:Character = "a"

var s = "abc"
s.append(c);          // 方法append可以在“字符串”后增加“字符”

print(c)
print(s)
3.5.3. String Interpolation
String Interpolation 是构造新字符串的一种方式,用 \() 表示,如:
let apples = 3
let oranges = 5

let appleSummary = "I have \(apples) apples."
let fruitSummary = "I have \(apples + oranges) pieces of fruit."

print(appleSummary)    // I have 3 apples.
print(fruitSummary)    // I have 8 pieces of fruit.
3.6. 类型别名(typealias)
使用关键字 typealias 可以给已存在的类型取一个新名字,如:
typealias Feet = Int       // Feet是Int的别名
var distance: Feet = 100
print(distance)            // 输出 100
4. 组合数据类型
4.1. Array
数组用 [] 表示,下面是数组使用的一些例子:
var someInts: [Int] = [10, 20, 40]                 // 定义数组

print(someInts[0])                                 // 通过下标访问数组元素
print(someInts[1])                                 // 通过下标访问数组元素
print(someInts[2])                                 // 通过下标访问数组元素

print(someInts.count)                              // 数组元素个数保存在count属性中

for item in someInts {                             // 遍历数组
    print(item)
}

for (index, item) in someInts.enumerated() {       // 用enumerated()遍历数组,可得到下标
    print("Value at index = \(index) is \(item)")
}

var a: [String] = []

if a.isEmpty {                                     // 数组为空时,isEmpty属性为true
    print("Array a is empty.")
}

a.append("abc")                                    // 使用append可以在数组尾部增加元素
a += ["def", "xyz"]                                // 使用 += 也可以在数组尾部增加元素

a.insert("ijk", at: 0)                             // 使用insert可在指定位置插入元素
a.remove(at: 1)                                    // 使用remove可删除指定位置的元素

for item in a {
    print(item)
}
4.2. Set
Set 由无序元素组成,且没有相同的元素。
4.2.1. 创建集合
使用 Set<SomeType> 可以初始化集合,如:
var s = Set<String>()

s.insert("abc")
s.insert("edf")

print(s)                  // ["abc", "edf"]
4.2.1.1. 用数组字面量创建集合
可以使用数组字面量创建集合,如:
var favoriteGenres: Set<String> = ["Rock", "Classical", "Hip hop"]
var favoriteGenres: Set = ["Rock", "Classical", "Hip hop"]          // 同上
4.2.2. 访问和修改集合
下面是访问和修改集合的例子:
var someSet: Set = ["x", "y", "z"]

// "count" method can be used to show the number of elements in the set.
someSet.count           // the number of elements

// "insert" method can be used to insert values in set.
someSet.insert("c")     // adds the element to Set.

// Similarly, isEmpty can be used to check if set is empty.
someSet.isEmpty         // returns true or false depending on the set Elements.

// "remove" method can be used to remove value in set.
someSet.remove("c")     // removes a element , removeAll() can be used to remove all elements

// "contains" method can be used to check existence of value in a set.
someSet.contains("c")   // to check if set contains this value.
4.2.3. 遍历集合
使用 for-in 可以遍历集合,如:
for items in someSet {
   print(someSet)
}

// Swift sets are not in an ordered way, to iterate over a set in ordered way use
for items in someSet.sorted() {
   print(someSet)
}
4.2.4. 集合其它操作
使用 union, intersection, subtracting 可以求并集、交集和子集,如:
let evens: Set = [10,12,14,16,18]
let odds: Set = [5,7,9,11,13]
let primes = [2,3,5,7]

print(odds.union(evens).sorted())
// [5,7,9,10,11,12,13,14,16,18]

print(odds.intersection(evens).sorted())
//[]

print(odds.subtracting(primes).sorted())
//[9, 11, 13]
4.3. Dictionary
创建字典的语法为:
var someDict = [KeyType: ValueType]()
如:
var someDict1 = [Int: String]()                               // 创建空字典
var someDict2:[Int: String] = [1:"One", 2:"Two", 3:"Three"]
var someDict3 = [1:"One", 2:"Two", 3:"Three"]                 // 同上一行
5. 操作符
Swift 支持下面操作符:
- Arithmetic Operators
- Comparison Operators
- Logical Operators
- Bitwise Operators
- Assignment Operators
- Ternary Conditional Operator
- Nil-Coalescing Operator
- Range Operators
除 Nil-Coalescing Operator/Range Operators 外,上面操作符都存在于 C 语言中。
5.1. Nil-Coalescing Operator (??)
The nil-coalescing operator (a ?? b) unwraps an optional a if it contains a value, or returns a default value b if a is nil.
也就是说: a ?? b 等价于: a != nil ? a! : b
下面是 ?? 操作符的使用实例:
let defaultColorName = "red"
var userDefinedColorName: String?   // defaults to nil

// ......
// userDefinedColorName = "green"
//

var colorNameToUse = userDefinedColorName ?? defaultColorName
// 如果 userDefinedColorName 不是 nil,则 colorNameToUse 为 userDefinedColorName
// 如果 userDefinedColorName 是 nil ,则 colorNameToUse 为 defaultColorName
5.2. Range Operators
5.2.1. Closed Range Operator
a...b 表示从 a 到 b 的范围(包含 a 和 b ),它常用于 for-in 语句中,如:
for index in 1...5 {
    print(index)        // 按行分别输出 1 2 3 4 5
}
5.2.2. Half-Open Range Operator
a..<b 表示从 a 到 b 的范围(包含 a ,但不包含 b ),如:
for index in 1..<5 {
    print(index)        // 按行分别输出 1 2 3 4
}
注:如果 a 和 b 相等,则范围 a..<b 为空。
5.2.3. One-Sided Ranges
为方便,我们可以仅指定单侧区间,另一侧自动推导出来,如:
let names = ["Anna", "Alex", "Brian", "Jack"]

for name in names[2...] {
    print(name)
}
// Brian
// Jack

for name in names[...2] {
    print(name)
}
// Anna
// Alex
// Brian

for name in names[..<2] {
    print(name)
}
// Anna
// Alex
6. 流程控制
6.1. 条件
Swift 支持 if 和 switch 语句。
6.2. 循环
Swift 支持 for-in,while,repeat-while(类似于其它语言的 do-while)语句。
6.3. Early Exit(guard .. else 语句)
A guard statement, like an if statement, executes statements depending on the Boolean value of an expression. You use a guard statement to require that a condition must be true in order for the code after the guard statement to be executed. Unlike an if statement, a guard statement always has an else clause—the code inside the else clause is executed if the condition is not true.
下面是 guard 的使用例子:
func greet(person: [String: String]) {
    guard let name = person["name"] else {    // 当 guard 后面的条件不满足时(即 person["name"] 为 nil),就会执行else语句
        return
    }

    print("Hello \(name)!")

    guard let location = person["location"] else {
        print("I hope the weather is nice near you.")
        return
    }

    print("I hope the weather is nice in \(location).")
}

greet(person: ["name": "John"])
// Prints "Hello John!"
// Prints "I hope the weather is nice near you."
greet(person: ["name": "Jane", "location": "Cupertino"])
// Prints "Hello Jane!"
// Prints "I hope the weather is nice in Cupertino.
7. 函数
Swift 中使用关键字 func 定义函数,如:
func helloWorld() {
    print("hello world")
}

func greet(person: String) -> String {
    let greeting = "Hello, " + person + "!"
    return greeting
}
7.1. 调用函数
调用函数时,要指定参数名字,如:
func greet(person: String) -> String {
    let greeting = "Hello, " + person + "!"
    return greeting
}

var s = greet(person: "xx")         // 调用函数时需要指定参数名字person

print(s)
7.1.1. Argument Label
定义函数时,可以为参数指定一个不一样的名字(称为 Argument Label,如下面的 firstArg 和 secondArg)。这样在调用函数时,指定参数时需要设置为 Argument Label,如:
func pow(firstArg a: Int, secondArg b: Int) -> Int {
    var res = a
    for _ in 1..<b {
        res = res * a
    }
    return res
}

var i = pow(firstArg:5, secondArg:3)    // 函数内部使用 a,b 调用它时使用 firstArg, secondArg

print(i)
如果想在调用函数时,省略参数名字,则可以在定义函数指定参数 label 为 _ ,如:
func pow(_ a: Int, _ b: Int) -> Int {    // 参数 label 为 _ ,这样调用函数时不用指定参数名
    var res = a
    for _ in 1..<b {
        res = res * a
    }
    return res
}

var i = pow(5, 3)

print(i)
7.2. 多个返回值
函数可以有多个返回值(也可以认为返回一个 Tuple 类型),如:
func minMax(array: [Int]) -> (min: Int, max: Int) {
    var currentMin = array[0]
    var currentMax = array[0]
    for value in array[1..<array.count] {
        if value < currentMin {
            currentMin = value
        } else if value > currentMax {
            currentMax = value
        }
    }
    return (currentMin, currentMax)
}

let result = minMax(array: [5, -1, 3, 9])
print(result.min)
print(result.max)
7.3. 嵌套函数
可以在函数内部定义函数,这称为嵌套函数(Nested Functions),如:
func chooseStepFunction(backward: Bool) -> (Int) -> Int {
    func stepForward(input: Int) -> Int { return input + 1 }     // Nested Function
    func stepBackward(input: Int) -> Int { return input - 1 }    // Nested Function
    return backward ? stepBackward : stepForward
}

var currentValue = -4
let moveNearerToZero = chooseStepFunction(backward: currentValue > 0)

// moveNearerToZero now refers to the nested stepForward() function
while currentValue != 0 {
    print("\(currentValue)... ")
    currentValue = moveNearerToZero(currentValue)
}

print("zero!")

// -4...
// -3...
// -2...
// -1...
// zero!
7.3.1. 捕获外围变量
下面是嵌套函数的另一个例子:
func makeIncrementer(forIncrement amount: Int) -> () -> Int {
    var runningTotal = 0
    func incrementer() -> Int {  // incrementer是嵌套函数,它捕获了外围环境中的变量runningTotal和amount
        runningTotal += amount
        return runningTotal
    }
    return incrementer
}

let incrementByTen = makeIncrementer(forIncrement: 10)

print(incrementByTen()) // 输出10
print(incrementByTen()) // 输出20
print(incrementByTen()) // 输出30

let incrementBySeven = makeIncrementer(forIncrement: 7)
print(incrementBySeven()) // 输出7

print(incrementByTen()) // 输出40
8. Closures
Closures are self-contained blocks of functionality that can be passed around and used in your code. Closures in Swift are similar to blocks in Objective-C and to lambdas in other programming languages.
函数和嵌套函数可以看作是特殊形式的 Closures。
8.1. Closure Expressions
Closure 表达式的语法如下所示:
{
   (parameters) −> return_type in
   statements
}
下面是 Closure Expression 的一个例子:
let divide = {
   (val1: Int, val2: Int) -> Int in
   return val1 / val2
}

let result = divide(200, 20)
print(result)                   // 输出 10
8.2. 各种 Closure 的简写形式
下面是把字符串数组进行倒序排列的例子:
let names = ["Chris", "Alex", "Ewa", "Barry", "Daniella"]

// 显式定义函数
func backward(_ s1: String, _ s2: String) -> Bool {
    return s1 > s2
}
var reversedNames = names.sorted(by: backward)
实现上面同样的功能,如果我们使用 Closure,可以改写为下面五种形式:
// 不显式定义函数
// 使用 closure
reversedNames = names.sorted(by: { (s1: String, s2: String) -> Bool in return s1 > s2 } )

// 简写形式一:
// 使用省略了类型声明及 -> 符号的 closure
reversedNames = names.sorted(by: { s1, s2 in return s1 > s2 } )

// 简写形式二:
// 使用进一步省略了 return 关键的 closure
reversedNames = names.sorted(by: { s1, s2 in s1 > s2 } )

// 简写形式三:
// 使用Shorthand Argument Names(参数和关键字in都可以省略,参数分别用 $0, $1 等表示),后面还会介绍它
reversedNames = names.sorted(by: { $0 > $1 } )

// 简写形式四:
// 使用Operator Method,由于Swift中,String类型把操作符 > 重新定义为了一个Method(接收两个String类型的参数,返回Bool类型)
// 所以,我们可以进一步简化为下面形式:
// 关于Operator Method可以参考 https://docs.swift.org/swift-book/LanguageGuide/AdvancedOperators.html#ID42
reversedNames = names.sorted(by: >)
8.2.1. Shorthand Argument Names ($0, $1, etc)
Closure Expressions 的各个参数可省写为 $0, $1, ..., $n ,参数类型说明,返回值类型说明等等都可以省略。
比如,代码:
var nums: Set = [2, 5, 10, 30, 60]

var biggerThanTen = nums.filter({(item) -> Bool in
    return (item > 10)
})

print(biggerThanTen)      // [30, 60]
等同于:
var nums: Set = [2, 5, 10, 30, 60]

var biggerThanTen = nums.filter({ $0 > 10 })          // 代码更简洁
// var biggerThanTen = nums.filter{ $0 > 10 }         // 同上,省略了小括号。

print(biggerThanTen)      // [30, 60]
8.3. Trailing Closures
如果函数的最后一个参数是 Closure,则调用这个函数有多种形式,如下面函数的最后一个参数(这里只有一个参数)是 Closure :
func someFunctionThatTakesAClosure(closure: () -> Void) {
    // function body goes here
}
正常地,我们可以这样调用函数:
someFunctionThatTakesAClosure(closure: {
    // closure's body goes here
})
我们也可以这样调用函数(这种形式称为 Trailing Closure):
someFunctionThatTakesAClosure() {  // 能这样调用的前提是函数 someFunctionThatTakesAClosure 的最后一个参数是 Closure
    // trailing closure's body goes here
}
如果函数只有一个参数,则小括号都可以省略,即还可以进一步简写为:
someFunctionThatTakesAClosure {
    // trailing closure's body goes here
}
前一节的例子中, names.sorted 的最后一个参数是 Closure,所以前一节的例子还可以写为下面形式:
reversedNames = names.sorted() { $0 > $1 }
reversedNames = names.sorted { $0 > $1 }
8.4. Escaping Closures
A closure is said to escape a function when the closure is passed as an argument to the function, but is called after the function returns. When you declare a function that takes a closure as one of its parameters, you can write @escaping before the parameter’s type to indicate that the closure is allowed to escape.
一般地,如果函数的参数是 Closure,我们往往会在函数体内调用这个 Closure;但并不总是这样, 当闭包的生命周期超过当前函数的生命周期时,则需要为这个 Closure 参数设置为 @escaping 。
比如:
var completionHandlers: [() -> Void] = []
func someFunctionWithEscapingClosure(completionHandler: @escaping () -> Void) {
    completionHandlers.append(completionHandler)
}
上面例子中,在函数 someFunctionWithEscapingClosure 中,并没有调用 completionHandler,只是把 completionHandler 保存到全局数组 completionHandlers 中供以后调用,所以参数 completionHandler 需要声明为 @escaping 。
8.4.1. 需要显式指定 self
如果 Closure 声明为了 @escaping ,则 Closure 访问外围类对象的方法或字段时需要显式地指定 self 。
var completionHandlers: [() -> Void] = []
func someFunctionWithEscapingClosure(closure: @escaping () -> Void) {
    completionHandlers.append(closure)  // 函数返回前没有调用 closure
}

func someFunctionWithNonescapingClosure(closure: () -> Void) {
    closure() // 函数返回前调用了 closure
}

class SomeClass {
    var x = 10
    func doSomething() {
        someFunctionWithEscapingClosure(closure: { () -> Void in self.x = 100 }) // 由于 closure 使用 @escaping 修饰,访问 x 时必须使用 self
        someFunctionWithNonescapingClosure(closure: { () -> Void in x = 200 }) // 访问 x 时可以省略 self(当然加上也行)
        // 上面两行可以写为 Trailing Closures 的形式,即写为:
        // someFunctionWithEscapingClosure { self.x = 100 }
        // someFunctionWithNonescapingClosure { x = 200 }
    }
}

let instance = SomeClass()
instance.doSomething()
print(instance.x)
// Prints "200"

completionHandlers.first?()
print(instance.x)
// Prints "100"
8.4.2. 可能出现循环引用
为什么当闭包的生命周期超过当前函数的生命周期时,需要使用 @escaping 特殊地标记下呢?这是因为当闭包的生命周期超过当前函数的生命周期时,可能出现循环引用的情况。这时如果强制使用 self 来捕获变量,可以提醒开发者此处代码可能导致循环引用,需要开发者小心处理。
参考:https://sarunw.com/posts/what-is-escaping-in-swift-closures/
8.5. 函数、嵌套函数、Closure Expressions 的区别
函数、嵌套函数、Closure Expressions 的区别如表 2 所示。
| 说明 | |
|---|---|
| Global Functions | Have a name. Do not capture any values |
| Nested Functions | Have a name. Capture values from enclosing function |
| Closure expressions | Unnamed Closures capture values from their surrounding context |
9. 枚举
枚举用关键字 enum 表示。
下面是使用枚举的例子:
enum CompassPoint {       // 定义枚举
    case north
    case south
    case east
    case west
}

var directionToHead = CompassPoint.south   // 把枚举赋值给变量

directionToHead = .east                    // 可以把 directionToHead 赋值为另一个枚举值


switch directionToHead {
case .north:                               // 这里写为 case CompassPoint.north: 也行
    print("Lots of planets have a north")
case .south:
    print("Watch out for penguins")
case .east:
    print("Where the sun rises")
case .west:
    print("Where the skies are blue")
}
9.1. Associated Values
可以为枚举指定一个“关联值”,如:
enum Barcode {
    case upc(Int, Int, Int, Int)        // 1D barcodes in UPC format
    case qrCode(String)                 // 2D barcodes in QR code format
}

var productBarcode = Barcode.upc(8, 85909, 51226, 3)

productBarcode = .qrCode("ABCDEFGHIJKLMNOP")

switch productBarcode {
case .upc(let numberSystem, let manufacturer, let product, let check):      // 读取枚举中的关联值
    print("UPC: \(numberSystem), \(manufacturer), \(product), \(check).")
case .qrCode(let productCode):
    print("QR code: \(productCode).")
}
上面代码会输出 QR code: ABCDEFGHIJKLMNOP.
9.2. Raw Values
可以为枚举指定 Raw Values,Raw Values 的类型可以是 “strings, characters, or any of the integer or floating-point number”。下面例子中 Raw Values 的类型是 Character:
enum ASCIIControlCharacter: Character {
    case tab = "\t"
    case lineFeed = "\n"
    case carriageReturn = "\r"
}
Raw Values 和 Associated Values 不同,对于枚举的某个 case,其 Raw Values 一定都相同(比如上面例子中 ASCIIControlCharacter.tab 的 Raw Values 总是为 \t );而对于枚举的某个 case,其 Associated Values 可能不同。
9.2.1. 隐式 Raw Values
当 Raw Values 的类型为 Int 时,如果不显式指定,则从 0 开始依次为枚举的各个 case 设置 raw value。当 Raw Values 的类型为 String 时,如果不显式指定,则枚举的 raw value 就是其 case 的名称,如:
enum Planet: Int {
    case mercury, venus, earth, mars, jupiter, saturn, uranus = 100, neptune
}

print(Planet.mercury.rawValue)        // 输出 0
print(Planet.neptune.rawValue)        // 输出 101。由于前一个(uranus)设置的 raw value为100,所以它为 101


enum CompassPoint: String {
    case north, south, east, west = "WEST"
}

print(CompassPoint.north.rawValue)    // 输出 north
print(CompassPoint.west.rawValue)     // 输出 WEST
9.2.2. 从 Raw Value 初始化枚举变量
可以从 Raw Value 初始化枚举变量,如:
enum Planet: Int {
    case mercury, venus, earth, mars, jupiter, saturn, uranus, neptune
}

let possiblePlanet = Planet(rawValue: 2)   // 从 Raw Value 初始化枚举变量,这相当于 let possiblePlanet = Planet.earth
9.3. 遍历枚举
如果想遍历枚举,则可以把枚举指定为 CaseIterable 协议:
enum Beverage: CaseIterable {
    case coffee, tea, juice
}

for beverage in Beverage.allCases {   // 使用 allCases 可以得到枚举的所有情况
    print(beverage)
}
9.4. 枚举是值类型
枚举是值类型,相关例子可参考节 10.5
10. 结构体和类
Swift 中结构体和类比较相似,都可以为它们定义属性、方法、Subscripts。下面是类定义和使用的例子:
class Shape {
    var numberOfSides = 0
    func simpleDescription() -> String {
        return "A shape with \(numberOfSides) sides."
    }
}


var shape = Shape()             // 创建类实例(对象)
shape.numberOfSides = 7
var shapeDescription = shape.simpleDescription()

print(shapeDescription)
结构体和类也有不同,比如:
- 类支持继承,而结构体不支持继承(一个结构体不能继承于另一个结构体);
- 类支持构造函数
deinit,而结构体不支持; - 编译器自动为结构体生成一个 memberwise initializer,而不会类生成;
- 类是引用类型,而结构体是值类型。
是选择结构体还是选择类,可以参考:https://developer.apple.com/documentation/swift/choosing_between_structures_and_classes
10.1. 属性
10.1.1. Stored Properties
Stored Properties 保存“变量或者常量”作为对象实例的一部分。如:
struct FixedLengthRange {
    var firstValue: Int             // Stored Property, 用 var 定义,它是变量
    let length: Int                 // Stored Property, 用 let 定义,它是常量
    // 结构体自动有 memberwise initializer,可不定义 init
}

var rangeOfThreeItems = FixedLengthRange(firstValue: 0, length: 3)
rangeOfThreeItems.firstValue = 6    // 可以修改 rangeOfThreeItems 的属性 firstValue,但不能修改属性 length
// rangeOfThreeItems.length = 2        // 这里会报错,因为 length 是常量


let rangeOfFourItems = FixedLengthRange(firstValue: 0, length: 4)
// rangeOfFourItems.firstValue = 6     // 这里会报错,因为 rangeOfFourItems 本身是常量(由 let 定义)
需要说明的是,如果 FixedLengthRange 是类,当 rangeOfFourItems 是常量(即用 let 定义)时,也可以修改它的 firstValue 属性,这是因为结构体是值类型,而类是引用类型。 如果把实例的引用赋值给常量,则仍然可以通过这个常量修改实例中的可变属性。
class FixedLengthRange {
    var firstValue: Int                   // Stored Property, 用 var 定义,它是变量
    let length: Int                       // Stored Property, 用 let 定义,它是常量
    init(firstValue: Int, length: Int) {
        self.firstValue = firstValue
        self.length = length
    }
}

var rangeOfThreeItems = FixedLengthRange(firstValue: 0, length: 3)
rangeOfThreeItems.firstValue = 6    // 可以修改 rangeOfThreeItems 的属性 firstValue,但不能修改属性 length


let rangeOfFourItems = FixedLengthRange(firstValue: 0, length: 4)
rangeOfFourItems.firstValue = 6     // 这里不会报错,“如果把实例的引用赋值给常量,则仍然可以通过这个常量修改实例中的可变属性”
10.1.1.1. Lazy Stored Properties
如果属性被标记为 lazy ,则当这个属性第一次被访问时,才会进行初始化。如:
class Person {
    var name: String

    lazy var personalizedGreeting: String = {            // 第一次访问 personalizedGreeting 时才会初始化
        return "Hello, \(self.name)!"
    }()

    init(name: String) {
        self.name = name
    }
}

let x = Person(name: "Alice")
print(x.personalizedGreeting)   // 第一次访问 personalizedGreeting 时,才会初始化这个 lazy 属性
lazy 提供了一种“按需初始化”的机制, lazy 很适合初始化某属性比较耗时的场景。
需要注意的是, 在多线程环境中,如果多个线程同时访问 lazy 属性,则 lazy 属性并不会保证只初始化一次,可能会被初始化多次。
10.1.2. Computed Properties
Computed Properties 不会在对象实例上存储相关信息,而是提供一个 getter 和一个可选的 setter 来间接访问其它属性。如:
struct Point {
    var x = 0.0, y = 0.0
}
struct Size {
    var width = 0.0, height = 0.0
}
struct Rect {
    var origin = Point()
    var size = Size()
    var center: Point {            // center 是一个 Computed Property
        get {
            let centerX = origin.x + (size.width / 2)
            let centerY = origin.y + (size.height / 2)
            return Point(x: centerX, y: centerY)
        }
        set(newCenter) {
            origin.x = newCenter.x - (size.width / 2)
            origin.y = newCenter.y - (size.height / 2)
        }
    }
}
var square = Rect(origin: Point(x: 0.0, y: 0.0),
                  size: Size(width: 10.0, height: 10.0))

let initialSquareCenter = square.center     // 这会调用 center 的 get 方法
square.center = Point(x: 15.0, y: 15.0)     // 这会调用 center 的 set 方法
print("square.origin is now at (\(square.origin.x), \(square.origin.y))")
// Prints "square.origin is now at (10.0, 10.0)"
10.1.2.1. setter 的简写(newValue)
在 setter 中可以使用 newValue 作为传入的新值,如:
struct AlternativeRect {
    var origin = Point()
    var size = Size()
    var center: Point {
        get {
            let centerX = origin.x + (size.width / 2)
            let centerY = origin.y + (size.height / 2)
            return Point(x: centerX, y: centerY)
        }
        set {
            origin.x = newValue.x - (size.width / 2)     // 可以直接使用newValue,它相当于前面例子中的 newCenter
            origin.y = newValue.y - (size.height / 2)
        }
    }
}
10.1.2.2. getter 的简写
如果 getter 仅仅由单个表达式构成,则隐含着 return 这个表达式,如:
struct CompactRect {
    var origin = Point()
    var size = Size()
    var center: Point {
        get {
            Point(x: origin.x + (size.width / 2),
                  y: origin.y + (size.height / 2))       // 只有单个表达式,可以省略 return
        }
        set {
            origin.x = newValue.x - (size.width / 2)
            origin.y = newValue.y - (size.height / 2)
        }
    }
}
10.1.2.3. Read-Only Computed Properties(没有定义 setter,省略 get 关键字)
如果不为 Computed Property 定义 setter,则它是 Read-Only Computed Property,这时可以进一步省略 get 关键字及其括号,如:
struct Cuboid {
    var width = 0.0, height = 0.0, depth = 0.0
    var volume: Double {                    // volume 是一个 Read-Only Computed Property,可以省略 get 及其括号
        return width * height * depth
    }
}

let fourByFiveByTwo = Cuboid(width: 4.0, height: 5.0, depth: 2.0)
print("the volume of fourByFiveByTwo is \(fourByFiveByTwo.volume)")
// Prints "the volume of fourByFiveByTwo is 40.0"
10.1.3. Property Observers (willSet, didSet)
可以为属性定义 willSet/didSet 代码块,这称为 Property Observers。如:
class StepCounter {
    var totalSteps: Int = 0 {
        willSet(newTotalSteps) {             // 对属性 totalSteps 进行修改前会调用 willSet 代码
            print("About to set totalSteps to \(newTotalSteps)")
        }
        didSet {                             // 对属性 totalSteps 进行修改后会调用 didSet 代码
            if totalSteps > oldValue  {
                print("Added \(totalSteps - oldValue) steps")
            }
        }
    }
}
let stepCounter = StepCounter()
stepCounter.totalSteps = 200
// About to set totalSteps to 200
// Added 200 steps
stepCounter.totalSteps = 360
// About to set totalSteps to 360
// Added 160 steps
stepCounter.totalSteps = 896
// About to set totalSteps to 896
// Added 536 steps
10.1.4. Property Wrappers (wrappedValue)
A property wrapper adds a layer of separation between code that manages how a property is stored and the code that defines a property.
@propertyWrapper
struct TwelveOrLess {               // TwelveOrLess 是个 Property Wrapper
    private var number = 0
    var wrappedValue: Int {         // 属性 wrappedValue 用于实现 Property Wrapper 具体逻辑
        get { return number }
        set { number = min(newValue, 12) }
    }
}

struct SmallRectangle {             // 它的 height 和 width 都不会超过 12
    @TwelveOrLess var height: Int   // 使用 property wrapper 的好处:不用为 height/width 分别写 getter/setter 了
    @TwelveOrLess var width: Int
}

var rectangle = SmallRectangle()
print(rectangle.height)
// Prints "0"

rectangle.height = 10
print(rectangle.height)
// Prints "10"

rectangle.height = 24               // 尽管是设置为 24,但实际上运行 wrappedValue 中的 set 方法
print(rectangle.height)
// Prints "12"
10.1.5. Type Property (static, class)
使用 static 关键字可以定义 Type Property,类似于其它语言的静态变量。如:
struct SomeStructure {
    static var storedTypeProperty = "Some value."
    static var computedTypeProperty: Int {
        return 1
    }
}
enum SomeEnumeration {
    static var storedTypeProperty = "Some value."
    static var computedTypeProperty: Int {
        return 6
    }
}
class SomeClass {
    static var storedTypeProperty = "Some value."
    static var computedTypeProperty: Int {
        return 27
    }
    class var overrideableComputedTypeProperty: Int {  // 如果类的 Computed Type Property 用 class 修饰,表示它是 Type Property,但“可以被子类 override”
        return 107
    }
}
如果类的 Computed Type Property 用 class 修饰,表示它是 Type Property,但“可以被子类 override”。
10.2. 方法
10.2.1. init
我们可以为类指定 init 方法,这样在创建类实例时可以初始化它。如:
class NamedShape {
    var numberOfSides: Int = 0
    var name: String

    init(name: String) {
        self.name = name
    }

    func simpleDescription() -> String {
        return "\(name) with \(numberOfSides) sides."
    }
}

let test = NamedShape(name: "My test shape")     // 创建类实例(对象)

print(test.simpleDescription())
10.2.2. 重写父类方法(override)
使用 override 关键字可以重写父类方法,如:
class NamedShape {
    var numberOfSides: Int = 0
    var name: String

    init(name: String) {
        self.name = name
    }

    deinit {
        print("Shamp #\(name) is being deinitialized")
    }

    func simpleDescription() -> String {
        return "\(name) with \(numberOfSides) sides."
    }
}

class Square: NamedShape {
    var sideLength: Double

    init(sideLength: Double, name: String) {
        self.sideLength = sideLength             // self 是当前对象
        super.init(name: name)                   // super 是父对象
        numberOfSides = 4
    }

    func area() -> Double {
        return sideLength * sideLength
    }

    override func simpleDescription() -> String {            // 重写父类的simpleDescription方法
        return "A square with sides of length \(sideLength)."
    }
}

let test = Square(sideLength: 5.2, name: "my test square")

print(test.simpleDescription())
10.2.3. Type Methods (static, class)
Swift 中的 Type Method 类似于 C++中的静态方法,它使用 static 关键字修饰。如:
class SomeClass {
    static func someTypeMethod() {
        // type method implementation goes here
    }
}

SomeClass.someTypeMethod()
除了 static 关键字外,Type Method 还可以用 class 关键字修饰,它们的不同在于:~static~ 关键字修饰的 TYpe Method 在子类中不可以被重写,而 class 关键字修饰的 Type Method 可以在子类中被重写,如:
class Class1 {
    class func someTypeMethod() {
        print("Class1 someTypeMethod")
    }
}

class Class2 : Class1 {
    override class func someTypeMethod() {
        print("Class2 someTypeMethod")
    }
}

Class2.someTypeMethod()
10.3. Subscripts
如果在结构体/枚举/类上定义 Subscripts,则可以在对象后面使用中括号进行访问。 subscript 的语法为(其中 getter/setter 都可以使用省写形式):
subscript(index: Int) -> Int {
    get {
        // Return an appropriate subscript value here.
    }
    set(newValue) {
        // Perform a suitable setting action here.
    }
}
下面是个例子:
struct TimesTable {
    let multiplier: Int
    subscript(index: Int) -> Int {
        return multiplier * index         // 这是一个省写形式的 getter
    }
}
let threeTimesTable = TimesTable(multiplier: 3)

print("one times three is \(threeTimesTable[1])")   // 对象后面使用中括号进行访问
print("two times three is \(threeTimesTable[2])")
10.4. 测试对象是否相同( === 和 !== )
使用 === 和 !== 可以测试两个变量(或常量)所关联的对象是否相同。如:
class Class1 {
}

let a = Class1()
let b = Class1()
let c = b

if a === b {
    print("a and b is same")
} else {
    print("a and b is not same")
}

if b === c {
    print("b and c is same")
} else {
    print("b and c is not same")
}
运行上面代码将输出:
a and b is not same
b and c is same
10.5. 值类型(结构体、枚举、Tuple、Array、Set、Dictionary) vs 引用类型(类)
Swift 中“结构体”和“类”很相似。它们的最大区别在于: 结构体是值类型,而类是引用类型。
Structures are always copied when they are passed around in your code, but classes are passed by reference.
下面是“结构体”的一个例子:
struct DogStruct {
    var name: String
    init(name: String) {
        self.name = name
    }
}


var aDogStruct = DogStruct(name: "A-Doggo")
var bDogStruct = aDogStruct
bDogStruct.name = "B-Doggo"

print(aDogStruct.name)    // 输出 "A-Doggo"
print(bDogStruct.name)    // 输出 "B-Doggo"
上面代码会输出:
"A-Doggo"
"B-Doggo"
如果把第一行的 struct 关键字换为 class ,则会输出:
"B-Doggo"
"B-Doggo"
此外, 枚举和 Tuple、Array、Set、Dictionary 也都是值类型 ,如:
enum CompassPoint {
    case north, south, east, west
    mutating func turnNorth() {
        self = .north
    }
}
var currentDirection = CompassPoint.west
let rememberedDirection = currentDirection
currentDirection.turnNorth()

print("The current direction is \(currentDirection)")
print("The remembered direction is \(rememberedDirection)")
// Prints "The current direction is north"
// Prints "The remembered direction is west"
11. 初始化(Initialization)
Swift 有两类初始化方法:Designated initializer 和 Convenience initializer(使用关键字 convenience 表示):
init(parameters) {                      // Designated initializer
    // statements
}

convenience init(parameters) {          // Convenience initializer
    // statements
}
全能初始化方法(Designated initializer)和便利初始化方法(Convenience initializer)调用规则有三个:
- 全能初始化方法必须调用父类的全能初始化方法;
- 便利初始化方法只能调用当前类的初始化方法,不能调用父类的初始化方法;
- 便利初始化方法,最终必须调用当前类的全能初始化方法。
这三个规则总结起来如图 1 所示。
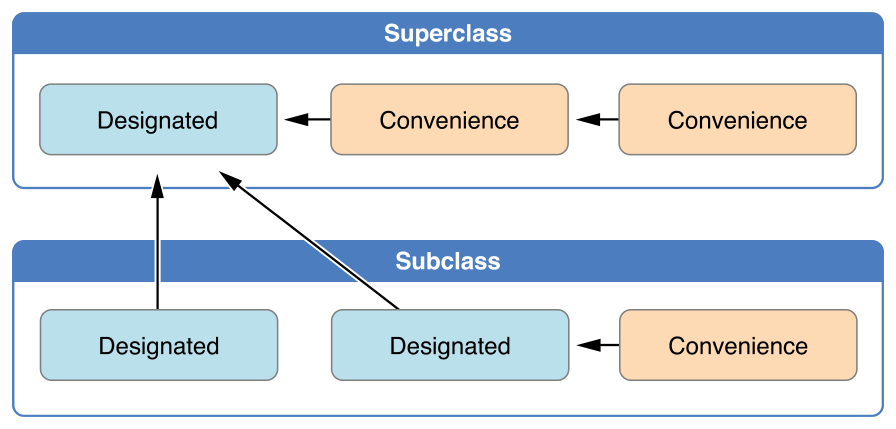
Figure 1: Designated initializer 和 Convenience initializer 的规则
12. 协议(Protocol)
A protocol defines a blueprint of methods, properties, and other requirements that suit a particular task or piece of functionality.
参考:https://docs.swift.org/swift-book/LanguageGuide/Protocols.html
13. 扩展(Extension)
Extensions add new functionality to an existing class, structure, enumeration, or protocol type. This includes the ability to extend types for which you do not have access to the original source code (known as retroactive modeling).
参考:https://docs.swift.org/swift-book/LanguageGuide/Extensions.html
14. 错误处理
In Swift, errors are represented by values of types that conform to the Error protocol.
在 Swift 中,“错误”需要符合 Error 协议。
常常使用枚举来定义一组相关的错误,如下面的 ValidationError:
enum ValidationError: Error {
    case tooShort
    case tooLong
    case invalidCharacterFound(Character)
}
需要抛出错误时,使用 throw 关键字即可,如:
throw ValidationError.tooShort
throw ValidationError.invalidCharacterFound(character)
14.1. 错误处理方式
一般地,有 4 种处理错误的方式:1、把错误传播给它的调用者;2、在 do-catch 语句中处理错误;3、使用 try? 把错误转换为 Optional;4、使用 try! 断言错误不会出现。下面将依次介绍它们。
14.1.1. 把错误传播给它的调用者
一个函数会抛出错误时,需要使用关键字 throws 显式地声明该函数会抛出错误。 如:
func canThrowErrors() throws -> String   // canThrowErrors 可以抛出错误
func cannotThrowErrors() -> String       // cannotThrowErrors 不能抛出错误
不能直接调用一个声明了 throws 的函数(可能抛出错误的函数),编译器会报错。调用时,需要在可能抛出错误的函数前面加上 try, try?, try! 关键字。
14.1.2. 在 do-catch 语句中处理错误
do-catch 语句的一般形式如下所示:
do {
    try expression
    statements
} catch pattern 1 {
    statements
} catch pattern 2 where condition {
    statements
} catch {
    statements
}
下面介绍一个具体的例子:
enum ValidationError: Error {
    case tooShort
    case tooLong
    case invalidCharacterFound(Character)
}

func validate(username: String) throws {   // 函数 validate 可能抛出错误
    guard username.count > 3 else {
        throw ValidationError.tooShort
    }

    guard username.count < 15 else {
        throw ValidationError.tooLong
    }

    for character in username {
        guard character.isLetter else {
            throw ValidationError.invalidCharacterFound(character)
        }
    }
}

func userDidPickName(_ username: String) {
    do {
        // 调用 validate 前使用了 try,如果出错,会执行到 catch 语句中
        try validate(username: username)

        // 代码走到这里里,说明上面的validate没有抛出错误
        // 可以进行其他操作了

        // Do something

    } catch {
        // The variable ‘error’ is automatically available
        // inside of ‘catch’ blocks.
        print(error)
    }
}

userDidPickName("aa")
14.1.3. 使用 try? 把错误转换为 Optional
我们可以把错误转换为 Optional Value。假设有下面可能抛出错误的函数:
func someThrowingFunction() throws -> Int {
    // ...
}
下面语句:
let x = try? someThrowingFunction() // 如果 someThrowingFunction 报错,则 x 为 nil
相当于:
let x: Int?
do {
    x = try someThrowingFunction()
} catch {
    x = nil
}
14.1.4. 使用 try! 断言错误不会出现
当我们认为错误一定不会出现时,可以直接使用 try! 来忽略错误。如果这时,错误出现了,则程序会报运行时错误。
假设我们把图片资源打包到应用中了,则我们可以安全地假设 loadImage 不会出现错误:
let photo = try! loadImage(atPath: "./Resources/John Appleseed.jpg")
14.2. 指定清理操作(defer 语句)
A defer statement defers execution until the current scope is exited.
func processFile(filename: String) throws {
    if exists(filename) {
        let file = open(filename)
        defer {
            close(file)
        }
        while let line = try file.readline() {
            // Work with the file.
        }
        // close(file) is called here, at the end of the scope.
    }
}
15. 类型转换(Type Casting)
15.1. 检测类型(is 操作符)
is 操作符可以检测对象是否属于某种类型。如:
class MediaItem {
    var name: String
    init(name: String) {
        self.name = name
    }
}

class Movie: MediaItem {
    var director: String
    init(name: String, director: String) {
        self.director = director
        super.init(name: name)
    }
}

class Song: MediaItem {
    var artist: String
    init(name: String, artist: String) {
        self.artist = artist
        super.init(name: name)
    }
}

let library = [
    Movie(name: "Casablanca", director: "Michael Curtiz"),
    Song(name: "Blue Suede Shoes", artist: "Elvis Presley"),
    Movie(name: "Citizen Kane", director: "Orson Welles"),
    Song(name: "The One And Only", artist: "Chesney Hawkes"),
    Song(name: "Never Gonna Give You Up", artist: "Rick Astley")
]

var movieCount = 0
var songCount = 0

for item in library {
    if item is Movie {          // is 操作符判断 item 是否为 Movie
        movieCount += 1
    } else if item is Song {    // is 操作符判断 item 是否为 Song
        songCount += 1
    }
}

print("Media library contains \(movieCount) movies and \(songCount) songs")
15.2. as, as?, as! 操作符
使用 as 可以进行类型转换,默认只允许一定安全的转换(比如 1 as Float )。
class Animal {}
class Dog: Animal {}

let a: Animal = Dog()
a as Dog		// now raises the error:  "'Animal is not convertible to 'Dog';
				// ... did you mean to use 'as!' to force downcast?"

a as! Dog		// forced downcast is allowed

let d = Dog()
d as Animal		// upcast succeeds
使用 as! 或者 as? 可以进行强制类型转换,它们的区别在于:当类型转换失败时, as! 会报运行时错误;而 as? 不会报错,只是转换结果为 nil 。
class Animal {}

class Cat: Animal {}

class Dog: Animal {
	var name = "Spot"
}

let dog: Dog? = nil
dog?.name		// evaluates to nil
dog!.name		// triggers a runtime error

let animal: Animal = Cat()
animal as? Dog	// evaluates to nil
animal as! Dog	// triggers a runtime error
总结: ! implies “this might trap,” while ? indicates “this might be nil.”
15.3. Any, AnyObject
Swift provides two special types for working with nonspecific types:
Anycan represent an instance of any type at all, including function types.AnyObjectcan represent an instance of any class type.
Here’s an example of using Any to work with a mix of different types, including function types and nonclass types. The example creates an array called things, which can store values of type Any:
var things = [Any]()

things.append(0)
things.append(0.0)
things.append(42)
things.append(3.14159)
things.append("hello")
things.append((3.0, 5.0))
things.append({ (name: String) -> String in "Hello, \(name)" })


for thing in things {
    switch thing {
    case 0 as Int:
        print("zero as an Int")
    case 0 as Double:
        print("zero as a Double")
    case let someInt as Int:
        print("an integer value of \(someInt)")
    case let someDouble as Double where someDouble > 0:
        print("a positive double value of \(someDouble)")
    case is Double:
        print("some other double value that I don't want to print")
    case let someString as String:
        print("a string value of \"\(someString)\"")
    case let (x, y) as (Double, Double):
        print("an (x, y) point at \(x), \(y)")
    case let stringConverter as (String) -> String:
        print(stringConverter("Michael"))
    default:
        print("something else")
    }
}
16. Automatic Reference Counting (ARC)
传统的垃圾回收机制对于移动平台来说十分低效,苹果采用的是自动引用计数(Automatic Reference Counting, ARC)的方式来管理内存。
每当你创建一个类的实例时,ARC 会自动分配一块内存空间来存放这个实例的信息,当这个实例不再被使用的时候,ARC 便释放实例所占用的内存。这是通过引用计数来实现的,其原理如下: 每个被管理的实例都会与一个引用计数器相连,这个计数器保存着当前实例被引用的次数,一旦创建一个新的引用指向这个实例,引用计数器便加 1,每当指向该实例的引用失效,引用计数器便减 1,当某个实例的引用计数器变成 0 的时候,这个实例就会被立即销毁。
在 Swift 中,对引用描述的关键字有三个:strong(强引用),weak(弱引用)和 unowned(无主引用),所有的引用没有特殊说明都是 strong 强引用类型。在 ARC 中,只有指向一个实例的所有强引用都断开了,这个实例才会被销毁。
下面是介绍引用计数的一个简单例子:
class Person {
    let name: String
    init(name: String) {
        self.name = name
        print("\(name) is being initialized")
    }
    deinit {
        print("\(name) is being deinitialized")
    }
}

var reference1: Person?
var reference2: Person?
var reference3: Person?

reference1 = Person(name: "John Appleseed")         // 创建了一个对象,被 reference1 引用
// Prints "John Appleseed is being initialized"

reference2 = reference1   // 前面的对象又被 reference2 引用。这行执行后,它的引用计数为2
reference3 = reference1   // 前面的对象又被 reference2 引用。这行执行后,它的引用计数为3

reference1 = nil    // 引用计数变为2
reference2 = nil    // 引用计数变为1

reference3 = nil    // 引用计数变为0,这时会释放对象占用的内存(调用其deinit方法)
// Prints "John Appleseed is being deinitialized"
16.1. 引用计数的不足(循环引用)
在某些情况下,一个类实例的强引用数永远不能变为 0,例如两个类实例互相持有对方的强引用,因而每个类实例都让对方一直存在,这就是所谓的强引用循环(Strong Reference Cycles)。下面举例来说明这种情况。
下面定义的是“人”和“公寓”两个类:
class Person {
    let name: String
    init(name: String) { self.name = name }
    var apartment: Apartment?
    deinit { print("\(name) is being deinitialized") }
}

class Apartment {
    let unit: String
    init(unit: String) { self.unit = unit }
    var tenant: Person?
    deinit { print("Apartment \(unit) is being deinitialized") }
}
其中,每一个 Person 实例有一个可选的初始化为 nil 的 Apartment 类型,因为一个人并不总是拥有公寓。同样,每一个 Apartment 实例都有一个可选的初始化为 nil 的 Person 类型,因为一个公寓并不总有承租人。
接下来的代码片段定义了两个可选类型的变量 john 和 unit4A,并分别设定为某个 Person 和 Apartment 的实例:
var john: Person?
var unit4A: Apartment?

john = Person(name: "John Appleseed")
unit4A = Apartment(unit: "4A")
到目前为止,它们之间的引用关系如图 2 所示。

Figure 2: 还没有关联两个实例时
下面代码将这两个实例关联起来:
john!.apartment = unit4A
unit4A!.tenant = john
这时,它们之间的引用关系如图 3 所示。
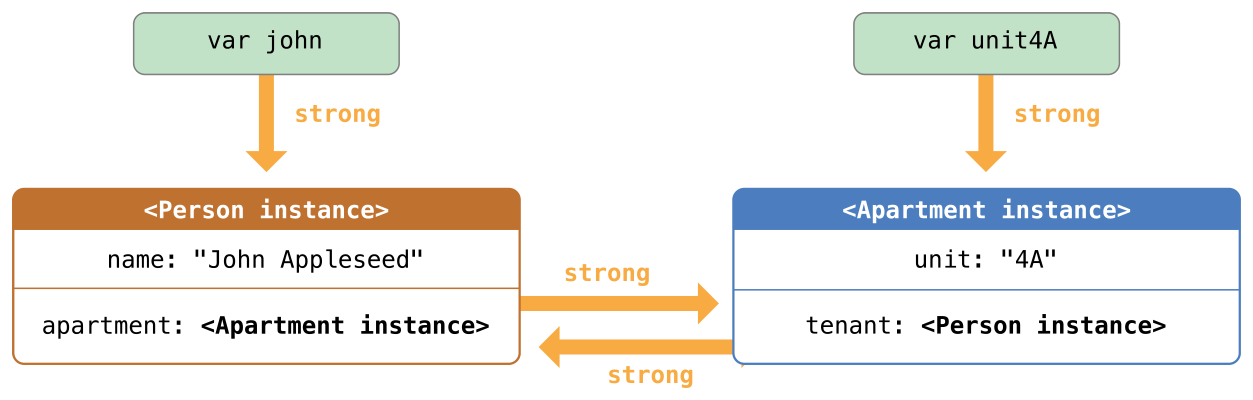
Figure 3: 循环引用
这两个实例关联之后,会产生一个“循环引用”。断开 john 和 unit4A 所持有的强引用后,如图 4 所示。
// 断开 john 和 unit4A 所持有的强引用时,引用计数器并不会归零,导致了内存泄漏
john = nil
unit4A = nil
这时,引用计数器并不会归零,所以这两块空间也得不到释放,这就导致了内存泄漏。
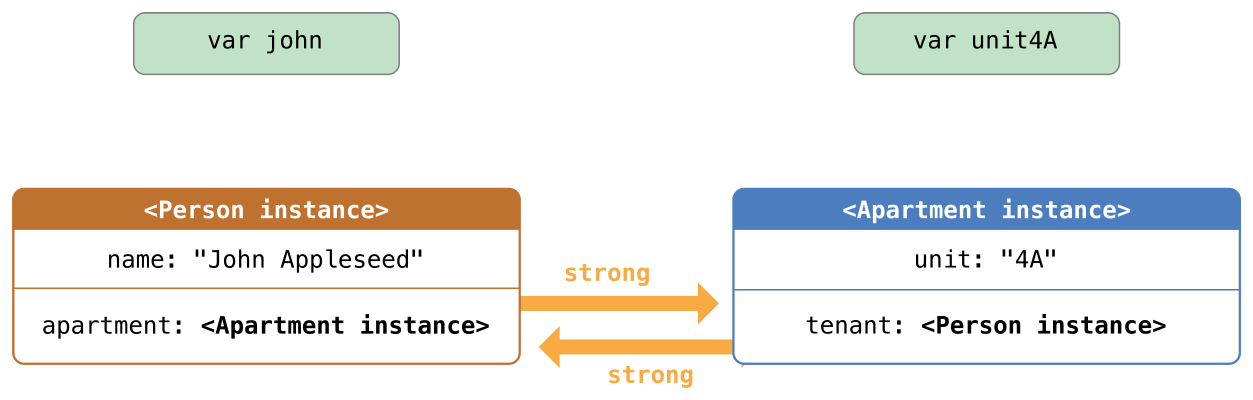
Figure 4: 导致了内存泄漏(没有变量引用这两个对象,但它们也没有被释放)
16.2. 解决办法:弱引用
将其中一个类中的变量设定为 weak (弱引用)可以打破这种强引用循环。在 ARC 机制中,一个实例的所有强引用都断开后,这个实例就会被销毁。
class Person {
    let name: String
    init(name: String) { self.name = name }
    var apartment: Apartment?
    deinit { print("\(name) is being deinitialized") }
}

class Apartment {
    let unit: String
    init(unit: String) { self.unit = unit }
    weak var tenant: Person?      // 和前面的不同在于,这里增加了 weak 关键字
    deinit { print("Apartment \(unit) is being deinitialized") }
}

var john: Person?
var unit4A: Apartment?

john = Person(name: "John Appleseed")
unit4A = Apartment(unit: "4A")

john!.apartment = unit4A
unit4A!.tenant = john
关联两个实例后,如图 5 所示。

Figure 5: Person 对象有一个强引用,Apartment 实例有两个强引用
当断开 john 所持有的强引用时:
john = nil
// Prints "John Appleseed is being deinitialized"
这时,Person 对象没有强引用了,会被回收。同时, Apartment 对象的 tenant 属性会被自动设置为 nil 。 如图 6 所示。
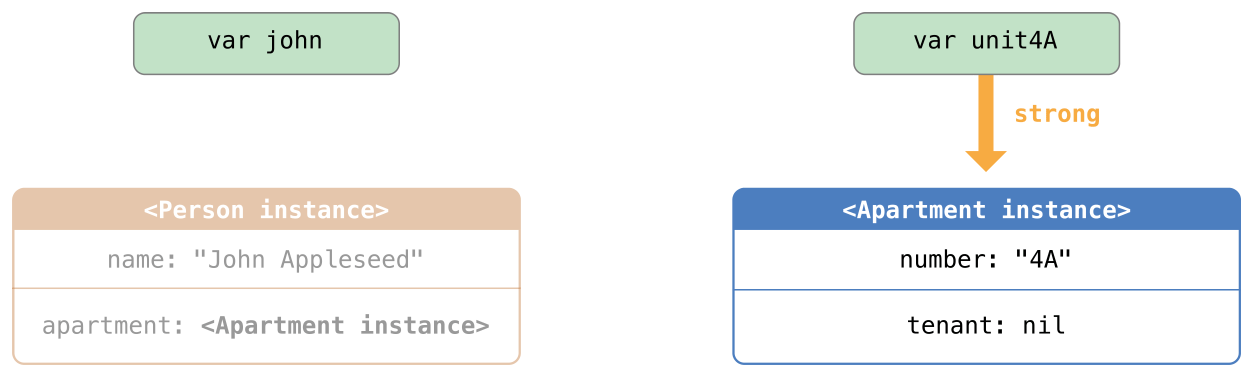
Figure 6: Person 对象被回收,Apartment 对象的 tenant 属性会被自动设置为 nil
如果再断开 unit4A 所持有的强引用:
unit4A = nil
// Prints "Apartment 4A is being deinitialized"
则,Apartment 对象没有被引用了,也会被回收,如图 7 所示。
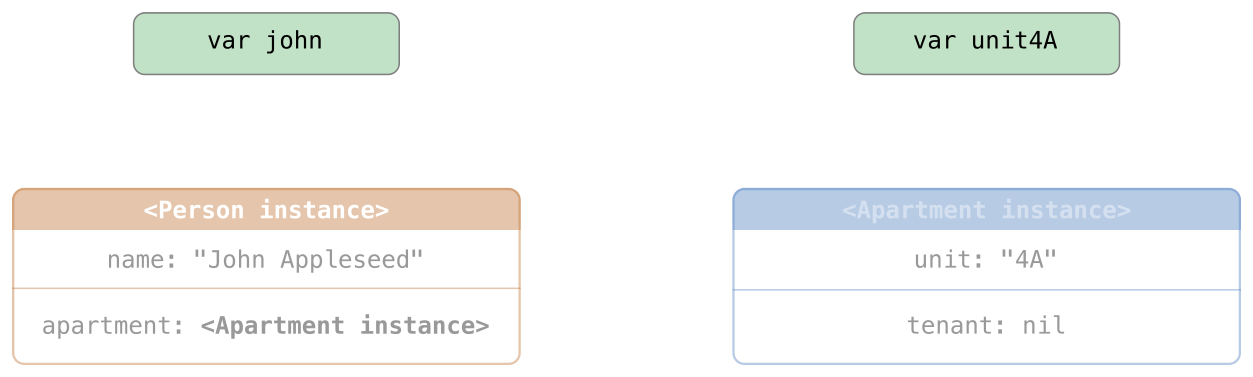
Figure 7: swift_weak_reference03_2x
16.3. 解决办法:无主引用
“unowned 无主引用”和“weak 弱引用”类似,回收对象时只关心对象没有“强引用”,不关心是否有“无主引用”或者“弱引用”。
什么情况下使用“无主引用”呢?当类的属性“总有值”时(这说明类属性关联的对象的生命周期和本对象是一样长或者更长),这比较抽象,下面通过例子说明一下。
我们知道前面的例子中,“一个人并不总是拥有公寓,一个公寓也并不总有承租人”,所以 Person 类的 apartment 属性是可选的(可以为 nil),Apartment 类的 tenant 属性也是可选的(可以为 nil)。
我们再看另外一个例子:描述客户(Customer)和信用卡(CreditCard)。客户不一定有信用卡,而信用卡一定关联着某个客户。建模如下:客户(Customer)有一个“可选属性”card,而信用卡(CreditCard)有一个“非可选属性”customer(这时, 这个属性“总有值”,我们把它设置为无主引用,可以避免循环引用导致内存泄露 )。如下所示:
class Customer {
    let name: String
    var card: CreditCard?             // 客户不一定有信用卡
    init(name: String) {
        self.name = name
    }
    deinit { print("\(name) is being deinitialized") }
}

class CreditCard {
    let number: UInt64
    unowned let customer: Customer     // 信用卡一定关联着某个客户
    init(number: UInt64, customer: Customer) {
        self.number = number
        self.customer = customer
    }
    deinit { print("Card #\(number) is being deinitialized") }
}
在这个例子中,每一个类都是将另一个类的实例作为自身的属性,所以会产生循环引用。通过把 customer 设置为 unowned ,可以打破这种强引用循环。
注: 我们不能把“非可选”属性 customer 设置为 weak ,因为设置为 weak 的属性必需是可选属性(前一节提到 Person 对象被回收后 Apartment 对象的 tenant 属性会被自动设置为 nil,只有可选属性才能被设置为 nil),强行这样设置,编译器会报错。
当我们关联两个实例后:
var john: Customer?

john = Customer(name: "John Appleseed")
john!.card = CreditCard(number: 1234_5678_9012_3456, customer: john!)
它们的引用关系如图 8 所示。
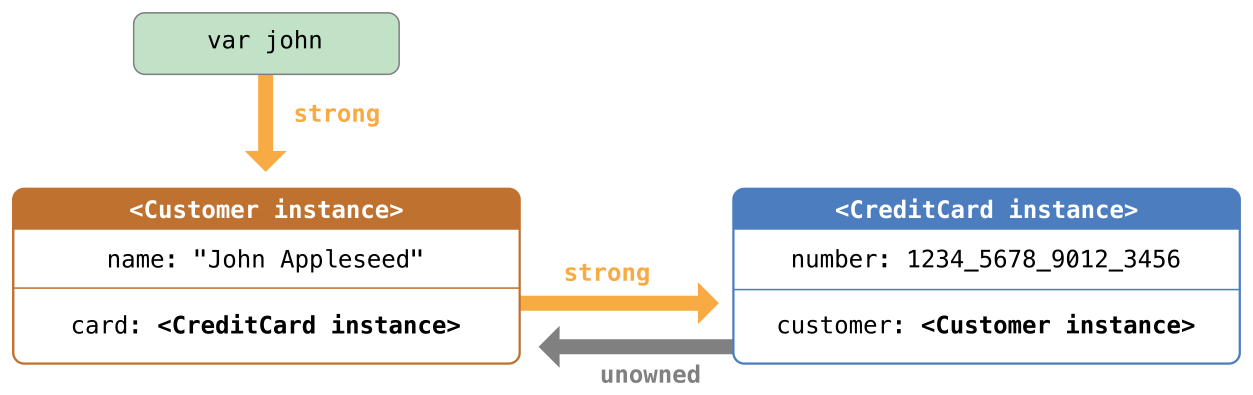
Figure 8: 无主引用
当断开 john 变量持有的强引用:
john = nil
// Prints "John Appleseed is being deinitialized"
// Prints "Card #1234567890123456 is being deinitialized"
这时(如图 9 所示),再也没有指向 Customer 的强引用了,所以该实例被销毁了,其后,再也没有指向 CreditCard 的强引用了,该实例也被销毁了。
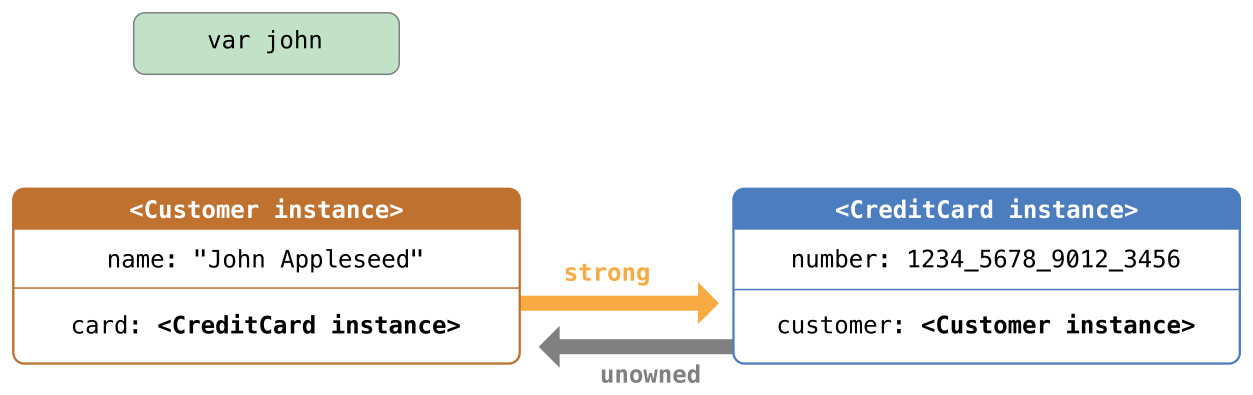
Figure 9: 断开 john 变量持有的强引用后,两个实例都会被回收
16.4. 闭包引起的循环强引用
在 Swift 中,闭包可以在其定义的上下文中捕获常量或者变量。所以, 在一个类中,闭包被赋值给了一个属性,而这个闭包又使用了这个类的实例的时候,就会引起循环强引用。
Swift 提供了一种方法来解决这个问题:闭包捕获列表(closure capture list)。在定义闭包的同时定义捕获列表作为闭包的一部分,捕获列表定义了闭包体内捕获一个或者多个引用类型的规则。跟解决两个类实例之间的循环强引用一样,声明每个捕获的引用为弱引用或者无主引用。
捕获列表中的每一项都由一对元素组成,一个元素是 weak 或者 unowned 关键字,另一个元素是类实例的引用(例如最常见就是 self ),这些在 [] 内用逗号隔开。具体可参考:https://docs.swift.org/swift-book/LanguageGuide/AutomaticReferenceCounting.html
17. Access Control
使用 Access Control 可以控制某代码是否可以被其它代码访问。不过,如果你编写的是 Single-Target App,你往往不用关心 Access Control(因为默认的访问级别是 internal,它表示所修饰实体在当前 Module 里可以访问,后文将介绍)。
17.1. Modules and Source Files
在 Swift 中,Access Control 机制基于 Module 和 Souce File。
什么是 Module 呢?A module is a single unit of code distribution. 具体来说, 一个 framework,或者一个 build target 就是一个 Module。 import 关键字后面接的就是 Module 名称。
17.2. Access Levels
有五个访问修饰符,分别对应五个关键字 open/public/internal/fileprivate/private,这五个级别,越到后面表示限制越多。它们的区别如表 3 所示。
| Access Level | 说明 |
|---|---|
| open | 所修饰实体可被任何代码访问 |
| public | 所修饰实体可被任何代码访问。不过,只在当前 Module 内可以被 override 和继承,在其他 Module 中不可以被 override 和继承 |
| internal(默认访问级别) | 所修饰实体在当前 Module 里可以访问,由于这是默认访问级别,所以 internal 关键字可写可不写 |
| fileprivate | 所修饰实体在当前 Swift 源文件里可以访问 |
| private | 所修饰实体只能在当前类里访问 |