Parallel Computing (CUDA Programming)
Table of Contents
1. GPU 简介
GPU(Graphics Processing Unit)是一种图形渲染设备,是显卡(Video Card/Graphics Card)的计算核心。GPU 最初仅用作纹理映射和多边形着色等需要较多存储空间的图形处理任务,不过,现代 GPU 已经不再局限于 3D 图形处理。GPU 已经成为了通用的多核处理器,它在 浮点运算、并行计算 等方面提供数十倍乃至于上百倍于 CPU 的性能。
GPU 和 CPU 有设计理念的不同,GPU 中包含大量的 ALU(Arithmetic Logic Unit),如图 1 所示。
Figure 1: GPU 和 CPU 有设计理念的不同,GPU 中包含大量的计算单元
2. CUDA C 编程
Nvidia 提出了 CUDA(Compute Unified Device Architecture)编程模型,它在 C(注:也支持 Fortran)语言的基础上进行了很小的扩展,使得应用程序既可以包含在 CPU 中执行的代码,又可以包含在 GPU 中执行的代码,充分利用了 CPU 和 GPU 各自的优点。
CUDA 程序的执行过程如图 2 所示,这个图演示了先执行 CPU 代码,再执行 GPU 代码,然后又执行 CPU 代码,又再执行 GPU 代码的情况。
Figure 2: Execution of a CUDA program
CUDA 程序中, 一个函数用 __global__ 修饰,表明这个函数在 GPU 中运行,且被称为“kernel”。
2.1. Hello World
#include<stdio.h>

// Your first kernel (= GPU function)
__global__ void helloFromGPU (void)      // __global__ 是 CUDA 的扩展,表明这个函数在 GPU 中运行
{
    printf("Hello World from GPU! Thread %d\n", threadIdx.x);
}

int main(void)
{
    helloFromGPU <<<1, 4>>>();           // <<< >>> 是 CUDA 的扩展,用于指定 GPU 线程规模

    cudaDeviceReset();
    return 0;
}
使用 nvcc 进行编译:
$ nvcc hello.cu –o hello
测试运行得到的可执行程序:
$ ./hello
Hello World from GPU! Thread 0
Hello World from GPU! Thread 1
Hello World from GPU! Thread 2
Hello World from GPU! Thread 3
2.2. 实例:数组相加
下面通过“两个浮点数数组相加”的例子来介绍一下 CUDA 编程。
2.2.1. CPU 版本
先看一下“两个浮点数数组相加”的 CPU 版本:
#include <iostream>
#include <math.h>

// function to add the elements of two arrays
void add(int n, float *x, float *y)
{
    for (int i = 0; i < n; i++)
        y[i] = x[i] + y[i];
}

int main(void)
{
    int N = 1<<20; // 1M elements

    float *x = new float[N];
    float *y = new float[N];

    // initialize x and y arrays on the host
    for (int i = 0; i < N; i++) {
        x[i] = 1.0f;
        y[i] = 2.0f;
    }

    // Run on the CPU
    add(N, x, y);

    // Check for errors (all values should be 3.0f)
    float maxError = 0.0f;
    for (int i = 0; i < N; i++)
        maxError = fmax(maxError, fabs(y[i]-3.0f));
    std::cout << "Max error: " << maxError << std::endl;

    // Free memory
    delete [] x;
    delete [] y;

    return 0;
}
编译并运行:
$ g++ add.cpp -o add
$ ./add
Max error: 0
2.2.2. 改造为 GPU 版本
下面我们来看看如何把前面的程序改造为 GPU 版本。
GPU 只能访问 GPU 中的内存,称为 Device Memory;而 CPU 能访问的内存称为 Host Memory。
Figure 3: Host Memory and Device Memory
对于前面例子,我们要把输入数据(x, y 两个数组)所占的内存从 Host Memory 复制到 Device Memory 中,然后执行 GPU 计算,计算完成后,把计算后的结果从 Device Memory 复制加 Host Memory 中。 这是 GPU 编程的通用编程模式。
下面是改造后的 GPU 版本:
// 这个例子仅启动了 1 个 GPU 线程,没有利用 GPU 优势
#include <iostream>
#include <math.h>

// Kernel function to add the elements of two arrays
__global__                                              // __global__ 表示其将在 GPU 上运行
void add(int n, float *x, float *y)
{
    for (int i = 0; i < n; i++)
        y[i] = x[i] + y[i];
}

int main(void)
{
    int N = 1<<20; // 1M elements

    float *x = new float[N];
    float *y = new float[N];

    // initialize x and y arrays on the host
    for (int i = 0; i < N; i++) {
        x[i] = 1.0f;
        y[i] = 2.0f;
    }

    //
    float *dev_x, *dev_y;
    int size = N * sizeof(float);
    cudaError_t err
    err = cudaMalloc((void **)&dev_x, size);            // 在 GPU 上分配内存
    if (err != cudaSuccess) {
        printf("%s in %s at line %d\n", cudaGetErrorString(err),__FILE__,__LINE__);
        exit(EXIT_FAILURE);
    }
    err = cudaMalloc((void **)&dev_y, size);
    if (err != cudaSuccess) {
        printf("%s in %s at line %d\n", cudaGetErrorString(err),__FILE__,__LINE__);
        exit(EXIT_FAILURE);
    }
    cudaMemcpy(dev_x, x, size, cudaMemcpyHostToDevice); // 把输入数据从 Host 内存到 Device 内存
    cudaMemcpy(dev_y, y, size, cudaMemcpyHostToDevice);

    add<<<1, 1>>>(N, x, y);                             // 在 GPU 上执行计算

    cudaMemcpy(y, dev_y, size, cudaMemcpyDeviceToHost); // 把结果从 Device 内存复制回 Host 内存

    cudaFree(dev_x);                                    // 释放 Device 内存
    cudaFree(dev_y);

    // Check for errors (all values should be 3.0f)
    float maxError = 0.0f;
    for (int i = 0; i < N; i++)
        maxError = fmax(maxError, fabs(y[i]-3.0f));
    std::cout << "Max error: " << maxError << std::endl;

    // Free Host memory
    delete [] x;
    delete [] y;

    return 0;
}
经过这个改造后,函数 add 在 GPU 上运行,但仅启动了一个 GPU 线程,这并没有利用 GPU 的优势。为了利用 GPU 优势,我们需要对函数 add 本身进行改造。后面将对此进行介绍。
2.2.3. 线程结构 <<<numBlocks, threadsPerBlock>>>
在启用 GPU 线程时,需要使用语法 <<<numBlocks, threadsPerBlock>>> 指定线程结构。
比如: kernel1<<<1, 4>>>(); 表示 1 个 block,每个 block 中有 4 个线程。
在 kernel 函数中,可以通过 threadIdx.x 知道自己是第几个线程。这例子中 kernel1 中打印 threadIdx.x 时会分别得到 0,1,2,3,参考节 2.1 中的例子。
又如: kernel1<<<2, 4>>>(); 表示 2 个 block,每个 block 中有 4 个线程。
在 kernel 函数中, 可以通过 blockIdx.x 知道自己是第几个 block,这个例子中会分别为 0,1;可以通过 threadIdx.x 知道自己是第几个线程。 这例子中 kernel1 中打印 threadIdx.x 时会分别得到 0,1,2,3。也就是说 8 个线程中打印 blockIdx.x 和 threadIdx.x 时会得到:
blockIdx.x   threadIdx.x
0            0
0            1
0            2
0            3
1            0
1            1
1            2
1            3
在 kernel 函数,通过 blockDim.x 可以知道 threadIdx.x 的维度(最大 x 下标加 1)。也就是说 8 个线程中打印 blockIdx.x, threadIdx.x, blockDim.x 时会得到:
blockIdx.x   threadIdx.x   blockDim.x
0            0             4
0            1             4
0            2             4
0            3             4
1            0             4
1            1             4
1            2             4
1            3             4
这样,以方式 kernel1<<<2, 4>>>(); 启动 kernel1 时,在 kernel1 函数中使用 blockIdx.x * blockDim.x + threadIdx.x 就可以得到 0,1,2,3,4,5,6,7。
这里介绍的线程结构比较简单,关于更多细节,可参考节:3.1
2.2.4. GPU 版本 2(monolithic kernel)
为了充分利用 GPU 优势,我们让每个 GPU 线程仅处理数组中的一个元素。kernel 函数改造为如下:
__global__
void add(int n, float *x, float *y)                 // kernel 中仅处理一个元素,每个 kernel 处理不同元素
{
    int i = blockIdx.x * blockDim.x + threadIdx.x;  // 获取元素下标,其含义参考上一节内容
    if (i < n)
        y[i] = x[i] + y[i];
}
这种类型的 kernel 被称为“monolithic kernel”。
每个线程仅处理 1 个元素,数组有 N=1<<20 (即 1M)元素,故我们需要启动 1M 线程,每个线程处理不同元素,下面这都是可行的:
add<<<ceil(N/512.0), 512>>>(N, x, y); // ceil(N/512.0) = 2048 个 block,每个 block 中有 512 个线程;2048 * 512 = 1M
add<<<ceil(N/256.0), 256>>>(N, x, y); // ceil(N/256.0) = 4096 个 block,每个 block 中有 256 个线程;4096 * 256 = 1M
我们可以直接配置 1 个 block,让 block 的线程数为 N 吗?像下面这样:
add<<<1, N>>>(N, x, y); // 这是不行的,N 超过了每个 block 中的最大线程数的限制
这是不行的。因为每个 block 中的最大线程数是有限制的:
- 当 Compute capability < 2.0 时,每个 block 中的最大线程数为 512;
- 当 Compute capability >= 2.0 时,每个 block 中的最大线程数为 1024。
2.2.5. GPU 版本 3(grid-stride loop)
在上一节介绍的 monolithic kernel 是不灵活的。启动 GPU 线程时,必须指定恰当的 <<<numBlocks, threadsPerBlock>>> 参数,否则可能出现数组元素没有被处理的情况(这种情况在指定的 numBlocks 太小时可能出现);此外,当元素规模变得更大时,可能会超过 numBlocks 的最大限制。
这种介绍另外一种更加灵活的 Kernel 函数编写方式——grid-stride loop:
__global__
void add(int n, float *x, float *y)                      // grid-stride loop
{
    int index = blockIdx.x * blockDim.x + threadIdx.x;
    int stride = blockDim.x * gridDim.x;
    for (int i = index; i < n; i += stride)
        y[i] = x[i] + y[i];
}
grid-stride loop 形式的 kernel 很灵活,其正确性和调用时如何指定线程无关。比如,下面这些调用形式都可以得到正确的结果:
add<<<1, 256>>>(N, x, y);
add<<<2, 256>>>(N, x, y);
add<<<4096, 256>>>(N, x, y);
add<<<1, 1>>>(N, x, y);
......
下面分别介绍这几种情况。
当使用 add<<<1, 256>>>(N, x, y); 时,共 256 个线程,每个线程处理 4096 个元素,每个线程中各变量如下:
blockIdx.x  blockDim.x  threadIdx.x  gridDim.x  index    stride
0           256         0            1          0        256 * 1
0           256         1            1          1        256 * 1
......
0           256         254          1          254      256 * 1
0           256         255          1          255      256 * 1
例如,index 为 0 的线程将对数组下标为 0, 256, 2*256, ..., 4095*256 的元素(共 4096 个)进行处理。
当使用 add<<<2, 256>>>(N, x, y); 共 512 个线程,每个线程处理 2048 个元素,每个线程中各变量如下:
blockIdx.x  blockDim.x  threadIdx.x  gridDim.x  index    stride
0           256         0            2          0        256 * 2
0           256         1            2          1        256 * 2
......
0           256         254          2          254      256 * 2
0           256         255          2          255      256 * 2
1           256         0            2          256      256 * 2
1           256         1            2          257      256 * 2
......
1           256         254          2          510      256 * 2
1           256         255          2          511      256 * 2
例如,index 为 0 的线程将对数组下标为 0, 512, 2*512, ..., 2047*512 的元素(共 2048 个)进行处理。
当使用 add<<<4096, 256>>>(N, x, y); 时,共 1M 线程(index 为 515 的线程如图 4 所示,图片摘自 https://developer.nvidia.com/blog/even-easier-introduction-cuda/ ),每个线程处理 1 个元素,每个线程中各变量如下:
blockIdx.x  blockDim.x  threadIdx.x  gridDim.x  index    stride
0           256         0            4096       0        256 * 4096
0           256         1            4096       1        256 * 4096
......
0           256         254          4096       254      256 * 4096
0           256         255          4096       255      256 * 4096
1           256         0            4096       256      256 * 4096
1           256         1            4096       257      256 * 4096
......
4095        256         254          4096       1048574  256 * 4096
4095        256         255          4096       1048575  256 * 4096
Figure 4: add<<<4096, 256>>>(N, x, y); 中 index 为 515 的线程
当使用 add<<<1, 1>>>(N, x, y); 时,共 1 个线程,每个线程处理 1M 元素,每个线程中各变量如下:
blockIdx.x  blockDim.x  threadIdx.x  gridDim.x  index    stride
0           1           0            1          0        1 * 1
在 CUDA Pro Tip: Write Flexible Kernels with Grid-Stride Loops 一文中,总结了 grid-stride loop 的几个优点:
- Scalability and thread reuse. By using a loop, you can support any problem size even if it exceeds the largest grid size your CUDA device supports. Moreover, you can limit the number of blocks you use to tune performance.
- Debugging. By using a loop instead of a monolithic kernel, you can easily switch to serial processing by launching one block with one thread.
add<<<1, 1>>>(N, x, y);This makes it easier to emulate a serial host implementation to validate results. - Portability and readability. The grid-stride loop code is more like the original sequential loop code than the monolithic kernel code, making it clearer for other users.
2.3. Function Execution Space Specifiers
函数除了用 __global__ 修饰外,还可以指定 __device__, __host__ ,它们的含义和区别如表 1 所示。
| name | Executed on the: | Only callable from the: |
|---|---|---|
__global__ |
device | host |
__device__ |
device | device |
__host__ |
host | host |
所谓 host 就是指 CPU,而 device 就是 GPU。
__global__ 不能和 __device__ 同时使用,也不能和 __host__ 同时使用;而 __device__ 和 __host__ 可以同时使用。
参考:https://docs.nvidia.com/cuda/cuda-c-programming-guide/index.html#function-declaration-specifiers
2.3.1. __forceinline__ and __noinline__
当一个函数用 __device__ 修饰时,编译器自己会决定是否对该函数进行内联编译。
我们也可以指定 __forceinline__ 或者 __noinline__ 来强制使用(或者不使用)内联编译。
3. 可伸缩的并行执行
3.1. CUDA 线程组织
一个 Grid 内的所有线程会执行相同的 kernel 函数。
在语法 <<<m, n>>> 中,参数 m 和 n 除了可以是 int 类型外,还可以是 dim3 类型(三维数组):
dim3 dimGrid(2, 1, 1);
dim3 dimBlock(4, 1, 1);
kernel1<<<dimGrid, dimBlock>>>(...);          // 这相同于 kernel1<<<2, 4>>>(...)
下面我们看一个复杂一些的例子,dimGrid 为 2 x 2 x 1,dimBlock 为 4 x 2 x 2:
dim3 dimGrid(2, 2, 1);
dim3 dimBlock(4, 2, 2);
Kernel1<<<dimGrid, dimBlock>>>(...);
这个例子中,block 共 4 个,表现为二维形式;而 thread 共 8 个,表现为三维形式,如图 5 所示。
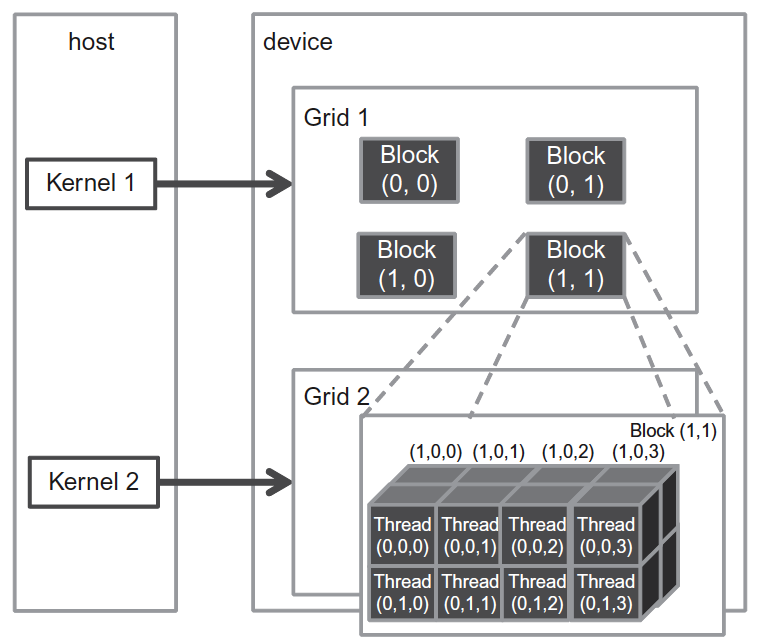
Figure 5: A multidimensional example of CUDA grid organization.
内置变量 gridDim.x, gridDim.y, gridDim.z 分别保存着 grid 的三个维度的信息,上面例子中,由于 dimGrid 为 2 x 2 x 1,所以有:
gridDim.x = 2
gridDim.y = 2
gridDim.z = 1
内置变量 blockDim.x, blockDim.y, blockDim.z 分别保存着 block 的三个维度的信息,上面例子中,由于 dimBlock 为 4 x 2 x 2,所以有:
blockDim.x = 4
blockDim.y = 2
blockDim.z = 2
blockIdx.x, blockIdx.y, blockIdx.z 保存着 grid 中当前 block 的下标, threadIdx.x, threadIdx.y, threadIdx.z 保存着 block 中当前 thread 的下标。如果以图 5 中面向读者的右下角那个 thread 为当前 thread,则有:
blockIdx.x = 1
blockIdx.y = 1
blockIdx.z = 0
threadIdx.x = 0
threadIdx.y = 1
threadIdx.z = 3
3.1.1. 各种维度情况下线程的编号
不管采用什么维度的 grid 和 block,我们都可以得到当前 thread 的扁平的全局一维下标:
// 1D grid of 1D blocks
__device__
int getGlobalIdx_1D_1D(){
    return blockIdx.x *blockDim.x + threadIdx.x;
}

// 1D grid of 2D blocks
__device__
int getGlobalIdx_1D_2D(){
    return blockIdx.x * blockDim.x * blockDim.y
        + threadIdx.y * blockDim.x + threadIdx.x;
}

// 1D grid of 3D blocks
__device__
int getGlobalIdx_1D_3D(){
    return blockIdx.x * blockDim.x * blockDim.y * blockDim.z
        + threadIdx.z * blockDim.y * blockDim.x
        + threadIdx.y * blockDim.x + threadIdx.x;
}

// 2D grid of 1D blocks
__device__ int getGlobalIdx_2D_1D(){
    int blockId = blockIdx.y * gridDim.x + blockIdx.x;
    int threadId = blockId * blockDim.x + threadIdx.x;
    return threadId;
}

// 2D grid of 2D blocks
__device__
int getGlobalIdx_2D_2D(){
    int blockId = blockIdx.x + blockIdx.y * gridDim.x;
    int threadId = blockId * (blockDim.x * blockDim.y)
        + (threadIdx.y * blockDim.x) + threadIdx.x;
    return threadId;
}

// 2D grid of 3D blocks
__device__
int getGlobalIdx_2D_3D(){
    int blockId = blockIdx.x + blockIdx.y * gridDim.x;
    int threadId = blockId * (blockDim.x * blockDim.y * blockDim.z)
        + (threadIdx.z * (blockDim.x * blockDim.y))
        + (threadIdx.y * blockDim.x) + threadIdx.x;
    return threadId;
}

// 3D grid of 1D blocks
__device__
int getGlobalIdx_3D_1D(){
    int blockId = blockIdx.x + blockIdx.y * gridDim.x
        + gridDim.x * gridDim.y * blockIdx.z;
    int threadId = blockId * blockDim.x + threadIdx.x;
    return threadId;
}

// 3D grid of 2D blocks
__device__
int getGlobalIdx_3D_2D(){
    int blockId = blockIdx.x + blockIdx.y * gridDim.x
        + gridDim.x * gridDim.y * blockIdx.z;
    int threadId = blockId * (blockDim.x * blockDim.y)
        + (threadIdx.y * blockDim.x) + threadIdx.x;
    return threadId;
}

// 3D grid of 3D blocks
__device__
int getGlobalIdx_3D_3D(){
    int blockId = blockIdx.x + blockIdx.y * gridDim.x
        + gridDim.x * gridDim.y * blockIdx.z;
    int threadId = blockId * (blockDim.x * blockDim.y * blockDim.z)
        + (threadIdx.z * (blockDim.x * blockDim.y))
        + (threadIdx.y * blockDim.x) + threadIdx.x;
    return threadId;
}
参考:https://cs.calvin.edu/courses/cs/374/CUDA/CUDA-Thread-Indexing-Cheatsheet.pdf
3.1.2. 抽象概念(Grid/Block/Thread)和硬件的映射关系
下面是抽象概念(Grid/Block/Thread)和硬件的映射关系:
- Grids map to GPUs
- Blocks map to the MultiProcessors (MP)
- Threads map to Stream Processors (SP)
- Warps are groups of (32) threads that execute simultaneously
3.2. 映射线程到多维数据(RGB 转灰度图片实例)
grid 可以是 1D,2D,3D,block 也可以是 1D,2D,3D,那我们应该如何选择线程的组织形式呢?这往往由待处理数组的结构的决定。 比如,处理图片时,由于图片是像素点的二维数组,这时采用 2D grid 和 2D block 是个不错的选择。假设,现在要处理图片的像素规模为 \(x \times y = 76 \times 62\) 。我们决定采用 16 x 16 的 2D block,这时 x 方向上至少需要 5 block,而 y 方向上至少需要 4 block,如图 6 所示。
Figure 6: Using a 2D thread grid to process a 76 × 62 picture P.
从图 6 中可以看到,在 x 方向上有 4 个多余的线程,在 y 方向上有 2 个多余的线程。在 kernel 函数中通过边界检查让多余线程不执行操作即可。
假设 GPU 任务为 RGB 彩色图片转灰色图片,则可以这样启动 kernel:
int m = 76;
int n = 62;
dim3 dimGrid(ceil(m/16.0), ceil(n/16.0), 1);      // 5 x 4 x 1
dim3 dimBlock(16, 16, 1);                         // 16 x 16 x 1
colorToGreyscaleConversion<<<dimGrid,dimBlock>>>(d_Pin, d_Pout, m, n);
关键的 kernel,即 colorToGreyscaleConversion 的实现如下:
// we have 3 channels corresponding to RGB
// The input image is encoded as unsigned characters [0, 255]
__global__
void colorToGreyscaleConversion(unsigned char * Pout, unsigned
                                char * Pin, int width, int height) {,
    int Col = threadIdx.x + blockIdx.x * blockDim.x;        // threadIdx.x: [0, 15] ,blockIdx.x: [0, 4],blockDim.x 总是为 16
    int Row = threadIdx.y + blockIdx.y * blockDim.y;        // threadIdx.y: [0, 15] ,blockIdx.y: [0, 3],blockDim.y 总是为 16
    if (Col < width && Row < height) {                      // 多余的线程不会通过这个边界检查
        // get 1D coordinate for the grayscale image
        int greyOffset = Row*width + Col;
        // one can think of the RGB image having
        // CHANNEL times columns than the grayscale image
        int rgbOffset = greyOffset*CHANNELS;                // RGB 有 3 个通道,CHANNELS 为 3
        unsigned char r = Pin[rgbOffset ]; // red value for pixel
        unsigned char g = Pin[rgbOffset + 2]; // green value for pixel
        unsigned char b = Pin[rgbOffset + 3]; // blue value for pixel
        // perform the rescaling and store it
        // We multiply by floating point constants
        Pout[grayOffset] = 0.21f*r + 0.71f*g + 0.07f*b;     // RGB 转灰色的公式
    }
}
3.3. 图片模糊处理实例
图片模糊处理的一种方式就是“把当前像素相邻的几个像素的平均值”作为当前像素的值,如图 7 所示,它取的是 3 x 3 小窗口里的像素的平均值(当然这个小窗口也可以更大,如 5 x 5 或 7 x 7 等)。
Figure 7: Each output pixel is the average of a patch of pixels in the input image.
下面是图片模糊处理 blurKernel 的实现:
__global__
void blurKernel(unsigned char * in, unsigned char * out, int w, int h) {
    int Col = threadIdx.x + blockIdx.x * blockDim.x;
    int Row = threadIdx.y + blockIdx.y * blockDim.y;
    if (Col < w && Row < h) {
        int pixVal = 0;
        int pixels = 0;

        // Get the average of the surrounding BLUR_SIZE x BLUE_SIZE box
        for (int blurRow = -BLUR_SIZE; blurRow < BLUR_SIZE + 1; ++blurRow) {
            for (int blurCol = -BLUE_SIZE; blurCol < BLUR_SIZE + 1; ++blurCol) {
                int curRow = Row + blurRow;
                int curCol = Col + blurCol;

                // Verify we have a valid image pixel
                if (curRow > -1 && curRow < h && curCol > -1 && curCol < w) {
                    pixVal += in[curRow * w + curCol];
                    pixels++; // Key track of number of pixels in the avg
                }
            }
        }

        // Write our new pixel value out
        out[Row * w + Col] = (unsigned char)(pixVal / pixels);
    }
}
上面代码中,如果计算 3 x 3 小窗口里的像素的平均值(9 个像素点的平均值),则 BLUE_SIZE = 1;如果计算 5 x 5 小窗口里的像素的平均值(25 个像素点的平均值),则 BLUE_SIZE = 2。
需要说明的是,对于角上和边上的像素,其平均值并没有计算 9 个像素点,如图 8 所示。
Figure 8: 角上仅考虑了 4 个像素点的平均,边上仅考虑了 6 个像素点的平均
3.4. Barrier Synchronization(限于 block 内)
CUDA 中,可以使用函数 __syncthreads() ,让同一个 block 中的线程进行同步。也就是说,当一个线程调用 __syncthreads() 后,它会等待同一个 block 中的所有其它线程都到达 __syncthreads() 所在位置后,才往下执行。
不过,需要注意的是。一个 __syncthreads() 必须被同一个 block 中所有线程都执行,或者都不执行。假设在 if-then-else 语句的 if 和 else 分支中各有一个 __syncthreads() 语句,而同一个 block 中的有些线程执行进入了 if 分支,而另外一些线程进入了 else 分支,那么这个程序会一直等待。
这种同步机制限定在同一个 block 内,也就是说 block 之间没有任何的依赖和约束,它们可以以任意顺序执行, 这提供了 Transparent Scalability,如图 9 所示。
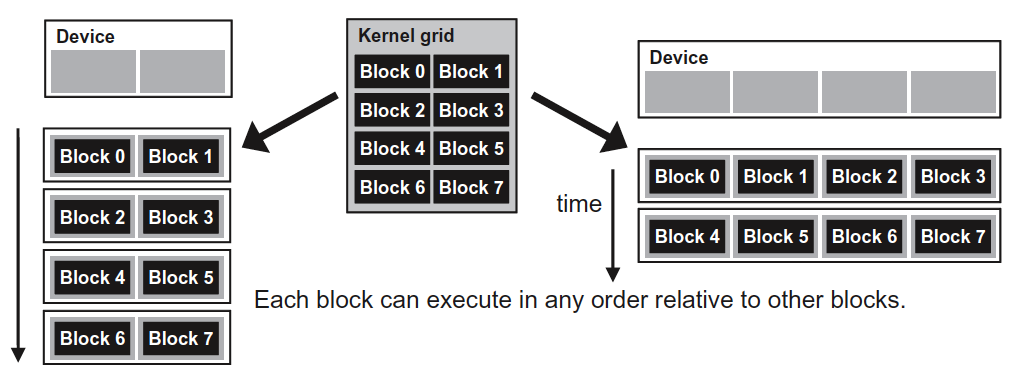
Figure 9: Lack of synchronization constraints between blocks enables transparent scalability for CUDA programs.
3.5. Thread Scheduling
Thread 调度属于硬件的实现细节,了解这些实现细节有助于我们进行性能调优。
CUDA 程序一般会创建一些线程块(Block), Block 会被调度到空闲的 Streaming Multiprocessors(SM)上去。当 Block 执行完毕后,Block 会退出 SM,释放出 SM 的资源,以供其他待 Block 调度进去。
因此,无论是只有 2 个 SM 的 GPU,还是有 4 个 SM 的 GPU,这些线程块都会被调度执行,只不过 4 个 SM 的 GPU 一般会执行得更快。因此,同样的程序,可以在具有不同 SM 数量上的 GPU 运行,这称为 Automatic Scalability。如图 10 所示。
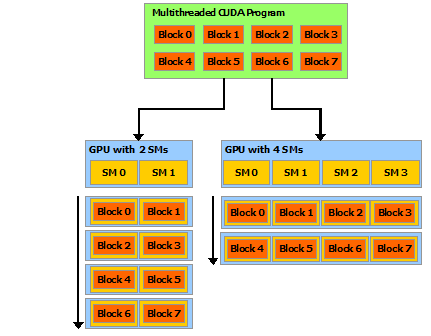
Figure 10: Automatic Scalability
更细节一点, 一个 block 分配给 SM 执行时,还会进一步拆分为 Warp,它是以 32 个 thread 组成的小分组(warpSize 是一个硬件的参数,它往往为 32)。Warp 是 SM 内的线程调度的最小单元。 假设,一个 block 中共有 256 个线程,则我们可以计算出这个 block 包含 256/32 = 8 个 Warp。
一个 Warp 在执行时,遵循 Single instruction, multiple threads(SIMT)模式。也就是 32 个 thread 会共享“instruction fetching”过程,并不是每个 thread 分别去“instruction fetching”,而是“instruction fetching”后,给 32 个线程都执行。这种方式可以大大减少频繁的“instruction fetching”过程。
4. Memory and Data Locality
4.1. Memory-Bound Programs
考虑节 3.3 中介绍的图片模糊 kernel 的最核心代码:
        // Get the average of the surrounding BLUR_SIZE x BLUE_SIZE box
        for (int blurRow = -BLUR_SIZE; blurRow < BLUR_SIZE + 1; ++blurRow) {
            for (int blurCol = -BLUE_SIZE; blurCol < BLUR_SIZE + 1; ++blurCol) {
                int curRow = Row + blurRow;
                int curCol = Col + blurCol;

                // Verify we have a valid image pixel
                if (curRow > -1 && curRow < h && curCol > -1 && curCol < w) {
                    pixVal += in[curRow * w + curCol];
                    pixels++; // Key track of number of pixels in the avg
                }
            }
        }
在内层 for 循环的每次迭代中,有 1 次 Global Memory 的访问(即对 in[] 数组的访问),有 1 次浮点数的加法运算(即 pixVal += in[curRow * w + curCol] )。
我们把“浮点运算次数”和“取内存次数”的比值定义为 compute-to-globalmemory-access ratio (CGMA),对于上面例子有:
\[CGMA = \frac{\text{浮点运算次数}}{\text{Global Memory 访问次数}} = \frac{1}{1} = 1.0\]
假设 Global memory 的访问速度是 1000 GB/s(即 1 TB/s),考虑单精度浮点数占用 4 个字节,那么每秒可以加载 1000/4=250 giga 浮点数,也就是说 kernel 每秒处理浮点数不会超过 250 GFLOPS。
设某 GPU 的浮点计算性能为 12 TFLOPS,那么运行上面 kernel 时,仅达到浮点计算能力峰值的 2%,没有充分地利用 GPU。像这种,执行速度的 “瓶颈位于内存访问过程”的程序被称为“memory-bound program”。
后文将介绍如何减少内存的访问次数,以提高程序执行速度。
4.2. 矩阵乘法
下面介绍矩阵 M 和 N 相乘得到结果矩阵 P。
假设每个线程仅计算结果矩阵 P 的一个元素,可以使用下面的 kernel 函数:
__global__
void MatrixMulKernel(float* M, float* N, float* P, int Width) {
    // Calculate the row index of the P element and M
    int Row = blockIdx.y * blockDim.y + threadIdx.y;
    // Calculate the column index of P and N
    int Col = blockIdx.x * blockDim.x + threadIdx.x;
    if ((Row < Width) && (Col < Width)) {
        float Pvalue = 0;
        // each thread computes one element of the block sub-matrix
        for (int k = 0; k < Width; ++k) {
            Pvalue += M[Row*Width+k] * N[k*Width+Col];
        }
        P[Row*Width+Col] = Pvalue;
    }
}
这个 kernel 和节 3.2 介绍的彩色图片转灰度图片的 colorToGreyscaleConversion 基本类似。kernel 中 Row 和 Col 的如图 11 所示。
Figure 11: Row 和 Col 的计算
和彩色图片转灰度图片类似,我们也是采用 2D block。假设矩阵为 4 x 4 的,采用 2 x 2 的 block,那么 kernel 执行如 12 图所示。
Figure 12: MatrixMulKernel 执行示意图
如果仅考虑 block(0,0) 中线程的执行,则如图 13 所示。

Figure 13: block(0,0) 中线程的执行
在下面最关键代码中:
        for (int k = 0; k < Width; ++k) {
            Pvalue += M[Row*Width+k] * N[k*Width+Col];
        }
有两次 Global memory 的访问,一次浮点乘法和一次浮点加法。所以上一节介绍的 CGMA 值会为 1,这是一个“memory-bound program”,我们需要想办法减少内存的访问次数。
4.3. CUDA 内存类型
CUDA 设备中有不同的内存类型,可以帮助我们提高 CGMA,以提高程序性能。
CUDA 的内存类型如图 14 所示。
Figure 14: Overview of the CUDA device memory model
通过表 2 所示语法可以声明程序变量位于哪种内存中。
| Variable declaration | Memory | Scope | Lifetime |
|---|---|---|---|
| Automatic variables other than arrays | Register | Thread | Kernel |
| Automatic array variables | Local | Thread | Kernel |
__device__ __shared__ int SharedVar; |
Shared | Block | Kernel |
__device__ int GlobalVar; |
Global | Grid | Application |
__device__ __constant__ int ConstVar; |
Constant | Grid | Application |
4.4. 矩阵相乘优化(Tile 优化)
如何减少矩阵相乘时对 Global memory 的访问呢?我们先看看图 13 的情况。
block(0,0) 中的 4 个线程读取 Global memory 的情况如图 15 所示。可以发现:Global memory 中的数据被读取了多次。
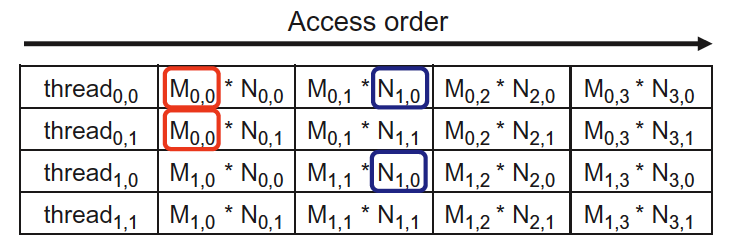
Figure 15: block(0,0) 线程读取内存的情况
如果同一个 block 中的线程仅从 Global memory 中读取输入矩阵一次,放入到 Shared memory 中,则可以减少对 Global memory 的访问,以提高程序性能。
这种优化被为 Tile 优化。下面是一个采用 Tile 优化的矩阵相乘的 kernel 函数:
__global__
void MatrixMulKernel(float* d_M, float* d_N, float* d_P,
                     int Width) {
    __shared__ float Mds[TILE_WIDTH][TILE_WIDTH];  // 后面会把 d_M 数据(Global memory)先保存到Shared memory 中
    __shared__ float Nds[TILE_WIDTH][TILE_WIDTH];  // 后面会把 d_M 数据(Global memory)先保存到Shared memory 中

    int bx = blockIdx.x; int by = blockIdx.y;
    int tx = threadIdx.x; int ty = threadIdx.y;
    // Identify the row and column of the d_P element to work on
    int Row = by * TILE_WIDTH + ty;
    int Col = bx * TILE_WIDTH + tx;
    float Pvalue = 0;
    // Loop over the d_M and d_N tiles required to compute d_P element
    for (int ph = 0; ph < Width/TILE_WIDTH; ++ph) {
        // Collaborative loading of d_M and d_N tiles into shared memory
        Mds[ty][tx] = d_M[Row*Width + ph*TILE_WIDTH + tx];
        Nds[ty][tx] = d_N[(ph*TILE_WIDTH + ty)*Width + Col];
        __syncthreads();     // 确保当每个线程需要的数据被不同线程加载到 Shared memory 中后,同 block 中的线程才往下执行
        for (int k = 0; k < TILE_WIDTH; ++k) {
            Pvalue += Mds[ty][k] * Nds[k][tx];
        }
        __syncthreads();     // 确保当所有线程都执行完上面的计算后,同 block 中的线程才往下执行
    }
    d_P[Row*Width + Col] = Pvalue;
}
5. Unified Memory
CUDA 6 中引入了 Unified Memory,不用显式地使用 cudaMemcpy 在 Host 和 Device 之间复制内存了,简化了编程步骤,如图 16 所示。

Figure 16: CUDA 6 Unified Memory
6. 并行计算模式
在《Programming Massively Parallel Processors, 3rd, 2017》一书介绍了一些并行计算模式,如:Convolution、Prefix Sum、Histogram、Sparse Matrix Computation、Merge Sort、Graph Search。
这里不介绍它们,有兴趣的读者可以参考原著。
7. Compute Capability
CUDA 的计算能力 Compute Capability 可以认为是硬件的版本。表 3 列出了不同 Compute Capability 下的一些产品型号。
| Compute Capability | Micro-architecture | GeForce(消费级) | Quadro(专业级) | Tesla(数据中心) | Jetson(嵌入式) |
|---|---|---|---|---|---|
| 1.0 | Tesla | GeForce 8800 GTX | Quadro FX 5600 | ||
| 2.0 | Fermi | GeForce GTX 590 | Quadro Plex 7000 | ||
| 3.0 | Kepler | GeForce GTX 770 | Quadro K5000 | Tesla K10 | |
| 3.2 | Kepler | ||||
| 3.5 | Kepler | GeForce GTX TITAN Z | Quadro K6000 | Tesla K40, Tesla K20 | |
| 3.7 | Kepler | Tesla K80 | |||
| 5.0 | Maxwell | GeForce GTX 750 | Quadro K1200 | ||
| 5.2 | Maxwell | GeForce GTX TITAN X | Quadro M5000 | Tesla M60, Tesla M40 | |
| 5.3 | Maxwell | Jetson TX1, Tegra X1 | |||
| 6.0 | Pascal | Quadro GP100 | Tesla P100 | ||
| 6.1 | Pascal | GeForce GTX 1080 | Quadro P6000 | Tesla P40, Tesla P4 | |
| 6.2 | Pascal | Jetson TX2 | |||
| 7.0 | Volta | NVIDIA TITAN V | Quadro GV100 | Tesla V100 | |
| 7.2 | Volta | Jetson AGX Xavier | |||
| 7.5 | Turing | Geforce RTX 2080 | Quadro RTX 8000 | Tesla T4 | |
| 8.0 | Ampere |
不同 Compute Capability 的区别可以参考:https://docs.nvidia.com/cuda/cuda-c-programming-guide/index.html#compute-capabilities
8. 开发工具
8.2. nvprof
nvprof 是对 CUDA 程序进行性能瓶颈分析的工具。
下面是使用 nvprof 对矩阵相乘 CUDA 程序进行分析的例子:
$ nvprof matrixMul
[Matrix Multiply Using CUDA] - Starting...
==27694== NVPROF is profiling process 27694, command: matrixMul
GPU Device 0: "GeForce GT 640M LE" with compute capability 3.0

MatrixA(320,320), MatrixB(640,320)
Computing result using CUDA Kernel...
done
Performance= 35.35 GFlop/s, Time= 3.708 msec, Size= 131072000 Ops, WorkgroupSize= 1024 threads/block
Checking computed result for correctness: OK

Note: For peak performance, please refer to the matrixMulCUBLAS example.
==27694== Profiling application: matrixMul
==27694== Profiling result:
Time(%)      Time     Calls       Avg       Min       Max  Name
 99.94%  1.11524s       301  3.7051ms  3.6928ms  3.7174ms  void matrixMulCUDA<int=32>(float*, float*, float*, int, int)
  0.04%  406.30us         2  203.15us  136.13us  270.18us  [CUDA memcpy HtoD]
  0.02%  248.29us         1  248.29us  248.29us  248.29us  [CUDA memcpy DtoH]

==27964== API calls:
Time(%)      Time     Calls       Avg       Min       Max  Name
 49.81%  285.17ms         3  95.055ms  153.32us  284.86ms  cudaMalloc
 25.95%  148.57ms         1  148.57ms  148.57ms  148.57ms  cudaEventSynchronize
 22.23%  127.28ms         1  127.28ms  127.28ms  127.28ms  cudaDeviceReset
  1.33%  7.6314ms       301  25.353us  23.551us  143.98us  cudaLaunch
  0.25%  1.4343ms         3  478.09us  155.84us  984.38us  cudaMemcpy
  0.11%  601.45us         1  601.45us  601.45us  601.45us  cudaDeviceSynchronize
  0.10%  564.48us      1505     375ns     313ns  3.6790us  cudaSetupArgument
  0.09%  490.44us        76  6.4530us     307ns  221.93us  cuDeviceGetAttribute
  0.07%  406.61us         3  135.54us  115.07us  169.99us  cudaFree
  0.02%  143.00us       301     475ns     431ns  2.4370us  cudaConfigureCall
  0.01%  42.321us         1  42.321us  42.321us  42.321us  cuDeviceTotalMem
  0.01%  33.655us         1  33.655us  33.655us  33.655us  cudaGetDeviceProperties
  0.01%  31.900us         1  31.900us  31.900us  31.900us  cuDeviceGetName
  0.00%  21.874us         2  10.937us  8.5850us  13.289us  cudaEventRecord
  0.00%  16.513us         2  8.2560us  2.6240us  13.889us  cudaEventCreate
  0.00%  13.091us         1  13.091us  13.091us  13.091us  cudaEventElapsedTime
  0.00%  8.1410us         1  8.1410us  8.1410us  8.1410us  cudaGetDevice
  0.00%  2.6290us         2  1.3140us     509ns  2.1200us  cuDeviceGetCount
  0.00%  1.9970us         2     998ns     520ns  1.4770us  cuDeviceGet
8.3. nvidia-smi
nvidia-smi (NVIDIA System Management Interface) 是管理 NVIDIA GPU 设备的命令行工具。可以监控 GPU 使用情况以及更改 GPU 状态。
下面是 nvidia-smi 的运行例子,输出中 GPU-Util 为 100% 表示 GPU 正在满负载工作。
$ nvidia-smi
+-----------------------------------------------------------------------------+
| NVIDIA-SMI 418.67       Driver Version: 418.67       CUDA Version: 10.1     |
|-------------------------------+----------------------+----------------------+
| GPU  Name        Persistence-M| Bus-Id        Disp.A | Volatile Uncorr. ECC |
| Fan  Temp  Perf  Pwr:Usage/Cap|         Memory-Usage | GPU-Util  Compute M. |
|===============================+======================+======================|
|   0  Tesla P4            On   | 00000000:00:08.0 Off |                    0 |
| N/A   59C    P0    47W /  75W |   1399MiB /  7611MiB |    100%      Default |
+-------------------------------+----------------------+----------------------+

+-----------------------------------------------------------------------------+
| Processes:                                                       GPU Memory |
|  GPU       PID   Type   Process name                             Usage      |
|=============================================================================|
|    0     22589      C   ./test                                      1389MiB |
+-----------------------------------------------------------------------------+
9. 参考
本文主要考虑书籍:Programming Massively Parallel Processors
CUDA C++ Programming Guide
CUDA C++ Best Practices Guide