ROS tf package
Table of Contents
1. tf 简介
tf is a package that lets the user keep track of multiple coordinate frames over time. tf maintains the relationship between coordinate frames in a tree structure buffered in time, and lets the user transform points, vectors, etc between any two coordinate frames at any desired point in time.
1.1. 命令行工具
tf 包还提供了一些辅助工具用来帮调试等用途。
| 工具 | 描述 |
|---|---|
| view_frames | visualizes the full tree of coordinate transforms. |
| tf_monitor | monitors transforms between frames. |
| tf_echo | prints specified transform to screen. |
| roswtf | with the tfwtf plugin, helps you track down problems with tf. |
| static_transform_publisher | a command line tool for sending static transforms. |
You may also wish to use the tf_remap node, which is a utility node for remapping coordinate transforms.
2. tf demo
下面这个例子来自:http://wiki.ros.org/tf/Tutorials/Introduction%20to%20tf
首先,安装这个 demo 的依赖库。
$ sudo apt-get install ros-indigo-ros-tutorials ros-indigo-geometry-tutorials ros-indigo-rviz ros-indigo-rosbash ros-indigo-rqt-tf-tree
然后,直接运行 demo。
$ roslaunch turtle_tf turtle_tf_demo.launch
可以看到两只小乌龟。在启动 demo 的 terminal 中(注意不是有小乌龟的窗口中)用方向键(“上”为前进,“下”为后退,“左”逆时针转变方向,“右”顺时针转变方向)可以控制一只小乌龟,而另一只小乌龟会跟着它走。最后两只小乌龟重叠在一起。
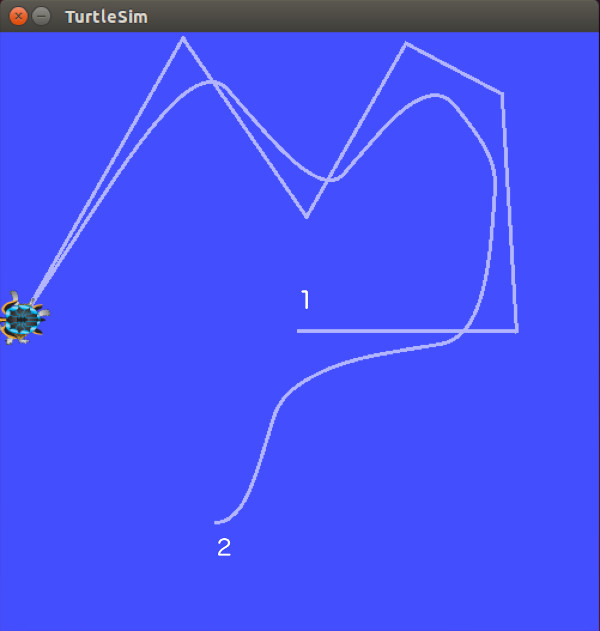
Figure 1: ROS tf demo(线路 1 是小乌龟 1 的线路,可用“方向键”控制;线路 2 是小乌龟 2 的线路,它跟随着小乌龟 1)
2.1. 工作原理分析
这个 demo 使用 tf 库建立了三个坐标系:a world frame, a turtle1 frame, and a turtle2 frame。 使用 tf broadcaster 发布两只乌龟的坐标系,并且使用 tf listener 计算乌龟坐标系之间的差异,使得第二只乌龟跟随第一只乌龟移动。
2.2. 查看坐标系(rqt_tf_tree)
用工具 rqt_tf_tree 可以方便地查看发布的坐标系。
下面任一个命令都可以启动 rqt_tf_tree。
$ rosrun rqt_tf_tree rqt_tf_tree
$ rqt &                            # 在plugins菜单中选择tf tree
可以看到 world 坐标系及发布的两个坐标系:
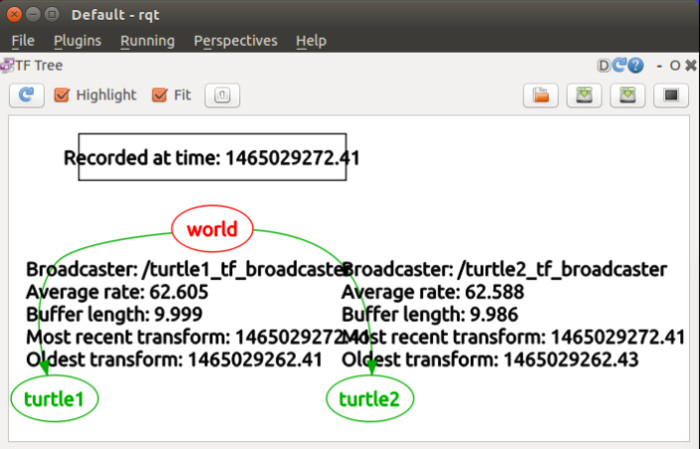
Figure 2: world 坐标系及两只乌龟的坐标系
2.3. 查看坐标系(rviz)
rviz is a visualization tool that is useful for examining tf frames. Let's start rviz with the turtle_tf configuration file using the -d option for rviz:
$ rosrun rviz rviz -d `rospack find turtle_tf`/rviz/turtle_rviz.rviz
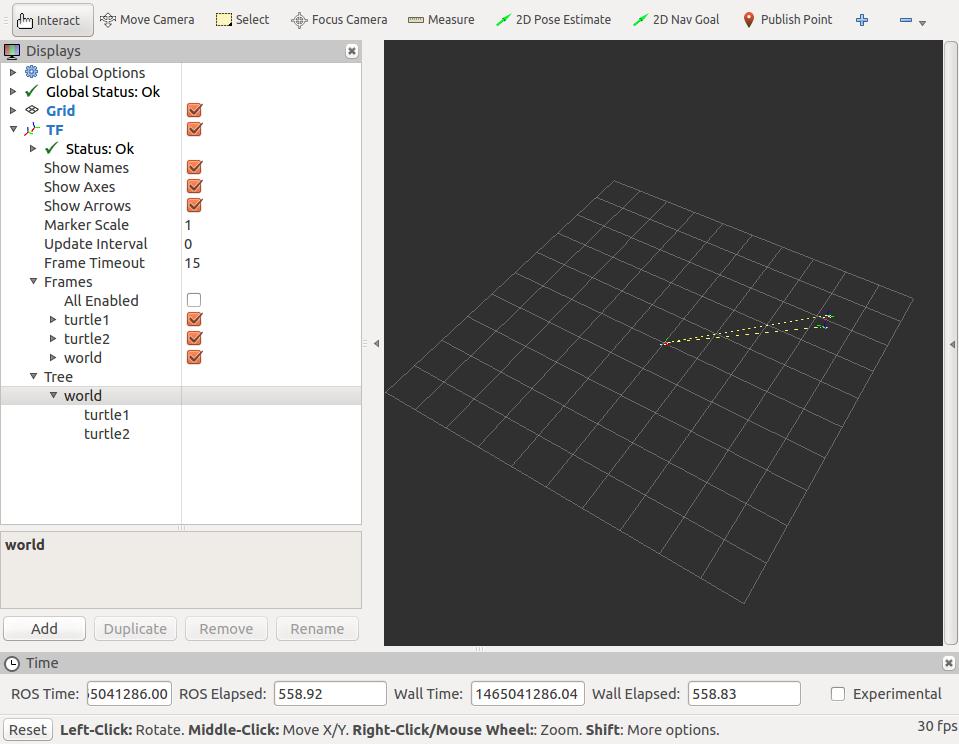
Figure 3: 两只乌龟移动时,坐标中两个对应标记也会随着移动
3. Writing a tf broadcaster
现在开始通过两个 Tutorials(Writing a tf broadcaster 和 Writing a tf listener)来介绍前一节中 tf demo 的实现原理。
首先介绍 Writing a tf broadcaster,摘自:http://wiki.ros.org/tf/Tutorials/Writing%20a%20tf%20broadcaster%20%28Python%29
先创建一个名为 learning_tf 的 package,基本步骤如下:
$ cd %YOUR_CATKIN_WORKSPACE_HOME%/src
$ catkin_create_pkg learning_tf tf roscpp rospy turtlesim
$ cd %YOUR_CATKIN_WORKSPACE_HOME%/
$ catkin_make
$ source ./devel/setup.bash
3.1. 创建 Node
先进入包目录,创建 nodes 子目录:
$ roscd learning_tf
$ mkdir nodes
创建文件 nodes/turtle_tf_broadcaster.py,内容如下:
#!/usr/bin/env python
import roslib
roslib.load_manifest('learning_tf')
import rospy

import tf
import turtlesim.msg

# The handler function for the turtle pose message broadcasts this turtle's translation
# and rotation, and publishes it as a transform from frame "world" to frame "turtleX".
def handle_turtle_pose(msg, turtlename):
    br = tf.TransformBroadcaster()
    br.sendTransform((msg.x, msg.y, 0),
                     tf.transformations.quaternion_from_euler(0, 0, msg.theta),
                     rospy.Time.now(),
                     turtlename,
                     "world")

if __name__ == '__main__':
    rospy.init_node('turtle_tf_broadcaster')
    turtlename = rospy.get_param('~turtle')     # takes a single parameter "turtle", which specifies a turtle name, e.g. "turtle1" or "turtle2".
    rospy.Subscriber('/%s/pose' % turtlename,   # subscribes to topic "turtleX/pose" and runs function handle_turtle_pose on every incoming message.
                     turtlesim.msg.Pose,
                     handle_turtle_pose,
                     turtlename)
    rospy.spin()
把 node 加上可执行权限:
$ chmod +x nodes/turtle_tf_broadcaster.py
3.2. 创建 launch 文件并启动
创建一个 launch 文件,
$ mkdir launch
增加文件 launch/start_demo.launch,其内容如下:
  <launch>
    <!-- Turtlesim Node-->
    <node pkg="turtlesim" type="turtlesim_node" name="sim"/>
    <node pkg="turtlesim" type="turtle_teleop_key" name="teleop" output="screen"/>

    <node name="turtle1_tf_broadcaster" pkg="learning_tf" type="turtle_tf_broadcaster.py" respawn="false" output="screen" >
      <param name="turtle" type="string" value="turtle1" />
    </node>
    <node name="turtle2_tf_broadcaster" pkg="learning_tf" type="turtle_tf_broadcaster.py" respawn="false" output="screen" >
      <param name="turtle" type="string" value="turtle2" />
    </node>

  </launch>
用下面命令启动这个例子:
$ roslaunch learning_tf start_demo.launch
将会出现一只小乌龟。在启动运行上面命令的 terminal 窗口中(注意不是有小乌龟的窗口中)用方向键可以控制它的移动。如下图所示:
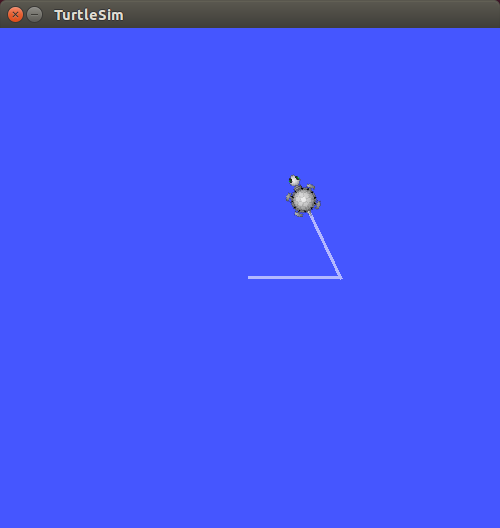
Figure 4: 一只小乌龟,可以用方向键移动它
3.3. 检测结果
现在使用工具 tf_echo 来检测小乌龟的位置和方向是否发布给了 tf。
启动 tf_echo:
$ rosrun tf tf_echo /world /turtle1
下面这些数据是小乌龟按图 4 所示路径移动时产生的:
$ rosrun tf tf_echo /world /turtle1
At time 1465054378.890
- Translation: [5.544, 5.544, 0.000]
- Rotation: in Quaternion [0.000, 0.000, 0.000, 1.000]
            in RPY (radian) [0.000, -0.000, 0.000]
            in RPY (degree) [0.000, -0.000, 0.000]
At time 1465054379.657
- Translation: [5.544, 5.544, 0.000]
- Rotation: in Quaternion [0.000, 0.000, 0.000, 1.000]
            in RPY (radian) [0.000, -0.000, 0.000]
            in RPY (degree) [0.000, -0.000, 0.000]
At time 1465054380.665
- Translation: [6.728, 5.544, 0.000]
- Rotation: in Quaternion [0.000, 0.000, 0.000, 1.000]
            in RPY (radian) [0.000, -0.000, 0.000]
            in RPY (degree) [0.000, -0.000, 0.000]
At time 1465054381.673
- Translation: [7.560, 5.544, 0.000]
- Rotation: in Quaternion [0.000, 0.000, 0.112, 0.994]
            in RPY (radian) [0.000, -0.000, 0.224]
            in RPY (degree) [0.000, -0.000, 12.834]
At time 1465054382.665
- Translation: [7.560, 5.544, 0.000]
- Rotation: in Quaternion [0.000, 0.000, 0.846, 0.534]
            in RPY (radian) [0.000, -0.000, 2.016]
            in RPY (degree) [0.000, -0.000, 115.508]
At time 1465054383.673
- Translation: [7.243, 6.209, 0.000]
- Rotation: in Quaternion [0.000, 0.000, 0.846, 0.534]
            in RPY (radian) [0.000, -0.000, 2.016]
            in RPY (degree) [0.000, -0.000, 115.508]
At time 1465054384.665
- Translation: [6.692, 7.364, 0.000]
- Rotation: in Quaternion [0.000, 0.000, 0.846, 0.534]
            in RPY (radian) [0.000, -0.000, 2.016]
            in RPY (degree) [0.000, -0.000, 115.508]
world 坐标系的原点位于左下角,对于小乌龟 turtle1 的转换关系,其实就是小乌龟 turtle1 在 world 坐标系中所在的坐标位置以及旋转角度。
在刚开始测试时,小乌龟往右移动,可以从数据中看到 Translation 的第 1 个参数(x轴)会变大,后来小乌龟向西北方向移动,Translation 的第 1 个参数又会变小。由于是在平面上,所以 Translation 的第 3 个参数(z轴)会一直为 0。
4. Writing a tf listener
这个 Tutorial 摘自:http://wiki.ros.org/tf/Tutorials/Writing%20a%20tf%20listener%20%28Python%29
前一个 Tutorial 中创建了包 learning_tf,我们直接进入到包所在的目录:
$ cd %YOUR_CATKIN_WORKSPACE_HOME%/
$ source ./devel/setup.bash
$ roscd learning_tf
4.1. 创建 Node
创建文件 nodes/turtle_tf_listener.py,内容如下:
#!/usr/bin/env python
import roslib
roslib.load_manifest('learning_tf')
import rospy
import math
import tf
import geometry_msgs.msg
import turtlesim.srv

if __name__ == '__main__':
    rospy.init_node('tf_turtle')

    listener = tf.TransformListener()  # we create a tf.TransformListener object. Once the listener is created
                                       # it starts receiving tf transformations over the wire.

    rospy.wait_for_service('spawn')
    spawner = rospy.ServiceProxy('spawn', turtlesim.srv.Spawn)
    spawner(4, 2, 0, 'turtle2')

    turtle_vel = rospy.Publisher('turtle2/cmd_vel', geometry_msgs.msg.Twist,queue_size=1)

    rate = rospy.Rate(10.0)
    while not rospy.is_shutdown():
        try:
            # query the listener for a specific transformation by lookupTransform.
            (trans,rot) = listener.lookupTransform('/turtle2', '/turtle1', rospy.Time(0))
        except (tf.LookupException, tf.ConnectivityException, tf.ExtrapolationException):
            continue

        angular = 4 * math.atan2(trans[1], trans[0])
        linear = 0.5 * math.sqrt(trans[0] ** 2 + trans[1] ** 2)
        cmd = geometry_msgs.msg.Twist()
        cmd.linear.x = linear
        cmd.angular.z = angular
        turtle_vel.publish(cmd)

        rate.sleep()
把 node 加上可执行权限:
$ chmod +x nodes/turtle_tf_listener.py
4.2. 修改 launch 文件并启动
打开文件 launch/start_demo.launch,增加下面节点:
<launch>
    ...
    <node pkg="learning_tf" type="turtle_tf_listener.py"
          name="listener" />
</launch>
用下面命令启动这个例子(如果之前的例子没有关闭请先关闭它):
$ roslaunch learning_tf start_demo.launch
一切正常的话,你将看到两只小乌龟。一只随着另一只移动,可以在 terminal 窗口中用方向键控制第 1 只小乌龟,和前面介绍的 tf demo 一样。
5. Adding a frame
这个例子来自:http://wiki.ros.org/tf/Tutorials/Adding%20a%20frame%20%28Python%29
增加一个参考坐标系和例子 Writing a tf broadcaster 很相似。
5.1. 为什么要增加参考坐标系
对于很多任务来说,增加一个参考坐标系会带来方便。如,在 world 参考系下,有很多不同方位的激光扫描器,每个都定义一个参考坐标系,tf 可以帮助我们将激光扫描器得到的信息坐标转换为 world 坐标系中的坐标。
5.2. 把参考坐标系添加到某个父坐标系下
tf 采用树形结构来管理坐标系: 每个坐标系只有一个父坐标系,可以有多个子坐标系。
前面例子中,已经有了三个坐标系:world,turtle1 和 turtle2。如果我们增加一个名为 carrot1 的参考坐标系,并使它为 turtle1 的子坐标系,那么坐标系关系会是这样的:
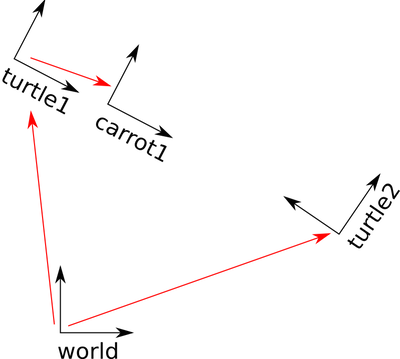
Figure 5: 四个坐标系关系(红色箭头表示父子坐标系,箭头指向子坐标系)
5.3. 创建 Node
先进入到包 learning_tf 所在目录。
$ cd %YOUR_CATKIN_WORKSPACE_HOME%/
$ source ./devel/setup.bash
$ roscd learning_tf
创建文件 nodes/fixed_tf_broadcaster.py,其内容如下:
#!/usr/bin/env python
import roslib
roslib.load_manifest('learning_tf')

import rospy
import tf

if __name__ == '__main__':
    rospy.init_node('my_tf_broadcaster')
    br = tf.TransformBroadcaster()
    rate = rospy.Rate(10.0)
    while not rospy.is_shutdown():
        # create a new transform, from the parent "turtle1" to the new child "carrot1"
        # The carrot1 frame is 2 meters offset from the turtle1 frame.
        br.sendTransform((0.0, 2.0, 0.0),
                         (0.0, 0.0, 0.0, 1.0),
                         rospy.Time.now(),
                         "carrot1",
                         "turtle1")
        rate.sleep()
把 node 加上可执行权限:
$ chmod +x nodes/fixed_tf_broadcaster.py
5.4. 修改 launch 文件并启动
打开文件 launch/start_demo.launch,增加下面节点:
<launch>
    ...
    <node pkg="learning_tf" type="fixed_tf_broadcaster.py"
          name="broadcaster_fixed" />
</launch>
用下面命令启动这个例子(如果之前的例子没有关闭请先关闭它):
$ roslaunch learning_tf start_demo.launch
启动后,可以看到两只乌龟,效果和前面例子一样,一只随着另一只移动。
我们现在来改变跟随关系。打开 nodes/turtle_tf_listener.py,将"/turtle1"替换为"/carrot1":
(trans,rot) = self.tf.lookupTransform("/turtle2", "/carrot1", rospy.Time(0))
重新启动后,可以看到两只乌龟,一只随着另一只移动,但它们会相距 2 米。
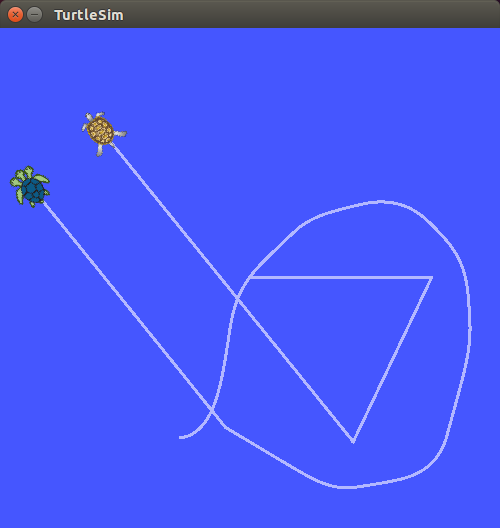
Figure 6: 两只乌龟,一只随着另一只移动(但相距 2 米)
5.5. 发布移动的坐标系
前面例子中,坐标系 carrot1 和坐标系 turtle1 固定地相距 2 米,之间的关系不会变化。
现在我们来动态地改变坐标系 carrot1 和坐标系 turtle1 的关系。其关键就是修改 sendTransform 函数。
打开 nodes/fixed_tf_broadcaster.py,修改为:
#!/usr/bin/env python
import roslib
roslib.load_manifest('learning_tf')

import rospy
import tf
import math

if __name__ == '__main__':
    rospy.init_node('my_tf_broadcaster')
    br = tf.TransformBroadcaster()
    rate = rospy.Rate(10.0)
    while not rospy.is_shutdown():
        t = rospy.Time.now().to_sec() * math.pi
        br.sendTransform((2.0 * math.sin(t), 2.0 * math.cos(t), 0.0),
                         (0.0, 0.0, 0.0, 1.0),
                         rospy.Time.now(),
                         "carrot1",
                         "turtle1")
        rate.sleep()
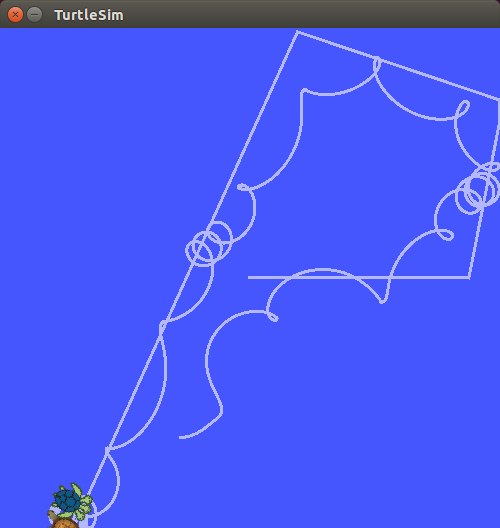
Figure 7: 两只乌龟,一只随着另一只移动(三角函数关系)