ROS (Robot Operating System) Tutorials
Table of Contents
1. 安装 ROS Indigo
ROS 有很多发行版本(Distributions),本文以 ROS Indigo Igloo 为例介绍其在 Ubuntu 14.04 中的安装过程。
下面介绍的安装过程摘自:http://wiki.ros.org/indigo/Installation/Ubuntu
1.1. Install ros-indigo-desktop-full
$ sudo sh -c 'echo "deb http://packages.ros.org/ros/ubuntu $(lsb_release -sc) main" > /etc/apt/sources.list.d/ros-latest.list'
$ sudo apt-key adv --keyserver hkp://pool.sks-keyservers.net --recv-key 0xB01FA116
$ sudo apt-get update
$ sudo apt-get install ros-indigo-desktop-full
1.2. Initialize rosdep
Before you can use ROS, you will need to initialize rosdep. rosdep enables you to easily install system dependencies for source you want to compile and is required to run some core components in ROS.
$ sudo rosdep init
$ rosdep update
1.3. Environment setup
It's convenient if the ROS environment variables are automatically added to your bash session every time a new shell is launched:
$ echo "source /opt/ros/indigo/setup.bash" >> ~/.bashrc
$ source ~/.bashrc
1.4. Getting rosinstall
rosinstall is a frequently used command-line tool in ROS that is distributed separately. It enables you to easily download many source trees for ROS packages with one command.
To install this tool on Ubuntu, run:
$ sudo apt-get install python-rosinstall
2. ROS 基本概念
参考:
"Programming Robots with ROS"
http://wiki.ros.org/ROS/Concepts
ROS cheatsheet
2.1. ROS 系统的基本结构(ROS graph)
A ROS system is made up of many different programs, running simultaneously, which communicate with each other by passing messages. Visualizing this as a graph, the programs are the nodes, and programs that communicate with each other are connected by edges, typically nodes are POSIX processes and edges are TCP connections.
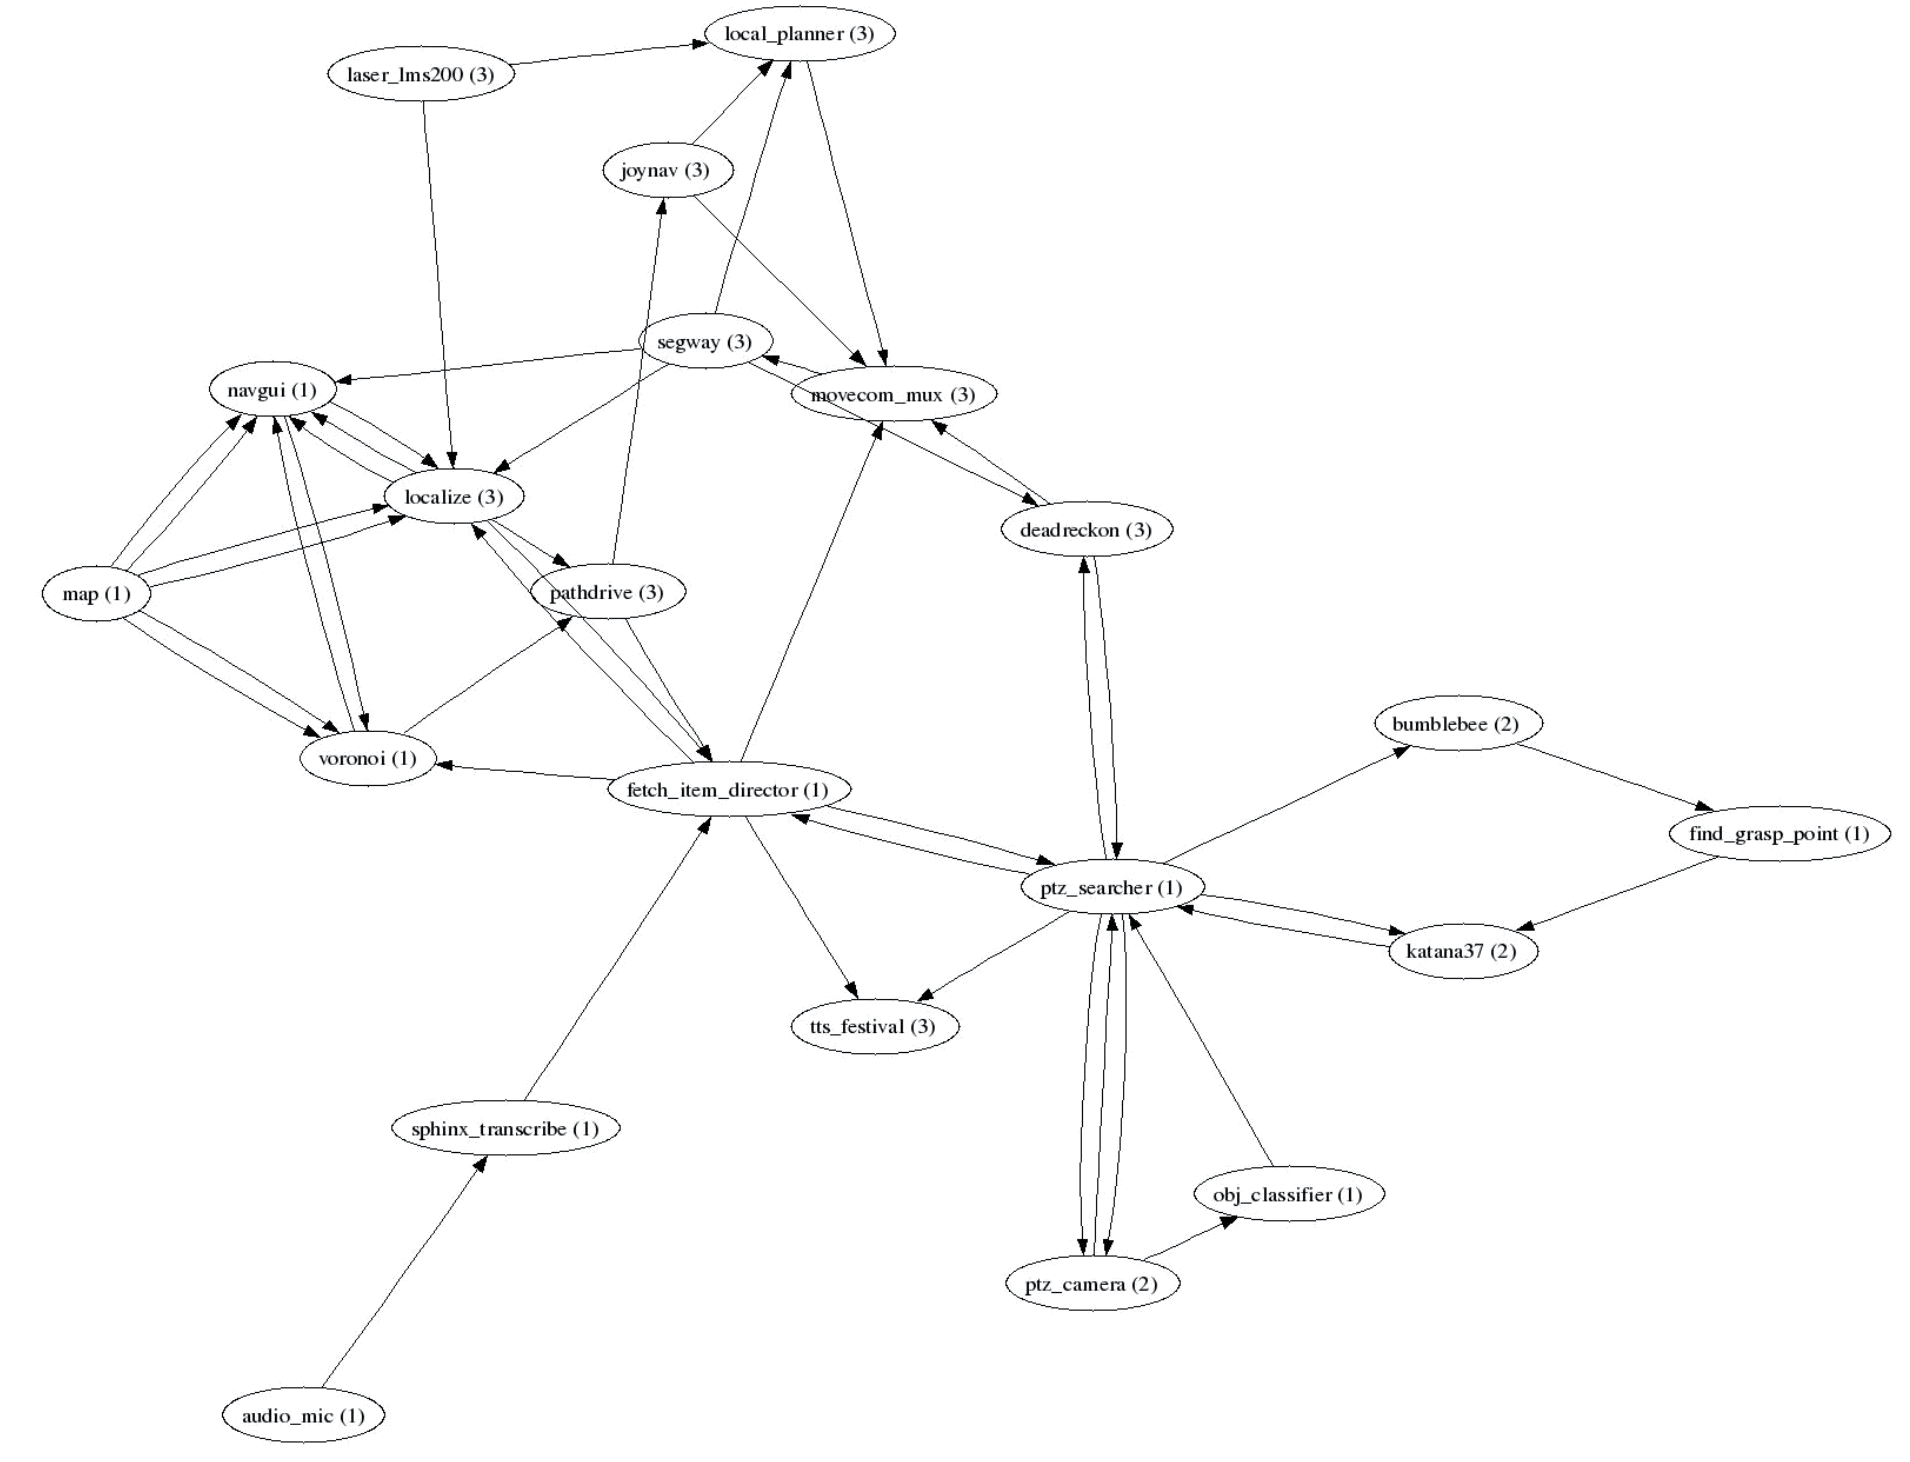
Figure 1: 一个“取物机器人”的组成(Nodes in the graph represent individual programs; edges represent message streams)
2.1.1. roscore(内置的核心节点/程序)
ROS 的各个节点(即程序)怎么知道系统中还存在其它的节点呢?ROS 系统中有一个核心程序叫 roscore,它负责干这些事情。
roscore is a broker that provides connection information to nodes so that they can transmit messages to each other.
2.2. 节点间通信——Topics
ROS systems consist of a number of independent nodes that comprise a graph. These nodes by themselves are typically not very useful. Things only get interesting when nodes communicate with each other, exchanging information and data. The most common way to do that is through topics. A topic is a name for a stream of messages with a defined. For example, the data from a laser range- finders might be send on a topic called scan, with a message type of LaserScan, while the data from a camera might be sent over a topic called image, with a message type of Image.
Before they can start to transmit data over topics, nodes must first announce, or advertize, both the topic name and the type of messages that are going to be sent. Then they can start to send, or publish, the actual data on the topic. Nodes that want to receive messages on a topic can subscribe to that topic by making a request to roscore. After subscribing, all messages on the topic are delivered to the node that make the request. Topics implement a publish/subcribe communications mechanism.
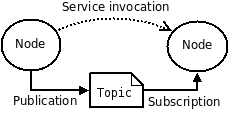
Figure 2: ROS topic(摘自http://wiki.ros.org/ROS/Concepts)
总结:一个 Topic 对应一个具体的消息类型,消息发送者先“发布”一个 Topic,消息接收者可以“订阅”这个 Topic。
2.3. 节点间通信——Services(同步,类似于 RPC)
Services are another way to pass data between nodes in ROS. Services are really just synchronous remote procedure calls; they allow one node to call a function in another node.
2.4. 节点间通信——Actions(异步,适应于耗时操作)
ROS 中的 Services 是同步的,适应于一些耗时很少的操作,如查询状态信息,对设备进行配置等。对于耗时的操作(如移动到某个位置),ROS 中 Actions 更加合适。
ROS actions are the best way to implement interfaces to time-extended goal-oriented behaviors like 'goto_position'. While services are synchronous, actions are asynchronous (actions are implemented atop topics). Similar to the request and response of a service, an action uses a goal to initiate a behavior and sends a result when the behavior is complete. But the action further uses feedback to provide updates on the behavior’s progress toward the goal and also allows for goals to be canceled.
3. ROS 工程的目录结构
3.1. 什么是 Package 和 Workspace
什么是 Package?
Packages form the atomic level of ROS. A package has the minimum structure and content to create a program within ROS. It may have ROS runtime processes (nodes), configuration files, and so on.
什么是 Workspace?
The workspace is a folder where we have packages, edit the source files or compile packages.
3.2. catkin(ROS 官方编译系统,rosbuild 的继承者)
catkin is the official build system of ROS and the successor to the original ROS build system, rosbuild.
catkin 使用 package.xml 作为“功能包”的配置文件(rosbuild 使用 manifest.xml 作为“功能包”的配置文件)。
说明:stack 概念在 catkin 中已经过时,请使用 metapackages。请参考: Goodbye Stacks, Hello Metapackages
3.3. catkin workspace 的目录结构
A catkin workspace is a folder where you modify, build, and install catkin packages. It is specified in REP 128.
一个 catkin workspace 的典型目录结构如下:
workspace_folder/         -- WORKSPACE
  src/                    -- SOURCE SPACE
    CMakeLists.txt        -- The 'toplevel' CMake file
    package_1/
      CMakeLists.txt
      package.xml
      ...
    package_n/
      CMakeLists.txt
      package.xml
      ...
  build/                  -- BUILD SPACE
    CATKIN_IGNORE         -- Keeps catkin from walking this directory
  devel/                  -- DEVELOPMENT SPACE (set by CATKIN_DEVEL_PREFIX)
    bin/
    etc/
    include/
    lib/
    share/
    .catkin
    env.bash
    setup.bash
    setup.sh
    ...
  install/                -- INSTALL SPACE (set by CMAKE_INSTALL_PREFIX)
    bin/
    etc/
    include/
    lib/
    share/
    .catkin
    env.bash
    setup.bash
    setup.sh
    ...
3.4. 实例:创建 catkin workspace
可用 catkin_init_workspace 创建 Workspaces,如:
$ mkdir -p ~/catkin_ws/src
$ cd ~/catkin_ws/src
$ catkin_init_workspace
Creating symlink "/home/cig01/catkin_wc/src/CMakeLists.txt" pointing to "/opt/ros/indigo/share/catkin/cmake/toplevel.cmake"
上面例子中 catkin_init_workspace 的作用仅仅是在当前目录中创建了 CMakeLists.txt 的软链接。
3.5. 实例:创建 catkin package
可用 catkin_create_pkg 方法创建 Packages,如:
$ cd ~/catkin_ws/src
$ catkin_create_pkg beginner_tutorials std_msgs rospy roscpp
说明:上面操作中创建了功能包 beginner_tutorials(并设置这个功能包依赖于另外 3 个功能包 std_msgs rospy roscpp),生成的文件(如 package.xml,CMakeLists.txt)都存放在新创建的子目录 beginner_tutorials 中。
3.6. 实例:编译 workspace 中的 packages
在 workspace 根目录用 [[http://wiki.ros.org/catkin/commands/catkin_make][catkin_make]] 可编译 workspace 中的 packages,如:
$ cd ~/catkin_ws
$ catkin_make
3.7. Package 相关实用工具(rospack, roscd, rosls)
| 工具名称 | 用法 | 作用 |
|---|---|---|
| rospack | rospack <command> [options] [package] |
查询 Package 相关信息 |
| roscd | roscd <package-or-stack>[/subdir] |
直接进入 Package 目录(或其子目录) |
| rosls | rosls <package-or-stack>[/subdir] |
查看 Package 目录(或其子目录)的内容 |
参考:http://wiki.ros.org/action/fullsearch/ROS/Tutorials/NavigatingTheFilesystem
3.7.1. rospack
rospack 可以查询 Package 相关信息。基本格式为: rospack <command> [options] [package]
rospack 中最常用的命令是 rospack find package-name ,用于查询包 package-name 的安装位置。
rospack 用法实例:
$ rospack find roscpp                                  # 查询包 roscpp 的安装位置
/opt/ros/indigo/share/roscpp
$ rospack list |grep gazebo                            # 查询和 gazebo 相关的包及其安装位置
gazebo_msgs /opt/ros/indigo/share/gazebo_msgs
gazebo_plugins /opt/ros/indigo/share/gazebo_plugins
gazebo_ros /opt/ros/indigo/share/gazebo_ros
4. Tutorials
入门资料,请参考:
http://wiki.ros.org/ROS/Tutorials
http://wiki.ros.org/rospy_tutorials
http://wiki.ros.org/roscpp_tutorials
4.1. Topic 实例:Writing a Simple Publisher and Subscriber
这个实例摘自: Writing a Simple Publisher and Subscriber (C++)
这个教程将演示 Topic 的基本使用。下面会创建两个 Node,一个作为 Publisher(发送消息 hello world),另一个作为 Subscriber(接收消息)。
这里假设你已经按前面介绍的实例创建了 workspace 和 package。
4.1.1. 准备 Publisher 节点的代码
先在功能包 beginner_tutorials 中创建 src 目录:
$ cd ~/catkin_ws/src/beginner_tutorials
$ mkdir -p ~/catkin_ws/src/beginner_tutorials/src
创建文件 src/talker.cpp,其内容如下:
// file talker.cpp
#include "ros/ros.h"
#include "std_msgs/String.h"

#include <sstream>

int main(int argc, char **argv)
{
  ros::init(argc, argv, "talker");

  /**
   * NodeHandle is the main access point to communications with the ROS system.
   * The first NodeHandle constructed will fully initialize this node, and the last
   * NodeHandle destructed will close down the node.
   */
  ros::NodeHandle n;

  /**
   * The advertise() function is how you tell ROS that you want to
   * publish on a given topic name. This invokes a call to the ROS
   * master node, which keeps a registry of who is publishing and who
   * is subscribing. After this advertise() call is made, the master
   * node will notify anyone who is trying to subscribe to this topic name,
   * and they will in turn negotiate a peer-to-peer connection with this
   * node.  advertise() returns a Publisher object which allows you to
   * publish messages on that topic through a call to publish().  Once
   * all copies of the returned Publisher object are destroyed, the topic
   * will be automatically unadvertised.
   */
  ros::Publisher chatter_pub = n.advertise<std_msgs::String>("chatter", 1000);

  ros::Rate loop_rate(10);

  int count = 0;
  while (ros::ok())
  {
    std_msgs::String msg;

    std::stringstream ss;
    ss << "hello world " << count;
    msg.data = ss.str();

    ROS_INFO("%s", msg.data.c_str());

    /**
     * The publish() function is how you send messages. The parameter
     * is the message object. The type of this object must agree with the type
     * given as a template parameter to the advertise<>() call, as was done
     * in the constructor above.
     */
    chatter_pub.publish(msg);

    /* Calling ros::spinOnce() here is not necessary for this simple program
     */
    ros::spinOnce();

    loop_rate.sleep();
    ++count;
  }

  return 0;
}
4.1.2. 准备 Subscriber 节点的代码
在功能包 beginner_tutorials 中创建文件 src/listener.cpp,其内容如下:
// file listener.cpp
#include "ros/ros.h"
#include "std_msgs/String.h"

/**
 * This tutorial demonstrates simple receipt of messages over the ROS system.
 */
void chatterCallback(const std_msgs::String::ConstPtr& msg)
{
  ROS_INFO("I heard: [%s]", msg->data.c_str());
}

int main(int argc, char **argv)
{
  ros::init(argc, argv, "listener");

  /**
   * NodeHandle is the main access point to communications with the ROS system.
   * The first NodeHandle constructed will fully initialize this node, and the last
   * NodeHandle destructed will close down the node.
   */
  ros::NodeHandle n;

  /**
   * The subscribe() call is how you tell ROS that you want to receive messages
   * on a given topic.  This invokes a call to the ROS
   * master node, which keeps a registry of who is publishing and who
   * is subscribing.  Messages are passed to a callback function, here
   * called chatterCallback.  subscribe() returns a Subscriber object that you
   * must hold on to until you want to unsubscribe.  When all copies of the Subscriber
   * object go out of scope, this callback will automatically be unsubscribed from
   * this topic.
   *
   * The second parameter to the subscribe() function is the size of the message
   * queue.  If messages are arriving faster than they are being processed, this
   * is the number of messages that will be buffered up before beginning to throw
   * away the oldest ones.
   */
  ros::Subscriber sub = n.subscribe("chatter", 1000, chatterCallback);

  /**
   * ros::spin() will enter a loop, pumping callbacks.  With this version, all
   * callbacks will be called from within this thread (the main one).  ros::spin()
   * will exit when Ctrl-C is pressed, or the node is shutdown by the master.
   */
  ros::spin();

  return 0;
}
4.1.3. 编译 Nodes
首先,编辑文件~/catkin_ws/src/beginner_tutorials/CMakeLists.txt,在文件最后增加下面内容:
include_directories(include ${catkin_INCLUDE_DIRS})

add_executable(talker src/talker.cpp)
target_link_libraries(talker ${catkin_LIBRARIES})
add_dependencies(talker beginner_tutorials_generate_messages_cpp)

add_executable(listener src/listener.cpp)
target_link_libraries(listener ${catkin_LIBRARIES})
add_dependencies(listener beginner_tutorials_generate_messages_cpp)
然后,在 workspace 根目录,运行 catkin_make 进行编译,如:
$ catkin_make
Base path: /home/cig01/catkin_ws
Source space: /home/cig01/catkin_ws/src
Build space: /home/cig01/catkin_ws/build
Devel space: /home/cig01/catkin_ws/devel
Install space: /home/cig01/catkin_ws/install
####
#### Running command: "make cmake_check_build_system" in "/home/cig01/catkin_ws/build"
####
-- Using CATKIN_DEVEL_PREFIX: /home/cig01/catkin_ws/devel
-- Using CMAKE_PREFIX_PATH: /opt/ros/indigo
-- This workspace overlays: /opt/ros/indigo
-- Using PYTHON_EXECUTABLE: /usr/bin/python
-- Using Debian Python package layout
-- Using empy: /usr/bin/empy
-- Using CATKIN_ENABLE_TESTING: ON
-- Call enable_testing()
-- Using CATKIN_TEST_RESULTS_DIR: /home/cig01/catkin_ws/build/test_results
-- Found gtest sources under '/usr/src/gtest': gtests will be built
-- Using Python nosetests: /usr/bin/nosetests-2.7
-- catkin 0.6.16
-- BUILD_SHARED_LIBS is on
-- ~~~~~~~~~~~~~~~~~~~~~~~~~~~~~~~~~~~~~~~~~~~~~~~~~
-- ~~  traversing 1 packages in topological order:
-- ~~  - beginner_tutorials
-- ~~~~~~~~~~~~~~~~~~~~~~~~~~~~~~~~~~~~~~~~~~~~~~~~~
-- +++ processing catkin package: 'beginner_tutorials'
-- ==> add_subdirectory(beginner_tutorials)
-- Configuring done
-- Generating done
-- Build files have been written to: /home/cig01/catkin_ws/build
####
#### Running command: "make -j1 -l1" in "/home/cig01/catkin_ws/build"
####
Scanning dependencies of target listener
[ 50%] Building CXX object beginner_tutorials/CMakeFiles/listener.dir/src/listener.cpp.o
Linking CXX executable /home/cig01/catkin_ws/devel/lib/beginner_tutorials/listener
[ 50%] Built target listener
Scanning dependencies of target talker
[100%] Building CXX object beginner_tutorials/CMakeFiles/talker.dir/src/talker.cpp.o
Linking CXX executable /home/cig01/catkin_ws/devel/lib/beginner_tutorials/talker
[100%] Built target talker
编译完成后,每个节点都生成了对应的可执行程序:
/home/cig01/catkin_ws/devel/lib/beginner_tutorials/listener
/home/cig01/catkin_ws/devel/lib/beginner_tutorials/talker
4.1.4. 运行 Nodes 进行测试
第一步,确保核心程序 roscore 已经运行,如果没有运行,请用下面命令启动它:
$ roscore &
第二步,在启动 Node 前,导入和 workspace 相关的环境设置,如:
$ cd ~/catkin_ws
$ source ./devel/setup.bash
第三步,用 [[http://wiki.ros.org/rosbash#rosrun][rosrun]] 启动节点 publisher(也就是 talker), rosrun 命令的基本格式为 rosrun <package> <executable> 。在这个例子中,启动节点的命令如下:
$ rosrun beginner_tutorials talker
[ INFO] [1430732181.510479169]: hello world 0
[ INFO] [1430732181.610567787]: hello world 1
[ INFO] [1430732181.710586980]: hello world 2
[ INFO] [1430732181.810581019]: hello world 3
[ INFO] [1430732181.910600488]: hello world 4
[ INFO] [1430732182.010723126]: hello world 5
[ INFO] [1430732182.110596785]: hello world 6
[ INFO] [1430732182.211556940]: hello world 7
[ INFO] [1430732182.310633424]: hello world 8
talker 程序会一直在终端上输出"hello world",直到按 Ctrl+C 退出。
第四步,打开另外一个终端,用 rosrun 启动节点 subscriber(也就是 listener),如:
$ cd ~/catkin_ws
$ source ./devel/setup.bash
$ rosrun beginner_tutorials listener
[ INFO] [1430732304.262828995]: I heard: [hello world 21]
[ INFO] [1430732304.363368221]: I heard: [hello world 22]
[ INFO] [1430732304.463365431]: I heard: [hello world 23]
[ INFO] [1430732304.562538918]: I heard: [hello world 24]
[ INFO] [1430732304.662391090]: I heard: [hello world 25]
[ INFO] [1430732304.762429223]: I heard: [hello world 26]
[ INFO] [1430732304.862479712]: I heard: [hello world 27]
[ INFO] [1430732304.963490914]: I heard: [hello world 28]
[ INFO] [1430732305.062607461]: I heard: [hello world 29]
[ INFO] [1430732305.163459575]: I heard: [hello world 30]
[ INFO] [1430732305.262455761]: I heard: [hello world 31]
[ INFO] [1430732305.362392775]: I heard: [hello world 32]
[ INFO] [1430732305.462446132]: I heard: [hello world 33]
可以看到,listener 接收到了"hello world"的消息。
4.2. Service 实例:Writing a Simple Service and Client
这个实例摘自: Writing a Simple Service and Client (C++)
这个教程将演示 Service 的基本使用,实例一个简单服务——接收两个整数,返回它们的和。
4.2.1. 创建和编译 srv 文件
srv 文件用来描述 service,它包含“请求”和“响应”两个部分,这两个部分用“---”分隔开(上部分为“请求”部分,下部分为“响应”部分)。
srv 文件最终会编译为 C++使用的.h 文件和 Python 使用的.py 文件。请看下面实例:
第一步:创建 srv 文件
先在要使用 service 的功能包的目录中创建 srv 子目录。
$ cd ~/catkin_ws/src/beginner_tutorials
$ mkdir srv
创建文件 srv/AddTwoInts.srv,其内容为:
int64 a
int64 b
---
int64 sum
第二步:在 package.xml 中增加下面两行:
  <build_depend>message_generation</build_depend>
  <run_depend>message_runtime</run_depend>
说明:message_generation 即可用于 msg 文件,又可用于 srv 文件,不用理睬 message_generation 这个名字本身。
第三步:在功能包的根目录中的 CMakeLists.txt 文件中,作下面修改。
把 CMakeLists.txt 文件中的下面内容
find_package(catkin REQUIRED COMPONENTS
  roscpp
  rospy
  std_msgs
)
修改为:
find_package(catkin REQUIRED COMPONENTS
  roscpp
  rospy
  std_msgs
  message_generation
)
在 CMakeLists.txt 中增加下面内容(一般 CMakeLists.txt 文件中有现成的模板,只需要取消注释并做相应修改即可):
add_service_files(
  FILES
  AddTwoInts.srv
)

generate_messages(
  DEPENDENCIES
  std_msgs
)
第四步:用工具 rossrv 测试新增加的 srv 文件。
$ ~/catkin_ws/src/beginner_tutorials$ rossrv show beginner_tutorials/AddTwoInts
int64 a
int64 b
---
int64 sum
第五步:编译 srv 文件为头文件。
用 catkin_make 编译 srv 文件为头文件。如:
$ cd ~/catkin_ws/
$ catkin_make install
编译完成后,会生成头文件"./devel/include/beginner_tutorials/AddTwoInts.h",这是给 C++程序使用的;还会生成"devel/lib/python2.7/dist-packages/beginner_tutorials/srv/_AddTwoInts.py",这是给 Python 程序使用的。
4.2.2. 准备 Service 节点的代码
进入到功能包 beginner_tutorials(这个功能包是在前面例子中创建的)中:
$ cd ~/catkin_ws/src/beginner_tutorials
创建文件 src/add_two_ints_server.cpp,其内容为:
#include "ros/ros.h"
#include "beginner_tutorials/AddTwoInts.h"

bool add(beginner_tutorials::AddTwoInts::Request  &req,
         beginner_tutorials::AddTwoInts::Response &res)
{
  res.sum = req.a + req.b;
  ROS_INFO("request: x=%ld, y=%ld", (long int)req.a, (long int)req.b);
  ROS_INFO("sending back response: [%ld]", (long int)res.sum);
  return true;
}

int main(int argc, char **argv)
{
  ros::init(argc, argv, "add_two_ints_server");
  ros::NodeHandle n;

  ros::ServiceServer service = n.advertiseService("add_two_ints", add);
  ROS_INFO("Ready to add two ints.");
  ros::spin();

  return 0;
}
4.2.3. 准备 Client 节点的代码
创建文件 src/add_two_ints_client.cpp,其内容为:
#include "ros/ros.h"
#include "beginner_tutorials/AddTwoInts.h"
#include <cstdlib>

int main(int argc, char **argv)
{
  ros::init(argc, argv, "add_two_ints_client");
  if (argc != 3)
  {
    ROS_INFO("usage: add_two_ints_client X Y");
    return 1;
  }

  ros::NodeHandle n;
  ros::ServiceClient client = n.serviceClient<beginner_tutorials::AddTwoInts>("add_two_ints");
  beginner_tutorials::AddTwoInts srv;
  srv.request.a = atoll(argv[1]);
  srv.request.b = atoll(argv[2]);
  if (client.call(srv))
  {
    ROS_INFO("Sum: %ld", (long int)srv.response.sum);
  }
  else
  {
    ROS_ERROR("Failed to call service add_two_ints");
    return 1;
  }

  return 0;
}
4.2.4. 编译 Nodes
首先,编辑文件~/catkin_ws/src/beginner_tutorials/CMakeLists.txt,在文件最后增加下面内容:
## If following line does not exist, uncomment it.
# include_directories(include ${catkin_INCLUDE_DIRS})

add_executable(add_two_ints_server src/add_two_ints_server.cpp)
target_link_libraries(add_two_ints_server ${catkin_LIBRARIES})
add_dependencies(add_two_ints_server beginner_tutorials_gencpp)

add_executable(add_two_ints_client src/add_two_ints_client.cpp)
target_link_libraries(add_two_ints_client ${catkin_LIBRARIES})
add_dependencies(add_two_ints_client beginner_tutorials_gencpp)
然后,在 workspace 根目录,运行 catkin_make 进行编译,如:
$ cd ~/catkin_ws
$ catkin_make
编译完成后,每个节点都生成了对应的可执行程序:
/home/cig01/catkin_ws/devel/lib/beginner_tutorials/add_two_ints_client
/home/cig01/catkin_ws/devel/lib/beginner_tutorials/add_two_ints_server
4.2.5. 运行 Nodes 进行测试
第一步,确保核心程序 roscore 已经运行,如果没有运行,请用下面命令启动它:
$ roscore &
第二步,在启动 Node 前,导入和 workspace 相关的环境设置,如:
$ cd ~/catkin_ws
$ source ./devel/setup.bash
第三步,用下面命令运行 Service 节点:
$ rosrun beginner_tutorials add_two_ints_server
[ INFO] [1430794215.139844241]: Ready to add two ints.
第四步,打开另外一个终端,运行 Client,并提供相应命令行参数,如:
$ source ./devel/setup.bash
$ rosrun beginner_tutorials add_two_ints_client 10 20
[ INFO] [1430794249.352988484]: Sum: 30
4.3. 用 roslaunch 启动 Service 实例中节点
roslaunch is a tool for easily launching multiple ROS nodes locally and remotely via SSH.
当节点比较多时,一个一个启动将非常地麻烦,这时工具 roslaunch 就派上用场了,它使用后缀为.launch 的文件作为配置文件。
下面我们将使用 roslaunch 启动前面介绍的 Service 实例中的节点(roslaunch 会默认启动节点 roscore)。
首先进入到功能包 beginner_tutorials 所在目录,并创建 launch 子目录。如:
$ cd ~/catkin_ws
$ source devel/setup.bash
$ roscd beginner_tutorials
$ mkdir launch
创建文件 launch/test_srv.launch,其内容如下:
<launch>
     <node name ="add_two_ints_server" pkg="beginner_tutorials"  type="add_two_ints_server" />
     <node name ="add_two_ints_client_1" pkg="beginner_tutorials"  type="add_two_ints_client" args="10 20" />
     <node name ="add_two_ints_client_2" pkg="beginner_tutorials"  type="add_two_ints_client" args="30 40" />
</launch>
用 roslaunch 启动文件 test_srv.launch 中配置的节点:
$ roslaunch launch/test_srv.launch
......
NODES
  /
    add_two_ints_client_1 (beginner_tutorials/add_two_ints_client)
    add_two_ints_client_2 (beginner_tutorials/add_two_ints_client)
    add_two_ints_server (beginner_tutorials/add_two_ints_server)

auto-starting new master
process[master]: started with pid [3656]
ROS_MASTER_URI=http://localhost:11311

setting /run_id to 2170226a-c40e-11e5-8dce-080027d30e2b
process[rosout-1]: started with pid [3669]
started core service [/rosout]
process[add_two_ints_server-2]: started with pid [3676]
process[add_two_ints_client_1-3]: started with pid [3688]
process[add_two_ints_client_2-4]: started with pid [3692]
[add_two_ints_client_1-3] process has finished cleanly
log file: /home/cig01/.ros/log/2170226a-c40e-11e5-8dce-080027d30e2b/add_two_ints_client_1-3*.log
[add_two_ints_client_2-4] process has finished cleanly
log file: /home/cig01/.ros/log/2170226a-c40e-11e5-8dce-080027d30e2b/add_two_ints_client_2-4*.log
从 roslaunch 的输出中,可以看到节点已经执行并结束,我们检测节点的日志,可以看到 Service(对两个整数相加)已经成功调用:
$ cat /home/cig01/.ros/log/2170226a-c40e-11e5-8dce-080027d30e2b/add_two_ints_client_1-3-stdout.log
[ INFO] [1430800067.983614134]: Sum: 30
$ cat /home/cig01/.ros/log/2170226a-c40e-11e5-8dce-080027d30e2b/add_two_ints_client_2-4-stdout.log
[ INFO] [1430800067.997234796]: Sum: 70
5. Parameter Server
A parameter server is a shared, multi-variate dictionary that is accessible via network APIs. Nodes use this server to store and retrieve parameters at runtime. As it is not designed for high-performance, it is best used for static, non-binary data such as configuration parameters.
The Parameter Server is implemented using XMLRPC and runs inside of the ROS Master (roscore). 启动 roscore 后,就已经有 Parameter Server 在运行了。
5.1. rosparam(用于操作参数)
The rosparam command-line tool enables you to query and set parameters on the Parameter Server using YAML syntax.
| rosparam 相关命令 | 描述 |
|---|---|
| rosparam set | set parameter |
| rosparam get | get parameter |
| rosparam load | load parameters from file |
| rosparam dump | dump parameters to file |
| rosparam delete | delete parameter |
| rosparam list | list parameter names |
rosparam 测试例子:
$ roscore &
$ rosparam list                 # 列出所有可用参数
/rosdistro
/roslaunch/uris/host_ubuntu14_04__52163
/rosversion
/run_id
$ rosparam get /rosdistro       # 查询参数 /rosdistro
'indigo

  '

$ rosparam set /foo 1.3         # 设置参数 /foo 不存在就新增
$ rosparam get /foo             # 查询参数 /foo
1.3
$ rosparam list
/foo
/rosdistro
/roslaunch/uris/host_ubuntu14_04__37581
/rosversion
/run_id
$ rosparam delete /foo          # 删除参数 /foo
$ rosparam get /foo
ERROR: Parameter [/foo] is not set
6. rqt
rqt is a Qt-based framework for GUI development for ROS.
在 shell 中执行 rqt 可以启动它。
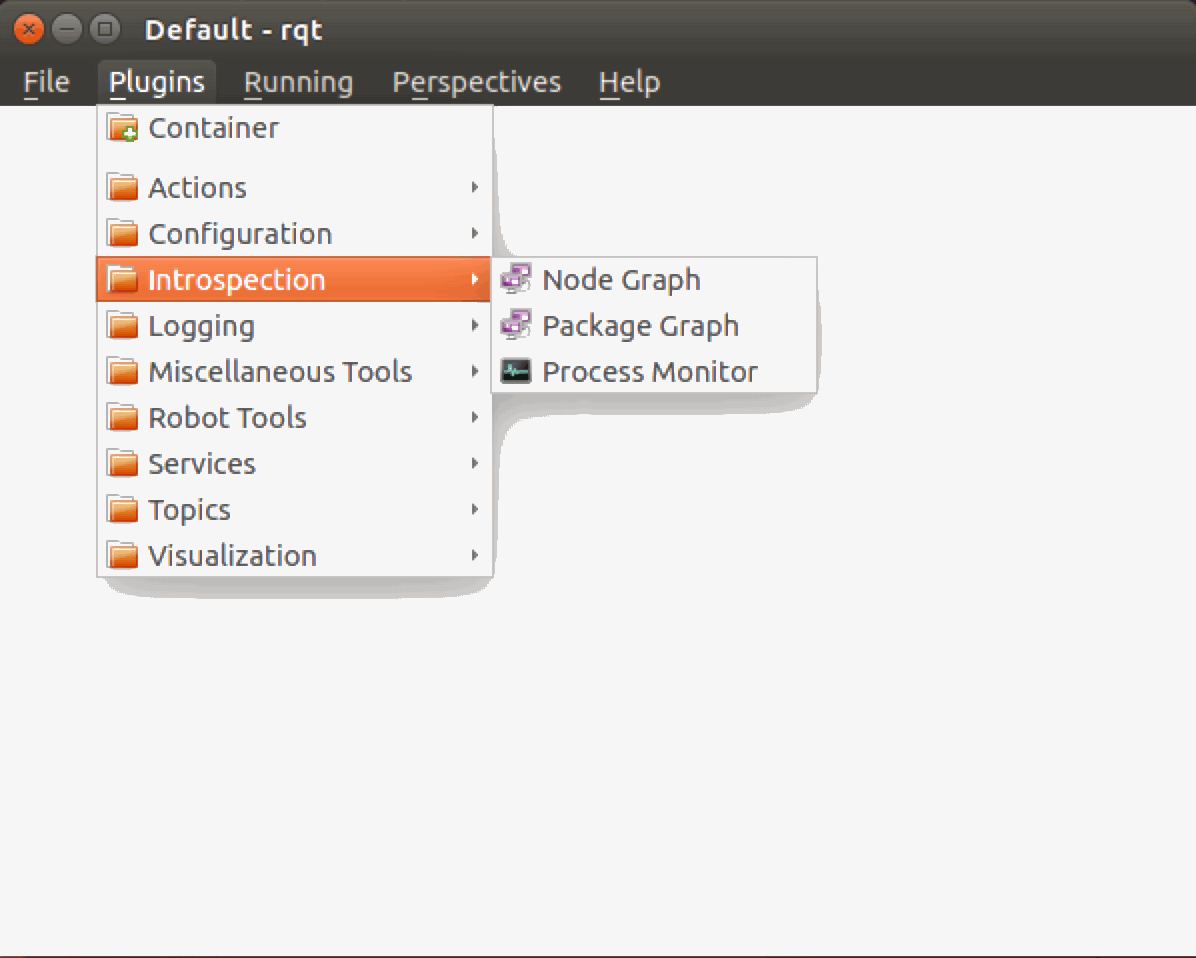
Figure 3: rqt 主界面
rqt 中的一些常用工具,也可以直接在 shell 中启动。如,在运行前面的 Topic 实例时,启动 rqt_graph 可得到下面的图示:
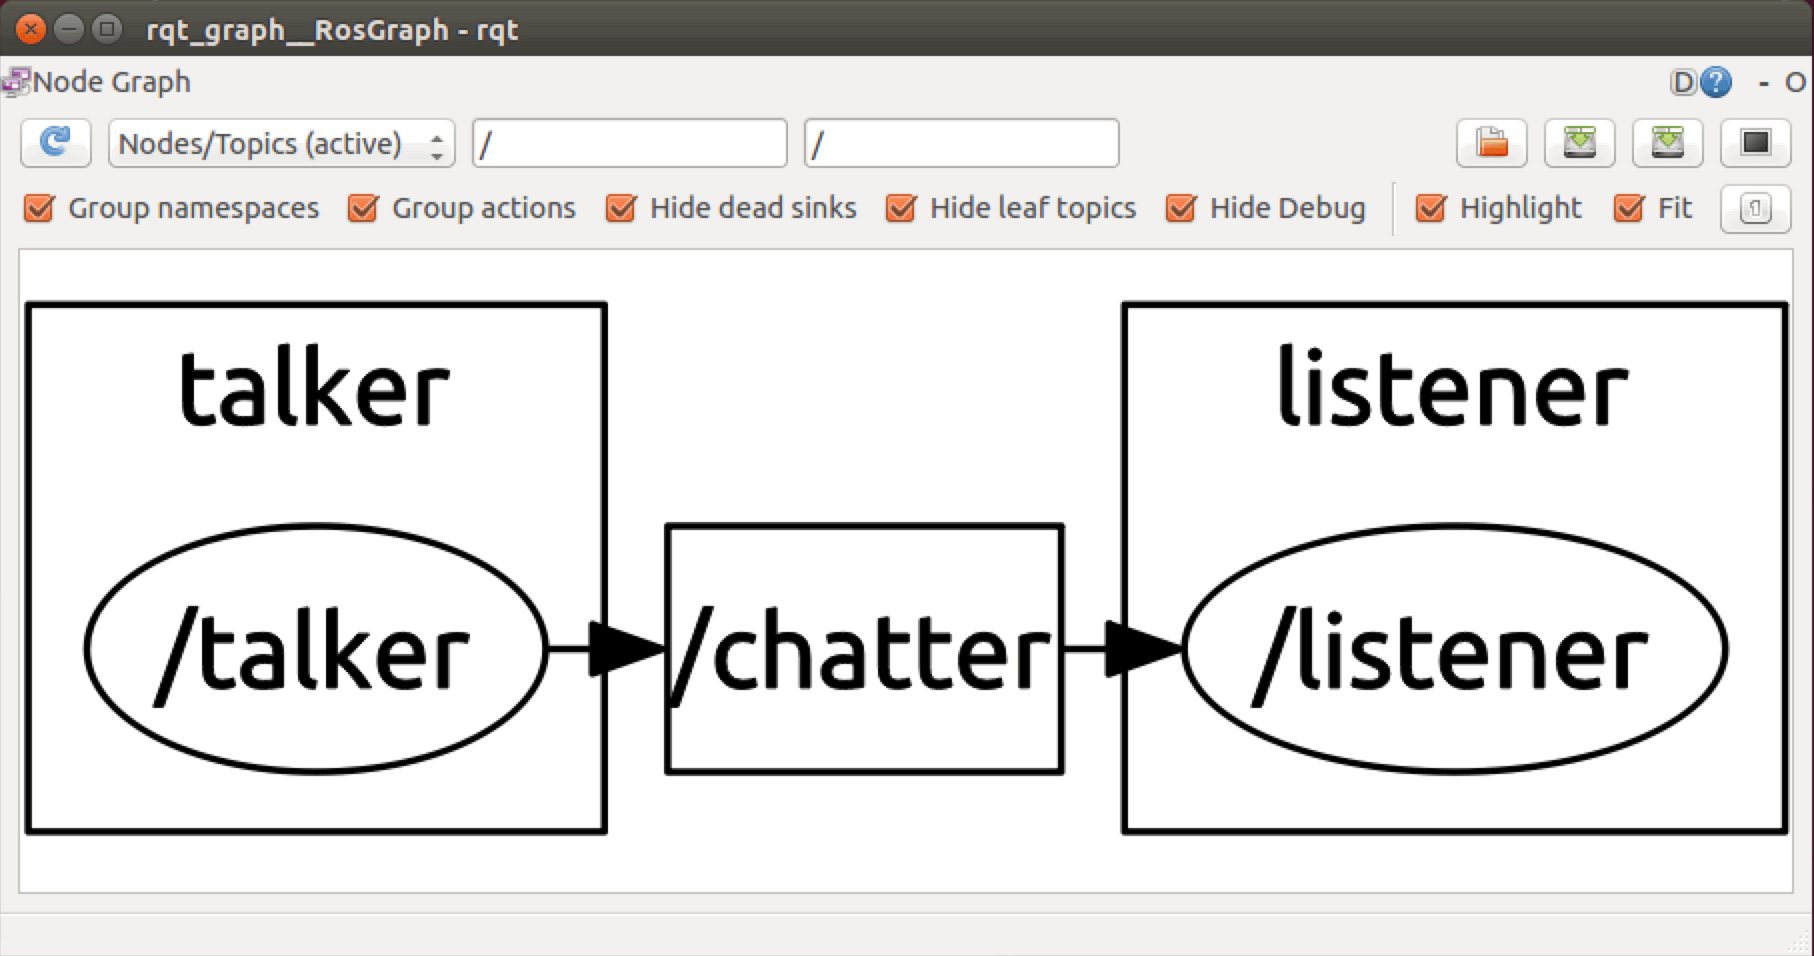
Figure 4: rqt_graph 实例
7. turtlesim
turtlesim is a tool made for teaching ROS and ROS packages.
可以用下面步骤启动 turtlesim。
首先,启动 roscore:
$ roscore
然后,编译和启动turtlesim:
$ rosmake turtlesim
$ rosrun turtlesim turtlesim_node
运行成功后,会出现下面窗口:
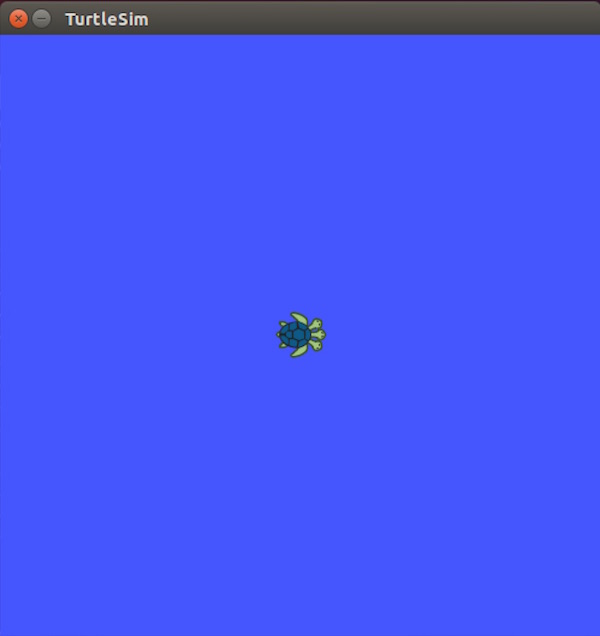
Figure 5: TurtleSim