TensorFlow
Table of Contents
1. TensorFlow 简介
TensorFlow is an open source software library for machine learning across a range of tasks, and developed by Google to meet their needs for systems capable of building and training neural networks to detect and decipher patterns and correlations, analogous to the learning and reasoning which humans use.
TensorFlow 和其它机器学习框架,如 Caffe,Torch 等的简单比较,可参见:https://en.wikipedia.org/wiki/Comparison_of_deep_learning_software
参考:
TensorFlow Machine Learning Cookbook
TensorFlow Website: https://www.tensorflow.org/
TensorFlow API Documentation: https://www.tensorflow.org/versions/master/api_docs/index.html
TensorFlow Tutorial, by Bharath Ramsundar: https://cs224d.stanford.edu/lectures/CS224d-Lecture7.pdf
1.1. Data Flow Graphs
Data flow graphs describe mathematical computation with a directed graph of nodes & edges. Nodes typically implement mathematical operations, but can also represent endpoints to feed in data, push out results, or read/write persistent variables. Edges describe the input/output relationships between nodes. These data edges carry dynamically-sized multidimensional data arrays, or tensors. The flow of tensors through the graph is where TensorFlow gets its name. Nodes are assigned to computational devices and execute asynchronously and in parallel once all the tensors on their incoming edges becomes available.
简单总结:在 TensorFlow 中,Computation 用 Data Flow Graph 表示:其中 Node 主要用来表示数学运算(比如 add, divide, multiply 等等),而 Edge 有两种类型:
(1) Normal Edges:用来表示所操作的数据(即 Tensor);
(2) Special Edges:用来表示两个 Nodes 之间的依赖。Let's suppose we have two nodes A and B and a special edges connecting A to B; it means that B will start its operation only when the operation in A ends.
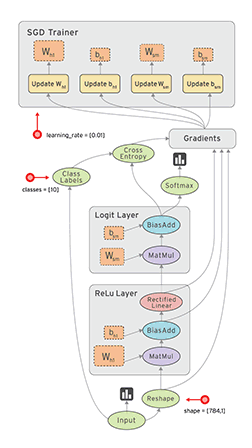
Figure 1: Data Flow Graph 示意图
1.2. 第一个例子
下面是使用 TensorFlow 计算两个矩阵相加的例子:
#!/usr/bin/env python
# -*- coding: utf-8 -*-

from __future__ import print_function

import tensorflow as tf

input1 = tf.constant([1.0, 1.0, 1.0, 1.0])
input2 = tf.constant([2.0, 2.0, 2.0, 2.0])
output = tf.add(input1, input2)

with tf.Session() as sess:
    result = sess.run(output)           # 这一行也可以写为 result = output.eval()
    print("result: ", result)           # 将打印出 result:  [ 3.  3.  3.  3.]
Session 表示 client program 和 TensorFlow runtime system 之间的通信。When the client program has to establish communication with the TensorFlow runtime system, a session must be created. As soon as the session is created for a client, an initial graph is created and is empty.
2. 创建和使用 Tensors
Tensors are the primary data structure that TensorFlow uses to operate on the computational graph.
2.1. Constant tensors
| 创建 Constant tensors 方法 | 说明 |
|---|---|
| zero_tsr = tf.zeros([row_dim, col_dim]) | Create a zero filled tensor. |
| ones_tsr = tf.ones([row_dim, col_dim]) | Create a one filled tensor. |
| filled_tsr = tf.fill([row_dim, col_dim], 42) | Create a constant filled tensor. |
| constant_tsr = tf.constant([1,2,3]) | Create a tensor out of an existing constant. |
| linear_tsr = tf.linspace(start=0, stop=1, start=3) | Sequence tensors [0.0, 0.5, 1.0]. |
| integer_seq_tsr = tf.range(start=6, limit=15, delta=3) | Sequence tensors [6, 9, 12]. |
| randunif_tsr = tf.random_uniform([row_dim, col_dim], minval=0, maxval=1) | A tensor with random draws from a uniform distribution. |
| randnorm_tsr = tf.random_normal([row_dim, col_dim], mean=0.0, stddev=1.0) | A tensor with random draws from a normal distribution. |
| shuffled_output = tf.random_shuffle(input_tensor) | 从 input_tensor 得到另一个随机 tensor. |
| cropped_output = tf.random_crop(input_tensor, crop_size) | 从 input_tensor 得到另一个限制大小的随机 tensor. |
| output_tsr = tf.convert_to_tensor(input, dtype=tf.float32) | Convert any numpy array to a Python list, or constant to a tensor. |
2.2. Variables
什么是 Variables? Variables are the parameters of the algorithm and TensorFlow keeps track of how to change these to optimize the algorithm.
怎么创建 Variables?The main way to create a variable is by using the Variable() function, which takes a tensor as an input and outputs a variable. This is the declaration and we still need to initialize the variable. Initializing is what puts the variable with the corresponding methods on the computational graph.
2.2.1. 变量使用实例
下面是变量使用实例:
#!/usr/bin/env python
# -*- coding: utf-8 -*-

from __future__ import print_function

import tensorflow as tf

state = tf.Variable(0, name="counter")        # 创建变量state

new_value = tf.add(state, tf.constant(1))
update = tf.assign(state, new_value)          # 创建一个更新操作,其作用是使state增加1

init_op = tf.global_variables_initializer()   # 初始化所有变量。本例只有变量state,它相当于 init_op = state.initializer

with tf.Session() as sess:
    sess.run(init_op)
    print(sess.run(state))                    # 输出state初始值0
    for _ in range(2):
        sess.run(update)
        print(sess.run(state))                # 输出更新后的state值
运行上面程序会输出:
0
1
2
2.2.2. 变量有依赖时,要依次初始化
如果两个变量有依赖,则必须依次初始化,不能利用 tf.global_variables_initializer()初始化全部变量。 如:
#!/usr/bin/env python
# -*- coding: utf-8 -*-

from __future__ import print_function

import tensorflow as tf

first_var = tf.Variable(tf.ones([2,3]))

# Depends on first_var
second_var = tf.Variable(tf.zeros_like(first_var))

with tf.Session() as sess:
    sess.run(first_var.initializer)
    sess.run(second_var.initializer)
    result = sess.run(second_var)
    print("result: ", result)
运行上面程序会输出:
result:  [[ 0.  0.  0.]
 [ 0.  0.  0.]]
2.3. Placeholders
Placeholders are just holding the position for data to be fed into the graph. Placeholders get data from a feed_dict argument in the session.
下面是 Placeholders 的实例:
#!/usr/bin/env python
# -*- coding: utf-8 -*-

from __future__ import print_function

import tensorflow as tf

input1 = tf.placeholder(tf.float32)        # 定义一个Placeholder
input2 = tf.placeholder(tf.float32)        # 定义另一个Placeholder
output = tf.add(input1, input2)

with tf.Session() as sess:
    result = sess.run(output, feed_dict={input1: [7.0, 8.0], input2: [3.0, 4.0]})
    print("result: ", result)              # 会输出 result:  [ 10.  12.]
3. 最小化损失函数
One of the benefits of using TensorFlow, is that it can keep track of operations and automatically update model variables based on back propagation.
TensorFlow 提供了优化设施(如 tf.train.GradientDescentOptimizer),最小化损失函数时,可以自动更新变量(参数)。
3.1. 随机梯度下降
下面是用随机梯度下降来拟合 \(x \times A = y\) 的例子。
#!/usr/bin/env python
# -*- coding: utf-8 -*-

from __future__ import print_function

import numpy as np
import tensorflow as tf

# Regression Example:
# We will create sample data as follows:
# x-data: 100 random samples from a normal ~ N(1, 0.1)
# target: 100 values of the value 10.
# We will fit the model:
# x-data * A = target
# Theoretically, A = 10.

# Create data
x_vals = np.random.normal(1, 0.1, 100)
y_vals = np.repeat(10., 100)
x_data = tf.placeholder(shape=[1], dtype=tf.float32)    # 后面会从x_vals中随机选择一个数提供给x_data
y_target = tf.placeholder(shape=[1], dtype=tf.float32)

# Create variable (one model parameter = A)
A = tf.Variable(tf.random_normal(shape=[1]))      # 定义变量A(这里仅是一个数,不是向量/矩阵),随机初始化它

# Add operation to graph
my_output = tf.multiply(x_data, A)

# Add L2 loss operation to graph
loss = tf.square(my_output - y_target)            # 定义平方损失函数(这里my_output, y_target都是一个数,故不需要使用loss = tf.reduce_mean(tf.square(my_output - y_target))

# Create Optimizer
my_opt = tf.train.GradientDescentOptimizer(0.02)  # 创建梯度下降优化器
train_step = my_opt.minimize(loss)

# Initialize variables
init = tf.global_variables_initializer()

with tf.Session() as sess:
    sess.run(init)

    # Run Loop
    for i in range(100):
        rand_index = np.random.choice(100)         # 产生一个0到100之间(不包含100)的随机数
        rand_x = [x_vals[rand_index]]              # 从 x_vals 中随机选择一个数(随机梯度下降法)
        rand_y = [y_vals[rand_index]]
        sess.run(train_step, feed_dict={x_data: rand_x, y_target: rand_y})   # 最小化损失函数
        if (i+1)%25==0:                            # 每25次迭代就打印A和loss
            print('Step #' + str(i+1) + ' A = ' + str(sess.run(A)))          # 打印求得的A
            print('Loss = ' + str(sess.run(loss, feed_dict={x_data: rand_x, y_target: rand_y})))
运行上面程序的一个可能输出:
Step #25 A = [ 6.46232939]
Loss = [ 15.06399345]
Step #50 A = [ 8.63834]
Loss = [ 3.78823781]
Step #75 A = [ 9.26825809]
Loss = [ 0.120468]
Step #100 A = [ 9.67277241]
Loss = [ 0.46880236]
3.2. Batch 梯度下降
下面是 Batch 梯度下降法的例子,这和前面介绍的随机梯度下降法很相似。
#!/usr/bin/env python
# -*- coding: utf-8 -*-

#!/usr/bin/env python
# -*- coding: utf-8 -*-

from __future__ import print_function

import numpy as np
import tensorflow as tf

# Regression Example:
# We will create sample data as follows:
# x-data: 100 random samples from a normal ~ N(1, 0.1)
# target: 100 values of the value 10.
# We will fit the model:
# x-data * A = target
# Theoretically, A = 10.

# Declare batch size
batch_size = 20

# Create data
x_vals = np.random.normal(1, 0.1, 100)
y_vals = np.repeat(10., 100)
x_data = tf.placeholder(shape=[None, 1], dtype=tf.float32)     # 后面会从x_vals中随机选择 batch_size 个值提供给x_data
y_target = tf.placeholder(shape=[None, 1], dtype=tf.float32)

# Create variable (one model parameter = A)
A = tf.Variable(tf.random_normal(shape=[1,1]))

# Add operation to graph
my_output = tf.matmul(x_data, A)

# Add L2 loss operation to graph
loss = tf.reduce_mean(tf.square(my_output - y_target))         # 定义平方损失函数。my_output和y_target都是向量

# Create Optimizer
my_opt = tf.train.GradientDescentOptimizer(0.02)
train_step = my_opt.minimize(loss)

# Initialize variables
init = tf.global_variables_initializer()

with tf.Session() as sess:
    sess.run(init)

    # Run Loop
    for i in range(100):
        rand_index = np.random.choice(100, size=batch_size)      # 一次得到 batch_size 个随机值
        rand_x = np.transpose([x_vals[rand_index]])
        rand_y = np.transpose([y_vals[rand_index]])
        sess.run(train_step, feed_dict={x_data: rand_x, y_target: rand_y})
        if (i+1)%25==0:
            print('Step #' + str(i+1) + ' A = ' + str(sess.run(A)))
            print('Loss = ' + str(sess.run(loss, feed_dict={x_data: rand_x, y_target: rand_y})))
运行上面程序的一个可能输出:
Step #25 A = [[ 5.97896194]]
Loss = 15.5133
Step #50 A = [[ 8.55298233]]
Loss = 3.43013
Step #75 A = [[ 9.52219296]]
Loss = 1.26389
Step #100 A = [[ 9.8888998]]
Loss = 1.12717