LaTeX
Table of Contents
- 1. LaTeX 简介
- 2. LaTeX 基本知识
- 3. LaTeX 数学公式
- 3.1. amsmath 宏包
- 3.2. 自动生成或定制公式编号
- 3.3. 上标下标(^和_)
- 3.4. 方根(sqrt)
- 3.5. 分式(frac)
- 3.6. 积分号、求和号、乘积号
- 3.7. 等号及其变种
- 3.8. 公式对齐
- 3.9. 分段函数(左大括号)
- 3.10. 二项系数(Binomial coefficient)
- 3.11. 各种“括号”和“点号”和“空格”
- 3.12. 在非 cases 环境中换行(gathered 环境)
- 3.13. 希腊字母
- 3.14. 矩阵记号
- 3.15. 模运算(mod, bmod, pmod)
- 3.16. math mode 中的字体设置
- 3.17. 符号 Tips
- 4. LaTeX 高级用法
- 5. XeTeX(用 xeCJK 宏包支持中文)
- 6. Beamer
- 7. MathJax
- 8. Tips
- 9. Troubleshooting
1. LaTeX 简介
LaTeX 是一个宏包,它使用 TeX 作为其排版引擎。
LaTeX was originally written in the early 1980s by Leslie Lamport. LaTeX2e is the current version of LaTeX, since it replaced LaTeX 2.09 in 1994.
参考:
LaTex Official website: http://www.latex-project.org
Hypertext Help with LaTeX: http://www.ctex.org/documents/latex/latex2e-html/ltx-2.html
The Comprehensive LATEX Symbol List: http://mirrors.ustc.edu.cn/CTAN/info/symbols/comprehensive/symbols-a4.pdf
The (Not So) Short Introduction to LaTeX2e (texdoc lshort): http://mirror.neu.edu.cn/CTAN/info/lshort/english/lshort.pdf
一份不太简短的 LATEX2ε 介绍:http://dante.ctan.org/get/info/lshort/chinese/lshort-zh-cn.pdf
Using Import graphics in LATEX2e: http://www.ctex.org/documents/latex/graphics/graphics.html
Wikibooks LaTex: https://en.wikibooks.org/wiki/LaTeX
The Comprehensive TEX Archive Network: http://www.ctan.org
1.1. Tex Live
TeX Live is an easy way to get up and running with the TeX document production system. It provides a comprehensive TeX system with binaries for most flavors of Unix, including GNU/Linux, and also Windows. It includes all the major TeX-related programs, macro packages, and fonts that are free software, including support for many languages around the world.
Download Tex Live: http://tug.org/texlive/acquire.html
每年国际 Tex 用户组(TeX Users Group, TUG)会发布一个 ISO,关于 TeX Live 在各个平台的安装参见 ISO 中内置的文档:《Tex Live 指南》。
1.1.1. Tex Live 中的自带字体
TeX Live 自带了很多字体(如 Source Code Pro 等等),通过下面命令可安装它(以 Mac 系统为例):
$ ln -s /usr/local/texlive/2017/texmf-dist/fonts ~/Library/Fonts/MacTeX
1.1.2. BasicTeX(更小的安装包)
TeX Live 2017 安装包的大小在 2GB 左右。BasicTeX 是一个精简版本(比如去掉了 TeX Live 中图形工具 TexShop 等等),其大小仅为 100MB 左右。
1.1.3. tlmgr(Tex Live 的宏包管理工具)
Tex Live 中内置了工具 tlmgr ,用于安装、更新、删除宏包等操作。如:
$ tlmgr install <package1> <package2> ...   # 安装软件包package1和package2
$ tlmgr update <package1> <package2> ...    # 升级软件包package1和package2
$ tlmgr remove <package1> <package2> ...    # 删除软件包package1和package2
$ tlmgr info <package1> <package2> ...      # 查看package1和package2的信息
$ tlmgr search <keyword>                    # 通过keyword查找软件包
下面是 tlmgr show 的使用例子:
$ tlmgr show xecjk
package:     xecjk
category:    Package
shortdesc:   Support for CJK documents in XeLaTeX
longdesc:    A LaTeX package for typesetting CJK documents in the way users have become used to, in the CJK package. The package requires a current version of xtemplate (and hence of the current LaTeX3 development environment).
installed:   Yes
revision:    44370
sizes:       src: 485k, doc: 1753k, run: 501k
relocatable: No
cat-version: 3.4.8
cat-date:    2017-05-15 17:51:51 +0200
cat-license: lppl1.3c
cat-topics:  chinese japanese korean xetex expl3
collection:  collection-xetex
1.1.4. Tex Live 的安装
Tex Live 的安装文档参见:https://www.tug.org/texlive/quickinstall.html
1.1.4.1. 通过 apt-get 安装
除了从 Tex Live 官网下载软件包,并参照其安装文档进行安装外,在 Ubuntu 系统中,还可以通过 apt-get 来安装 Tex Live。
以 Ubuntu 12.04 为例,介绍 Tex Live 的安装。
第一步,安装基本的 LaTeX 环境。
sudo apt-get install texlive
第二步,安装中文字体包。
sudo apt-get install latex-cjk-chinese
如果还想支持日文和韩文等,可以安装 latex-cjk-all
sudo apt-get install latex-cjk-all
注:如何想用 xetex 宏包处理中文,则需要安装下面软件:
sudo apt-get install texlive-xetex
参考:http://blog.sina.com.cn/s/blog_5e16f1770100kv5t.html
注:如果需要还可以安装下面软件包:
apt-get install texlive-latex-extra
这是一个非常大的包。安装了它,可以解决类似下面的问题:
LaTeX Error: File `everypage.sty' not found.
1.2. LaTeX 文本编辑工具
Gummi: 轻量级,简单直接。
texmaker: 功能较多。
Texworks: 界面简洁友好。
更多工具,请参考:http://en.wikipedia.org/wiki/Comparison_of_TeX_editors
1.3. 帮助文档(texdoc)
texdoc 是个查看帮助文档的好工具。
$ texdoc texdoc
texdoc 的具体实例,如:
$ texdoc lshort
$ texdoc amsldoc
$ texdoc caption
$ texdoc listing
$ texdoc listings
$ texdoc clsguide
1.3.1. Tips:查找某命令属于哪个宏包
如何查找某命令属于哪个宏包?如果命令由第三方宏包提供,可以直接在 texlive 安装目录中寻找。比如,查找 tlcventry 的所属宏包:
$ find /usr/local/texlive/2017/ -name '*.sty' | xargs grep tlcventry
/usr/local/texlive/2017//texmf-dist/tex/latex/moderntimeline/moderntimeline.sty:\newcommand{\tlcventry}[8][color1]{%
从结果中可知,它属于 moderntimeline 宏包。
参考:https://stackoverflow.com/questions/2440588/latex-how-to-find-packages-that-a-command-belongs-to
2. LaTeX 基本知识
2.1. LaTeX 源文件基本结构
LaTex 源文件常以.tex 为后缀,每个 LaTex 文件都以命令 \documentclass{...} 开始,之后可以加一些控制文档样式的命令。
正文的开始是 \begin{document} ,全文以 \end{document} 结束。
源文件中以 % 开始的内容为注释。
一个简单的 LaTex 文件如下:
\documentclass{article}
\begin{document}
This is a small simple.
%这是注释。
\end{document}
注:
对 article 类型的文件,有下列分节命令:
\section{...}
\subsection{...}
\subsubsection{...}
\paragraph{...}
\subparagraph{...}
对于 report 和 book 类型的文档,还有其它两个分节命令:
\part{...}
\chapter{...}
要生成 pdf,可直接运行命令
$ pdflatex 1.tex
注:如果你使用 xeCJK 宏包(使用 XeTeX 引擎)处理中文,则请用 xelatex 生成 pdf
$ xelatex 1.tex
2.2. 文档结构的划分(影响页码设置)
一个 book 类文档可分为“前言”、“正文”、“附录”、“后记”四个部分:
\frontmatter 前言部分。将页码切换成罗马数字格式,这个命令通常放在前言和目录前面。
\mainmatter 正文部分。将页码切换成阿拉伯数字,这个命令通常放在正文前面。
\appendix 附录部分。其后的 \chapter 改为使用拉丁字母编号,从 A 开始。
\backmatter 后记部分。页码格式不变,继续正常计数;其后的 \chapter 不编号。
2.3. 生成封面
可用 \maketitle 生成封面。
在使用这个命令前,应该先使用下面命令
\author
\date
\thanks
\title
参考:http://www.ctex.org/documents/latex/latex2e-html/ltx-263.html
2.4. 生成目录
可用 \tableofcontents 生成目录。生成目录时,文档会至少编译两次。
注:默认地,生成的目录没有超链接,增加下面语句可以生成目录的超链接: \usepackage{hyperref} ,这样点击目录可以进入相应位置了。
2.5. 调整页边距
如何调整页边距?可用宏包 geometry
\documentclass[a4paper]{article}
\usepackage{geometry}
\geometry{left=2.5cm,right=2.5cm,top=2.5cm,bottom=2.5cm}
\begin{document}
test
\end{document}
参考:
http://blog.sina.com.cn/s/blog_53a8a4710100kj1h.html
http://blog.sina.com.cn/s/blog_5e16f1770100gdhm.html
2.6. LaTex modes
When LaTeX is processing your input text, it is always in one of three modes:
- Paragraph mode
- Paragraph mode is the most common; it's the one LaTeX is in when processing ordinary text.
- Math mode
- LaTeX is in math mode when it's generating a mathematical formula. It is in math mode in the math, displaymath, equation, and eqnarray environments.
- LR mode
- Left-to-right mode, called LR mode for short. LaTeX is in LR mode when it starts making a box with an
\mboxcommand.
参考:http://www.ctex.org/documents/latex/latex2e-html/ltx-130.html
2.7. 列表(enumerate, itemize)
LaTeX 提供了基本的列表环境 enumerate(有序列表)和 itemize(无序列表),两者的用法很类似。实例如下:
Figure 1: LaTeX 中有序和无序列表
注:使用 \item[] 可以不显示无序列表前面的标记。
2.8. 插入表格(tabular)
用 \begin{tabular}{table spec} 可插入表格。
table spec 可以定义表格的样式,其中 l 产生左对齐的列, r 产生右对齐的列, c 产生居中的列, | 产生铅直表线。
在 tabular 环境中, & 表示跳入下一行,用 \\ 表示开始新的一行,用 \hline 表示插入水平表线。
参考:http://www.ctex.org/documents/latex/latex2e-html/ltx-68.html
2.8.1. 插入公式环境下的表格(array)
用 \begin{array}{列样式}…\end{array} 也可创建表格。
列样式可以是 clr 表示居中,左,右对齐,还可以使用|表示一条竖线。表格中各行使用\\分隔,各列使用&分隔。使用\hline 在本行前加入一条直线。
如:
\begin{array}{c|lcr}
n & \text{Left} & \text{Center} & \text{Right} \\
\hline
1 & 0.24 & 1 & 125 \\
2 & -1 & 189 & -8 \\
3 & -20 & 2000 & 1+10i \\
\end{array}
会产生下面结果:
\[\begin{array}{c|lcr}
n & \text{Left} & \text{Center} & \text{Right} \\
\hline
1 & 0.24 & 1 & 125 \\
2 & -1 & 189 & -8 \\
3 & -20 & 2000 & 1+10i \\
\end{array}\]
2.8.2. array 和 tabular 的不同
The array environment is for math mode and cell contents will be typeset in math mode (textstyle by default) and tabular is for text mode.
2.8.3. 可以跨页显示的表格(longtable)
tabular 环境无法跨页显示,如果你的表格有很多行,可以使用宏包 longtable 。
2.9. 插入图片
在 latex 文档的文件说明部分加上: \usepackage{graphicx}
然后在需要插入图片的地方引用: \includegraphics[option]{filename}
2.10. 盒子
盒子是 LaTex 排版的基础单元,它的解释有些抽象:每一行是一个盒子,里面的文字从左到右依次排列;每一页也是一个盒子,各行文字从上到下依次排布……颇有一些活字印刷术的味道。
2.10.1. 水平盒子(mbox, makebox, fbox, framebox)
生成水平盒子的命令如下:
\mbox{...}                     % 无框的水平盒子
\makebox[width][align]{...}    % 无框的水平盒子,支持控制盒子的宽度,以及内容的对齐方式
\fbox{...}                     % 带框的水平盒子,语法和 \mbox 相同。
\framebox[widtd][align]{...}   % 带框的水平盒子,语法和 \makebox 相同。
\mbox 生成一个基本的水平盒子,不允许分段。外表看上去, \mbox 的内容与正常的文本无二,不过断行时文字不会从盒子里断开。
\makebox 更进一步,可以加上可选参数用于控制盒子的宽度,以及内容的对齐方式,对齐方式可选居中对齐 c(默认值)、左对齐 l、右对齐 r 和分散对齐 s。
图 2 是水平盒子的例子。
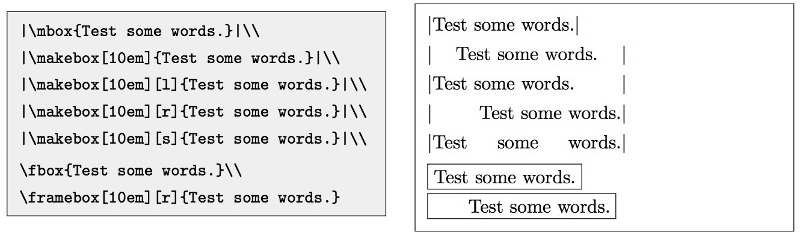
Figure 2: LaTeX 中的水平盒子
2.10.2. 垂直盒子(parbox, minipage 环境)
如果需要排版一个文字可以换行的盒子,LaTeX 提供了两种方式:
\parbox[align][height][inner-align]{width}{...}

\begin{minipage}[align][height][inner-align]{width}
...
\end{minipage}
说明:如果在 minipage 里使用 \footnote 命令,生成的脚注会出现在盒子底部,编号是独立的,并且使用小写字母编号。这也是 minipage 环境之被称为“迷你页”(Mini-page)的原因。在 \parbox 里无法正常使用 \footnote 命令。
2.11. 浮动体(figure 环境,table 环境)
内容丰富的文章或者书籍往往包含许多图片和表格等内容。这些内容的尺寸往往太大,导致分页困难。LaTeX 为此引入了浮动体的机制,令大块的内容可以脱离上下文,放置在合适的位置。
LaTeX 预定义了两类浮动体环境 figure 和 table 。习惯上 figure 里放图片,table 里放表格,但并没有严格限制,可以在任何一个浮动体里放置文字、公式、表格、图片等任意内容。
下面是 table 环境的用法举例(figure 环境类似):
\begin{table}[placement]
...
\end{table}
placement 参数提供了一些符号用来表示浮动体允许排版的位置,如表 1 所示。
| placement | 说明 |
|---|---|
| h | 当前位置(代码所处的上下文) |
| t | 顶部 |
| b | 底部 |
| p | 单独成页 |
! |
在决定位置时忽视限制 |
如 hbp 允许浮动体排版在当前位置、底部或者单独成页。table 和 figure 浮动体的默认设置为 tbp 。
注:排版位置的选取与参数里符号的顺序无关,LaTeX 总是以“h-t-b-p”的优先级顺序决定浮动体位置。也就是说 [!htp] 和 [ph!t] 没有区别。
3. LaTeX 数学公式
处于行内的数学公式要放在 \( 与 \) 之间, $ 与 $ 之间,或者 \begin{math} 与 \end{math} 之间。
处于单独一行的数学公式放在 \[ 与 \] 之间,或者 \begin{displaymath} 与 \end{displaymath} 之间。
如在行内插入 A 的平方: $A^{2}$
参考:
非常好的内置帮助文档 texdoc mathmode
List of LaTeX mathematical symbols: https://oeis.org/wiki/List_of_LaTeX_mathematical_symbols
LaTeX/Mathematics: https://en.wikibooks.org/wiki/LaTeX/Mathematics
LaTeX/Advanced Mathematics: https://en.wikibooks.org/wiki/LaTeX/Advanced_Mathematics
一份不太简短的 LATEX2ε 介绍,第三章
3.1. amsmath 宏包
amsmath 宏包是 AMS(美国数学协会)系列宏包中最重要的宏包,这个宏包引入了一些改进的数学环境。比如:加载 amsmath 之后,我们可以使用 aligned 环境,cases 环境等等。
在使用 amsmath 宏包前需要在导言区加入 \usepackage{amsmath} 。如:
\documentclass{article}
\usepackage{amsmath}
\begin{document}

This is a small simple.

\begin{cases}
a_1x+b_1y+c_1z=d_1 \\
a_2x+b_2y+c_2z=d_2 \\
a_3x+b_3y+c_3z=d_3
\end{cases}

\end{document}
参考:
https://www.ctan.org/pkg/amsmath?lang=en
User’s Guide for the amsmath Package: texdoc amsmath
3.2. 自动生成或定制公式编号
用 \begin{equation} 可以生成带自动编号的公式,如:
\begin{equation}
  a^2+b^2=c^2
\end{equation}
用 \begin{equation*} 则可以取消编号(equation 后面多一个星号),如:
\begin{equation*}
  a^2+b^2=c^2
\end{equation*}
3.2.1. 定制公式编号(tag)
用 \tag{} 可以定制公式编号。
如:
\begin{equation}
  a^2+b^2=c^2 \tag{100}
\end{equation}
的显示效果如下:
又如:
\begin{gather*}
a + b = c   \tag{A.1} \\
x + y = z   \tag{A.2} \\
m > n       \tag{A.3} \\
\end{gather*}
的显示效果如下:
说明: \begin{gather*} ... \end{gather*} 应该在 Paragraph mode 中使用,而不要在 Math mode 中使用。
\begin{align*}
B' &= -\partial \times E \tag{B10} \\
E' &= \partial \times B - 4\pi j \tag{B20}
\end{align*}
的显示效果为:
3.3. 上标下标(^和_)
如: A^{2} 和 A_{2} 会产生: \(A^{2}\) 和 \(A_{2}\)
又如: A^{3}_{ij} 会产生: \(A^{3}_{ij}\)
3.3.1. 调整巨算符的上(下)标显示位置(limits, nolimits)
LaTex 会自动调整巨算符(如 \(\sum\) 等)的上下标位置,当它是处于“单独一行的公式”(行间公式)中时,上(下)标位于正上(下)方;但当它处于“行内公式”中时,上(下)标会调整到右上(下)脚位置。
要强制使“行内公式”中的 \(\sum\) 符号的上(下)标位于其正上(下)方,可以使用 \limits ,如:
\sum_{i=0}^{100} 位于“行内公式”中时产生的效果为: \(\sum_{i=0}^{100}\)
\sum\limits_{i=0}^{100} 位于“行内公式”中时产生的效果为: \(\sum\limits_{i=0}^{100}\)
类似地, \nolimits 可强制使“行间公式”的上(下)标位于右上(下)脚位置。
3.4. 方根(sqrt)
如: \sqrt{x} 和 \sqrt[3]{2} 会产生: \(\sqrt{x}\) 和 \(\sqrt[3]{2}\)
3.5. 分式(frac)
如: \frac{x}{y} 会产生: \(\frac{x}{y}\)
说明:在指数或者积分表达式中使用\frac 会使表达式看起来不清晰,在专业的数学排版中不建议使用它,而应该直接使用一个水平的/来代替。如:
\[\begin{array}{cc}
\text{Bad Style} & \text{Better Style} \\
\hline \\
e^{\frac{i\pi}2}& e^{i\pi/2} \\
\int_{-\frac\pi2}^\frac\pi2 \sin x\,dx & \int_{-\pi/2}^{\pi/2}\sin x\,dx \\
\end{array}\]
3.5.1. 大号的分式(dfrac)
$\frac{-b \pm \sqrt{b^2 - 4ac}}{2a}$ 和 $\dfrac{-b \pm \sqrt{b^2 - 4ac}}{2a}$ 分别显示为:
\(\frac{-b \pm \sqrt{b^2 - 4ac}}{2a}\) 和 \(\dfrac{-b \pm \sqrt{b^2 - 4ac}}{2a}\)
3.5.2. 小号的分式(tfrac)
$$\frac{-b \pm \sqrt{b^2 - 4ac}}{2a}$$ 和 $$\tfrac{-b \pm \sqrt{b^2 - 4ac}}{2a}$$ 分别显示为(公式处于单独一行时才能看出大小差别,行内公式无效果):
\[\frac{-b \pm \sqrt{b^2 - 4ac}}{2a}\] 和 \[\tfrac{-b \pm \sqrt{b^2 - 4ac}}{2a}\]
3.5.3. Continued fractions (cfrac)
\cfrac{...}{...} 的效果如下:
\[x = a_0 + \cfrac{1}{a_1 + \cfrac{2}{a_2 + \cfrac{3}{a_3 + \cfrac{4}{a_4 + \cdots}}}}\]
如果使用 \frac{...}{...} ,则比较难看,效果如下:
\[x = a_0 + \frac{1}{a_1 + \frac{2}{a_2 + \frac{3}{a_3 + \frac{4}{a_4 + \cdots}}}}\]
3.6. 积分号、求和号、乘积号
积分号 (integral operator) 可以用 \int 产生,求和号 (sum operator) 用 \sum 命令,而乘积号 (product operator) 要用 \prod 命令。上限和下限用 ^ 和 _ 来指定,如同上标与下标一样。
如: \sum_{i=1}^{n} 会产生:\(\sum_{i=1}^{n}\)
3.7. 等号及其变种
LaTex 等号及其变种如表 2 所示。
| 效果 | LaTeX 表达 |
|---|---|
| \(=\) | = |
| \(\neq\) | \neq |
| \(\approx\) | \approx |
| \(\sim\) | \sim |
| \(\triangleq\) | \triangleq |
| \(\doteq\) | \doteq |
| \(\equiv\) | \equiv |
| \(\circeq\) | \circeq$ |
3.8. 公式对齐
3.8.1. align 基本用法
使用 align 环境,可以使下面公式按等号对齐。如:
\begin{align*} f(x) & = (a+b)^2 \\
 & = a^2+2ab+b^2 \\
\end{align*}
其效果为:
一个 & 符号表示一个 rl column pairs, r 表示右对齐, l 表示左对齐,即 & 左边的列会右对齐,而 & 右过的列会左对齐。如:
\begin{align*}
x^2+y^2 &< 1 \\
y &= \sqrt{1-x^2}
\end{align*}
其效果为:
如果要对齐多组公式,则每组公式之间使用 & 分开。如:
\begin{align*}
x&=y & X&=Y & a&=b+c\\
x'&=y' & X'&=Y' & a'&=b\\
x+x'&=y+y' & X+X'&=Y+Y' & a'b&=c'b
\end{align*}
其效果为:
3.8.2. align/align*/aligned 环境的区别
align(生成编号)/align*(不生成编号)环境直接用在正文中(如不需要用 $$ 和 $$ 包围)。
aligned 环境用在 Math mode 中(如 $$ 和 $$ 之间)。
注:gather/gather*/gathered 环境也有类似的区别。
3.8.3. 对齐实例:“Optimization Problems”
“Optimization Problems”可以用下面模板表示:
$$\begin{aligned}
& \underset{X}{\text{minimize}} & & \mathrm{trace}(X) \\
& \text{subject to} & & X_{ij} = M_{ij}, \; (i,j) \in \Omega, \\
&&& X \succeq 0.
\end{aligned}$$
其效果为:
\[\begin{aligned}
& \underset{X}{\text{minimize}} & & \mathrm{trace}(X) \\
& \text{subject to} & & X_{ij} = M_{ij}, \; (i,j) \in \Omega, \\
&&& X \succeq 0.
\end{aligned}\]
参考:https://jcnts.wordpress.com/2009/11/11/formatting-optimization-problems-with-latex/
3.8.4. 精确控制空格(alignat 环境)
在 align 环境中,一个 & 表示一个 rl column pairs,且会自动在多个 rl column pairs 之间增加空格。如:
       &                      &
<r col><l col> <space> <r col><l col>   ;; 上行对应格式
在 alignat 环境中,不会自动增加空格。这使我们能更精确地控制对齐方式。
比如下面式子中,如何让等号左边变为左对齐呢?
可以这样:
\begin{align*}
&ABC  &&= ABC - AB\\
&ABCD &&= ABC - ABCDEFG
\end{align*}
其效果为:
显然,这种方法不够好,它有多余的空格。
使用 alignat 环境可以解决这个问题。
\begin{alignat*}{2}
&ABC  &&= ABC - AB\\
&ABCD &&= ABC - ABCDEFG
\end{alignat*}
其效果为:
说明:alignat 环境需要指定一个数字参数(上面例子中为 2),它的计算方法为检测每行 & 数量,取最大值,加 1 后再除以 2。
参考: texdoc amsmath
3.8.4.1. alignat 实例:精确控制对齐
如何实现下面的对齐效果:
使用下面代码即可:
\begin{alignat*}{3}
x + 2& y - 3& z & = -&11\\
& y\; + & z & = &11\\
& & z & = &21\\
\end{alignat*}
3.8.4.2. align 和 alignat 的区别
align 和 alignat 的语法略有差异,alignat 需要指定一个数字参数。align 会在 rl column pairs 之间增加空格,而 alignat 不会自动增加空格。
参考:https://tex.stackexchange.com/questions/200813/difference-between-align-and-alignat-environments
3.9. 分段函数(左大括号)
如何实现这样的效果? \[f(x)= \begin{cases} -1 & x<0 \\ 0 & x=0 \\ 1 & x>0 \end{cases}\]
可以用下面的代码:
$$f(x)= \begin{cases}
-1 & x<0 \\
0 & x=0 \\
1 & x>0
\end{cases}$$
3.10. 二项系数(Binomial coefficient)
二项系数 \({n \choose r} = \frac{n!}{r!(n-r)!}\) 可以用 {n \choose r} 产生。
参考:http://www.combinatorics.net/weblib/commands/command.html
3.11. 各种“括号”和“点号”和“空格”
3.11.1. 各种括号
参考:
LaTeX 技巧 189:LaTeX 括号总结: http://blog.sina.com.cn/s/blog_5e16f1770100gk51.html
3.11.2. 字母上方的大括号(overbrace)
直接看下面实例。
\(\overbrace{abc}\) 可由 \overbrace{abc} 产生。
\(\overbrace{abc}^{\text{This is abc}}\) 可由 \overbrace{abc}^{\text{This is abc}} 产生。
如果字母上方的文本很长,想换行。可以使用 substack。如:
\(\overbrace{abc}^{\substack{\text{Some long text that} \\ \text{should be multiline}}}\) 可由 \overbrace{abc}^{\substack{\text{Some long text that} \\ \text{should be multiline}}} 产生。
3.11.3. 字母下方的大括号(underbrace)
直接看下面实例。
\(\underbrace{abc}\) 可由 \underbrace{abc} 产生。
\(\underbrace{abc}_{\text{This is abc}}\) 可由 \underbrace{abc}_{\text{This is abc}} 产生。
如果字母下方的文本很长,想换行。可以使用 substack。如:
\(\underbrace{abc}_{\substack{\text{Some long text that} \\ \text{should be multiline}}}\) 可由 \underbrace{abc}_{\substack{\text{Some long text that} \\ \text{should be multiline}}} 产生。
3.11.4. 各种点号
3.11.4.1. 居中的点(cdot, cdots)
直接输入点号,点号会位于中间偏下的位置。
要使点号处于中间位置,可以使用 \cdot
要连续输入 3 个处于中间位置的点号,可以使用 \cdots
如: x_1 \cdots x_n 会生成 \(x_1 \cdots x_n\)
3.11.4.2. 竖着的三个点(vdots)
竖着的三个点可用 \vdots 来产生。
3.11.4.3. 从左上角到右下角的三个点(ddots)
从左上角到右下角的三个点可用 \ddots 来产生。
3.11.5. 公式中的空格
LaTex 中有很多不同大小的空格,如表 3 所示。
| LaTeX spaces | Description |
|---|---|
| \! | -3/18 of \quad (= -3 mu) |
| \, | 3/18 of \quad (= 3 mu) |
| \: | 4/18 of \quad (= 4 mu) |
| \; | 5/18 of \quad (= 5 mu) |
| \ (space after backslash) | equivalent of space in normal text |
| \quad | space equal to the current font size (= 18 mu) |
| \qquad | twice of \quad (= 36 mu) |
实例:
\begin{align*}
f(x) =& x^2\! +3x\! +2 \\
f(x) =& x^2+3x+2 \\
f(x) =& x^2\, +3x\, +2 \\
f(x) =& x^2\: +3x\: +2 \\
f(x) =& x^2\; +3x\; +2 \\
f(x) =& x^2\ +3x\ +2 \\
f(x) =& x^2\quad +3x\quad +2 \\
f(x) =& x^2\qquad +3x\qquad +2
\end{align*}
上面演示了不同空格,其效果显示如下所示:
3.12. 在非 cases 环境中换行(gathered 环境)
公式中直接写 \\ 不会换行(除非 \\ 在 cases 等环境中)。
如果我们并不需要 cases 等环境,可以把 \\ 放入 gathered 环境中实现换行。
例如:
$$\begin{gathered}y_1 - (b_0 + b_1 t_{11} + \cdots + b_q t_{1q}) \\
y_2 - (b_0 + b_1 t_{21} + \cdots + b_q t_{2q}) \\
\vdots \\
y_n - (b_0 + b_1 t_{n1} + \cdots + b_q t_{nq}) \end{gathered}$$
会显示为:
\[\begin{gathered}y_1 - (b_0 + b_1 t_{11} + \cdots + b_q t_{1q}) \\
y_2 - (b_0 + b_1 t_{21} + \cdots + b_q t_{2q}) \\
\vdots \\
y_n - (b_0 + b_1 t_{n1} + \cdots + b_q t_{nq}) \end{gathered}\]
3.13. 希腊字母
| Greek letters (Lower case) | Command |
|---|---|
| \(\alpha\) | \alpha |
| \(\beta\) | \beta |
| \(\gamma\) | \gamma |
| \(\delta\) | \delta |
| \(\epsilon\) | \epsilon |
| \(\varepsilon\) | \varepsilon (variation, script-like) |
| \(\zeta\) | \zeta |
| \(\eta\) | \eta |
| \(\theta\) | \theta |
| \(\vartheta\) | \vartheta (variation, script-like) |
| \(\iota\) | \iota |
| \(\kappa\) | \kappa |
| \(\lambda\) | \lambda |
| \(\mu\) | \mu |
| \(\nu\) | \nu |
| \(\xi\) | \xi |
| \(\pi\) | \pi |
| \(\varpi\) | \varpi (variation) |
| \(\rho\) | \rho |
| \(\varrho\) | \varrho (variation, with the tail) |
| \(\sigma\) | \sigma |
| \(\varsigma\) | \varsigma (variation, script-like) |
| \(\tau\) | \tau |
| \(\upsilon\) | \upsilon |
| \(\phi\) | \phi |
| \(\varphi\) | \varphi (variation, script-like) |
| \(\chi\) | \chi |
| \(\psi\) | \psi |
| \(\omega\) | \omega |
| Greek letters (Capital letters) | Command |
|---|---|
| \(\Gamma\) | \Gamma |
| \(\Delta\) | \Delta |
| \(\Theta\) | \Theta |
| \(\Lambda\) | \Lambda |
| \(\Xi\) | \Xi |
| \(\Pi\) | \Pi |
| \(\Sigma\) | \Sigma |
| \(\Upsilon\) | \Upsilon |
| \(\Phi\) | \Phi |
| \(\Psi\) | \Psi |
| \(\Omega\) | \Omega |
参考:http://www.ctex.org/documents/latex/latex2e-html/ltx-405.html
3.14. 矩阵记号
矩阵记号如表 6 所示。
| Environment Name | Example |
|---|---|
| matrix | \[\begin{matrix} a_{1,1} & a_{1,2} \\ a_{2,1} & a_{2,2} \\ \end{matrix}\] |
| pmatrix | \[\begin{pmatrix} a_{1,1} & a_{1,2} \\ a_{2,1} & a_{2,2} \\ \end{pmatrix}\] |
| bmatrix | \[\begin{bmatrix} a_{1,1} & a_{1,2} \\ a_{2,1} & a_{2,2} \\ \end{bmatrix}\] |
| Bmatrix | \[\begin{Bmatrix} a_{1,1} & a_{1,2} \\ a_{2,1} & a_{2,2} \\ \end{Bmatrix}\] |
| vmatrix | \[\begin{vmatrix} a_{1,1} & a_{1,2} \\ a_{2,1} & a_{2,2} \\ \end{vmatrix}\] |
| Vmatrix | \[\begin{Vmatrix} a_{1,1} & a_{1,2} \\ a_{2,1} & a_{2,2} \\ \end{Vmatrix}\] |
参考:https://en.wikibooks.org/wiki/LaTeX/Mathematics#Matrices_and_arrays
3.15. 模运算(mod, bmod, pmod)
下面是模运算的几种写法,从上到下依次是 mod, bmod, pmod:
参考:http://www.matthewflickinger.com/blog/archives/2005/02/20/latex_mod_spacing.asp
3.16. math mode 中的字体设置
参考:
Math Font Selection in LaTeX and Unicode: http://milde.users.sourceforge.net/LUCR/Math/math-font-selection.xhtml
texdoc mathmode
3.16.1. 数学符号的字体形式
math mode 中的各种字体如表 7 所示。
| Command | Comments | Font sample |
|---|---|---|
\mathbb |
blackboard bold | \(\scriptstyle\mathbb{ABCDEFGHIJKLMNOPQRSTUVWXYZ}\) |
\mathrm |
roman | \(\scriptstyle\mathrm{ABCDEFGHIJKLMNOPQRSTUVWXYZabcdefghijklmnopqrstuvwxyz}\) |
\mathbf |
bold roman | \(\scriptstyle\mathbf{ABCDEFGHIJKLMNOPQRSTUVWXYZabcdefghijklmnopqrstuvwxyz}\) |
\mathsf |
sans serif | \(\scriptstyle\mathsf{ABCDEFGHIJKLMNOPQRSTUVWXYZabcdefghijklmnopqrstuvwxyz}\) |
\mathit |
text italic | \(\scriptstyle\mathit{ABCDEFGHIJKLMNOPQRSTUVWXYZabcdefghijklmnopqrstuvwxyz}\) |
\mathtt |
typewriter (fixed-width) | \(\scriptstyle\mathtt{ABCDEFGHIJKLMNOPQRSTUVWXYZabcdefghijklmnopqrstuvwxyz}\) |
\mathcal |
calligraphic | \(\scriptstyle\mathcal{ABCDEFGHIJKLMNOPQRSTUVWXYZ}\) |
\mathscr |
script | \(\scriptstyle\mathscr{ABCDEFGHIJKLMNOPQRSTUVWXYZabcdefghijklmnopqrstuvwxyz}\) |
说明:
\mathbf 只能加粗拉丁字母,对希腊字母就没有用。使用 \boldsymbol 可以解决这个问题,不过定界符、巨算符等一些符号本身没有粗体版本, \boldsymbol 也得不到粗体。LATEX 工具宏集之一的 bm 宏包可以用 \bm 命令生成“伪粗体”,一定程度上解决了不带粗体版本的符号的问题。
3.16.2. 数学符号的字体大小
数学符号的字体大小设置如表 8 所示。
| 命令 | 说明 | 实例 |
|---|---|---|
\displaystyle |
行间公式尺寸 | \(\displaystyle \sum a\) |
\textstyle |
行内公式尺寸 | \(\textstyle \sum a\) |
\scriptstyle |
上下标尺寸 | \(\scriptstyle a\) |
\scriptscriptstyle |
次级上下标尺寸 | \(\scriptscriptstyle a\) |
3.17. 符号 Tips
3.17.1. 箭头上面标记字母
如何在箭头上面标记字母?如 \(A\overset{t}{\longrightarrow} B\)
用下面代码即可:
A\overset{t}{\longrightarrow} B
3.17.2. 双箭头上加斜线
如何在双箭头上加斜线?如 \(A \mathrel{\rlap{\hskip .5em/}}\Longrightarrow B\)
可以使用 A \centernot\implies B ,但它在 MathJax 中不支持。要在 MathJax 实现类似效果,可以使用:
A \mathrel{\rlap{\hskip .5em/}}\Longrightarrow B
4. LaTeX 高级用法
4.1. hyperref 包(处理超链接)
\usepackage{hyperref}
在文件中增加上面语句后,用 xelatex 生成的 pdf 时默认带有书签,非常方便。但默认的超级链接处有个红色的方框,很难看。
克服上面问题的方法是,不要使用 hyperref 宏包的默认属性,可使用如下方式引入宏包:
\usepackage[colorlinks,
            linkcolor=red,
            anchorcolor=blue,
            citecolor=green
            ]{hyperref}
“colorlinks”的意思是将超链接以颜色来标识,而并非使用默认的方框来标识。
linkcolor, anchorcolor, citecolor 分别表示用来标识 link, anchor, cite 等各种链接的颜色。
若正式的文档中不想使用彩色的标识,但又希望具有超链接的功能,则将上例中的各种颜色换成“black”即可。
参考:
http://www.tug.org/applications/hyperref/manual.html
http://blog.sina.com.cn/s/blog_5e16f1770100fkcz.html
4.1.1. 插入 url
hyperref 包中\url 能方便地插入网址,可防止网址中的特殊字符(如波浪号~)被 latex 做特别处理。
\usepackage{hyperref}
\url{http://www.catb.org/~esr/}
4.2. listings 包(可插入程序源码)
用 listings 包可方便地在 Latex 文档中插入程序源码。
参考:
The Listings Package: http://mirrors.ustc.edu.cn/CTAN/macros/latex/contrib/listings/listings.pdf
LaTeX/Source Code Listings: http://en.wikibooks.org/wiki/LaTeX/Source_Code_Listings
4.3. pgf, TikZ 包(画图)
pgf (stands for Portable Graphics Format) 和 TikZ(TikZ 基于 pgf)是 Latex 中强大的画图工具。
参考:
A very minimal introduction to TikZ: http://cremeronline.com/LaTeX/minimaltikz.pdf
The TikZ and PGF Packages (Manual): http://mirror.bjtu.edu.cn/CTAN/graphics/pgf/base/doc/pgfmanual.pdf
http://ctan.org/pkg/pgf
http://martin-thoma.com/tag/tikz/
4.4. 检测当前平台(ifplatform 包)
ifplatform 包可用来检测当前的运行平台。
This package provides the three following conditionals to test which operating system is being used to run TEX:
\ifwindows
\iflinux
\ifmacosx
\ifcygwin
If you only wish to detect \ifwindows, then it does not matter how you load this package. Note then that use of (Linux or Mac OS X or Cygwin) can then be detected with \ifwindows \else.
If you also wish to determine the difference between which Unix-variant you are using (i.e., also detect \iflinux, \ifmacosx, and \ifcygwin) then shell escape must be enabled. This is achieved by using the -shell-escape command line option when executing LATEX.
If shell escape is not enabled, \iflinux, \ifmacosx, and \ifcygwin will all return false. A warning will be printed in the console output to remind you in this case.
在 xelatex 中启用 shell escape,可以这样:
$ xelatex -shell-escape 1.tex
参考:http://mirror.unl.edu/ctan/macros/latex/contrib/ifplatform/ifplatform.pdf
4.5. 长文档管理
当处理很大的文档文件时,有时找们希望将文件分成若干部分。
\include{filename}
在文挡区我们可以使用这条命令插入另一个文件的内容,LaTex 在处理插入的文本以前将启动新的一个页面。
\includeonly{filename1,filename2,...}
这个命令可在导言部分使用,允许 LaTex 对可插入的文本文件进行限制:这条命令执行后,上面的 \include{filename} 命令中的 filename 叁数必须是 \includeonly{filename1,filename2,...} 命令叁数中的一个。注意文件名 filename1,filename2,... 同其后面的逗号之间不能有空格。
\input{filename}
这个命令将在新的页面上对插人的文件文本进行排版,如果你不希望这样,可以用上面的命令插入别的文件。
总结:
\input 插入不开启新页
\include 插入开启新页
\includeonly 插入多文件时,可以一个一个文件编译,提高效率。
需要注意的是 \includeonly 在导言部分使用!
4.6. 定义自己的类文件
要定义自己的类文件,可参考:
$ texdoc clsguide
实例参考:
http://rpi.edu/dept/arc/training/latex/resumes/res.cls
http://rpi.edu/dept/arc/training/latex/resumes/
5. XeTeX(用 xeCJK 宏包支持中文)
xeCJK 宏包所使用的 XeTeX 引擎,最初在 MacOS 平台上开发,后来移植到了 Linux 和 Windows 上。它最大的特点是从底层就具备对 Unicode 的支持,以及可以直接调用系统中已有的字体。这意味着将 LaTeX 用户从和字体相关的一大推问题中解放出来了。只要系统中安装了中文字体,那么使用 XeTeX 就能使用这些字体。
\documentclass{article}
\usepackage{xeCJK}
\setCJKmainfont{SimSun}
\begin{document}
你好,中文 TeX Live 2009
\end{document}
运行上面实例时,系统中必须存在 SimSun 字体。
生成 pdf,用 xelatex 命令:
$ xelatex 1.tex
参考:
The XeTeX Companion (pdf)
The XeTeX reference guide (pdf)
xeCJK宏包 (pdf)
5.1. fontspec (Advanced font selection in XELATEX and LuaLATEX)
可以通过 fontspec 包来方便地设置字体。
fontspec 宏包主要提供了三个命令用于设置字体:
\setmainfont 命令设置文档的默认字体(一般为衬线字体);
\setsansfont 命令设置文档的无衬线字体;
\setmonofont 命令设置文档的等宽字体。
此外,fontspec 宏包还提供了 \IfFontExistsTF 来测试字体是否存在。
\documentclass[12pt]{article}

\usepackage{fontspec}
\setmainfont{Times New Roman}               % 设置衬线字体
\setsansfont{Arial}                         % 设置无衬线字体
\setmonofont{Courier}                       % 设置等宽字体

\begin{document}
  \textnormal{Normal text in Times New Roman font}
\par
  \textsf{Sans-serif text in Arial font}
\par
  \texttt{Monospace text in Courier font}
\end{document}
5.1.1. newfontfamily(设置文字的字体)
要对部分文字定制字体,通过下面两个步骤即可。
第一步,使用 \newfontfamily 命令增加字体名字(如 myfont)。即:
\newfontfamily\myfont{Zapfino}
第二步,使用 {\myfont xxx} 对文字设置字体。即:
{\myfont Some text in the special font}
下面是一个完整的例子。
\documentclass[12pt]{article}

\usepackage{fontspec}
\setmainfont{Times New Roman}               % 设置衬线字体
\setsansfont{Arial}                         % 设置无衬线字体
\setmonofont{Courier}                       % 设置等宽字体

\newfontfamily\myfonta{Cochin}                 % 请确保系统中有Cochin字体。
\newfontfamily\myfontb{Brush Script MT}        % 请确保系统中有Brush Script MT字体。

\begin{document}
Some text in the default font (Times New Roman) \par
\textsf{Some text in the default sans serif font (Arial)} \par
\texttt{Some text in the default monospace font (Courier)} \par
{\myfonta Some text in the special font (Cochin) }  \par
{\myfontb Some text in the special font (Brush Script MT)}
\end{document}
运行 xelatex file.tex 生成 pdf 后,得到的效果如图 3 所示。
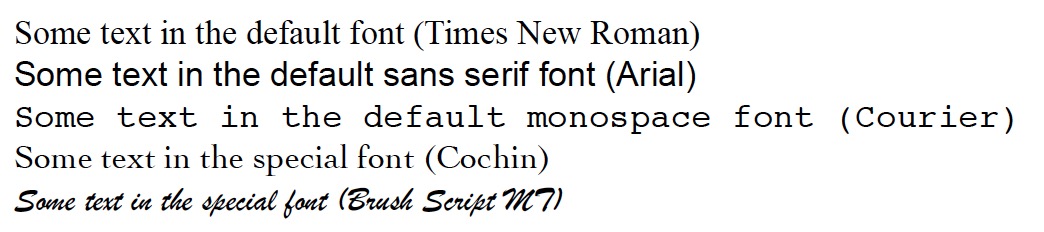
Figure 3: 使用 newfontfamily 设置文字字体
5.2. ucharclasses(可为不同的 Unicode block 设置不同字体)
宏包 ucharclasses 可以帮助我们为不同的 Unicode block 设置不同字体。一般来说,一个字体仅会对 Unicode 的子集定义字形,目前没有一个字体对所有 Unicode 定义了字形。
宏包 ucharchasses 中定义了 \setTransitionTo, \setTransitionFrom 等命令。它们的用法为:
\setTransitionTo{arg1}{arg2} ,其中 arg1 是 Unicode block 名字,arg2 是进入对应 Unicode block 所执行的代码;
\setTransitionFrom{arg1}{arg2} ,其中 arg1 是 Unicode block 名字,arg2 是离开对应 Unicode block 所执行的代码。
ucharchasses 实例:
\usepackage{fontspec}
\newfontfamily{\defaultfont}{Code2000}
\newfontfamily{\latinfont}{Palatino Linotype}
\newfontfamily{\cjkfont}{HAN NOM A}
\newfontfamily{\japanesefont}{Ume Mincho}
\newfontfamily{\unifiedCJKfont}{SimSun-ExtB}
\newfontfamily{\thaifont}{IrisUPC}
\newfontfamily{\sinhalafont}{Iskoola Pota}
\newfontfamily{\malayalamfont}{Arial Unicode MS}
\newfontfamily{\dominofont}{FreeSerif}
\newfontfamily{\mahjongfont}{FreeSerif}

\usepackage[CJK, Latin, Thai, Sinhala, Malayalam, DominoTiles, MahjongTiles]{ucharclasses}
\setDefaultTransitions{\defaultfont}{}
\setTransitionsForLatin{\latinfont}{}
\setTransitionsForCJK{\cjkfont}{}
\setTransitionsForJapanese{\japanesefont}{}
\setTransitionTo{CJKUnifiedIdeographsExtensionB}{\unifiedCJKfont}
\setTransitionTo{Thai}{\thaifont}
\setTransitionTo{Sinhala}{\sinhalafont}
\setTransitionTo{Malayalam}{\malayalamfont}
\setTransitionTo{DominoTiles}{\dominofont}
\setTransitionTo{MahjongTiles}{\mahjongfont}
参考:
XeLaTeX: Unicode font fallback for unsupported characters: https://michaelfranzl.com/2014/12/10/xelatex-unicode-font-fallback-unsupported-characters/
ucharclasses documentation: http://mirrors.opencas.org/ctan/macros/xetex/latex/ucharclasses/ucharclasses.pdf
6. Beamer
Beamer 是一个 LaTeX Class,用来生成演示文稿(presentation)。
Presentation 的基本组成:Each Beamer project is made up of a series of frames. Each frame produces one or more slides, depending on the slide’s overlays.
安装 Beamer(以 Ubuntu LTS 12.04 系统为例):
sudo apt-get install latex-beamer
参考:
A Beamer Quickstart: http://userpages.umbc.edu/~rostamia/beamer/quickstart.html
Beamer by Example: http://www.tug.org/pracjourn/2005-4/mertz/mertz.pdf
A Beamer Tutorial in Beamer: http://www.uncg.edu/cmp/reu/presentations/Charles%20Batts%20-%20Beamer%20Tutorial.pdf
User Guide (texdoc beamer): http://www.ctan.org/tex-archive/macros/latex/contrib/beamer/doc/
User Guide 中文版:http://math.ecnu.edu.cn/~latex/slides/beamer/beamer_guide_cn.pdf
7. MathJax
MathJax 是一个开源,基于 Ajax 技术的数学表达式显示解决方案,它能够在 HTMl 页面中高质量的显示 LaTeX 或 MathML 数学符号。
参考:
MathJax basic tutorial and quick reference: http://meta.math.stackexchange.com/questions/5020/mathjax-basic-tutorial-and-quick-reference
8. Tips
8.1. 另起新行并缩进
\par 可另起新行并缩进。
8.2. 百分号作用(注释,换行但不产生空格)
百分号 % 除了表示注释外,如果放在行尾,可以起到“换行但不产生空格”的作用。如:
\documentclass{article}
\begin{document}
Hello%
World!
\end{document}
和下面 LaTeX 文档是相同的:
\documentclass{article}
\begin{document}
HelloWorld!            % Hello World之间没有空格
\end{document}
8.3. 输入双引号和单引号
如何输入双引号和单引号呢?
连续键入两个反引号(在键盘的 Tab 键上侧),然后输入键盘的两个单引号。单引号的输入类似。例如:
``a''
`b'
8.4. 改变文字颜色
用 \color{<color name>}{<text or math>} 和 \textcolor{<color name>}{<text or math>} 可以改变文字或公式的颜色。
\color 命令不仅会影响它的第 2 个大括号内的文字或公式的颜色,还会影响到它后面文字的颜色,除非在外层再用 {} 包围起来。例如: {\color{red}{This is red.}} Not red. 和 \textcolor{red}{This is red.} Not red. 有相同效果。
实例:
\color{red}{This is red.} This is ALSO red.
{\color{red}{This is red.}} This is not red.
\textcolor{red}{This is red.} This is not red.
8.5. 转换 LaTeX 为 Html
LaTex2HTML 和 TeX4ht 都可以把 LaTex 文件转换为 Html 文件。
但是 LaTex2HTML 项目已经没人维护了,很多新的包无法支持;而 TeX4ht 使用时遇到了各种问题。
除此外,还可以使用万能格式转换工具 pandoc
参考:
http://www.cv.nrao.edu/~abridle/toolmemo/node8.shtml
LaTex2HTML 使用实例:http://www.ctex.org/documents/latex/graphics/node121.html
8.6. auctex(emacs 插件)
AUCTEX is an extensible package for writing and formatting TEX files in GNU Emacs and XEmacs.
安装方法:apt-get install auctex
8.6.1. 一站式编辑文件
| shortcuts | 描述 |
|---|---|
| C-c C-s | 插入章或节 |
| C-c C-e | 插入 LaTex 环境 |
| C-c C-j | 插入列表 item |
| C-c ] | 闭合 LaTeX 环境 |
| C-c C-m | 插入 Tex 宏 |
在 tex 文档中,为了结构化的需要,经常会需要插入 \chapter, \section, \subsection 命令。在 auctex 中,这些命令都可以通过 ‘C-c C-s’ 一站式完成,你只需要告诉 auctex 你所需要插入章节层次(section level),然后告诉 auctex 相应章节的标题,如果需要,你也可以添加相应的标签(可选)。
类似的,在 tex 文档中,必不可少的 \begin{document} 与 \end{document} ,以及众多的类似的各种各样的环境,自己在编辑 tex 文档时,经常会遗忘去匹配相应的环境,然后在编译时候要花费时间去修改。于 auctex 里你只需要键入 ‘C-c C-e’ 然后告诉 auctex 你所希望插入文档的环境,例如你键入了 math,auctex 会悉心的插入数学环境 \begin{math} 与 \end{math} 。
auctex 还提供了 ‘C-c C-m’ 快捷键供方便地插入宏命令,在大多数情况下 auxtex 都可以理解相应宏命令的参数个数并提示你一一输入。
8.6.2. 一站式编译,查看,打印文件
可用快捷键 C-c C-c 完成一站式编译,查看,打印文件。
如果你已经完成了 tex 文档的编写想查看排版后输出的 pdf,试着输入 ‘C-c C-c’。auctex 会询问你想调用那项命令,在大多数情形中,auctex 所建议给出的命令往往可以符合你的需要。例如,你刚刚完成对文档的修改,此时 auctex 所给出的建议命令为 ‘latex’,即建议你重新编译文档,而如果你已经完成对最新文档的编译,auctex 会建议你查看最新的 pdf,而不是再次对文档进行编译。
8.6.3. 多文件管理(TeX-master 变量)
在协作文档时,为了便于对文档进行管理,一般都会把文档根据内容拆分成几个部分,搭配使用 LaTeX 的\include 或\input 命令对文件进行组织。
举个例子,假设当前目录下有三个 tex 文件,master.tex, sectone.tex, secttwo.tex,其内容分别如下。
master.tex:
\documentclass{article}
\begin{document}
\include{sectone}
\include{secttwo}
\end{document}
sectone.tex:
\section{one}
hello, world!
secttwo.tex:
\section{two}
Don't be evil!
用 auctex 编辑 secttwo.tex 文件时,编译文件时就会出错,因为 auctex 无法知道当前文件所属的 master 文件,因此需要设置 auctex master 文件的信息。
为了便于对文件进行组织和管理,auctex 允许你为文件设置文件变量(file variables)。因此你可以把 sectwo.tex 修改成如下内容。
\section{two}
Don't be evil!

%%% Local Variables:
%%% TeX-master: "master"
%%% End:
现在再编译 secttwo.tex 文件,auctex 就可以知道 master.tex 文件为 master 文件,auctex 会转去编译 master.tex 文件。因此,你需要在每个 tex 文件末尾添加相应的信息,文件一多,就会变得很繁琐。因此,auctex 提供了‘TeX-master’变量,可以设置其为“master”,这样就可以通知所有的文件 master 文件总为 master.tex 文件。
(setq-default TeX-master "master")
当然,如果你不需要对多文件进行组织和管理,设置 ‘TeX-master’ 为 t 即可,即假设当前的文件总为 master 文件。
8.6.4. preview-latex
auctex 的组件 preview-latex 可用于预览 LaTex 文件。
在 auctex 已经加载的情况下,可通过菜单 Preview 使用它的功能。
参考:
https://www.gnu.org/software/auctex/preview-latex.html
https://www.gnu.org/software/auctex/manual/preview-latex.html
9. Troubleshooting
9.1. File ended while scanning use of \@newl@bel
错误描述:
Runaway argument?
! File ended while scanning use of \@newl@bel.
<inserted text>
                \par
l.48 \begin{document}

?
解决方法:将文件夹中除了 eps 文件,tex 文件和 bib 文件之外的文件全部删除,重新运行一次即可!