PDF Tools
Table of Contents
1. Ghostscript
Ghostscript is an interpreter for the PostScript language and for PDF.
1.1. pdfmark
pdfmark is a PostScript operator that allows for the inclusion of PDFfeatures when the PostScript file is converted to PDF.
使用 pdfmark 可以为 pdf 文件添加书签、Annotations 等。表 1 是 pdfmark 的一些基本功能。
| Features 名字 | 功能 |
|---|---|
| ANN | Annotations |
| OUT | Bookmarks |
| DOCINFO | Document Info dictionary |
| DOCVIEW | Document open options |
| EMBED | Embedded file content |
| PAGELABEL | Page label and plate color(设置 pdf 逻辑页码) |
pdfmark 操作符的基本格式如下:
[ any_1 ... any_n feature pdfmark
1.1.1. 添加书签(OUT)
下面介绍如何使用 pdfmark 为 pdf 文件添加书签。
首先,准备下面文件(假设文件名为 pdfmark_command.txt):
[/Count 2   /Title (Chapter 1)     /Page 1 /OUT pdfmark
[/Count -2  /Title (Section 1.1)   /Page 2 /OUT pdfmark
[           /Title (Section 1.1.1) /Page 3 /OUT pdfmark
[           /Title (Section 1.1.2) /Page 4 /OUT pdfmark
[/Count -1  /Title (Section 1.2)   /Page 5 /OUT pdfmark
[           /Title (Section 1.2.1) /Page 6 /OUT pdfmark
/Count 属性用于指定当前书签下有几个“子书签”,正/负符号表示“是/否 Collapse 显示当前书签”。
执行下面命令可以为文件 input.pdf 添加对应的书签:
$ gs -sDEVICE=pdfwrite -o output.pdf pdfmark_command.txt -f input.pdf
成功执行上面命令后,打开 output.pdf,可得到图 1 所示的书签,例子中“Section 1.1”和“Section 1.2”默认会折叠,这是因为它们的 /Count 属性值被设置为负数。
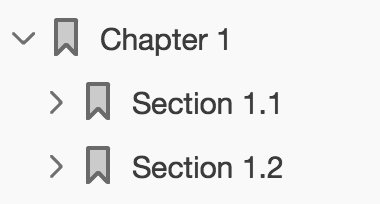
Figure 1: gs 添加书签实例
注:如果文档中已经存在书签,则已经存在的书签不会被删除。
1.1.1.1. View destinations
可以通过 /View 来控制打开书签时页面定位的精细位置和缩放情况等。如下面设置会使点击相应书签时缩放 200%:
[/Page 2 /View [/XYZ null null 2] /Title (This is page 2) /OUT pdfmark
/View 支持的其它参数如表 2 所示。
| Name | Parameters | Description |
|---|---|---|
| Fit | None | Fit the page to the window. This is a shortcut for specifying FitR with the rectangle being the crop box for the page. |
| FitB | None | Fit the bounding box of the page contents to the window. |
| FitBH | top | Fit the width of the bounding box of the page contents to the window. top specifies the distance from the page origin to the top of the window. |
| FitBV | left | Fit the height of the bounding box of the page contents to the window. left specifies the distance from the page origin to the left edge of the window. |
| FitH | top | Fit the width of the page to the window. top specifies the distance from the page origin to the top of the window. This is a shortcut for specifying FitR with the rectangle having the width of the page, and both y-coordinates equal to top. |
| FitR | x1 y1 x2 y2 | Fit the rectangle specified by the parameters to the window. |
| FitV | left | Fit the height of the page to the window. left specifies the distance in from the page origin to the left edge of the window. This is a shortcut for specifying FitR with the rectangle having the height of the page, and both x-coordinates equal to left. |
| XYZ | left top zoom | left and top specify the distance from the origin of the page to the top-left corner of the window. zoom specifies the zoom factor, with 1 being 100% magnification. If left, top or zoom is NULL, the current value of that parameter is retained. For example, specifying a view destination of /View [/XYZ null null null] goes to the specified page and retains the same horizontal and vertical offset and zoom as the current page. A zoom of 0 has the same meaning as a zoom of NULL. |
1.1.2. 修改初始视图(DOCVIEW)
下面是修改打开 pdf 文件时初始视图的例子(打开文件时默认显示书签,且定位到第 2 页):
[ /PageMode /UseOutlines
  /Page 2
  /DOCVIEW pdfmark
上面 pdfmark 比较简单,我们通过 -c 在命令行中直接指定,如:
$ gs -sDEVICE=pdfwrite -o output.pdf -c '[ /PageMode /UseOutlines /Page 2 /DOCVIEW pdfmark' -f input.pdf
/PageMode 的其它候选值如表 3 所示。
| PageMode 候选值 | 说明 |
|---|---|
| UseNone | Open the document, displaying neither bookmarks nor thumbnail images (defaults). |
| UseOutlines | Open the document and display bookmarks. |
| UseThumbs | Open the document and display thumbnail images. |
| FullScreen | Open the document in full screen mode. |
1.2. Tips
1.2.1. 合并 pdf 文件
使用 gs 命令可以合并 pdf 文件,如:
$ gs -dBATCH -dNOPAUSE -q -sDEVICE=pdfwrite -sOutputFile=output_file.pdf file1.pdf file2.pdf
命令完成后,文件 file1.pdf 和 file2.pdf 将被合并为 output_file.pdf
1.2.2. 转换 ps 文件为 pdf
要转换 ps 文件为 pdf,使用 ps2pdf 即可,它最终会调用 gs 命令完成转换。
2. 其它 pdf 工具
2.1. 合并 pdf 文件(pdftk)
pdftk,官方网站:http://www.pdflabs.com/tools/pdftk-the-pdf-toolkit/
pdftk 可以将多个 PDF 文件合并成一个文件。比如下面的例子:
$ pdftk 1.pdf 2.pdf 3.pdf cat output 123.pdf
或者使用文件句柄:
$ pdftk A=1.pdf B=2.pdf cat A B output 12.pdf
下面的例子使用了文件通配符:
$ pdftk *.pdf cat output combined.pdf
下面的例子将多个文件的多页提取出来生成一个新的 PDF 文件:
$ pdftk A=one.pdf B=two.pdf cat A1-7 B1-5 A8 output combined.pdf
2.2. 提取 pdf 部分页面(pdftk)
pdftk 可以随意删除或旋转页面。下面是一个把指定页码的页面移出 pdf 文档的示例。
$ pdftk new.pdf cat 1-96 98-end output new1.pdf
新生成的 new1.pdf 文档不包含页码为 97 的页面。cat 选项后跟的参数用以指定页码范围和页面方向的限定条件。1-96 表示从 1 到 96 页,98-end 表示从 98 页至文档末尾。所以输出的新 pdf 文档不包含页码为 97 的页面。
除了示例中的具体数值,还可使用一些限定字符。odd 和 even 表示奇偶页码。N、S、E、W、L、R、D 表示文档版面的旋转角度(N: 0,E: 90,S: 180,W: 270,L: -90,R: +90,D: +180)。
如:1-6odd 表示 1,3,5;
1-6even 表示 2,4,6;
1-endE 表示整篇文档所有页面都旋转 90 度。
90 度旋转 PDF 文件的第一页:
$ pdftk in.pdf cat 1E 2-end output out.pdf
旋转整个文档 180 度:
$ pdftk in.pdf cat 1-endS out.pdf
折分文档,将 PDF 文件的每一页输出成一个 PDF 文件,输出文件默认命名为 pg\_0001.pdf pg\_0002.pdf 等等:
$ pdftk in.pdf burst
也可以指定输出文件名,比如下面的例子:
$ pdftk in.pdf burst output page_%1d.pdf
2.3. 查看和更新元数据(pdftk)
使用 pdftk 把元数据保存到 report.txt 中:
$ pdftk input.pdf dump_data_utf8 output report.txt
修改 report.txt 后,可以更新元数据到 pdf 中
$ pdftk input.pdf update_info_utf8 report.txt output result.pdf
注:尽管查看元数据时,能导出书签等信息,但是更新元数据仅能更新 InfoKey 对应的 InfoValue 的值,不能更新书签相关信息!
2.4. 查看和更新元数据(exiftool)
使用 exiftool 可以查看和更新 pdf 文件中的元数据。
下面是一些例子:
$ exiftool file.pdf                                           # 查看所有元数据
ExifTool Version Number         : 10.05
File Name                       : file.pdf
Directory                       : .
File Size                       : 109 kB
File Modification Date/Time     : 2017:11:04 21:13:57+08:00
File Access Date/Time           : 2017:11:04 21:16:21+08:00
File Inode Change Date/Time     : 2017:11:04 21:13:57+08:00
File Permissions                : rw-r--r--
File Type                       : PDF
File Type Extension             : pdf
MIME Type                       : application/pdf
PDF Version                     : 1.5
Linearized                      : No
Page Mode                       : UseOutlines
Language                        : English
Page Count                      : 2
Creator                         : Emacs 25.1.1 (Org mode 9.0.7)
Title                           : test
Author                          : cig01
Producer                        : XeTeX 0.99992
Keywords                        : keyword1, keyword2
Create Date                     : 2017:11:04 21:13:57+08:00
$ exiftool -Producer file.pdf                                 # 查看指定的元数据(Producer)
Producer                        : XeTeX 0.99992
$ exiftool -Author file.pdf                                   # 查看指定的元数据(Author)
Author                          : cig01
$ exiftool -Author='New Author' file.pdf                      # 更新指定的元数据(Author)
    1 image files updated
$ exiftool -Author file.pdf
Author                          : New Author
参考:
https://askubuntu.com/questions/27381/how-to-edit-pdf-metadata-from-command-line
2.5. 编辑书签(JPdfBookmarks)
推荐工具:JPdfBookmarks,官方网站:http://sourceforge.net/projects/jpdfbookmarks/
它是 JAVA 程序,界面操作简单易懂,下面仅介绍命令行模式的操作。
从 pdf 文件中导出书签:
$ jpdfbookmarks input.pdf --dump -o bookmarks.txt
把书签文件应用到 pdf 文件:
$ jpdfbookmarks input.pdf --apply bookmarks.txt -o result.pdf
注:选项--dump 可以简写为-d,选项--apply 可以简写为-a。其书签文件的格式如下:
Chapter 1. The Beginning/3
	Para 1.1 Child of first level/5
		Para 1.1.2 Child of second level/9
	Para 1.2 Another Child of first level/14
Chapter 2. The Continue/27
其中显示级别用“tab”缩进表示,“/”前的内容为书签名称,“/”后的内容为书签页码。
2.6. 编辑逻辑页码(jPDF Tweak)
推荐工具:jPDF Tweak,官方网站:http://jpdftweak.sourceforge.net/
它是 JAVA 程序,界面操作简单易懂,下面仅介绍命令行模式的操作。
举例:
假设有个 pdf 文件,第 1 页为封面,第 2,3,4 页为目录,从第 5 页开始为正文。现在我们想设定封面页码为 Cover,目录页码为 i,ii,iii,正文页码为 1,2,3...
Step1.
新建文件 mydata.txt。
内容如下:
1=Cover:1-
2=1i
5=1
Step2.
运行下面命令:
$ java -jar jpdftweak.jar -i input.pdf -o output.pdf -loadpagenumbers mydata.txt
注:mydata.txt 中每一行表示一节,每节的格式为:
page=[prefix:]pagenum[type]
page:表示这节的开始页码;
prefix:表示页码前缀;
pagenum:表示编页码时从几开始(前文中若 2=2i,则会从 ii 开始编码,目录页码为 ii,iii,iv);
type:表示页码的类型。省略表示数字,I表示大写罗马字母,i表示小写罗马字母,A表示大写英文字母,a表示小写英文字母,-表示不设置页码。
关于选项 loadpagenumbers 的详细用法可用下面命令查询:
$ java -jar jpdftweak.jar -help loadpagenumbers
2.7. 转换图片为 pdf(convert)
推荐工具:convert,convert 是 imagemagick 的一个组件。
$ sudo apt-get install imagemagick
下面命令可以把当前目录的所有.jpg 文件合并为 out.pdf:
$ convert *.jpg out.pdf
使用 convert 转换图片为 pdf 时容易发生 segmentation fault。使用 gs 也可以完成这个工作,参考节 1.2.3 。
2.8. 提取 pdf 中的图片(pdfimages)
推荐工具:pdfimages,它是 poppler-utils 的一个组件。
安装方式:
$ sudo aptitude install poppler-utils    # Ubuntu
$ brew install poppler                   # Mac
poppler-utils 中包括一些实用工具,有:pdftops (PDF 到 Posts script 的转换器), pdfinfo (PDF 文档信息提取器), pdfimages (PDF 图像提取器), pdftohtml (PDF 到 HTML 的转换器), pdftotext (PDF 到 text 的转换器), 以及 pdffonts (PDF 字体分析器)。
pdfimages 从 PDF 文件提取“原始图像数据”,不做任何额外的变化,任何 PDF 内容流里的旋转,剪切,颜色反转等动作都被忽略。提取的图片可保存为可移植像素图(PPM), 可移植位图(PBM), 或者 JPEG 文件。
使用 -j 选项将图像保存为 JPEG 格式,使用 -f 和 -l 选项制定起始页和结束页(不指定则默认认为转换所有页面)。
下面例子将提取 PDF 文件第 3 至 7 页(包括 3 和 7)中的图片:
$ pdfimages -f 3 -l 7 -j example.pdf imageroot
上面例子中,imageroot 是生成文件名的前缀,最终的文件名会如 imageroot-nnn.jpg 等(其中 nnn 是数字编号)。
使用 -list 选项可以列出 PDF 中的图片,如:
$ pdfimages -list -f 7 -l 8  ct-magazin-14-2012.pdf

  page   num  type   width height color comp bpc  enc interp  object ID
  ---------------------------------------------------------------------
     7     0 image     581   838  rgb     3   8  jpeg   no        39  0
     7     1 image       4     4  rgb     3   8  image  no        40  0
     7     2 image     314   332  rgb     3   8  jpx    no        44  0
     7     3 image     358   430  rgb     3   8  jpx    no        45  0
     7     4 image       4     4  rgb     3   8  image  no        46  0
     7     5 image       4     4  rgb     3   8  image  no        47  0
     7     6 image       4     6  rgb     3   8  image  no        48  0
     7     7 image     596   462  rgb     3   8  jpx    no        49  0
     7     8 image       4     6  rgb     3   8  image  no        50  0
     7     9 image       4     4  rgb     3   8  image  no        51  0
     7    10 image       8    10  rgb     3   8  image  no        41  0
     7    11 image       6     6  rgb     3   8  image  no        42  0
     7    12 image     113    27  rgb     3   8  jpx    no        43  0
     8    13 image     582   839  gray    1   8  jpeg   no      2080  0
     8    14 image     344   364  gray    1   8  jpx    no      2079  0
2.9. 给 pdf 加 annotations
工具 1:pdfedit,主页:http://pdfedit.cz/en/index.html
$ sudo apt-get install pdfedit
不过,这个工具界面不友好,也不稳定,界面经常卡死。
工具 2:PDF Studio,非常好的跨平台 pdf 编辑工具(它是商业软件,不是免费的)。
2.10. 命令行中查询 pdf 页码数
在 MacOS 中可以使用命令行工具 mdls 来查询 pdf 文件的页码数,如:
$ mdls file.pdf |grep kMDItemNumberOfPages |awk '{print $3}'
126