Unix-like Tools
Table of Contents
- 1. cal
- 2. colrm
- 3. column(列对齐输出)
- 4. comm(求两个有序文件的不同)
- 5. CPU Benchmark
- 6. cron 和 crontab(定时执行任务)
- 7. date 和 tzselect
- 8. dconf-editor 和 gconf-editor
- 9. diff 和 patch
- 10. dig, nslookup, host(DNS 查询)
- 11. djvused(编辑 djvu 文件)
- 12. ed
- 13. env 和 set
- 14. expand 和 unexpand(空格和 tab 互转)
- 15. expect
- 16. fc-list 和 fc-cache
- 17. fcrackzip(zip 密码破解)
- 18. fdisk(磁盘分区)
- 19. fdupes(按 md5 值删除重复文件)
- 20. ffmpeg(音频视频编辑)
- 21. find
- 22. fold(超过指定列数后换行)
- 23. Fortify (Static Code Analysis)
- 24. fuser(找出使用文件的进程)
- 25. getconf
- 26. gprof(性能分析工具)
- 27. grep 系列
- 28. grub-install 和 update-grub
- 29. GnuPG
- 30. hexdump
- 31. indent
- 32. info
- 33. inkscape(矢量图形编辑软件)
- 34. ip(iproute2)和 ifconfig
- 35. ipcs
- 36. join
- 37. Kazam(屏幕录制软件)
- 38. lftp
- 39. look(有序文件中查找行)
- 40. ls
- 41. lsblk(查看磁盘等块设备信息)
- 42. m4
- 43. man
- 44. mkisofs 和 genisoimage
- 45. namei
- 46. netstat
- 47. od
- 48. parcellite
- 49. paste
- 50. pgrep 和 pwdx
- 51. pmap(查看进程的内存映像信息)
- 52. ps 和 pstree
- 53. pstack(进程当前 stack 信息)
- 54. rsync
- 55. samba
- 56. screen
- 57. Source Insight
- 58. split 和 csplit
- 59. ssh
- 60. strace, ltrace, mtrace
- 61. strings
- 62. stty
- 63. sudo
- 64. SystemTap(stap, 内核调试工具)
- 65. testdisk(数据恢复软件)
- 66. top
- 67. troff(tbl, pic, eqn)
- 68. tsort
- 69. useradd 和 gpasswd 等用户管理命令
- 70. VNC(Virtual Network Computing)
- 71. wget
- 72. whatis
- 73. wine
- 74. wkhtmltopdf
- 75. write 和 wall 和 mesg
- 76. xargs
- 77. xhost
- 78. xmodmap
- 79. xsel
- 80. yacc
- 81. yes
1. cal
cal 可在终端显示日历,不带参数运行 cal 可显示当前月份的日历。
实例:显示某一整年的日历:
$ cal -y 2000
                            2000
      January               February               March
Su Mo Tu We Th Fr Sa  Su Mo Tu We Th Fr Sa  Su Mo Tu We Th Fr Sa
                   1         1  2  3  4  5            1  2  3  4
 2  3  4  5  6  7  8   6  7  8  9 10 11 12   5  6  7  8  9 10 11
 9 10 11 12 13 14 15  13 14 15 16 17 18 19  12 13 14 15 16 17 18
16 17 18 19 20 21 22  20 21 22 23 24 25 26  19 20 21 22 23 24 25
23 24 25 26 27 28 29  27 28 29              26 27 28 29 30 31
30 31

       April                  May                   June
Su Mo Tu We Th Fr Sa  Su Mo Tu We Th Fr Sa  Su Mo Tu We Th Fr Sa
                   1      1  2  3  4  5  6               1  2  3
 2  3  4  5  6  7  8   7  8  9 10 11 12 13   4  5  6  7  8  9 10
 9 10 11 12 13 14 15  14 15 16 17 18 19 20  11 12 13 14 15 16 17
16 17 18 19 20 21 22  21 22 23 24 25 26 27  18 19 20 21 22 23 24
23 24 25 26 27 28 29  28 29 30 31           25 26 27 28 29 30
30
......
2. colrm
colrm 可以删除标准输入中指定的列。如:
$ printf "abcde\n123456\n" | colrm 1 3    # 从第1列删到第3列
de
456
$ printf "abcde\n123456\n" | colrm 4      # 删除第4列及以后的列
abc
123
3. column(列对齐输出)
column 常常用来进行列对齐后再输出。下面例子中,第 2 列和第 3 列在输出时被对齐了:
$ printf "abcdef ab a\n1 2 3\n4 5 6\n" | column -t
abcdef  ab  a
1       2   3
4       5   6
默认输入数据中的分隔符为空格,如果不是,可以通过 -s sep 来指定输入数据的分隔符,如:
$ printf "abcdef:ab:a\n1:2:3\n4:5:6\n" | column -t -s":"
abcdef  ab  a
1       2   3
4       5   6
4. comm(求两个有序文件的不同)
comm 可以求出两个有序文件的交集和差集等。
comm file1 file2 的输出包含三列(tab 分隔),第 1 列是仅出现在 file1 的行,第 2 列是仅出现在 file2 中的行,第 3 列是同时出现在 file1 和 file2 中的行。
首先,生成两个测试文件 file1 和 file2:
$ sed -n '100p;2000p;3000p;4000p;5000p;6000p;7000p' /usr/share/dict/words |sort >file1
$ sed -n '10p;2000p;4000p;7000p;9000p' /usr/share/dict/words |sort >file2
$ cat file1
Abbadide
Alsophila
Amoy
actinomere
advisableness
agitate
alef
$ cat file2
Aaron
Amoy
actinomere
agitate
annulation
运行命令 comm file1 file2 的结果如下(第 1 列是仅出现在 file1 的行,第 2 列是仅出现在 file2 中的行,第 3 列是同时出现在 file1 和 file2 中的行):
$ comm file1 file2
	Aaron
Abbadide
Alsophila
		Amoy
		actinomere
advisableness
		agitate
alef
	annulation
comm 命令的常用实例如表 1 所示。
| 命令 | 说明 |
|---|---|
| comm -2 -3 file1 file2 | 显示 file1 中独有的行(即不显示 2,3 列) |
| comm -1 -3 file1 file2 | 显示 file2 中独有的行(即不显示 1,3 列) |
| comm -1 -2 file1 file2 | 显示同时出现在 file1 和 file2 中的行(即不显示 1,2 列) |
| comm -3 file1 file2 | tr -d '\t' | 显示仅出现在一个文件中的行(即不显示第 3 列,删除 tab,假定 file1 和 file2 中没有 tab) |
测试如下:
$ comm -2 -3 file1 file2              # 显示file1中独有的行
Abbadide
Alsophila
advisableness
alef
$ comm -1 -3 file1 file2              # 显示file2中独有的行
Aaron
annulation
$ comm -1 -2 file1 file2              # 显示同时出现在file1和file2中的行
Amoy
actinomere
agitate
$ comm -3 file1 file2 | tr -d '\t'    # 显示仅出现在一个文件中的行
Aaron
Abbadide
Alsophila
advisableness
alef
annulation
参考: man comm
5. CPU Benchmark
5.1. 7-Zip LZMA Benchmark(CPU Benchmark)
7z 除了可用于压缩和解压文件外,还内置了一个 CPU Benchmark 工具。
参考:https://www.7-cpu.com/ (有一些常见 CPU 的性能测试数据)
5.1.1. 安装 7z
安装 7z:
$ sudo apt install p7zip-full     # Ubuntu
$ brew install p7zip              # MacOS
5.1.2. 测试 CPU 多线程性能
执行 7z b 可以启动 7-Zip LZMA Benchmark 测试,默认机器有多少核心就会启动多少个线程进行测试:
$ 7z b                      # 进行 CPU Benchmark,机器有多少核心就会启动多少个线程

7-Zip [64] 17.05 : Copyright (c) 1999-2021 Igor Pavlov : 2017-08-28
p7zip Version 17.05 (locale=utf8,Utf16=on,HugeFiles=on,64 bits,8 CPUs x64)

x64
CPU Freq:  3127  3094  3317  3336  3223  3224  3231  3320  3251

RAM size:   16384 MB,  # CPU hardware threads:   8
RAM usage:   1765 MB,  # Benchmark threads:      8

                       Compressing  |                  Decompressing
Dict     Speed Usage    R/U Rating  |      Speed Usage    R/U Rating
         KiB/s     %   MIPS   MIPS  |      KiB/s     %   MIPS   MIPS

22:      18879   578   3175  18366  |     203946   744   2339  17396
23:      17687   608   2964  18021  |     200205   739   2344  17325
24:      17218   638   2901  18513  |     196828   736   2349  17275
25:      16582   647   2928  18934  |     189543   739   2284  16869
----------------------------------  | ------------------------------
Avr:             618   2992  18458  |              739   2329  17216
Tot:             678   2661  17837
上面的输出中,有两个测试集:Compressing 和 Decompressing 的测试数据。关于这两个测试集的介绍可以参考:https://7-zip.opensource.jp/chm/cmdline/commands/bench.htm
输出的说明:
Dict:表示 Dictionary Size,如 22 表示 2^22=4MB。
Usage (%):表示 CPU 使用率。
R/U, i.e. Rating / Usage (MIPS, Million Instructions Per Second): 表示单个 CPU 线程的性能,数据越大表示 CPU 性能越好。对现代 CPU 来说,这个数据会接近于 CPU 的频率。
Rating (MIPS):表示 CPU 的多线程性能,值越大越好。
Avr: 不同 Dictionary Size 下进行测试,其平均结果。
Tot: 两个测试集的平均测试数据。
通过选项 -mmt{N} 可以指定 N 个线程进行测试,如启动 2 个线程进行测试可执行 7z b -mmt2 :
$ 7z b -mmt2                # 启动 2 个线程进行 CPU Benchmark

7-Zip [64] 17.05 : Copyright (c) 1999-2021 Igor Pavlov : 2017-08-28
p7zip Version 17.05 (locale=utf8,Utf16=on,HugeFiles=on,64 bits,8 CPUs x64)

x64
CPU Freq:  3001  3067  3189  3233  3275  3319  3333  3183  2995

RAM size:   16384 MB,  # CPU hardware threads:   8
RAM usage:    441 MB,  # Benchmark threads:      2

                       Compressing  |                  Decompressing
Dict     Speed Usage    R/U Rating  |      Speed Usage    R/U Rating
         KiB/s     %   MIPS   MIPS  |      KiB/s     %   MIPS   MIPS

22:       6389   168   3697   6215  |      76650   199   3295   6544
23:       6361   176   3692   6481  |      74178   197   3257   6421
24:       6414   182   3796   6896  |      76058   199   3352   6677
25:       6415   186   3947   7324  |      74348   199   3318   6617
----------------------------------  | ------------------------------
Avr:             178   3783   6729  |              199   3306   6565
Tot:             188   3544   6647
5.1.3. 测试 CPU 单线程性能
执行 7z b -mmt1 可以测试单个 CPU 核心的性能:
$ 7z b -mmt1                # 启动 1 个线程进行 CPU Benchmark

7-Zip [64] 17.05 : Copyright (c) 1999-2021 Igor Pavlov : 2017-08-28
p7zip Version 17.05 (locale=utf8,Utf16=on,HugeFiles=on,64 bits,8 CPUs x64)

x64
CPU Freq:  3035  3075  3142  3223  3327  3301  3253  2893  3184

RAM size:   16384 MB,  # CPU hardware threads:   8
RAM usage:    435 MB,  # Benchmark threads:      1

                       Compressing  |                  Decompressing
Dict     Speed Usage    R/U Rating  |      Speed Usage    R/U Rating
         KiB/s     %   MIPS   MIPS  |      KiB/s     %   MIPS   MIPS

22:       3372    99   3305   3280  |      39082    99   3367   3337
23:       3311   100   3383   3374  |      37838    98   3342   3275
24:       3302   100   3556   3551  |      39223    99   3461   3443
25:       3195   100   3652   3649  |      39013   100   3476   3472
----------------------------------  | ------------------------------
Avr:             100   3474   3463  |               99   3411   3382
5.2. sysbench
sysbench 也可用于 CPU Benchmark,它的原理是进行素数计算。这个测试场景很单一,并不能全面反映 CPU 性能。
下面是它的使用实例:
$ sysbench cpu run
sysbench 1.0.20 (using system LuaJIT 2.1.0-beta3)

Running the test with following options:
Number of threads: 1
Initializing random number generator from current time


Prime numbers limit: 10000

Initializing worker threads...

Threads started!

CPU speed:
    events per second: 3332010.63

General statistics:
    total time:                          10.0000s
    total number of events:              33325854

Latency (ms):
         min:                                    0.00
         avg:                                    0.00
         max:                                    2.10
         95th percentile:                        0.00
         sum:                                 2700.61

Threads fairness:
    events (avg/stddev):           33325854.0000/0.00
    execution time (avg/stddev):   2.7006/0.00
输出中 events per second 的值越大表示 CPU 越快。
6. cron 和 crontab(定时执行任务)
cron 是 Unix/Linux 系统中的一个 deamon 程序,用于周期性地执行任务(注:它每隔一分钟检查一次是否有任务需要执行)。使用工具 crontab 可以方便地查看、增加或删除定时任务。crontab 的基本使用如表 2 所示。
| crontab 命令 | 功能 |
|---|---|
| crontab -l | 列出当前用户的定时任务(保存在目录 /var/spool/cron 中),并不会显示所有定时任务 |
| crontab -e | 增加(或编辑)当前用户的定时任务(会启动 EDITOR 所指定编辑器,默认为 vi) |
| crontab -r | 删除当前用户的定时任务 |
要查看所有的定时任务,需要检查下面这些目录:
/etc/cron.d/
/etc/cron.daily/
/etc/cron.deny
/etc/cron.hourly/
/etc/cron.monthly/
/etc/crontab
/etc/cron.weekly/
重启 cron 服务:
$ systemctl restart crond.service
注:cron 假定系统不停机,如果停机错过了执行时间就不会执行相关任务,使用工具 anacron 可以克服 cron 的这个缺点。
6.1. 增加定时任务
使用 crontab -e 可以增加(或编辑已有的)定时任务。定时任务的格式如下:
# Example of job definition:
# .---------------- minute (0 - 59)
# |  .------------- hour (0 - 23)
# |  |  .---------- day of month (1 - 31)
# |  |  |  .------- month (1 - 12) OR jan,feb,mar,apr ...
# |  |  |  |  .---- day of week (0 - 6) (Sunday=0 or 7) OR sun,mon,tue,wed,thu,fri,sat
# |  |  |  |  |
# *  *  *  *  *  command to be executed
定时任务分为 6 个字段(使用空格或者制表符分隔),前 5 个字段用来指定时间周期,最后一个字段是想要执行的命令。
下面重点介绍一下前 5 个字段。 除了使用具体数字外,还有几个特殊符号: * 和 - 和 , 。其中星号 * 代表所有有效数字,连字符 - 代表从某个数字到某个数字,逗号 , 代表几个离散的数字(注:很多实现还支持用特殊符号 / 表示“每”的含义,不过 POSIX 标准中并没有包含它)。
表 3 是 crontab 的几个实例。
| crontab 实例 | 说明 |
|---|---|
| * * * * * echo 'Test' >> /tmp/file1 | 每分钟执行 echo 'Test' >> /tmp/file1 |
| 0 * * * * myCommand | 每小时 0 分钟(整点)执行 myCommand |
| 0 0 * * * myCommand | 每天零点执行 myCommand |
| 25,45 8-11 * * * myCommand | 每天上午 8 点到 11 点的第 25 和第 45 分钟执行 myCommand |
| 15 1 * * 6,0 myCommand | 每周六、周日的 1:15 执行 myCommand |
注意:有些系统可能要求在执行命令前配置用户名,到底需要不需要可以通过查看 /etc/crontab 得知(下面例子就是需要用户名):
$ cat /etc/crontab
SHELL=/bin/bash
PATH=/sbin:/bin:/usr/sbin:/usr/bin
MAILTO=root

# For details see man 4 crontabs

# Example of job definition:
# .---------------- minute (0 - 59)
# |  .------------- hour (0 - 23)
# |  |  .---------- day of month (1 - 31)
# |  |  |  .------- month (1 - 12) OR jan,feb,mar,apr ...
# |  |  |  |  .---- day of week (0 - 6) (Sunday=0 or 7) OR sun,mon,tue,wed,thu,fri,sat
# |  |  |  |  |
# *  *  *  *  * user-name  command to be executed
参考: man 5 crontab
7. date 和 tzselect
date 除查看当前时区时间外,还可查看其它时区时间。
如果计算机的 locate 时区不是你所在时区,如何查看你所在时区的时间呢?可以通过在运行 date 前,先设置 TZ 变量的实现。
假设,当前计算机默认时区为 Pacific Standard Time,如:
bash-3.2$ date
2012年 12月 24日 星期一 18:59:01 PST
上面显示的时区为 PST(Pacific Standard Time),要查看 China Standard Time,怎么办?
在运行 date 前设置 TZ=UTC,可以查看协调世界时(UTC)
bash-3.2$ TZ=UTC date
2012年 12月 25日 星期二 02:59:06 UTC
对应的 China Standard Time 就是 UTC 加 8 个小时,即 10:59:06 了。
能不能直接得到 China Standard Time 呢?看下文。
尝试 1:设置 TZ 为 CST:
bash-3.2$ TZ=CST date
2012年 12月 25日 星期二 02:59:31 CST
可以发现设置 TZ=CST 和 TZ=UTC,得到的结果是一样的(仅秒钟不一样,这是运行命令有先后造成的)
这是在这里 CST 是 Central Standard Time 的缩写(而不是 China Standard Time 的缩写)。
尝试 2:设置 TZ 为 Asia/Shanghai
bash-3.2$ TZ='Asia/Shanghai' date
2012年 12月 25日 星期二 10:59:36 CST
终于得到了北京时间!
除了设置为 Asia/Shanghai 外,设置为 Asia/Harbin 等得到的结果也一样,但是却不能设置为 Asia/Beijing,为什么呢?网上很多人也在报怨,可以是历史原因吧。
这些字符串都太长了,难输入,可以直接 TZ=PRC,同样得到北京时间!
查询某地区所使用的时区 tzselect:
bash-3.2$ tzselect
Please identify a location so that time zone rules can be set correctly.
Please select a continent or ocean.
 1) Africa
 2) Americas
 3) Antarctica
 4) Arctic Ocean
 5) Asia
 6) Atlantic Ocean
 7) Australia
 8) Europe
 9) Indian Ocean
10) Pacific Ocean
一步一步提示你输入,直到定位到某地区。
注:
时区相关的文件在/usr/share/zoneinfo
7.1. date 按指定格式显示时间
可以指定 date 的时间显示格式。如显示 UTC 时间:
$ date -u +"%Y-%m-%d %H:%M:%S"
2014-05-20 03:58:48
上面例子中“-u”表示显示协调世界时(UTC)。
显示 ISO8601 格式(这个标准下日期和小时之间只能是字符 T,时区中可以包含也可以不包含冒号)的时间:
$ date +%Y-%m-%dT%T%z
2019-12-31T20:48:49+0800
显示 RFC3339 格式(它是 ISO 8601 的一个 profile。这个标准下日期和小时之间可以是空格也可以是字符 T,时区中需要包含冒号)的时间:
$ date +%Y-%m-%dT%T%z | sed 's@^.\{22\}@&:@'
2019-12-31T20:49:13+08:00
上面 sed 命令的作用是在前 22 个字符的后面增加一个冒号。
7.2. unix timestamp
执行 date +%s 可以得到 unix timestamp,如:
$ date +%s
1547001951
$ timestamp=$(date +%s)
$ echo $timestamp
1547001959
8. dconf-editor 和 gconf-editor
dconf 速度更快。因为 dconf 使用 binary 格式保存配置,而 gconf 使用 xml 格式。
dconf 正在逐渐取代 gconf。
它们分别对应的设置工具为:dconf-editor 和 gconf-editor
参考:
http://askubuntu.com/questions/91403/when-to-use-gconf-vs-dconf
http://askubuntu.com/questions/34490/what-are-the-differences-between-gconf-and-dconf
8.1. 对特定网址忽略代理
Firstly, run dconf-edior
Then, manually navigate to system -> http_proxy -> ignore_hosts
参考:
http://askubuntu.com/questions/135089/proxy-exceptions-in-12-04-lts
9. diff 和 patch
生成某个文件 patch 文件:
$ diff -u old.c new.c >old.patch
对单个文件应用 patch:
$ patch old.c <old.patch
取消 patch(-R 选项):
$ patch -R old.c <old.patch
9.1. 应用 patch 的实例
最常见的用法:
$ patch -p num <file.patch
实例说明:
$ diff -u ./dir1/dir2/calc.dot ./dir1/dir2/calc.dot.new >file.patch
得到的 file.patch 的前两行内容类似于:
--- dir1/dir2/calc.dot 2013-07-25 13:11:26.228482262 0800 dir1/dir2/calc.dot.new 2013-07-25 13:01:32.084468140 +0800
++
如果你在当前目录下运行 patch,可以运行(指定-p0):
$ patch -p0 <file.patch
如果 file.patch 被你移动到./dir1 里面了,你在./dir1 里运行 patch 时,应该这样运行(指定-p1):
$ patch -p1 <file.patch
-p1 的意思去掉 file.patch 文件中的 1 个/符号(及其左边部分),这样 patch 理解的就是下面内容:
--- dir2/calc.dot 2013-07-25 13:11:26.228482262 0800 dir2/calc.dot.new 2013-07-25 13:01:32.084468140 +0800
++
9.2. 左右对比查看(diff -y 或 sdiff)
用 diff -y 或 sdiff 可左右对比查看两个文件的不同。
假设有下面两个文件:
$ cat file1
a
b
c
d
e
f
g
$ cat file2
a
x
c
d
用 diff -y 或 sdiff 的输出如下:
$ diff -y file1 file2
a                                                               a
b                                                             | x
c                                                               c
d                                                               d
e                                                             <
f                                                             <
g                                                             <
$ sdiff file1 file2
a                                                               a
b                                                             | x
c                                                               c
d                                                               d
e                                                             <
f                                                             <
g                                                             <
9.3. 对两个目录进行比较
diff 可以直接对目录进行比较。
9.3.1. 递归比较子目录(-r)
$ diff -r dir1 dir2
9.3.2. 忽略 CVS 相关文件(-x)
$ diff -x "*CVS*" -r dir1 dir2
9.3.3. 同时显示相同的文件(-s)
$ diff -s -r dir1 dir2
9.3.4. 目录比较实例
假设在下面两个目录 dir1 和 dir2,其中 file1 是不同的,file5 只存在于 dir2 中。
$ find dir1
dir1
dir1/sub
dir1/sub/file1
dir1/sub/file2
dir1/sub/file3
dir1/sub/file4
$ find dir2
dir2
dir2/sub
dir2/sub/file1
dir2/sub/file2
dir2/sub/file3
dir2/sub/file4
dir2/sub/file5
递归比较两个目录,如:
$ diff -r dir1 dir2
diff -r dir1/sub/file1 dir2/sub/file1
2c2
< ABC
---
> ABCD
Only in dir2/sub: file5
同时显示所有相同文件的列表,如:
$ diff -s -r dir1 dir2
diff -s -r dir1/sub/file1 dir2/sub/file1
2c2
< ABC
---
> ABCD
Files dir1/sub/file2 and dir2/sub/file2 are identical
Files dir1/sub/file3 and dir2/sub/file3 are identical
Files dir1/sub/file4 and dir2/sub/file4 are identical
Only in dir2/sub: file5
用 diff 的'-q'选项可以只显示不同文件的文件名,而不是显示具体哪些不同,如:
$ diff -q -r dir1 dir2
Files dir1/sub/file1 and dir2/sub/file1 differ
Only in dir2/sub: file5
10. dig, nslookup, host(DNS 查询)
dig 和 nslookup 和 host 都是 dns 查询工具,其中 dig (domain information groper)的功能更强大,这里将重点介绍它。
10.1. DNS 的记录类别和记录类型
在介绍 dig 命令前,先介绍一下 DNS 的记录类别(class)和记录类型(type)。
DNS 的记录“类别”如表 4 所示。
| Class Num | Name | Reference |
|---|---|---|
| 0 | Reserved | RFC6895 |
| 1 | Internet(IN) | RFC1035 |
| 2 | Unassigned | |
| 3 | Chaos(CH) | |
| 4 | Hesiod(HS) | |
| 5-253 | Unassigned | |
| 254 | QCLASS NONE | RFC2136 |
| 255 | QCLASS * (ANY) | RFC1035 |
| 256-65279 | Unassigned | |
| 65280-65534 | Reserved for Private Use | RFC6895 |
| 65535 | Reserved | RFC6895 |
DNS 常见的记录“类型”如表 5 所示。
| 类型 | 说明 |
|---|---|
| A 记录 | 用来指定域名的 IPv4 地址,如果需要将域名指向一个 IP 地址,就需要添加 A 记录 |
| AAAA 记录 | 同 A 记录,不过它是指定域名的 IPv6 地址 |
| CNAME 记录 | 如果需要将域名指向另一个域名,再由另一个域名提供 IP 地址,就需要添加 CNAME (Canonical NAME)记录 |
| MX 记录 | 如果需要设置邮箱,让邮箱能够收到邮件,需要添加 MX 记录 |
| NS 记录 | 域名服务器记录,如果需要把子域名交给其他 DNS 服务器解析,就需要添加 NS 记录 |
| PTR 记录 | 反向记录,也即从 IP 地址到域名的一条记录 |
| TXT 记录 | 可以写任何东西,长度限制为 255。绝大多数的 TXT 记录是用来做 SPF 记录(反垃圾邮件) |
10.2. dig 命令格式
dig 的语法为:
dig @server name [type]
不指定的 type 时,默认是查询 A 记录。
它的输出格式如下:
$ dig www.baidu.com

; <<>> DiG 9.10.6 <<>> www.baidu.com
;; global options: +cmd
;; Got answer:
;; ->>HEADER<<- opcode: QUERY, status: NOERROR, id: 19384
;; flags: qr rd ra; QUERY: 1, ANSWER: 3, AUTHORITY: 0, ADDITIONAL: 1

;; QUESTION SECTION:
;www.baidu.com.			IN	A

;; ANSWER SECTION:
www.baidu.com.		897	IN	CNAME	www.a.shifen.com.
www.a.shifen.com.	298	IN	A	111.13.100.92
www.a.shifen.com.	298	IN	A	111.13.100.91

;; ADDITIONAL SECTION:
caishikou.redirect.	3600	IN	A	127.0.0.1

;; Query time: 61 msec
;; SERVER: 8.8.8.8#53(8.8.8.8)
;; WHEN: Fri Apr 05 01:13:59 CST 2019
;; MSG SIZE  rcvd: 124
我们重点关注其中的 ANSWER SECTION,即:
;; ANSWER SECTION:
www.baidu.com.      897 IN CNAME    www.a.shifen.com.
www.a.shifen.com.   298 IN  A   111.13.100.92
www.a.shifen.com.   298 IN  A   111.13.100.91
                     ^   ^  ^
                     |   |  |
                     |   | type
                     | class
                     |
             本次查询缓存时间(如在298秒内本地DNS服务器可以安全地使用这次查询结果)
10.3. dig 实例
10.3.1. 不带参数的 dig
不带参数的 dig 命令会查询“.”(即根域)的 NS 记录,也就是返回 13 台根服务器的地址。
$ dig

; <<>> DiG 9.10.6 <<>>
;; global options: +cmd
;; Got answer:
;; ->>HEADER<<- opcode: QUERY, status: NOERROR, id: 21788
;; flags: qr rd ra; QUERY: 1, ANSWER: 13, AUTHORITY: 0, ADDITIONAL: 1

;; QUESTION SECTION:
;.				IN	NS

;; ANSWER SECTION:
.			66011	IN	NS	f.root-servers.net.
.			66011	IN	NS	m.root-servers.net.
.			66011	IN	NS	d.root-servers.net.
.			66011	IN	NS	g.root-servers.net.
.			66011	IN	NS	l.root-servers.net.
.			66011	IN	NS	e.root-servers.net.
.			66011	IN	NS	k.root-servers.net.
.			66011	IN	NS	b.root-servers.net.
.			66011	IN	NS	j.root-servers.net.
.			66011	IN	NS	i.root-servers.net.
.			66011	IN	NS	a.root-servers.net.
.			66011	IN	NS	c.root-servers.net.
.			66011	IN	NS	h.root-servers.net.

;; ADDITIONAL SECTION:
caishikou.redirect.	3600	IN	A	127.0.0.1

;; Query time: 9 msec
;; SERVER: 8.8.8.8#53(8.8.8.8)
;; WHEN: Fri Apr 05 00:28:39 CST 2019
;; MSG SIZE  rcvd: 262
从上面输出中可知,全球的域名根服务器共有 13 组服务器(命名从 a 到 m)。我们可以接着查询根域名服务器(如“a.root-servers.net”)的 A 记录,如:
$ dig a.root-servers.net

; <<>> DiG 9.10.6 <<>> a.root-servers.net
;; global options: +cmd
;; Got answer:
;; ->>HEADER<<- opcode: QUERY, status: NOERROR, id: 52598
;; flags: qr rd ra; QUERY: 1, ANSWER: 1, AUTHORITY: 0, ADDITIONAL: 1

;; QUESTION SECTION:
;a.root-servers.net.		IN	A

;; ANSWER SECTION:
a.root-servers.net.	268303	IN	A	198.41.0.4

;; ADDITIONAL SECTION:
caishikou.redirect.	3600	IN	A	127.0.0.1

;; Query time: 11 msec
;; SERVER: 8.8.8.8#53(8.8.8.8)
;; WHEN: Fri Apr 05 00:50:53 CST 2019
;; MSG SIZE  rcvd: 86
10.3.2. 从指定的 DNS 服务器上查询(@X.X.X.X)
要从指定的 DNS 服务器上查询结果,在 @ 后指定 DNS 服务器地址即可。如向 1.1.1.1 查询 www.baidu.com 的 A 记录:
$ dig @1.1.1.1 www.baidu.com

; <<>> DiG 9.10.6 <<>> @1.1.1.1 www.baidu.com
; (1 server found)
;; global options: +cmd
;; Got answer:
;; ->>HEADER<<- opcode: QUERY, status: NOERROR, id: 28343
;; flags: qr rd ra; QUERY: 1, ANSWER: 3, AUTHORITY: 0, ADDITIONAL: 1

;; OPT PSEUDOSECTION:
; EDNS: version: 0, flags:; udp: 1452
;; QUESTION SECTION:
;www.baidu.com.			IN	A

;; ANSWER SECTION:
www.baidu.com.		987	IN	CNAME	www.a.shifen.com.
www.a.shifen.com.	41	IN	CNAME	www.wshifen.com.
www.wshifen.com.	42	IN	A	103.235.46.39

;; Query time: 45 msec
;; SERVER: 1.1.1.1#53(1.1.1.1)
;; WHEN: Fri Apr 05 01:05:16 CST 2019
;; MSG SIZE  rcvd: 111
10.3.3. 跟踪整个 DNS 查询过程(+trace)
dig 最有用一个查询选项就是 +trace ,指定这个选项后,dig 会从根域名服务器查询一直跟踪直到查询到最终结果,并将整个过程打印出来。如:
$ dig +trace www.baidu.com

; <<>> DiG 9.10.6 <<>> +trace www.baidu.com
;; global options: +cmd
.			63870	IN	NS	f.root-servers.net.
.			63870	IN	NS	m.root-servers.net.
.			63870	IN	NS	d.root-servers.net.
.			63870	IN	NS	g.root-servers.net.
.			63870	IN	NS	l.root-servers.net.
.			63870	IN	NS	e.root-servers.net.
.			63870	IN	NS	k.root-servers.net.
.			63870	IN	NS	b.root-servers.net.
.			63870	IN	NS	j.root-servers.net.
.			63870	IN	NS	i.root-servers.net.
.			63870	IN	NS	a.root-servers.net.
.			63870	IN	NS	c.root-servers.net.
.			63870	IN	NS	h.root-servers.net.
;; Received 262 bytes from 8.8.8.8#53(8.8.8.8) in 8 ms

com.			172800	IN	NS	d.gtld-servers.net.
com.			172800	IN	NS	a.gtld-servers.net.
com.			172800	IN	NS	h.gtld-servers.net.
com.			172800	IN	NS	k.gtld-servers.net.
com.			172800	IN	NS	e.gtld-servers.net.
com.			172800	IN	NS	j.gtld-servers.net.
com.			172800	IN	NS	i.gtld-servers.net.
com.			172800	IN	NS	b.gtld-servers.net.
com.			172800	IN	NS	l.gtld-servers.net.
com.			172800	IN	NS	f.gtld-servers.net.
com.			172800	IN	NS	m.gtld-servers.net.
com.			172800	IN	NS	g.gtld-servers.net.
com.			172800	IN	NS	c.gtld-servers.net.
com.			86400	IN	DS	30909 8 2 E2D3C916F6DEEAC73294E8268FB5885044A833FC5459588F4A9184CF C41A5766
com.			86400	IN	RRSIG	DS 8 1 86400 20190417050000 20190404040000 25266 . k/Q8UURlRxrLYopQVTwlE0KjWNoRihTD55m3sc9zPfziFrgkyFy6c25V zkp/h8sm9zURVfyUvoq3CrPW2Xh7qaSZi2OqYeXNWVyumGEO7DMy9kKw b2HorK78jaxnE96Q2MYaAzzd2Q+LjakFQwqlHmKOLO47fAMFrdXxwczl rwNMr7luindGDJysq2Zig2Ir1NJT412I9V+oZJwXF3TMDu0zULC2tQKl V8cEiSYjIB44Jyp/aQ4MbLAbDII+t3Ufeo+aIj/uFEiPcK9UqPGzbpyz OvkENLwf2UgFUxOodiUXD6Xn5c5xQ4CXdMOe60a3hky8UQxwnRcEIjWd GXVf5g==
;; Received 1173 bytes from 2001:500:12::d0d#53(g.root-servers.net) in 325 ms

baidu.com.		172800	IN	NS	ns2.baidu.com.
baidu.com.		172800	IN	NS	ns3.baidu.com.
baidu.com.		172800	IN	NS	ns4.baidu.com.
baidu.com.		172800	IN	NS	ns1.baidu.com.
baidu.com.		172800	IN	NS	ns7.baidu.com.
CK0POJMG874LJREF7EFN8430QVIT8BSM.com. 86400 IN NSEC3 1 1 0 - CK0Q1GIN43N1ARRC9OSM6QPQR81H5M9A  NS SOA RRSIG DNSKEY NSEC3PARAM
CK0POJMG874LJREF7EFN8430QVIT8BSM.com. 86400 IN RRSIG NSEC3 8 2 86400 20190409044615 20190402033615 16883 com. X+3zfSeuAw+1PA2uwM3VGKS2ahL8ZWuRGin6OzcQ8FV419c/IWM9Chvs TNRrRdCcLtxq4kQs1PjuWmxFu/YdQj25+7APKc1OafQaduJcKS6BX/YM jT5fUUs+5UeC+o0KW+9cD6B4jj3VS13nJyl/PbXwsZpF1PO22J5RkKFx Oe0=
HPVV2B5N85O7HJJRB7690IB5UVF9O9UA.com. 86400 IN NSEC3 1 1 0 - HPVVN3Q5E5GOQP2QFE2LEM4SVB9C0SJ6  NS DS RRSIG
HPVV2B5N85O7HJJRB7690IB5UVF9O9UA.com. 86400 IN RRSIG NSEC3 8 2 86400 20190411050415 20190404035415 16883 com. r4CQBigORbrJFkzFWWLxF0YdRnRx67gEi9SF7wjXql4rNMuZ18g3Abhg Pz0KijJyid0WpbaLlzAcE/l5ikS1bB+Ce17sIq/bKa3u5tZWwdyYy+YZ hjmFAIEMMHOgiGl4HpZ3IF++Mbc4zovdl6x4dumrw2bkaJlVNNAcLaIE asw=
;; Received 697 bytes from 192.26.92.30#53(c.gtld-servers.net) in 340 ms

www.baidu.com.		1200	IN	CNAME	www.a.shifen.com.
a.shifen.com.		1200	IN	NS	ns3.a.shifen.com.
a.shifen.com.		1200	IN	NS	ns1.a.shifen.com.
a.shifen.com.		1200	IN	NS	ns5.a.shifen.com.
a.shifen.com.		1200	IN	NS	ns2.a.shifen.com.
a.shifen.com.		1200	IN	NS	ns4.a.shifen.com.
;; Received 239 bytes from 202.108.22.220#53(ns1.baidu.com) in 9 ms
11. djvused(编辑 djvu 文件)
要对 djvu 文件进行编辑,推荐工具:djvused。
书签相关操作:
把书签 dump 到一个文件中:
$ djvused 1.djvu -e "print-outline" >bookmarks.txt
设置书签:
$ djvused 1.djvu -e "set-outline bookmarks.txt" -s
书签文件的格式实例:
(bookmarks
("Title" "#1")
("My Chapter 1" "#5"
("Sub Chapter 1" "#5")
("Sub Chapter 2" "#15"))
)
关于它的格式的说明可以参考 man djvused 。
下面是一个把一般格式的页码内容转换为 djvused 可识别的页码格式的小程序:
# format_djvu_bookmarks.awk
# 功能:把一般格式的页码内容转换为djvused可识别的页码格式。
# 假设28为逻辑页码为实际页码的差值。
$NF>0 {
$NF=$NF+28;
$1=sprintf("\(\"%s",$1);
$(NF-1)=sprintf("%s\"\n",$(NF-1));
if (length($NF)<=2){
  $NF=sprintf("\"#0%s\"\)",$NF);
} else {
  $NF=sprintf("\"#%s\"\)",$NF);
}
print;
}
页面 title 相关操作可以认为是“逻辑页码”,如果页面设置了 title,在较新的 djvu 阅读器中,页码处会优先显示页面的 title 而不是页码。这样可以实现类似于 pdf 文件的逻辑页码的效果。
12. ed
ed 编辑器是以行为单位对文本进行操作的编辑器,也就是说它一次编辑一行(很多 vi 命令都来自 ed)。
当 ed 打开一文本文件时,将复制文件的内容到 ed 命令的缓存中,在 ed 中的所有命令操作只作用于缓存中的内容,而不会对源文件有任何影响,除非对源文件进行 w(写)操作。
12.1. ed 两种模式(命令模式和输入模式)
ed 有命令模式和输入模式两种模式,类似于 vi 的两种模式,ed 在命令模式下输入的是命令,这些命令用来指定对编辑文本的操作;ed 在输入模式下输入的是文本,这些文本将依照命令模式下输入的命令被添加或替换到文本中。
当第一次被调用时,ed 默认进入命令模式,当输入 a, c 或 i 命令后即进入输入模式。
在输入模式下,单行输入单个点号(.)然后回车,则回到命令模式(说明:这使得你无法用 ed 直接插入仅含有单个点的一行)。
13. env 和 set
env 用来查看所有环境变量(environmental variables),set 用来查看所有本地变量(local variables)。
环境变量和本地变量的区别:
1、环境变量可用于所有子进程,可以包括编辑器、脚本和其他应用程序。
2、本地变量在用户现在的 shell 生命期的脚本中使用。只在用户当前 shell 生命期有意义,如果在 shell 中启动另一个进程此值将无效,也就是本地变量不会传递到子进程中去。
一般来说,set 的输出会比 env 的输出多,在 Ubuntu 12.04 中 PS1,PS2 等都在本地变量中,不要环境变量中。
Tips 1: 可以用 readonly 命令设置环境变量或本地变量为只读。
Tips 2: 可以用 unset 命令来清除环境变量或本地变量。
14. expand 和 unexpand(空格和 tab 互转)
expand 命令将制表符变成空格。unexpand 将空格变成制表符。
这两个命令都接受 stdin 输入以及命令行指定文件的输入。使用 -t 选项可以设置一个或多个制表符停止位。
15. expect
Expect is a tool for automating interactive applications such as telnet, ftp, passwd, fsck, rlogin, tip, etc.
Following three expect commands are used when automating any interactive processes.
- send – to send the strings to the process
- expect – wait for the specific string from the process
- spawn – to start the command
参考:
6 Expect Script Examples: http://www.thegeekstuff.com/2010/10/expect-examples/
expect 学习笔记及实例详解:http://blog.itpub.net/27042095/viewspace-745589/
15.1. 输出 debug 信息
文件第一行加个-d
#!/usr/bin/expect -d
15.2. 访问环境变量
Expect is an extension of Tcl. Tcl access enviroment variables via the global env array:
如访问 PATH 变量: $env(PATH)
参考:http://stackoverflow.com/questions/12695474/how-to-access-environment-variables-in-an-expect-script
15.3. 实例:和 scp 交互
$ cat getfile.exp
#!/bin/expect -f
set timeout -1

set ip [lindex $argv 0]
set user [lindex $argv 1]
set password [lindex $argv 2]

set remotefile [lindex $argv 3]
set localfile [lindex $argv 4]

spawn scp $user@$ip:$remotefile $localfile
expect {
"*yes/no" { send "yes\r"; exp_continue}
"*password:" { send "$password\r" }
}

expect eof
# expect eof在此的作用是在命令scp的输出中搜索文件结束符。
# http://bbs.chinaunix.net/thread-1859692-2-1.html
16. fc-list 和 fc-cache
列出当前系统中所有可用字体:
$ fc-list
更新字体,重新建立缓存:
$ fc-cache -fv
注 1,字体的配置文件:
/etc/fonts/fonts.conf
注 2,默认字体位置:
/usr/share/fonts
/usr/local/share/fonts
/home/<username>/.fonts
16.1. 实例:列出系统中所有的中文字体
使用命令 fc-list :lang=zh 可以列出系统中所有的中文字体,如:
$ fc-list :lang=zh        # 列出系统中所有的中文字体
/usr/share/fonts/wqy-microhei/wqy-microhei.ttc: WenQuanYi Micro Hei Mono,文泉驛等寬微米黑,文泉驿等宽微米黑:style=Regular
/usr/share/fonts/wqy-zenhei/wqy-zenhei.ttc: WenQuanYi Zen Hei Sharp,文泉驛點陣正黑,文泉驿点阵正黑:style=Regular
/usr/share/fonts/wqy-microhei/wqy-microhei.ttc: WenQuanYi Micro Hei,文泉驛微米黑,文泉驿微米黑:style=Regular
/usr/share/fonts/cjkuni-uming/uming.ttc: AR PL UMing TW MBE:style=Light
/usr/share/fonts/wqy-zenhei/wqy-zenhei.ttc: WenQuanYi Zen Hei Mono,文泉驛等寬正黑,文泉驿等宽正黑:style=Regular
/usr/share/fonts/wqy-zenhei/wqy-zenhei.ttc: WenQuanYi Zen Hei,文泉驛正黑,文泉驿正黑:style=Regular
/usr/share/fonts/cjkuni-uming/uming.ttc: AR PL UMing TW:style=Light
/usr/share/fonts/cjkuni-uming/uming.ttc: AR PL UMing HK:style=Light
/usr/share/fonts/cjkuni-uming/uming.ttc: AR PL UMing CN:style=Light
17. fcrackzip(zip 密码破解)
fcrackzip, a fast/free zip password cracker.
fcrackzip 支持暴力破解,也支持使用字典破解。
下面是使用 fcrackzip 进行暴力破解的例子:
$ fcrackzip -b -c 'aA1' -l 1-10 -u -v 1.zip
found file '1.txt', (size cp/uc   1353/  5680, flags 9, chk 8a8c)

PASSWORD FOUND!!!!: pw == 1234
上面例子中用到的参数,其说明如下:
-b 表示暴力破解, -c 用于指定字符集(格式后面会说明), -l 用于指定长度, -u 表示使用 unzip 进一步确认猜测出来的密码(如果不加这个选项,则会提示很多“可能的密码”), -v 表示输出更多信息。
注:使用 -c 指定字符集时,其格式只能为 'aA1!:' ,含义如下:
a 表示小写字母 [a-z]
A 表示大写字母 [A-Z]
1 表示阿拉伯数字 [0-9]
! 感叹号表示特殊字符 [!:$%&/()=?{[]}+*~#]
: 表示包含冒号之后的字符(不能为二进制的空字符),例如 a1:$% 表示字符集包含小写字母、数字、$和%
参考: man fcrackzip
18. fdisk(磁盘分区)
fdisk 是一个磁盘分区工具。下面通过配置一个全新的 SSD 来介绍 fdisk 的使用。
18.1. 实例:Setting up an NVMe SSD
第一步,使用 lsblk 命令找到 SSD 设备,如:
$ lsblk
NAME        MAJ:MIN RM   SIZE RO TYPE MOUNTPOINT
nvme0n1     259:1    0    10G  0 disk
|-nvme0n1p1 259:2    0     1M  0 part
`-nvme0n1p2 259:3    0    10G  0 part /
nvme1n1     259:0    0 279.4G  0 disk
从上面输出中,可知“/dev/nvme1n1”还没有进行分区。
第二步,使用 fdisk 对“/dev/nvme1n1”进行分区。
执行 sudo fdisk /dev/nvme1n1 ,再输入 n 命令进行分区,完成后输入 w 命令完成修改。下面例子中把“/dev/nvme1n1”分为了两个(执行了两次 n 命令)主分区:
$ sudo fdisk /dev/nvme1n1
Welcome to fdisk (util-linux 2.23.2).

Changes will remain in memory only, until you decide to write them.
Be careful before using the write command.

Device does not contain a recognized partition table
Building a new DOS disklabel with disk identifier 0x7c324172.

Command (m for help): n
Partition type:
   p   primary (0 primary, 0 extended, 4 free)
   e   extended
Select (default p): p
Partition number (1-4, default 1): 1
First sector (2048-585937499, default 2048):
Using default value 2048
Last sector, +sectors or +size{K,M,G} (2048-585937499, default 585937499): 292968750
Partition 1 of type Linux and of size 139.7 GiB is set

Command (m for help): n
Partition type:
   p   primary (1 primary, 0 extended, 3 free)
   e   extended
Select (default p): p
Partition number (2-4, default 2):
First sector (292968751-585937499, default 292970496):
Using default value 292970496
Last sector, +sectors or +size{K,M,G} (292970496-585937499, default 585937499):
Using default value 585937499
Partition 2 of type Linux and of size 139.7 GiB is set

Command (m for help): w
The partition table has been altered!

Calling ioctl() to re-read partition table.
Syncing disks.
第三步,使用 lsblk 检测分区情况,如:
$ lsblk
NAME        MAJ:MIN RM   SIZE RO TYPE MOUNTPOINT
nvme0n1     259:1    0    10G  0 disk
|-nvme0n1p1 259:2    0     1M  0 part
`-nvme0n1p2 259:3    0    10G  0 part /
nvme1n1     259:0    0 279.4G  0 disk
|-nvme1n1p1 259:4    0 139.7G  0 part
`-nvme1n1p2 259:5    0 139.7G  0 part
从上面输出中,可知磁盘“/dev/nvme1n1”已经被分为两个大小相等的分区。
第四步,使用 mkfs 在分区上创建文件系统,如:
$ sudo mkfs -t ext4 /dev/nvme1n1p1  # 为分区/dev/nvme1n1p1创建ext4文件系统
$ sudo mkfs -t ext4 /dev/nvme1n1p2  # 为分区/dev/nvme1n1p2创建ext4文件系统
第五步,使用 mount 挂载分区,如:
$ sudo mkdir /media/nvme1n1p1
$ sudo mount /dev/nvme1n1p1  /media/nvme1n1p1  # 挂载分区/dev/nvme1n1p1到目录/media/nvme1n1p1

$ sudo mkdir /media/nvme1n1p2
$ sudo mount /dev/nvme1n1p2  /media/nvme1n1p2  # 挂载分区/dev/nvme1n1p2到目录/media/nvme1n1p2
如果想重启系统后自动挂载分区,可以先使用 blkid 命令找到新分区的 UUID,再把相关信息加入到文件“/etc/fstab”中,如:
$ sudo blkid
/dev/nvme0n1p2: UUID="509812a1-3a50-44d0-ad12-154d10a313b1" TYPE="xfs" PARTUUID="cc8f8c5a-3a04-4a6a-aa62-ed173ee9aede"
/dev/nvme1n1p1: UUID="9235d3a6-d38e-4bd6-38f9-7625504b9a9f" TYPE="ext4"
/dev/nvme1n1p2: UUID="5ba78c3d-bd34-461d-a788-09a69109e3f1" TYPE="ext4"
找到“/dev/nvme1n1p1”和“/dev/nvme1n1p2”的 UUID 后,在文件“/etc/fstab”中增加下面内容即可:
UUID=9235d3a6-d38e-4bd6-38f9-7625504b9a9f /media/nvme1n1p1 ext4 defaults 0 0
UUID=5ba78c3d-bd34-461d-a788-09a69109e3f1 /media/nvme1n1p2 ext4 defaults 0 0
第六步,为方便使用,可修改挂载点的 owner 为指定用户(不修改的话会是 root),如:
$ sudo chown -R user:usergroup /media/nvme1n1p1
$ sudo chown -R user:usergroup /media/nvme1n1p2
19. fdupes(按 md5 值删除重复文件)
Debian 系统中可以这样安装:
$ sudo apt-get install fdupes
19.1. 实例:删除当前文件夹下重复文件
删除当前文件夹中的相同文件,遇到相同文件时提示保留哪些文件:
$ fdupes -d .
删除当前文件夹中的相同文件,不提示用户选择,直接仅保留第一个文件:
$ fdupes -d -N .
20. ffmpeg(音频视频编辑)
FFmpeg is a free software project that produces libraries and programs for handling multimedia data.
参考:
man for ffmpeg: http://ffmpeg.org/ffmpeg.html
20.1. ffmpeg 实例
下面内容摘自:“玩转 FFmpeg 的 7 个小技巧” http://wowubuntu.com/7-tricks-with-ffmpeg.html
1 音频转换
$ ffmpeg -i my_audio.wav my_audio.mp3
-i 后为要转换的音频文件,my_audio.mp3 为目的音频文件。
2 视频转换
$ ffmpeg -i my_video.mpeg -s 500×500 my_video.flv
-i 后为源视频文件, -s 表示设置目标视频文件的分辨率,my_video.flv 为目的视频文件。
3 从视频中截取图片
$ ffmpeg -i test.mpg image%d.jpg
默认 1s 截取 25 张图片,可以通过 -r 设置每秒截取的图片数量
4 从视频中采集音频
$ ffmpeg -i video.avi -f mp3 audio.mp3
-f 强制选择格式
用下面命令也可从视频中采集音频:
$ ffmpeg -i video.avi -vn audio.mp3
-vn 取消截取视频(也就是只输出音频文件)
5 创建截屏视频
$ ffmpeg -f x11grab -r 25 -s wxga -i :0.0 /tmp/outputFile.mpg
0.0 是你 X11 server 的屏幕显示号码,和 DISPLAY 一样的。
此条命令以每秒 25 帧的速率来截取 wxga 屏幕视频,当然这里可以用 -s 来设置视频分辨率,输出文件是/tmp/outputFile.mpg
6 用图片制作视频
$ ffmpeg -f image2 -i img%d.jpg /tmp/a.mpg
将'img001.jpg', 'img002.jpg'这种顺序排列的图片文件转制作为视频
7 从 webcam 中截取视频
$ ffmpeg -f video4linux2 -s 320x240 -i /dev/video0 out.mpg
同时截取音频和视频:
$ ffmpeg -f oss -i /dev/dsp -f video4linux2 -s 320x240 -i /dev/video0 out.mpg
/dev/video0 为视频设备 /dev/dsp 为音频设备
8 截取指定时间段的部分视频
$ ffmpeg -i input.mp4 -ss 00:09:00 -to 00:10:00 -c copy output.mp4
上面命令表示把 input.mp4 中从 09:00 到 10:00 的部分保存到 output.mp4 中。
20.2. 处理字幕文件
20.2.1. 提取字幕文件
使用 ffmpeg 可以提取字幕文件。
第一步,查看字幕位于哪个 Stream 中,如:
$ ffmpeg -i input.mkv
Input #0, matroska,webm, from 'input.mkv':
  Metadata:
  Duration: 00:00:05.00, start: 0.000000, bitrate: 106 kb/s
    Stream #0:0: Video: h264 (High 4:4:4 Predictive), yuv444p, 320x240 [SAR 1:1 DAR 4:3], 25 fps, 25 tbr, 1k tbn, 50 tbc (default)
    Stream #0:1: Audio: vorbis, 44100 Hz, mono, fltp (default)
    Stream #0:2: Audio: aac, 44100 Hz, mono, fltp (default)
    Stream #0:3: Audio: flac, 44100 Hz, mono, fltp (default)
    Stream #0:4: Subtitle: ass (default)
上面的输出可知,Stream 0:4 是字幕。
第二步,复制相应的 Stream 为字幕文件,如:
$ ffmpeg -i input.mkv -map 0:4 -c copy subtitles.ass
这样,Stream 0:4 中的字幕保存为了文件 subtitles.ass。
注意,如果字幕是 subrip 格式,导出时则需要指定 srt 后缀。如:
$ ffmpeg -i input.mkv -map 0:4 -c copy subtitles.srt
20.2.2. 嵌入字幕文件
假设有字幕文件 subtitles.srt,有视频 input.mkv,使用下面命令可以把字幕文件嵌入到视频中,其结果保存为 output.mkv:
$ ffmpeg -sub_charenc 'UTF-8' -i subtitles.srt -i input.mkv -c:v copy -c:a copy -c:s srt output.mkv
注:当字幕文件 subtitles.srt 中存在非英语字符时需要通过 -sub_charenc 来指定字幕的编码。
20.2.3. 删除字幕文件
假设 input.mkv 中嵌入了字幕,通过下面命令可以把字幕删除,其结果保存为 output.mkv:
$ ffmpeg -i input.mkv -c:v copy -c:a copy -sn output.mkv
21. find
21.1. 实例:查找多种后缀的文件
如查找以 pl 和 pm 为后缀的文件:
$ find . -name "*.pl" -o -name "*.pm"
$ find . -regex ".*\.\(pl\|pm\)"
第一种方法利用了选项 -o (含义为“或者”),写法比较直观。
第二种方法利用正则表达式,但需要很多转义,比较麻烦。
注意:删除以 pl 和 pm 为后缀的文件,下面方法不可行!
$ find . -name "*.pl" -o -name "*.pm" -print0 |xargs -0 rm # Wrong!
这个命令只会删除 pm 为后缀的文件,正确的命令是:
$ find . \( -name "*.pm" -o -name "*.pl" \) -print0 |xargs -0 rm
注意,左括号和右括号都要进行转义,且左括号的右一个字符和右括号的左一个字符必须是空格。
也可以是下面命令:
find . -name "*.pl" -print0 -o -name "*.pm" -print0 |xargs -0 rm
21.2. 实例:查找文件夹软链接中的文件
假设 B 是目录 A 的链接,默认 find B -name 1.txt 并不会去 A 文件夹中查找文件 1.txt。
要使用 -L 才会查找文件夹软链接中的文件,如:
$ find -L B -name 1.txt
21.3. 实例:按大小查找文件
下面是按大小查找文件的一些实例:
$ find . -size +100k   # 查找大于 100 kb的文件(注:k 是小写,大写会报错)
$ find . -size +100M   # 查找大于 100M 的文件
$ find . -size +1G     # 查找大于 1G 的文件
$ find . -size +1T     # 查找大于 1T 的文件
21.4. 实例:按权限查找文件
查找权限为 777 的文件:
$ find . -perm 777
查找权限不为 777 的文件:
$ find . -not -perm 777
21.5. 实例:查找 4 天内修改过的文件
查找当前目录中 4 天内修改过的文件:
$ find . -mtime -4
特别注意:-mtime 参数中 4 和+4 意义完全不一样!
atime 最后一次访问时间, 如 ls, more 等, 但 chmod, chown, ls, stat 等不会修改些时间, 使用 ls -utl 可以按此时间顺序查看;
ctime 最后一次状态修改时间, 如 chmod, chown 等状态时间改变但修改时间不会改变,使用 stat file 可以查看;
mtime 最后一次内容修改时间,如 vi 保存后等,修改时间发生改变的话,atime 和 ctime 也相应跟着发生改变。
注意:linux 里是不会记录文件的创建时间的,除非这个文件自创建以来没有发生改变,那么它的创建时间就是它的最后一次修改时间。
21.6. 实例:查找无效的软链接(目标不存在的软链接)
$ find . -L -type l
21.7. 实例:find 后接-exec 选项
find 后接 -exec 选项,可对找到的文件执行相应的命令。如:
$ find . -name "*.txt" -exec cat {} \;
说明 1: {} 是一个占位符,会被正在处理的符合条件的文件名替代。
说明 2:在 shell 中运行时,分号前一定要用反斜线转义,因为 find 需要得到这个分号来知道-exec 的结束,如果不转义,分号会被 shell 吃掉!
如果 find . -name "*.txt"能得到下面文件:
H1.txt
H2.txt
H3.txt
则 find . -exec cat {} \;相当于
cat H1.txt
cat H2.txt
cat H3.txt
这个用法有两个缺点:
缺点 1. 它有性能问题,对找到的每个文件都执行一遍命令!如果 find 找到 1000 个文件,则会执行-exec 后的命令 1000 遍。
缺点 2. 它可能有安全问题,因为-exec 后命令执行的“启动目录”就是运行 find 命令的目录。
对缺点 1 进行改进:
用+标记命令结束,这样可以一次提交所有找到的文件
$ find . -name "*.txt" -exec cat {} +
以前面例子为例,上面命令相当于:
cat H1.txt H2.txt H3.txt
对缺点 2 进行改进:
用 execdir 代替 exec
Like -exec, but the specified command is run from the subdirectory containing the matched file
$ find . -name "*.txt" -execdir cat {} \;
21.7.1. xargs 和 -exec 选项比较
用 xargs 和 find 配合,也可以实现 find 加 -exec 选项的功能。
前面的实例可以用 xargs 实现:
$ find . -name "*.txt" |xargs cat
选项 -exec 有性能问题,尽管这个问题已经被解决(通过使用加号+来一次提交所有文件),但它只在较新的系统上才能使用。
22. fold(超过指定列数后换行)
fold 默认限制每行最多显示 80 列,超过部分换行显示。
-w 选项:设置每行最多显示的列数。
-s 选项:在空格处断开。
实例:
$ cat file1
123456789abc
123 456 789
$ fold -w3 file1
123
456
789
abc
123
 45
6 7
89
$ fold -sw3 file1
123
456
789
abc
123

456

789
23. Fortify (Static Code Analysis)
Fortify 是著名的源码静态分析工具,它是商业软件。
Fortify 会把源码转换为它自己理解的形式。
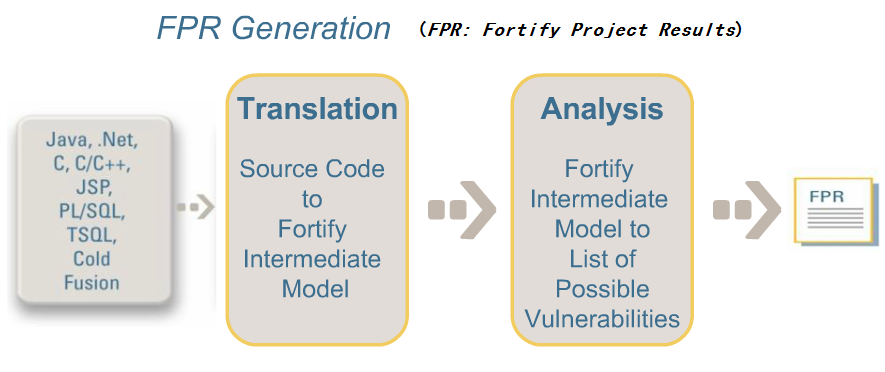
Figure 1: Fortify 工作过程
参考:
Static analysis tools for security: http://www.dwheeler.com/essays/static-analysis-tools.html
List of tools for static code analysis: https://en.wikipedia.org/wiki/List_of_tools_for_static_code_analysis
23.1. Fortify 基本用法
用工具 sourceanalyzer 可以生成 FPR 文件,详情可参考 sourceanalyzer -h 。
用工具 auditworkbench 可以打开 FPR 文件,它会启动图形界面,可方便地检查发现的问题。
以 C 代码为例,Fortify 基本用法如下:
$ ./bin/sourceanalyzer -b my_test -clean
$ ./bin/sourceanalyzer -b my_test gcc -c 1.c
$ ./bin/sourceanalyzer -b my_test -scan -f my_test.fpr
$ ./bin/auditworkbench my_test.fpr
说明 1:更多的实例可以参考 Fortify 自带的 Sample。
说明 2:如果想直接在控制台中查看发现的问题,生成 text 格式的报告即可(-f 选项指定.txt 后缀的文件即可),如:
$ ./bin/sourceanalyzer -b my_test -scan -f my_test.txt
$ cat my_test.txt

[/home/user1/test]

[EC15CFBDCBAB0F7CF4514CBFDAA662F3 : low : Dangerous Function : strcpy() : semantic ]
1.c(7) : strcpy()

[3A61B90FBDD7380464B7E456B2CD4D61 : high : Buffer Overflow : dataflow ]
1.c(7) :  ->strcpy(1)
    1.c(6) : <=> (path)
    1.c(6) : <- getenv(return)

[DB472DE24AFF49C6E5EED93B82D27A8F : high : Buffer Overflow : buffer ]
1.c(11) : strncat()
   Buffer Definition, buf2 1.c(9)
 Buffer Size: 8 bytes
 Write Length: 15 bytes
    [var 0] src.$strlen: 13

[7382E26AD11C9FA80B70DEF9C4FA4D16 : medium : Missing Check against Null : controlflow ]

    1.c(6) : start -> allocated : path = getenv(...) : getenv may return NULL
    1.c(7) : allocated -> used : path : path used without null check
注:生成上面报告的测试程序的内容如下:
/* file 1.c */
#include<string.h>

int
main() {
  char buf1[1024] = "";
  char * path = getenv("PATH");
  strcpy(buf1, path);

  char buf2[8] = "abcd";
  char *src = "1234567890abc";
  strncat(buf2, src, 10);

  return 0;
}
23.1.1. 和 make 集成
方法一:使用 Fortify Touchless Build Adapter,用法如下:
$ ./bin/sourceanalyzer -b my_test touchless make
方法二:修改 makefile 文件
CC=sourceanalyzer -b my_test gcc
CXX=sourceanalyzer -b my_test g++
AR=sourceanalyzer -b my_test ar
23.2. Tips
23.2.1. 找不到 rules files
可能提示下面错误:
[error]: No rules files found
[warning]: No rules files found
执行 rules 更新程序即可。
$ ls Core/config/rules
README.TXT

$ ./bin/rulepkupdate      # 在新版fortify中改名成了 ./bin/fortifyupdate

$ ls Core/config/rules
core_abap.bin          core_java.bin        extended_content.bin
core_abap_preview.bin  core_javascript.bin  extended_cpp.bin
core_actionscript.bin  core_objc.bin        extended_dotnet.bin
core_android.bin       core_php.bin         extended_java.bin
core_annotations.bin   core_python.bin      extended_jsp.bin
core_cfml.bin          core_ruby.bin        extended_sql.bin
core_cobol.bin         core_sql.bin         README.TXT
core_cpp.bin           core_vb.bin          rp.update.properties
core_dotnet.bin        extended_config.bin
参考:http://stackoverflow.com/questions/18209159/fortify-error-no-rules-file-found
24. fuser(找出使用文件的进程)
fuser 显示使用指定文件或者文件系统的进程的 pid ,默认会在每个 pid 后面加上一个字符表示访问的方式。
字符代表的访问方式的含义如下:
c :表示 current directory,表示该目录是进程的当前目录;
e :表示是可执行的程序;
f :打开文件。默认不显示;
F:打开文件(以写方式打开),默认不显示;
r :root 目录,表示该目录是该进程的 root 目录(如果不明白,可以查看 chroot 命令);
m:表示 mmap 过的文件或者共享库。
常用选项:
-u:表示在进程 pid 后加上对应用户名;
-v:详细地显示信息;
-m:测试文件所在的文件系统;
-k:杀死找到的相关进程,除非使用-signal 修改信号,否则将发送 SIGKILL 信号。
参考:
Linux 调试工具 fuser 的深入分析:http://home.lupaworld.com/home-space-uid-56821-do-blog-id-232572.html
24.1. 实例:查找谁在使用 vim
$ sudo fuser -uv /usr/bin/vim
                     USER        PID ACCESS COMMAND
/usr/bin/vim:        user1      1979 ...e. (user1)vim
                     user2      9768 ...e. (user2)vim
                     user3      9838 ...e. (user3)vim
说明:用其它方法也可以找到谁在使用 vim,但用 fuser 可以精确地找到使用/usr/bin/vim(而不是/usr/vim 或其它)的进程。
24.2. 实例:解决无法 umout 光驱的问题
找到使用光驱的进程,再 kill 即可。
$ fuser -uvm /mnt/cdrom
24.3. 实例:看有哪些程序正在使用 libc.so.6
首先找到本机 libc.so.6 的位置,随便 ldd 一个程序即可,如 ldd /bin/cat,可以找出本机 libc.so.6 的位置。
再用 fuser 查看有哪些程序正在使用 libc.so.6,如:
$ fuser -uv /lib64/libc.so.6
                     USER        PID ACCESS COMMAND
/lib64/libc.so.6:    user1      3975 ....m (user1)bash
                     user1     12974 ....m (user1)sleep
25. getconf
我们时常需要查询系统相关的信息,比如页面大小,整数大小之类,如果编写程序去计算会比较繁琐。
有一个很有用的命令,可以用来获取系统相关信息。它就是 getconf。
$ getconf PAGE_SIZE
4096
$ getconf INT_MAX
2147483647
显示所有可配置项及其当前值:
$ getconf -a
26. gprof(性能分析工具)
gprof 是一个性能分析工具。
下面演示一个简单的使用实例:
第 1 步,用 gcc -pg 选项编译程序。
$ gcc -ggdb3 -pg 1.c -o 1
第 2 步,执行编译好的程序(注意会在当前文件夹中生成文件 gmon.out)
$ ./1
第 3 步,用 gprof 生成报告
$ gprof 1 gmon.out >output.txt
参考:http://web.eecs.umich.edu/~sugih/pointers/gprof_quick.html
27. grep 系列
grep 用来在文件中查找信息。它的基本用法为:
$ grep pattern files
27.1. grep 支持三种正则表达式
grep 支持三种正则表达式:
- 基本的正则表达式,通过选项
-G指定 grep 使用这种正则表达式,这是默认选项,即grep相当于grep -G; - 扩展的正则表达式,通过选项
-E指定 grep 使用这种正则表达式; - perl 兼容的正则表达式,通过选项
-P指定 grep 使用这种正则表达式。
三种正则表达式的区别:
- 对于基本的正则表达式
?,+,{,|,(,)没有特殊含义,仅是表达其相应的“字面字符”,如果要表达其特殊的含义必须对其进行转义(不过需要说明的是:?和+不被基本的正则表达式支持); - 对于“perl 兼容的正则表达式”,可以通过 man pcrepattern(比较全面),man pcresyntax(仅是摘要)得到,这里不介绍;
- 对于扩展的正则表达式,直接支持
?,+,{,|,(,)的特殊含义。
下面例子可以在文件 test.txt 中查找关键字 a 或 b:
$ grep "a\|b" <test.txt     ## grep "a|b" <test.txt 会直接查找a|b,而不是查找a或b。
$ grep -E "a|b" <test.txt   ## 相当于egrep "a|b" <test.txt。
27.2. egrep
egrep 使用扩展的正则表达式,相当于 grep -E
27.3. fgrep
固化表达式的搜索,取消所有的转义,特殊字符串一般化。相当于 grep -F(f 是 fixed 的含义)。
$ fgrep '$PATH..[a-z]' <test.txt
$ grep -F '$PATH..[a-z]' <test.txt      ## 和上面相同
将会找到 test.txt 中的字符串 $PATH..[a-z] ,注意:如果用双引号的话, $PATH 会被 shell 展开。
27.4. rgrep
在目录中查找,相当于 grep -d recurse 或 grep -r
rgrep 实例:
在 /home/user1 目录(包括其子目录)的所有文件中查找 a 或 b。
$ rgrep "a\|b" /home/user1/
$ grep -d recurse "a\|b" /home/user1/    ## 和上面相同
$ grep -r "a\|b"  /home/user1/           ## 和上面相同
27.5. 标记单词的边界
我们知道 ^ 和 $ 分别表示一行的开头和结束。怎么表示一个单词的开头和结束呢? \< 和 \> 即可表示单词的开头和结束。
如:在当前目录的所有文件中查找单词 jack:
$ grep "\<jack\>" *
注意: \<jack\> 要加上单引号或双引号。
27.6. -w(--word-regexp)选项(精确匹配单词)
--word-regexp 用于精确匹配单词。如匹配 is 时,this,kiss 等都不会被匹配。
27.7. -a(--text)选项(强制当作文本文件)
有时 grep 会误把文本文件当前 binary 文件。这样如果找到配置,只会显示下面内容:
Binary file file1 matches
要强制 grep 把文件当作文本文件,可以指定 -a 或 --text 选项。
$ grep -a pattern file1
27.8. -l 和 -L 选项(仅列出匹配或不匹配的文件名)
使用 -l 可以只列出匹配的文件名;使用 -L 可以列出不匹配的文件名:
$ grep -l pattern files      ## 只列出匹配的文件名
$ grep -L pattern files      ## 列出不匹配的文件名
27.9. -Z 选项(以 NUL 字符代替换行符)
-Z 选项的含义是输出时以 NUL 字符代替换行符。它和 find 的 -print0 ,perl 的 -0 以及 sort 的 -z 选项类似。
说明: -Z 选项常和 -l 或 -L 连用。
27.10. zgrep,zegrep,zfgrep
用 zgrep, zegrep, zfgrep 可在 gzip 文件中查找(省去了先解压)。
27.11. bzgrep,bzegrep,bzfgrep
用 bzgrep, bzegrep, bzfgrep 可在 bzip2 文件中查找(省去了先解压)。
27.12. grep 实例
27.12.1. 查找 IP 地址
使用 grep -oE "\b([0-9]{1,3}\.){3}[0-9]{1,3}\b" 可以查找 IP 地址 ,如:
$ ifconfig | grep -oE "\b([0-9]{1,3}\.){3}[0-9]{1,3}\b"
127.0.0.1
192.168.1.4
192.168.1.255
27.12.2. 非贪婪匹配
假设 file 的内容为:
a bc d e abcddde abcef
现在想找到所有 bc 开始,e 结束的模式,也就是想输出:
bc d e
bcddde
bce
应该怎么实现呢?不能直接使用 bc.*e ,因为其中 .* 是一种贪婪模式,从而导致只会找到一个匹配,下面是运行例子:
$ grep -o 'bc.*e' file
bc d e abcddde abce
我们知道 .*? 表示非贪婪匹配,不过基本的 grep 并不支持,需要使用“Perl 兼容的正则表达式”或者“扩展的正则表达式”。
Linux 下的方法:
$ grep -Po 'bc.*?e' file   # Linux 下支持 -P(Perl 兼容的正则表达式),但 Mac 下不支持 -P
bc d e
bcddde
bce
Mac 下的方法:
$ grep -Eo 'bc.*?e' file   # Mac 下 grep -E 支持使用贪婪模式修饰符 ?,但 Linux 下 grep -E 并不支持贪婪模式修饰符 ?
bc d e
bcddde
bce
如果想在 Linux 和 Mac 下都工作,可以使用下面的 perl 实现:
$ perl -ne 'while ($_ =~ /(bc.*?e)/g) {print "$1\n"}' file      # 可移植性更好
bc d e
bcddde
bce
28. grub-install 和 update-grub
grub stands for GRand Unified Bootloader
28.1. 用 live cd 修复 grub
注:下文讨论的是 grub 1.99(Ubuntu 12.04 默认安装这个版本的 grub)
进入 live cd 后:
步骤 1:进入 sudo 模式
$ sudo -i
步骤 2:查看分区情况
$ fdisk -l
步骤 3:挂载分区
$ mount /dev/sdXX /mnt
把系统“安装分区”/dev/sdXX 挂载到/mnt 下(/mnt 为 live cd 中的目录)
如果 boot 分区是独立的,则还要挂载 boot 分区
$ mount /dev/sdYY /mnt/boot
步骤 4:挂载 live cd 中的/dev 目录到“安装分区”的相应位置
$ mount --bind /dev /mnt/dev
注:把 live cd 中的/dev 目录挂载到/mnt/dev(注意:/mnt 是“安装分区”的挂载处)
步骤 5:chroot 至系统分区(非常重要)
$ chroot /mnt
注:步骤 3 时把系统分区挂载到了/mnt
步骤 6:重装 grub
$ grub-install --recheck /dev/sdX
注意:grub 只能安装在磁盘中,而不能安装在磁盘中的某个分区上。因此,grub-install 的参数是整个磁盘/dev/sdX,而不是某个分区/dev/sdXX。
步骤 7:更新 grub
$ update-grub
步骤 8:重启机器
29. GnuPG
GnuPG(简称 GPG)是依照由 IETF 订定的 OpenPGP(RFC4880 有描述)技术标准设计,用来代替商业软件 PGP。
GnuPG 加解密文件的原理如图 2 所示。基本原理是:先使用“对称密钥”加密文件,而“对称密钥”本身使用 RSA 加密。
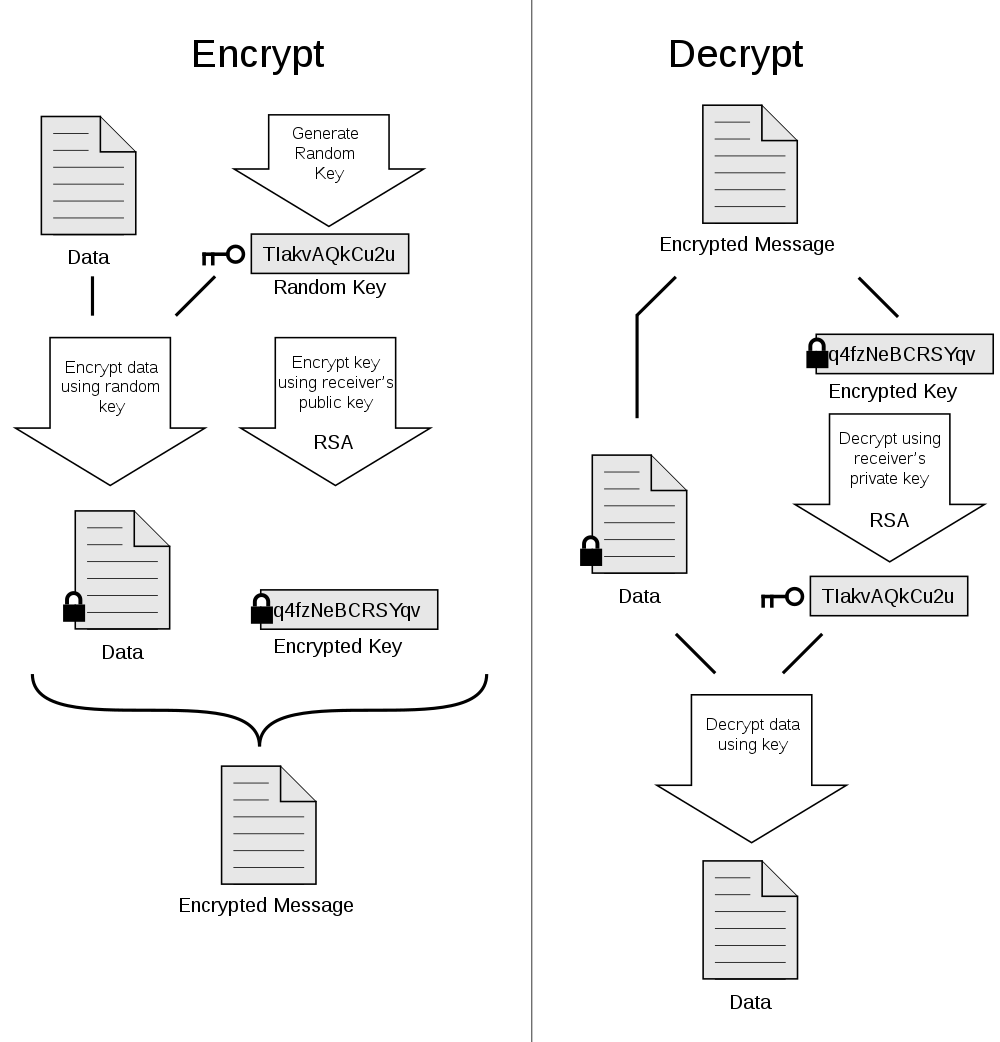
Figure 2: OpenPGP 加解密文件原理
29.1. GnuPG 使用实例
1、生成密钥
$ gpg --gen-key
在回答一系列问题后,默认生成文件的路径为 ~/.gnupg/
注:生成的公钥和私钥保存在密钥环里(密钥环包括公钥环 pubring.gpg 和私钥环 secring.gpg,分别用来保存公钥和私钥),如果要把公钥分发给别人,则要从密钥环里把公钥导出,如果要备份私钥,则可从私钥环里把私钥导出。
2、查看所有公钥
$ gpg --list-public-key
或者使用 gpg -k 把公钥环里保存了的公钥显示出来。
3、查看所有私钥
$ gpg --list-secret-key # or `gpg -K`
把私钥环里保存了的私钥显示出来。
4、导出公钥(把公钥环里保存的公钥导出来,以便分发给其它用户。)
导出前,先用命令 gpg --list-public-key 查看公钥环里保存有哪些公钥,根据列出的公钥,选择想要导出的公钥进行导出。
$ gpg --armor --export XXXX > file1.asc
说明 1:--armor,使导出的文件为 ASCII 编码,和 -a 作用相同。
说明 2:XXXX 为公钥环里你想导出的公钥的标识,例如通过 gpg --list-public-key 命令得到类似如下信息:
$ gpg --list-public-key
------------------------
pub   2048R/0F3D17B4 2011-06-23
uid                  user1 <test@sina.com>
sub   2048R/9DCD5E2E 2011-06-23
从上可知,只有一个公钥,当然就只能导出它了。
XXXX 可以写为 0F3D17B4,也可以写为 user1,也可以写为 test@sina.com,得到的公钥文件是相同的.
5、导出私钥(把私钥环里保存的私钥导出来,以便备份私钥)
$ gpg --armor --export-secret-keys XXXX > mysecretkey.asc
和导出公钥类似,只是--export 换成了--export-secret-keys
6、导入公钥或私钥到密钥环里。
导入私钥和公钥都用下面的命令
$ gpg --import file1.asc
file1.asc 是备份密钥的文件(可以为公钥,也可以为私钥)
7、把公钥或私钥从密钥环中删除
这个没试过,查看帮助可得到下面相关信息。
--delete-keys             remove keys from the public keyring
--delete-secret-keys      remove keys from the secret keyring
8、加密文件
用公钥加密文本文件
$ gpg -ea -r user1 123.txt
-e 表示加密,-a 表示生成 ASCII 文件。
这里 r 是收件人的意思,后面加的对方的密钥,对方给我发就因该加我的密钥标识码。
系统默认将生成一个 123.txt.asc 文件,这个就是用 user1 的公钥加密后的文件,我们可以把他发给别人。
9、解密文件
用私钥解密加密的文本文件
$ gpg -o 123.txt -d 123.txt.asc
-o 123.txt 表示解密后保存为 123.txt
-d 123.txt.asc 为待解密的文件。
提示输入密码,这个密码是在生成密钥对时自己输入的。(也就是仅有私钥还不能解密文件,还需要知道私钥的密码,这样就算私钥泄漏了,别人也不能解密,但这个密码不复杂的话可以用暴力破解得到)
10、验证签名
一些开源软件,往往带有一个相应的签名文件(常以 sig 或 asc 为后缀),如 emacs-24.2.tar.xz,相应就有 emacs-24.2.tar.xz.sig。
$ gpg --verify emacs-24.2.tar.xz.sig emacs-24.2.tar.xz
如果签名文件名以 sig 或 asc 为后缀,也可只输入签名文件名,它会自动匹配待验证的文件:
$ gpg --verify emacs-24.2.tar.xz.sig
如果公钥环里有签名时的公钥,则会提示 gpg: Good signature from "Chong Yidong <cyd@stupidchicken.com>",如果公钥环没有相应公钥则会输出信息:
gpg: Signature made 2012 年 08 月 27 日 星期一 14 时 28 分 56 秒 CST using DSA key ID BC40251C
gpg: Can't check signature: public key not found
提示找不到 ID 为 BC40251C 的公钥,如何下载?用--recv-keys 选项即可,具体操作请看下文。
11、下载公钥
下载 ID 为 BC40251C 的公钥:
$ gpg --recv-keys BC40251C
用命令 gpg -k ,查看密钥环可发现多个密钥。
30. hexdump
hexdump 能以 16 进制显示文件内容。
30.1. 实例:同时显示 16 进制和 ASCII 值
-C 是最常用的选项,以 16 进制方式显示,并显示对应的 ASCII 值:
$ hexdump -C file1
00000000  31 32 33 34 35 36 37 38  39 30 71 77 65 72 74 79  |1234567890qwerty|
00000010  75 69 6f 70 61 73 64 66  67 68 6a 6b 6c 7a 78 63  |uiopasdfghjklzxc|
00000020  76 62 6e 6d 0a                                    |vbnm.|
00000025
30.2. 实例:不用星号代替相同内容(-v)
默认地,hexdump 会用星号代替相同内容:
$ ( echo "abcdefghijklmno"; echo "abcdefghijklmno" ) | hexdump -C
00000000  61 62 63 64 65 66 67 68  69 6a 6b 6c 6d 6e 6f 0a  |abcdefghijklmno.|
*
00000020
加上 -v 选项,就不会出现*代替相同内容:
$ ( echo "abcdefghijklmno"; echo "abcdefghijklmno" ) | hexdump -v -C
00000000  61 62 63 64 65 66 67 68  69 6a 6b 6c 6d 6e 6f 0a  |abcdefghijklmno.|
00000010  61 62 63 64 65 66 67 68  69 6a 6b 6c 6d 6e 6f 0a  |abcdefghijklmno.|
00000020
30.3. 定制输出信息的格式(-e)
The -e argument has 5 parts separated by whitespace.
- An optional starting string (in quotes) which is printed beforeeach conversion. In the first example below we are printing x beforeeach hex character ("x").
- An interation count which defaults to 1 if not supplied but hasto be supplied if you want a byte count. This tells how many times todo the conversion before we print the end string. So if you weredecoding 4 things, each of 1 byte, you'd say 4/1.
- A byte count which is separated from the interation count by a /.I don't think there is a way to specify a byte count without aninteration count. This specifies how many bytes are in each item thatis being decoded.
- A sprintf format. The manual is somewhat useful here. Somestandard ones apply and there are _ extensions. In the first examplebelow this is "%02X" which prints each byte as a 2 character, 0prefixed capital hex number.
- An optional ending string (in quotes) which is printed after theconversion. A space in the first example below (" ").
实例:
$ echo "1234567890qwertyuiopasdfghjklzxcvbnm" | hexdump -v -e '"[" 16/1 "%2X " "]\n" '
[31 32 33 34 35 36 37 38 39 30 71 77 65 72 74 79]
[75 69 6F 70 61 73 64 66 67 68 6A 6B 6C 7A 78 63]
[76 62 6E 6D  A                                 ]
NOTE: the trailing space in "%2X " format will not be printed at the end of each interation.
31. indent
indent is a Unix utility that reformats C and C++ code in a user-defined indent style and coding style.
$ indent -gnu 1.c -o 1_gnu.c          # 变成gnu风格
$ indent -kr -i8 1.c -o 1_kernel.c    # 变成K&R风格
gnu 风格:http://www.gnu.org/prep/standards/
kernel 风格:https://www.kernel.org/doc/Documentation/CodingStyle
indent 常用选项如下:
-bad 或--blank-lines-after-declarations 在声明区段或加上空白行。
-bap 或--blank-lines-after-procedures 在程序或加上空白行。
-bbb 或--blank-lines-after-block-comments 在注释区段后加上空白行。
-bc 或--blank-lines-after-commas 在声明区段中,若出现逗号即换行。
-bl 或--braces-after-if-line if(或是 else,for 等等)与后面执行区段的"{"不同行,且"}"自成一行。
-bli<缩排格数>或--brace-indent<缩排格数> 设置{ }缩排的格数。
-br 或--braces-on-if-line if(或是 else,for 等等)与后面执行跛段的"{"不同行,且"}"自成一行。
-bs 或--blank-before-sizeof 在 sizeof 之后空一格。
-c<栏数>或--comment-indentation<栏数> 将注释置于程序码右侧指定的栏位。
-cd<栏数>或--declaration-comment-column<栏数> 将注释置于声明右侧指定的栏位。
-cdb 或--comment-delimiters-on-blank-lines 注释符号自成一行。
-ce 或--cuddle-else 将 else 置于"}"(if 执行区段的结尾)之后。
-ci<缩排格数>或--continuation-indentation<缩排格数> 叙述过长而换行时,指定换行后缩排的格数。
-cli<缩排格数>或--case-indentation-<缩排格数> 使用 case 时,switch 缩排的格数。
-cp<栏数>或-else-endif-column<栏数> 将注释置于 else 与 elseif 叙述右侧定的栏位。
-cs 或--space-after-cast 在 cast 之后空一格。
-d<缩排格数>或-line-comments-indentation<缩排格数> 针对不是放在程序码右侧的注释,设置其缩排格数。
-di<栏数>或--declaration-indentation<栏数> 将声明区段的变量置于指定的栏位。
-fc1 或--format-first-column-comments 针对放在每行最前端的注释,设置其格式。
-fca 或--format-all-comments 设置所有注释的格式。
-gnu 或--gnu-style. 指定使用 GNU 的格式,此为预设值。
-i<格数>或--indent-level<格数> 设置缩排的格数。
-ip<格数>或--parameter-indentation<格数> 设置参数的缩排格数。
-kr 或--k-and-r-style. 指定使用 Kernighan&Ritchie 的格式。
-lp 或--continue-at-parentheses 叙述过长而换行,且叙述中包含了括弧时,将括弧中的每行起始栏位内容垂直对其排列。
-nbad 或--no-blank-lines-after-declarations 在声明区段后不要加上空白行。
-nbap 或--no-blank-lines-after-procedures 在程序后不要加上空白行。
-nbbb 或--no-blank-lines-after-block-comments 在注释区段后不要加上空白行。
-nbc 或--no-blank-lines-after-commas 在声明区段中,即使出现逗号,仍旧不要换行。
-ncdb 或--no-comment-delimiters-on-blank-lines 注释符号不要自成一行。
-nce 或--dont-cuddle-else 不要将 else 置于"}"之后。
-ncs 或--no-space-after-casts 不要在 cast 之后空一格。
-nfc1 或--dont-format-first-column-comments 不要格式化放在每行最前端的注释。
-nfca 或--dont-format-comments 不要格式化任何的注释。
-nip 或--no-parameter-indentation 参数不要缩排。
-nlp 或--dont-line-up-parentheses 叙述过长而换行,且叙述中包含了括弧时,不用将括弧中的每行起始栏位垂直对其排列。
-npcs 或--no-space-after-function-call-names 在调用的函数名称之后,不要加上空格。
-npro 或--ignore-profile 不要读取 indent 的配置文件.indent.pro。
-npsl 或--dont-break-procedure-type 程序类型与程序名称放在同一行。
-nsc 或--dont-star-comments 注解左侧不要加上星号()。
-nsob 或--leave-optional-semicolon 不用处理多余的空白行。
-nss 或--dont-space-special-semicolon 若 for 或 while 区段仅有一行时,在分号前不加上空格。
-nv 或--no-verbosity 不显示详细的信息。
-orig 或--original 使用 Berkeley 的格式。
-pcs 或--space-after-procedure-calls 在调用的函数名称与"{"之间加上空格。
-psl 或--procnames-start-lines 程序类型置于程序名称的前一行。
-sc 或--start-left-side-of-comments 在每行注释左侧加上星号()。
-sob 或--swallow-optional-blank-lines 删除多余的空白行。
-ss 或--space-special-semicolon 若 for 或 swile 区段今有一行时,在分号前加上空格。
-st 或--standard-output 将结果显示在标准输出设备。
-T 数据类型名称缩排。
-ts<格数>或--tab-size<格数> 设置 tab 的长度。
-v 或--verbose 执行时显示详细的信息。
-version 显示版本信息。
31.1. 调整大括号"{"和"}"的格式
31.1.1. 让 if,else,for 等和"{"在同一行(-br 和-ce)
-br 或--braces-on-if-line 可设置左括号"{"和 if(else 或 for)在同一行,且让"}"自成一行。
如:
$ cat test4.c
if (x > 0)
{
  x--;}
else {
  ;
}
$ indent -br test4.c
$ cat test4.c
if (x > 0) {
  x--;
}
else {
  ;
}
-ce 或--cuddle-else 可将 else 置于"}"(if 执行区段的结尾)之后。
说明:-ce 常和-br 同时使用!
如:
$ cat test4.c
if (x > 0) {
  x--;
}
else{
  ;
}
$ indent -br -ce test4.c
$ cat test4.c
if (x > 0) {
  x--;
} else {
  ;
}
注意: -br 仅会调整一行。假设"{"和 if 之间有 1 个或多个空行,-br 选项并不会把"{"和 if 放在同一行,仅仅会使"{"和 if 更近一行。如:
$ cat test4.c
if (x > 0)

{
  x--;
}
$ indent -br test4.c
$ cat test4.c
if (x > 0)
{
  x--;
}
31.1.2. 让 if,else,for 等和"{"在不同行(-bl 和-bli)
-bl 或-braces-after-if-line 可使 if(或是 else,for 等等)与后面执行区段的"{"不同行,且"}"自成一行,默认"{"和"}"有 2 个空格的缩进(可通过-bli 调整)。
如:
$ cat test4.c
if (x > 0) {
  x--;
}
else {
  ;
}
$ indent -bl test4.c
$ cat test4.c
if (x > 0)
  {
    x--;
  }
else
  {
    ;
  }
-bli<缩排格数>或--brace-indent<缩排格数> 设置"{"和"}"缩排的格数。
说明:-bli<缩排格数>常和-bl 同时使用!
如:
$ cat test4.c
if (x > 0) {
  x--;
}
else {
  ;
}
$ indent -bl -bli0 test4.c
$ cat test4.c
if (x > 0)
{
  x--;
}
else
{
  ;
}
31.1.3. 调整结构体和函数中的"{"和"}"(-brs/-bls 和-brf/-blf)
The -brs or -bls option specifies how to format braces in struct declarations.
The -brs option formats braces like this:
            struct foo {
              int x;
            };
The -bls option formats them like this:
            struct foo
            {
              int x;
            };
Similarly to the structure brace -brs and -bls options, the function brace options -brf or -blf specify how to format the braces in function definitions.
The -brf option formats braces like this:
            int one(void) {
              return 1;
            };
The -blf option formats them like this:
            int one(void)
            {
              return 1;
            };
32. info
info 可查看命令的帮助信息。
32.1. 加入自己的 info 文件
编辑配置文件/usr/share/info/dir
按照已有的格式,在文件的最后加入下面内容:
 My-Info
 * Latex-Manual: (/home/user1/info/latex-manual).      Latex Manual.
33. inkscape(矢量图形编辑软件)
Inkscape 是开源的矢量图形编辑软件。可以直接在命令行中使用它。
实例 1,转换 svg 文件为 png 文件:
$ inkscape -f FILENAME.svg -e FILENAME.png
实例 2,转换 svg 文件为 pdf 文件:
$ inkscape -f FILENAME.svg -A FILENAME.pdf
实例 3,转换 pdf 文件为 svg 文件:
$ inkscape -f FILENAME.pdf -l FILENAME.svg
$ inkscape --file=FILENAME.pdf --export-plain-svg=FILENAME.svg   #和上面命令相同。
要查看帮助,可以使用命令 inkscape --help ,如:
$ inkscape --help
Usage: inkscape-bin [OPTIONS...] [FILE...]

Available options:
  -V, --version                             Print the Inkscape version number
  -z, --without-gui                         Do not use X server (only process
                                            files from console)
  -g, --with-gui                            Try to use X server (even if
                                            $DISPLAY is not set)
  -f, --file=FILENAME                       Open specified document(s) (option
                                            string may be excluded)
  -p, --print=FILENAME                      Print document(s) to specified
                                            output file (use '| program' for
                                            pipe)
  -e, --export-png=FILENAME                 Export document to a PNG file
  -d, --export-dpi=DPI                      Resolution for exporting to bitmap
                                            and for rasterization of filters
                                            in PS/EPS/PDF (default 90)
  -a, --export-area=x0:y0:x1:y1             Exported area in SVG user units
                                            (default is the page; 0,0 is
                                            lower-left corner)
  -D, --export-area-drawing                 Exported area is the entire
                                            drawing (not page)
  -C, --export-area-page                    Exported area is the entire page
      --export-margin=VALUE                 Only for PS/EPS/PDF, sets margin
                                            in mm around exported area
                                            (default 0)
      --export-area-snap                    Snap the bitmap export area
                                            outwards to the nearest integer
                                            values (in SVG user units)
  -w, --export-width=WIDTH                  The width of exported bitmap in
                                            pixels (overrides export-dpi)
  -h, --export-height=HEIGHT                The height of exported bitmap in
                                            pixels (overrides export-dpi)
  -i, --export-id=ID                        The ID of the object to export
  -j, --export-id-only                      Export just the object with
                                            export-id, hide all others (only
                                            with export-id)
  -t, --export-use-hints                    Use stored filename and DPI hints
                                            when exporting (only with
                                            export-id)
  -b, --export-background=COLOR             Background color of exported
                                            bitmap (any SVG-supported color
                                            string)
  -y, --export-background-opacity=VALUE     Background opacity of exported
                                            bitmap (either 0.0 to 1.0, or 1 to
                                            255)
  -l, --export-plain-svg=FILENAME           Export document to plain SVG file
                                            (no sodipodi or inkscape
                                            namespaces)
  -P, --export-ps=FILENAME                  Export document to a PS file
  -E, --export-eps=FILENAME                 Export document to an EPS file
      --export-ps-level=PS Level            Choose the PostScript Level used
                                            to export. Possible choices are 2
                                            (the default) and 3
  -A, --export-pdf=FILENAME                 Export document to a PDF file
      --export-pdf-version=PDF_VERSION      Export PDF to given version.
                                            (hint: make sure to input the
                                            exact string found in the PDF
                                            export dialog, e.g. "PDF 1.4"
                                            which is PDF-a conformant)
      --export-latex                        Export PDF/PS/EPS without text.
                                            Besides the PDF/PS/EPS, a LaTeX
                                            file is exported, putting the text
                                            on top of the PDF/PS/EPS file.
                                            Include the result in LaTeX like:
                                            \input{latexfile.tex}
  -M, --export-emf=FILENAME                 Export document to an Enhanced
                                            Metafile (EMF) File
  -m, --export-wmf=FILENAME                 Export document to a Windows
                                            Metafile (WMF) File
  -T, --export-text-to-path                 Convert text object to paths on
                                            export (PS, EPS, PDF, SVG)
      --export-ignore-filters               Render filtered objects without
                                            filters, instead of rasterizing
                                            (PS, EPS, PDF)
  -X, --query-x                             Query the X coordinate of the
                                            drawing or, if specified, of the
                                            object with --query-id
  -Y, --query-y                             Query the Y coordinate of the
                                            drawing or, if specified, of the
                                            object with --query-id
  -W, --query-width                         Query the width of the drawing or,
                                            if specified, of the object with
                                            --query-id
  -H, --query-height                        Query the height of the drawing
                                            or, if specified, of the object
                                            with --query-id
  -S, --query-all                           List id,x,y,w,h for all objects
  -I, --query-id=ID                         The ID of the object whose
                                            dimensions are queried
  -x, --extension-directory                 Print out the extension directory
                                            and exit
      --vacuum-defs                         Remove unused definitions from the
                                            defs section(s) of the document
      --verb-list                           List the IDs of all the verbs in
                                            Inkscape
      --verb=VERB-ID                        Verb to call when Inkscape opens.
      --select=OBJECT-ID                    Object ID to select when Inkscape
                                            opens.
      --shell                               Start Inkscape in interactive
                                            shell mode.

Help options:
  -?, --help                                Show this help message
      --usage                               Display brief usage message
参考:http://how-to.wikia.com/wiki/How_to_use_Inkscape_in_commandline_mode
34. ip(iproute2)和 ifconfig
Linux 的 ip 命令和 ifconfig 类似,但前者功能更强大,并旨在取代后者。
ifconfig 是 net-tools 中已被废弃使用的一个命令,许多年前就已经没有维护了。
ip 是 iproute2 套件里的工具之一。
| net-tools | iproute2 |
|---|---|
| ifconfig | ip l (ip link) |
| ifconfig -a | ip a show (ip address show) |
| ifconfig eth0 up | ip link set eth0 up |
| netstat | ss |
| netstat -i | ip -s link |
| netstat -l | ss -l |
| netstat -r | ip r (ip route) |
| route [add or del] | ip route [add or del] |
| route -n | ip route show |
| arp -n | ip n (ip neighbor) |
参考:http://www.linuxeden.com/html/softuse/20140604/152339.html
35. ipcs
ipcs 用于查看系统 System V IPC(或称 XSI IPC)资源的使用情况。
不带任何参数:ipcs,相当于: ipcs -a
仅查看共享内存: ipcs -m
仅查看信号量: ipcs -s
仅查看消息队列: ipcs -q
35.1. 显示进程 id(-p 选项)
ipcs -p option displays creator id, and process id which accessed the corresponding ipc facility very recently.
35.2. 显示详细信息(-i 选项)
Detailed information about an IPC facility (-i option)
ipcs -i option provides detailed information about an ipc facility.
$ ipcs -q -i 32768
Message Queue msqid=32768
uid=0   gid=0   cuid=0  cgid=0  mode=0644
cbytes=0        qbytes=65536    qnum=0  lspid=0 lrpid=0
send_time=Not set
rcv_time=Not set
change_time=Thu Aug  5 13:30:22 2010
Option -i with -q provides information about a particular message queue. Option -i with -s provides semaphore details. Option -i with -m provides details about a shared memory.
参考:http://www.thegeekstuff.com/2010/08/ipcs-command-examples/
35.3. 如何找到关联到共享内存的进程
Q: How do I determine what process is attached to a shared memory segment?
awagner@tree:/home/awagner$ ipcs -m
------ Shared Memory Segments --------
key shmid owner perms bytes nattch status
0x00000000 0 root 777 102400 1
0x00000000 32769 root 774 96 1 dest
0x00000000 98306 awagner 600 393216 2 dest
0x00000000 131075 awagner 600 393216 2 dest
how do I figure out which two processes are attached to segment 98305?
说明:nattch 列的数字表示这个共享内存的连接数目,status 列,如果显示 dest 则表示共享内存段已经被删除,但仍然有程序连接着它。
如何找到关联到共享内存的进程?没有标准的方法,请参考:http://stackoverflow.com/questions/5658568/how-to-list-processes-attached-to-a-shared-memory-segment-in-linux
36. join
join 用于将两个文件中指定列(称为连接列,默认为第 1 列,首列编号是从数字 1 开始)相同的行连接起来。这个命令要求输入文件已经按连接列排序。
join 默认列之间用空格分隔,可以通过 -t 指定分隔符,比如 -t, 表示指定逗号为分隔符。
假设有两个文件:
$ cat employees.txt    # uid name age
1 John 20
2 Jane 30
3 Bob 25
4 Alice 32

$ cat salaries.txt
1 50000
2 60000
3 55000
5 65000
下面是 join 的一些使用实例:
$ join employees.txt salaries.txt             # 默认把首列当作连接列,且只会输出两个文件中都存在的行(基于连接列)
1 John 20 50000
2 Jane 30 60000
3 Bob 25 55000

$ join -a 1 employees.txt salaries.txt        # 这里 -a 1 表示输出第 1 个文件(employees.txt)中所有行
1 John 20 50000
2 Jane 30 60000
3 Bob 25 55000
4 Alice 32

$ join -a 1 -o1.1,1.2,2.2 employees.txt salaries.txt    # 用 -o 可以指定输出哪些列,比如 1.1 表示第 1 个文件第 1 列(编号从 1 而不是 0 开始)
1 John 50000
2 Jane 60000
3 Bob 55000
4 Alice
36.1. Tips:join 多个文件
join 只能操作两个文件,如何 join 多个文件?
$ join file1 file2 | join - file3 | join - file4
参考:http://jjuanxi.blog.163.com/blog/static/17527419720121954756361/
37. Kazam(屏幕录制软件)
Kazam provides a well designed and easy to use interface for capturing screencasts and screenshots. It can record desktop video and multiple audio streams simultaneously with control over audio levels and the screen region being captured.
$ sudo apt-get install Kazam
38. lftp
lftp 是一个非常好用的 ftp 客户端工具。它支持自动补全和历史命令,还支持 bt 下载。
下载目录:
lftp :~> mirror dir1
lftp :~> mirror --parallel=10 dir1    # 同时下载10个文件(多线程方式)
上传目录:
lftp :~> mirror -R dir
用 ascii 方式上传文件:
lftp :~> put -a file
清除缓存,刷新文件列表:
lftp :~> rels
注:当服务器上的文件有修改时,ls 命令不会马上刷新,这时 rels 就很有用了。
38.1. 多线程下载某个文件
lftp :~> pget -c -n 10 http://download.jboss.org/jbossas/7.1/jboss-as-7.1.1.Final/jboss-as-7.1.1.Final.tar.gz
38.2. 同时下载一个目录中的多个文件(--parallel=n)
下面例子将同时下载目录 RemoteDir 中的 10 个文件:
lftp :~> mirror --parallel=10 RemoteDir
也可以把每个文件分为 5 块同时下载(需要服务器支持):
lftp :~> mirror --parallel=10 --use-pget-n=5 RemoteDir
38.3. Tips:解决中文乱码
在用 lftp 访问国内一些 ftp 服务器时,往往看到的中文是乱码。这是由于服务器和本地编码不一致造成的。我们只要在主目录下新建一个文件~/.lftprc 或者~/.lftp/rc
并在其中加入以下内容:
set ftp:charset GBK     # 解决lftp的目ls时,目录名和文件名的显示乱码问题
set file:charset UTF-8  # 解决下载后的文件名乱码问题
38.4. Tips:查看服务器错误信息
lftp 缺省不会显示 ftp 服务器的欢迎信息和错误信息,这在很多时候不方便,因为你有可能想知道这个服务器到底是因为没开机连不上,还是连接数已满。如果是这样,你可以在 ~/.lftp/rc 里写入一行
debug 3
就可以看到出错信息了。
39. look(有序文件中查找行)
look 可以在有序文件中进行快速地查找(采用二分搜索算法)。它是一个传统的 Unix 程序,尽管没有定义在 POSIX 标准中,但它被大多数系统内置。
下面命令可以在有序文件(sorted_file.txt)中查找以 keyword 开头的行:
$ look keyword sorted_file.txt
如果 Debian 系列系统中没有找到 look,则可以这样安装它:
$ apt install bsdmainutils
在 Debian 系统中,打开大文件时可能遇到 File too large 的错误。
解决办法是:不使用仓库中的版本,自己下载源码,patch 后再编译。
look 源码下载链接:http://ftp.de.debian.org/debian/pool/main/b/bsdmainutils/
look patch 链接:https://launchpadlibrarian.net/72602048/look2.diff
look patch 编译过程可参考:https://www.unix.com/unix-for-dummies-questions-and-answers/158365-unix-look-command-file-too-large-error-message-3.html
或者使用别人已经 patch 的版本:https://github.com/stuartraetaylor/bsdmainutils-look
40. ls
ls 列出目录中内容。
常用的排序选项:
-X 按扩展名排序;
-S 按大小排序;
-t 按修改时间排序;
--group-directories-first 目录优先,即先列出目录,再列出文件;
-r 和其它排序选项配合,可以反转结果;
--group-directories-first 好用,但太长不好输入,如果所有文件夹名字中都没有后缀(也就是说点字符没有出现在文件夹中),-X 选项也往往符合你的期待。
40.1. 实例:仅显示隐藏的文件和文件夹(以点开头)
$ ls -d .*
-d 选项的含义是如果是目录则只显示目录名,而不显示其内容。
40.2. 实例:直观地显示文件的类型
$ ls -F
1.txt     Documents/  Music/     Public/     test/
Desktop/  Downloads/  Pictures/  Templates/  Videos/
-F 选项能够在每个文件名后附上一个字符以说明该文件的类型,“*”表示可执行的文件;“/”表示目录;“@”表示符号链接;“|”表示 FIFOs;“=”表示 sockets。
40.3. ls -l 输出的第 2 列数字的含义
$ ls -l
total 36
-rw-r--r-- 1 cig01 cig01    0 Nov 21 11:19 1.txt
drwxr-xr-x 2 cig01 cig01 4096 Jul 26 09:37 Desktop
drwxr-xr-x 2 cig01 cig01 4096 Jul  4 14:54 Documents
drwxr-xr-x 3 cig01 cig01 4096 Sep 26 21:58 Downloads
drwxr-xr-x 2 cig01 cig01 4096 Jul  4 14:54 Music
drwxr-xr-x 2 cig01 cig01 4096 Jul  4 14:54 Pictures
drwxr-xr-x 2 cig01 cig01 4096 Jul  4 14:54 Public
drwxr-xr-x 2 cig01 cig01 4096 Jul  4 14:54 Templates
drwxr-xr-x 6 cig01 cig01 4096 Nov  6 22:24 test
drwxr-xr-x 2 cig01 cig01 4096 Jul  4 14:54 Videos
上面输出的第 2 列表示的是包含硬链接的数量!
对于目录,表示其子目录数(包含两个特殊目录:当前目录'.'和父目录'..'),如果仅算常规子目录的话就要减去 2。
如:
$ mkdir -p dir1/sub1
$ mkdir -p dir1/sub2
$ mkdir -p dir1/sub3
$ ls -l
total 40
-rw-r--r-- 1 cig01 cig01    0 Nov 21 11:19 1.txt
drwxr-xr-x 2 cig01 cig01 4096 Jul 26 09:37 Desktop
drwxr-xr-x 5 cig01 cig01 4096 Nov 21 11:37 dir1              # 第2列显示为5,说明这个目录包含5-2个常规子目录
drwxr-xr-x 2 cig01 cig01 4096 Jul  4 14:54 Documents
drwxr-xr-x 3 cig01 cig01 4096 Nov 21 11:35 Downloads
drwxr-xr-x 2 cig01 cig01 4096 Jul  4 14:54 Music
drwxr-xr-x 2 cig01 cig01 4096 Jul  4 14:54 Pictures
drwxr-xr-x 2 cig01 cig01 4096 Jul  4 14:54 Public
drwxr-xr-x 2 cig01 cig01 4096 Jul  4 14:54 Templates
drwxr-xr-x 6 cig01 cig01 4096 Nov  6 22:24 test
drwxr-xr-x 2 cig01 cig01 4096 Jul  4 14:54 Videos
参考:info ls
40.4. 改变 ls 时文件夹显示的颜色
默认文件夹显示为蓝色,对比度不高,ssh 连接远程主机后,很难看清楚,如何修改它的颜色?
其实 ls 时的颜色是通过环境变量 LS_COLORS 来控制的。
可以通过/etc/DIR_COLORS 来配置。
如果不想影响全局配置,可以在~/.dir_colors 中设置,也可以在~/.bashrc 中设置。
如,下面实例把文件夹颜色改为黄色。
首先生成~/.dir_colors 文件
$ cp /etc/DIR_COLORS ~/.dir_colors
编辑文件 ~/.dir_colors,做下面修改:
DIR 01;34 # directory
-->
DIR 01;33 # directory
参考:
http://serverfault.com/questions/463784/changing-colors-of-files-dirs-in-linux-ls
文件/etc/DIR_COLORS 中,那些数字的含义:
http://www.bigsoft.co.uk/blog/index.php/2008/04/11/configuring-ls_colors
http://blog.twistedcode.org/2008/04/lscolors-explained.html
说明:文件/etc/DIR_COLORS 存在于 redhat 系列的 Linux 中,Debian 系列 Linux 中没有这个文件。可用下面命令生成~/.dir_colors 文件:
$ dircolors -p >~/.dircolors # 注:Debian系列Linux中没有这个文件/etc/DIR_COLORS
41. lsblk(查看磁盘等块设备信息)
lsblk 可以查看磁盘等块设备信息。如:
$ lsblk
NAME   MAJ:MIN RM  SIZE RO TYPE MOUNTPOINT
vda    253:0    0   20G  0 disk
└─vda1 253:1    0   20G  0 part /
vdb    253:16   0   50G  0 disk
└─vdb1 253:17   0   50G  0 part /data1
vdc    253:32   0  500G  0 disk
└─vdc1 253:33   0  500G  0 part /data2
使用 -o 参数可以指定输出列,如:
$ lsblk -o NAME,TYPE,SIZE
NAME   TYPE  SIZE
vda    disk   20G
└─vda1 part   20G
vdb    disk   50G
└─vdb1 part   50G
vdc    disk  500G
└─vdc1 part  500G
42. m4
m4 是一个宏预处理器。
Autoconf 中使用 m4 来得到 configure 脚本。
m4 中的引用字符串是以 backtick (`)开始,以 single quote (')结束。
定义一个宏的语法是:
define(macro[, expansion])
实例:
$ m4
define(`xxx', `yyy')
Hello xxx world!
⇒Hello yyy world!
42.1. 给宏传参数
可以给宏传参数,如:
$ m4
define(`with2args', `The argument are $1 and $2.')
with2args
⇒The argument are  and .
with2args(1,3)
⇒The argument are 1 and 3.
42.2. 取消一个宏
可用 undefine 取消一个宏。
42.3. 注释和 dnl(delete to newline)
注释以#开始,也就是#后面的宏是不会展开的,如:
$ m4
define(`xxx', `yyy')
#xxx
⇒#xxx
xxx 不会被展开(原样输出#xxx)。
尽管#后的内容会当作注释,但它仍然会出现在输出中,要想不出现在输出中,应该使用 dnl。
dnl 会删除它本行之后的内容(包括换行符)。
42.4. 管理输出流 divert
divert(`1')
This text is diverted.
divert(`0')
⇒
This text is not diverted.
⇒This text is not diverted.
undivert(`1')
⇒
⇒This text is diverted.
⇒
说明:undivert(`1')后,This text is diverted.就显示出来了。
要查阅 m4 所有内置宏,请参考:m4 maunal 附录 C.1 Index for all m4 macros
43. man
用 man 可以查找命令的帮助文件。
| 代号 | 说明 |
|---|---|
| 1 | 使用者在 shell 中可以操作的指令或可执行程序 |
| 2 | 系统调用 |
| 3 | 一些常用的函数(function)与函数库(library),大部分是 C 的函数库(libc) |
| 4 | 装置档案的说明,通常在/dev 下的档案 |
| 5 | 文件格式和规则 |
| 6 | 游戏及其他 |
| 7 | 惯例与协定等,例如 Linux 档案系统、网络协定、ASCII code 等等的说明 |
| 8 | 系统管理员可用的管理指令 |
| 9 | 跟 kernel 有关的文件 |
43.1. 根据关键字进行查找(man -k)
用 man -k keyword 可根据关键字进行查找,相当于命令 apropos keyword
$ man -k printf
asprintf (3)         - print to allocated string
dprintf (3)          - print to a file descriptor
fprintf (3)          - formatted output conversion
fwprintf (3)         - formatted wide-character output conversion
printf (1)           - format and print data
printf (3)           - formatted output conversion
snprintf (3)         - formatted output conversion
sprintf (3)          - formatted output conversion
swprintf (3)         - formatted wide-character output conversion
vasprintf (3)        - print to allocated string
vdprintf (3)         - print to a file descriptor
vfprintf (3)         - formatted output conversion
vfwprintf (3)        - formatted wide-character output conversion
vprintf (3)          - formatted output conversion
vsnprintf (3)        - formatted output conversion
vsprintf (3)         - formatted output conversion
vswprintf (3)        - formatted wide-character output conversion
vwprintf (3)         - formatted wide-character output conversion
wprintf (3)          - formatted wide-character output conversion
43.2. 显示所有匹配章节(man -f)
-f 选项可查找所有匹配的章节,相当于 whatis
$ man -f sleep
sleep (3)            - Sleep for the specified number of seconds
sleep (1)            - delay for a specified amount of time

$ whatis sleep
sleep (3)            - Sleep for the specified number of seconds
sleep (1)            - delay for a specified amount of time
-a 选项可显示所有匹配的章节。
默认情况下,会按代号顺序进行搜索,显示最先搜索到的那个,比如,man sleep,只会显示 sleep(1)。
如:man -a sleep,会显示所有和 sleep 有关的文档,即 sleep(1)和 sleep(3)。
sleep(1)退出后,会提示
--Man-- next: sleep(3) [ view (return) | skip (Ctrl-D) | quit (Ctrl-C) ]
接着按回车,又显示了 sleep(3)
43.3. 显示指定章节
man 后接章节数字可显示指定章节。如:
$ man 3 sleep
$ man 1 sleep
43.4. 大小写敏感地搜索
man 使用下面方式(和 Emacs 类似)来决定是否区分大小写:
1、如果查找关键字全部是小写字母,则不区分大小写;
2、如果查找关键字中含有大写字母,则区分大小写。
参考:https://unix.stackexchange.com/questions/101295/case-insensitive-search-in-man-pages
43.5. 指定单词边界
如何在搜索时,指定单词边界?
在 Linux 中,可以使用 \b 来指定单词边界,如 \bword\b 可以搜索单词“word”。
在 Mac(测试版本 10.11)中,可以使用 [[:<:]] 来指定单词边界,如 [[:<:]]word[[:<:]] 可以搜索单词“word”。
为什么使用方式不一样呢?这是由于 man 命令默认会调用 less 程序来显示文本, less 的行为在不同平台上不一样。
参考:https://stackoverflow.com/questions/22740476/is-there-a-shortcut-for-word-boundary-in-less
43.6. 打印 man 的输出为 pdf 文件(-t 选项)
先用 man 的 -t 选项输出为 ps 文件,再用 ps2pdf 输出 pdf 文件。
$ man -t ascii | ps2pdf - >ascii.pdf
43.7. 显示行号
-N 显示行号, -n 取消行号。
注:这两个不是命令行的选项,而是打开 man 后输入的命令。
44. mkisofs 和 genisoimage
mkisofs 可以用来生成 ISO 文件。
在 Ubuntu 下,mkisofs 只是 genisoimage 的链接,所以用 man mkisofs 是没有结果的,要查看帮助文件,可运行 man genisoimage。
常用选项
-J 使用 Joliet 格式,当有中文文件时,建议使用这个选项,这样在 Windows 下兼容性比较好,一般不会乱码。
-r 使用 Rock Ridge 格式,这种格式能够保存 Linux 下文件相关权限等信息。
-V 设置光盘的 volume name。
如果光盘中有中文文件名,且要在 Windows 下使用,则建议使用-J
$ mkisofs -J -o file.iso dir_to_image/
如果是在 Linux 下做备份,建议使用-r,这样能保存文件权限。
$ mkisofs -r -o file.iso dir_to_image/
44.1. ISO 光盘文件格式介绍
ISO-9660
ISO-9660 是由国际标准化组织在 1985 年制定的,当前唯一通用的光盘文件系统,任何类型的计算机都支持它,所有的烧录软件也都支持它。而且,若想让所有的 CD-ROM 都能读取烧录好的光盘,就必须使用 ISO 9660 或与其兼容的文件系统。
Joliet
Joliet 文件系统是扩展文件系统之一,由 Microsoft 提出和实现。它以 ISO9660(1988)标准为基础。
Rock Ridge
针对 UNIX 系统的 ISO-9660 文件系统 ,支持文件名字母大小写、符号字符以及长文件名 。由于兼容 ISO-9660, 所以即使操作系统不支持 Rock Ridge, 也可以通过 ISO-9660 查看。
HFS
HFS 全称为混合文件系统 (Hybrid File System),是苹果公司 (Apple)的 MAC 机所使用的光盘文件系统 ,不支持 DOS、Windows 9x/NT 等其他操作系统。
44.2. 为什么 mkisofs 仅是 genisoimage 的链接
在几年前,genisoimage 还没登场,在 linux 的世界里,大部分发行都是使用 cdrtools 套件,cdrtools 是一位叫 Jörg Schilling 的老大而 mkisofs 就是 cdrtools 里面的一个子工具,由于 mkisofs 是 GPL 发行,于是深受各 Linux 发行喜欢,当然普及也很广了。而当时 cdrtools 的 Debian 维护人员最为卖力,跟 Jörg Schilling 关系非常好。
天有不测风云,Sun 搞了个叫 CDDL(Common Development and Distribution License)的许可,CDDL 跟 GPL 最大的区别是有些专利保护之类的东西在里面。Jörg Schilling 看到有商机,于是把 cdrtools 一部分改为 CDDL 许可(不知 mkisofs 是否也改成 CDDL),并且说 CDDL 跟 GPL 区别不大,都是免费的嘛。Debian 当然不干了,说 Sun 的人跟他们当面解释过,就别忽悠人了,Jörg Schilling 恼羞成怒,不再理会 Debian 的要求。
对 GPL 有严格要求的 Debian 于是让维护组自行开发了一个叫 cdrkit 新版本,cdrkit 是基于 cdrtools 的,并且把所有非 GPL 代码全部剔除,里面的 mkisofs 也用 genisoimage 代替了。
45. namei
使用 namei 的 -l 参数可以方便找到每个子目录的权限。
$ namei -l proj/wsclient/node_modules/
f: proj/wsclient/node_modules/
drwxrwxr-x cig01 cig01 proj
drwxrwxr-x cig01 cig01 wsclient
drwxrwxr-x cig01 cig01 node_modules
46. netstat
Linux 下查看 tcp 网络连接的常用的命令为:
$ sudo netstat -pant
其中:
-a:显示所有连接,包括监听中和非监听中的;
-t:仅显示 tcp 协议;
-n:直接显示 IP 地址,不显示域名,加快显示速度;
-p:显示进程的 PID 和名称。
输出 Kernel Interface Table:
$ netstat -ie
这个命令和 ifconfig 的输出一样。
说明:
netstat 在不同系统中的用法可能不一样。如在 Mac 中, -p 选项用来指定协议(而不是显示进程 pid),如显示 tcp 连接用下面命令:
$ netstat -p tcp # Only work in Mac
在 Mac 中,可以使用 lsof 查看占用端口的进程 pid。如查看占用 tcp 50001 端口的进程:
$ sudo lsof -i tcp:50001
46.1. 检查 tcp 端口是否被占用(netstat -an |grep port)
用下面命令可检查 tcp 端口(如 8080)是否被占用:
$ netstat -an |grep  8080
tcp        0      0 :::8080                     :::*                        LISTEN
上面例子中的输出表明 tcp 端口 8080 已经被占用。
说明 1:上面命令不需要 sudo 权限。
说明 2:下面例子只能说明 tcp 端口 22 已经被占用,tcp 端口 58280 并没有被占用(它仅是连接到其它机器的端口号)。
$ netstat -an |grep  58280
tcp        0      0 10.182.75.76:22             10.182.53.71:58280          ESTABLISHED
46.2. 查看路由表(netstat -r 或者 ip route)
使用 netstat -r 可以查看本机的路由表,如果想显示更快,可以增加 -n 选项。如:
$ netstat -nr
Kernel IP routing table
Destination     Gateway         Genmask         Flags   MSS Window  irtt Iface
192.168.210.0   0.0.0.0         255.255.255.0   U         0 0          0 vmnet8
192.168.98.0    0.0.0.0         255.255.255.0   U         0 0          0 vmnet1
192.168.122.0   0.0.0.0         255.255.255.0   U         0 0          0 virbr0
10.182.72.0     0.0.0.0         255.255.252.0   U         0 0          0 eth0
169.254.0.0     0.0.0.0         255.255.0.0     U         0 0          0 eth0
0.0.0.0         10.182.72.1     0.0.0.0         UG        0 0          0 eth0
也可以使用 ip route 查看路由表。如:
$ ip route
192.168.210.0/24 dev vmnet8  proto kernel  scope link  src 192.168.210.1
192.168.98.0/24 dev vmnet1  proto kernel  scope link  src 192.168.98.1
192.168.122.0/24 dev virbr0  proto kernel  scope link  src 192.168.122.1
10.182.72.0/22 dev eth0  proto kernel  scope link  src 10.182.74.189
169.254.0.0/16 dev eth0  scope link  metric 1002
default via 10.182.72.1 dev eth0
47. od
od - dump files in octal and other formats.
默认以 8 进制形式显示,可以通过选项控制让其显示 16 进制形式。
$ od [-abcdfhilovx][-A <字码基数>][-j <字符数目>][-N <字符数目>][-s <字符串字符数>][-t <输出格式>][-w <每列字符数>][--help][--version][文件...]
后面实例中文件 file1 由下面命令产生。
$ echo "1234567890qwertyuiopasdfghjklzxcvbnm" >file1
如:
$ od file1
0000000 031061 032063 033065 034067 030071 073561 071145 074564
0000020 064565 070157 071541 063144 064147 065552 075154 061570
0000040 061166 066556 000012
0000045
47.1. 指定按某进制显示(-t 选项)
-t 指定数据的显示格式,主要的参数(这些参数可以同时使用)有:
c ASCII 字符或反斜杠序列
d 有符号十进制数
f 浮点数
o 八进制(系统默认值为 02)
u 无符号十进制数
x 十六进制数
注:除了选项 c 以外的其他选项后面都可以跟一个十进制数 n,指定每个显示值所包含的字节数。
实例,以 16 进制显示:
$ od -tx file1
0000000 34333231 38373635 77713039 79747265
0000020 706f6975 66647361 6b6a6867 63787a6c
0000040 6d6e6276 0000000a
0000045
实例,16 进制显示,控制每个显示值仅包含 1 个字节:
$ od -tx1 file1
0000000 31 32 33 34 35 36 37 38 39 30 71 77 65 72 74 79
0000020 75 69 6f 70 61 73 64 66 67 68 6a 6b 6c 7a 78 63
0000040 76 62 6e 6d 0a
0000045
注:注意实例 3 和实例红色部分的不同!
实例,用 ASCII 码和十六进制组合的方式能提供更有价值的信息输出:
$ od -Ax -tcx1 file1
000000   1   2   3   4   5   6   7   8   9   0   q   w   e   r   t   y
        31  32  33  34  35  36  37  38  39  30  71  77  65  72  74  79
000010   u   i   o   p   a   s   d   f   g   h   j   k   l   z   x   c
        75  69  6f  70  61  73  64  66  67  68  6a  6b  6c  7a  78  63
000020   v   b   n   m  \n
        76  62  6e  6d  0a
000025
47.2. 指定地址的显示格式(-A 选项)
-A 选项可指定地址基数,包括:
d 十进制
o 八进制(系统默认值)
x 十六进制
n 不打印位移值
实例,以 10 进制显示地址:
$ od -Ad file1
0000000 031061 032063 033065 034067 030071 073561 071145 074564
0000016 064565 070157 071541 063144 064147 065552 075154 061570
0000032 061166 066556 000012
0000037
实例,不显示地址:
$ od -An file1
031061 032063 033065 034067 030071 073561 071145 074564
064565 070157 071541 063144 064147 065552 075154 061570
061166 066556 000012
48. parcellite
Parcellite is a stripped down, basic-features-only clipboard manager with a small memory footprint for those who like simplicity.
Ubuntu 系统中,可以这样安装:
$ sudo apt-get install parcellite
Features:
- Keeps a clipboard history.
- Various view options to display items the way you like it.
- Daemon mode; guard your clipboard contents when you close applications.
- Perform custom commands using clipboard contents.
说明:
它有一个非常实用的功能:应用程序退出后,剪贴板内容不会丢失!
安装完后,下次重启系统后会自动启动。
49. paste
paste 可按列合并文件。如:
$ cat file1
1
2
$ cat file2
a
b
c
$ paste file1 file2    # 按列合并,默认为tab为分隔符
1	a
2	b
	c
指定 -s 选项,把每个文件归为一行!
$ paste -s file1 file2
1	2
a	b	c
49.1. 指定不同的分隔符
用 -d 选项可以指定 1 个或多个不同的分隔符,如:
$ paste -d,_ file1 file2 file2
1,a_a
2,b_b
,c_c
49.2. 实例:将一个文本的所有行用逗号连接起来
将一个文本的所有行用逗号连接起来:
$ paste -sd, file2
a,b,c
49.3. 实例:对文件的所有行求和
对文件的所有行求和:
$ paste -s -d+ fil1 | bc
参考:
http://stackoverflow.com/questions/926069/add-up-a-column-of-numbers-at-the-unix-shell
50. pgrep 和 pwdx
pgrep 通过程序名字直接查询进程。
默认只会显示 pid,如果想显示进程名字,则可以加个 -l 选项。
实例:找出 java 进程
$ pgrep java
50.1. 实例:找出 root 运行的进程名为 s 开头的所有进程
用 pgrep 找出 root 运行的进程名为 s 开头的所有进程:
$ pgrep -u root "^s"
用 ps 也可以做到,只是比 pgrep 使用复杂地:
$ ps -u root | awk '{print $4" "$1}' | grep "^s" | awk '{print $2}'
50.2. 查看进程的工作目录
pwdx 可打印进程的工作目录。
显示进程 1052 的工作目录:
$ pwdx 1052
1052: /home/cig01
直接查看/proc/pid 目录中的文件也能达到同样的功能:
$ ls -l /proc/1052/cwd
lrwxrwxrwx 1 cig01 cig01 0 Nov 21 13:17 /proc/1052/cwd -> /home/cig01
51. pmap(查看进程的内存映像信息)
The pmap command reports the memory map of a process or processes.
SYNOPSIS
pmap [ -x | -d ] [ -q ] pids...
pmap -V
GENERAL OPTIONS
-x extended Show the extended format.
-d device Show the device format.
-q quiet Do not display some header/footer lines.
-V show version Displays version of program.
如查看进程 1 的内存映像信息:
$ sudo pmap -x 1
1:   /sbin/init
Address           Kbytes     RSS   Dirty Mode  Mapping
00007fe13c000000     164      12      12 rw---   [ anon ]
00007fe13c029000   65372       0       0 -----   [ anon ]
00007fe142f11000       4       0       0 -----   [ anon ]
00007fe142f12000    8192       8       8 rw---   [ anon ]
00007fe143712000       4       0       0 -----   [ anon ]
00007fe143713000    8192       8       8 rw---   [ anon ]
00007fe143f13000      16      16       0 r-x-- libattr.so.1.1.0
00007fe143f17000    2044       0       0 ----- libattr.so.1.1.0
00007fe144116000       4       4       4 r---- libattr.so.1.1.0
00007fe144117000       4       4       4 rw--- libattr.so.1.1.0
00007fe144118000      12      12       0 r-x-- libdl-2.19.so
00007fe14411b000    2044       0       0 ----- libdl-2.19.so
00007fe14431a000       4       4       4 r---- libdl-2.19.so
00007fe14431b000       4       4       4 rw--- libdl-2.19.so
00007fe14431c000     432      16       0 r-x-- libpcre.so.3.13.1
00007fe144388000    2048       0       0 ----- libpcre.so.3.13.1
00007fe144588000       4       4       4 r---- libpcre.so.3.13.1
00007fe144589000       4       4       4 rw--- libpcre.so.3.13.1
00007fe14458a000      28      28       0 r-x-- librt-2.19.so
00007fe144591000    2044       0       0 ----- librt-2.19.so
00007fe144790000       4       4       4 r---- librt-2.19.so
00007fe144791000       4       4       4 rw--- librt-2.19.so
00007fe144792000      88      88       0 r-x-- libkmod.so.2.2.8
00007fe1447a8000    2044       0       0 ----- libkmod.so.2.2.8
00007fe1449a7000       4       4       4 r---- libkmod.so.2.2.8
00007fe1449a8000       4       4       4 rw--- libkmod.so.2.2.8
00007fe1449a9000      16      16       0 r-x-- libcap.so.2.24
00007fe1449ad000    2044       0       0 ----- libcap.so.2.24
00007fe144bac000       4       4       4 r---- libcap.so.2.24
00007fe144bad000       4       4       4 rw--- libcap.so.2.24
00007fe144bae000     104     100       0 r-x-- libaudit.so.1.0.0
00007fe144bc8000    2044       0       0 ----- libaudit.so.1.0.0
00007fe144dc7000       8       8       8 r---- libaudit.so.1.0.0
00007fe144dc9000       4       4       4 rw--- libaudit.so.1.0.0
00007fe144dca000      40       4       4 rw---   [ anon ]
00007fe144dd4000      52      52       0 r-x-- libpam.so.0.83.1
00007fe144de1000    2048       0       0 ----- libpam.so.0.83.1
00007fe144fe1000       4       4       4 r---- libpam.so.0.83.1
00007fe144fe2000       4       4       4 rw--- libpam.so.0.83.1
00007fe144fe3000     132     116       0 r-x-- libselinux.so.1
00007fe145004000    2048       0       0 ----- libselinux.so.1
00007fe145204000       4       4       4 r---- libselinux.so.1
00007fe145205000       4       4       4 rw--- libselinux.so.1
00007fe145206000       8       4       4 rw---   [ anon ]
00007fe145208000    1660    1332       0 r-x-- libc-2.19.so
00007fe1453a7000    2048       0       0 ----- libc-2.19.so
00007fe1455a7000      16      16      16 r---- libc-2.19.so
00007fe1455ab000       8       8       8 rw--- libc-2.19.so
00007fe1455ad000      16      12      12 rw---   [ anon ]
00007fe1455b1000      96      96       0 r-x-- libpthread-2.19.so
00007fe1455c9000    2044       0       0 ----- libpthread-2.19.so
00007fe1457c8000       4       4       4 r---- libpthread-2.19.so
00007fe1457c9000       4       4       4 rw--- libpthread-2.19.so
00007fe1457ca000      16       4       4 rw---   [ anon ]
00007fe1457ce000     128     128       0 r-x-- ld-2.19.so
00007fe145908000     812     692     692 rw---   [ anon ]
00007fe1459ea000      16      16      16 rw---   [ anon ]
00007fe1459ee000       4       4       4 r---- ld-2.19.so
00007fe1459ef000       4       4       4 rw--- ld-2.19.so
00007fe1459f0000       4       4       4 rw---   [ anon ]
00007fe1459f1000    1160    1084       0 r-x-- systemd
00007fe145d12000     120     120     120 r---- systemd
00007fe145d30000       4       4       4 rw--- systemd
00007fe1474fc000    1172    1116    1116 rw---   [ anon ]
00007ffd46b0c000     132      48      48 rw---   [ stack ]
00007ffd46b2f000       8       8       0 r-x--   [ anon ]
00007ffd46b31000       8       0       0 r----   [ anon ]
ffffffffff600000       4       0       0 r-x--   [ anon ]
---------------- ------- ------- -------
total kB          110828    5260    2168
最后一行中 110828 表示该进程预先分配的虚拟内存大小。5260 是实际使用的内存(RSS)。
51.1. 实现 pmap 的另一种方法
通过查看 /proc/<pid>/maps 文件也可得到进程的内存映像信息。
如查看进程 1 的内存映像信息:
$ sudo cat /proc/1/maps
7fe13c000000-7fe13c029000 rw-p 00000000 00:00 0
7fe13c029000-7fe140000000 ---p 00000000 00:00 0
7fe142f11000-7fe142f12000 ---p 00000000 00:00 0
7fe142f12000-7fe143712000 rw-p 00000000 00:00 0
7fe143712000-7fe143713000 ---p 00000000 00:00 0
7fe143713000-7fe143f13000 rw-p 00000000 00:00 0
7fe143f13000-7fe143f17000 r-xp 00000000 08:01 130689                     /lib/x86_64-linux-gnu/libattr.so.1.1.0
7fe143f17000-7fe144116000 ---p 00004000 08:01 130689                     /lib/x86_64-linux-gnu/libattr.so.1.1.0
7fe144116000-7fe144117000 r--p 00003000 08:01 130689                     /lib/x86_64-linux-gnu/libattr.so.1.1.0
7fe144117000-7fe144118000 rw-p 00004000 08:01 130689                     /lib/x86_64-linux-gnu/libattr.so.1.1.0
7fe144118000-7fe14411b000 r-xp 00000000 08:01 130716                     /lib/x86_64-linux-gnu/libdl-2.19.so
7fe14411b000-7fe14431a000 ---p 00003000 08:01 130716                     /lib/x86_64-linux-gnu/libdl-2.19.so
7fe14431a000-7fe14431b000 r--p 00002000 08:01 130716                     /lib/x86_64-linux-gnu/libdl-2.19.so
7fe14431b000-7fe14431c000 rw-p 00003000 08:01 130716                     /lib/x86_64-linux-gnu/libdl-2.19.so
7fe14431c000-7fe144388000 r-xp 00000000 08:01 130810                     /lib/x86_64-linux-gnu/libpcre.so.3.13.1
7fe144388000-7fe144588000 ---p 0006c000 08:01 130810                     /lib/x86_64-linux-gnu/libpcre.so.3.13.1
7fe144588000-7fe144589000 r--p 0006c000 08:01 130810                     /lib/x86_64-linux-gnu/libpcre.so.3.13.1
7fe144589000-7fe14458a000 rw-p 0006d000 08:01 130810                     /lib/x86_64-linux-gnu/libpcre.so.3.13.1
7fe14458a000-7fe144591000 r-xp 00000000 08:01 130831                     /lib/x86_64-linux-gnu/librt-2.19.so
7fe144591000-7fe144790000 ---p 00007000 08:01 130831                     /lib/x86_64-linux-gnu/librt-2.19.so
7fe144790000-7fe144791000 r--p 00006000 08:01 130831                     /lib/x86_64-linux-gnu/librt-2.19.so
7fe144791000-7fe144792000 rw-p 00007000 08:01 130831                     /lib/x86_64-linux-gnu/librt-2.19.so
7fe144792000-7fe1447a8000 r-xp 00000000 08:01 130749                     /lib/x86_64-linux-gnu/libkmod.so.2.2.8
7fe1447a8000-7fe1449a7000 ---p 00016000 08:01 130749                     /lib/x86_64-linux-gnu/libkmod.so.2.2.8
7fe1449a7000-7fe1449a8000 r--p 00015000 08:01 130749                     /lib/x86_64-linux-gnu/libkmod.so.2.2.8
7fe1449a8000-7fe1449a9000 rw-p 00016000 08:01 130749                     /lib/x86_64-linux-gnu/libkmod.so.2.2.8
7fe1449a9000-7fe1449ad000 r-xp 00000000 08:01 130704                     /lib/x86_64-linux-gnu/libcap.so.2.24
7fe1449ad000-7fe144bac000 ---p 00004000 08:01 130704                     /lib/x86_64-linux-gnu/libcap.so.2.24
7fe144bac000-7fe144bad000 r--p 00003000 08:01 130704                     /lib/x86_64-linux-gnu/libcap.so.2.24
7fe144bad000-7fe144bae000 rw-p 00004000 08:01 130704                     /lib/x86_64-linux-gnu/libcap.so.2.24
7fe144bae000-7fe144bc8000 r-xp 00000000 08:01 130691                     /lib/x86_64-linux-gnu/libaudit.so.1.0.0
7fe144bc8000-7fe144dc7000 ---p 0001a000 08:01 130691                     /lib/x86_64-linux-gnu/libaudit.so.1.0.0
7fe144dc7000-7fe144dc9000 r--p 00019000 08:01 130691                     /lib/x86_64-linux-gnu/libaudit.so.1.0.0
7fe144dc9000-7fe144dca000 rw-p 0001b000 08:01 130691                     /lib/x86_64-linux-gnu/libaudit.so.1.0.0
7fe144dca000-7fe144dd4000 rw-p 00000000 00:00 0
7fe144dd4000-7fe144de1000 r-xp 00000000 08:01 130799                     /lib/x86_64-linux-gnu/libpam.so.0.83.1
7fe144de1000-7fe144fe1000 ---p 0000d000 08:01 130799                     /lib/x86_64-linux-gnu/libpam.so.0.83.1
7fe144fe1000-7fe144fe2000 r--p 0000d000 08:01 130799                     /lib/x86_64-linux-gnu/libpam.so.0.83.1
7fe144fe2000-7fe144fe3000 rw-p 0000e000 08:01 130799                     /lib/x86_64-linux-gnu/libpam.so.0.83.1
7fe144fe3000-7fe145004000 r-xp 00000000 08:01 130833                     /lib/x86_64-linux-gnu/libselinux.so.1
7fe145004000-7fe145204000 ---p 00021000 08:01 130833                     /lib/x86_64-linux-gnu/libselinux.so.1
7fe145204000-7fe145205000 r--p 00021000 08:01 130833                     /lib/x86_64-linux-gnu/libselinux.so.1
7fe145205000-7fe145206000 rw-p 00022000 08:01 130833                     /lib/x86_64-linux-gnu/libselinux.so.1
7fe145206000-7fe145208000 rw-p 00000000 00:00 0
7fe145208000-7fe1453a7000 r-xp 00000000 08:01 130701                     /lib/x86_64-linux-gnu/libc-2.19.so
7fe1453a7000-7fe1455a7000 ---p 0019f000 08:01 130701                     /lib/x86_64-linux-gnu/libc-2.19.so
7fe1455a7000-7fe1455ab000 r--p 0019f000 08:01 130701                     /lib/x86_64-linux-gnu/libc-2.19.so
7fe1455ab000-7fe1455ad000 rw-p 001a3000 08:01 130701                     /lib/x86_64-linux-gnu/libc-2.19.so
7fe1455ad000-7fe1455b1000 rw-p 00000000 00:00 0
7fe1455b1000-7fe1455c9000 r-xp 00000000 08:01 130825                     /lib/x86_64-linux-gnu/libpthread-2.19.so
7fe1455c9000-7fe1457c8000 ---p 00018000 08:01 130825                     /lib/x86_64-linux-gnu/libpthread-2.19.so
7fe1457c8000-7fe1457c9000 r--p 00017000 08:01 130825                     /lib/x86_64-linux-gnu/libpthread-2.19.so
7fe1457c9000-7fe1457ca000 rw-p 00018000 08:01 130825                     /lib/x86_64-linux-gnu/libpthread-2.19.so
7fe1457ca000-7fe1457ce000 rw-p 00000000 00:00 0
7fe1457ce000-7fe1457ee000 r-xp 00000000 08:01 130677                     /lib/x86_64-linux-gnu/ld-2.19.so
7fe145908000-7fe1459d3000 rw-p 00000000 00:00 0
7fe1459ea000-7fe1459ee000 rw-p 00000000 00:00 0
7fe1459ee000-7fe1459ef000 r--p 00020000 08:01 130677                     /lib/x86_64-linux-gnu/ld-2.19.so
7fe1459ef000-7fe1459f0000 rw-p 00021000 08:01 130677                     /lib/x86_64-linux-gnu/ld-2.19.so
7fe1459f0000-7fe1459f1000 rw-p 00000000 00:00 0
7fe1459f1000-7fe145b13000 r-xp 00000000 08:01 3879                       /lib/systemd/systemd
7fe145d12000-7fe145d30000 r--p 00121000 08:01 3879                       /lib/systemd/systemd
7fe145d30000-7fe145d31000 rw-p 0013f000 08:01 3879                       /lib/systemd/systemd
7fe1474fc000-7fe147621000 rw-p 00000000 00:00 0                          [heap]
7ffd46b0c000-7ffd46b2d000 rw-p 00000000 00:00 0                          [stack]
7ffd46b2f000-7ffd46b31000 r-xp 00000000 00:00 0                          [vdso]
7ffd46b31000-7ffd46b33000 r--p 00000000 00:00 0                          [vvar]
ffffffffff600000-ffffffffff601000 r-xp 00000000 00:00 0                  [vsyscall]
52. ps 和 pstree
ps 可查看系统中运行的进程。
说明:不同的系统支持的 ps 选项很不一样,使用时请查阅当前系统的 man 文档。
52.1. 查看某个进程的详细信息
直接用 ps pid 得到的进程信息比较简单。
$ ps 1052
  PID TTY      STAT   TIME COMMAND
 1052 pts/0    Ss     0:00 -bash
上面命令得到的信息很简单。
要得到详细的信息,可以使用 -f 或 -F 选项。
$ ps -f 1052
UID        PID  PPID  C STIME TTY      STAT   TIME CMD
cig01     1052  1049  0 10:59 pts/0    Ss     0:00 -bash
-f 是 full-format 的含义,输出的信息很详细,比如可查看父进程 id
$ ps -F 1052
UID        PID  PPID  C    SZ   RSS PSR STIME TTY      STAT   TIME CMD
cig01     1052  1049  0  5895  5600   0 11:16 pts/0    Ss     0:00 -bash
-F 是 extra full 的含义,比 -f 得到的信息更详细。
52.2. 查看进程的内存使用信息(ps v)
用 ps v 可查看进程的内存使用信息(这是 BSD 系统风格,几乎所有系统都支持这样使用。加上连字符,即 ps -v 在大部分系统中也可用,但 AIX 系统中提示非法选项。)
$ ps v
  PID TTY      STAT   TIME  MAJFL   TRS   DRS   RSS %MEM COMMAND
 1052 pts/0    Ss     0:00      1   966 22613  5600  0.5 -bash
 2376 pts/0    R+     0:00      0    84 10595  2028  0.1 ps v
查看某个进程的内存使用信息,在 ps v 后面接上 pid 即可:
$ ps v 1052
  PID TTY      STAT   TIME  MAJFL   TRS   DRS   RSS %MEM COMMAND
 1052 pts/0    Ss     0:00      1   966 22613  5600  0.5 -bash
52.3. 查看所有用户的所有进程
要查看所有用户的所有进程,可以使用下面方法(System V 风格):
$ ps -e
$ ps -ef
$ ps -eF
$ ps -ely
要查看所有用户的所有进程,也可以使用下面方法(BSD 风格):
$ ps ax
$ ps axu
可以验证,ps ax|wc -l 和 ps -e|wc -l 的结果是一样的,这说明 ps ax 和 ps -e 找到的进程数是一致的。
52.3.1. ps axu(BSD 风格)
ps axu 实例如下:
$ ps axu
USER       PID %CPU %MEM    VSZ   RSS TTY      STAT START   TIME COMMAND
root         1  0.0  0.4 110568  5024 ?        Ss   11:16   0:00 /sbin/init
root         2  0.0  0.0      0     0 ?        S    11:16   0:00 [kthreadd]
root         3  0.0  0.0      0     0 ?        S    11:16   0:00 [ksoftirqd/0]
root         5  0.0  0.0      0     0 ?        S<   11:16   0:00 [kworker/0:0H]
root         6  0.0  0.0      0     0 ?        S    11:16   0:00 [kworker/u2:0]
root         7  0.0  0.0      0     0 ?        S    11:16   0:00 [rcu_sched]
root         8  0.0  0.0      0     0 ?        S    11:16   0:00 [rcu_bh]
root         9  0.0  0.0      0     0 ?        S    11:16   0:00 [migration/0]
root        10  0.0  0.0      0     0 ?        S    11:16   0:00 [watchdog/0]
root        11  0.0  0.0      0     0 ?        S<   11:16   0:00 [khelper]
root        12  0.0  0.0      0     0 ?        S    11:16   0:00 [kdevtmpfs]
root        13  0.0  0.0      0     0 ?        S<   11:16   0:00 [netns]
......
下面来具体分析 ps axu,它是 BSD 的风格。
ps axu 的三个参数含义分别如下:
ps a:显示现行终端机下的所有程序,包括其他用户的程序。
ps x:显示所有程序,不以终端机来区分。(参数 x,显示当前用户的所有程序,不会显示其他用户的程序,和参数 a 一起用就可以显示所有用户的所有程序。)
ps u:以用户为主的格式来显示程序状况。(仅仅是定制输出格式为“user-oriented format”)
ps axu 输出信息的第 8 列为 STAT,它的含义是什么呢?
通过 man ps 可查阅,列出如下:
D 不可中断睡眠 (通常是在IO操作) 收到信号不唤醒和不可运行, 进程必须等待直到有中断发生
R 正在运行或可运行(在运行队列排队中)
S 可中断睡眠 (休眠中, 受阻, 在等待某个条件的形成或接受到信号)
T 已停止的进程收到SIGSTOP, SIGSTP, SIGTIN, SIGTOU信号后停止运行
W 正在换页(2.6内核之前有效)
X 死进程(未开启)
Z 僵尸进程(进程已终止, 但进程描述符存在, 直到父进程调用wait4()系统调用后释放BSD风格的)
< 高优先级(not nice to other users)
N 低优先级(nice to other users)
L 页面锁定在内存(实时和定制的IO)
s 一个信息头
l 多线程(使用 CLONE_THREAD,像NPTL的pthreads的那样)
+ 在前台进程组
特别注意:ps aux 与 ps -aux 是不同的,POSIX 标准要求 ps -aux 显示用户名为"x"的所有进程。但如果系统中没有名为"x"的用户,则 ps -aux 会与 ps aux 作用等同,同时提示一个 warning。
52.3.2. ps -ef(System V 风格)
ps -ef 实例如下:
$ ps -ef
UID        PID  PPID  C STIME TTY          TIME CMD
root         1     0  0 11:16 ?        00:00:00 /sbin/init
root         2     0  0 11:16 ?        00:00:00 [kthreadd]
root         3     2  0 11:16 ?        00:00:00 [ksoftirqd/0]
root         5     2  0 11:16 ?        00:00:00 [kworker/0:0H]
root         6     2  0 11:16 ?        00:00:00 [kworker/u2:0]
root         7     2  0 11:16 ?        00:00:00 [rcu_sched]
root         8     2  0 11:16 ?        00:00:00 [rcu_bh]
root         9     2  0 11:16 ?        00:00:00 [migration/0]
root        10     2  0 11:16 ?        00:00:00 [watchdog/0]
root        11     2  0 11:16 ?        00:00:00 [khelper]
root        12     2  0 11:16 ?        00:00:00 [kdevtmpfs]
root        13     2  0 11:16 ?        00:00:00 [netns]
......
下面来具体分析 ps -ef,它是 System V 的风格。
ps -e:显示所有程序。(所有用户的所有程序)
ps -f:更为完整的输出格式。(仅仅是定制输出格式,使其更详细)
52.4. 查看进程的所有子进程(pstree)
用 pstree 可显示某个进程的所有子进程。如:
$ pstree -p 1052
bash(1052)───pstree(2275)
-p 选项可显示所有子进程的 pid。
52.5. 查看进程的所有子线程(top -H 或 ps -L 或 ls /proc/pid/task)
查看某个进程的所有子线程有多种方法。
方法一,使用 top -H
如查看进程 gnome-shell(pid 为 1108)的所有子线程:
$ top -H -p 1108
 top - 13:58:56 up  2:59,  2 users,  load average: 0.00, 0.01, 0.05
Threads:   7 total,   0 running,   7 sleeping,   0 stopped,   0 zombie
%Cpu(s):  0.0 us,  0.0 sy,  0.0 ni,100.0 id,  0.0 wa,  0.0 hi,  0.0 si,  0.0 st
KiB Mem:   1024444 total,   858012 used,   166432 free,    73392 buffers
KiB Swap:   477180 total,        0 used,   477180 free.   345952 cached Mem

  PID USER      PR  NI    VIRT    RES    SHR S %CPU %MEM     TIME+ COMMAND
 1108 cig01     20   0 1312484 173236  67720 S  0.0 16.9   0:03.33 gnome-shell
 1133 cig01     20   0 1312484 173236  67720 S  0.0 16.9   0:00.00 gmain
 1137 cig01     20   0 1312484 173236  67720 S  0.0 16.9   0:00.02 gdbus
 1143 cig01     20   0 1312484 173236  67720 S  0.0 16.9   0:00.00 dconf worker
 1144 cig01     20   0 1312484 173236  67720 S  0.0 16.9   0:00.00 threaded-ml
 1145 cig01     20   0 1312484 173236  67720 S  0.0 16.9   0:00.00 JS GC Helper
 1146 cig01     20   0 1312484 173236  67720 S  0.0 16.9   0:00.00 JS Sour~ Thread
方法二,使用 ps -L
$ ps -L 1090
  PID   LWP TTY      STAT   TIME COMMAND
 1108  1108 ?        Sl     0:03 /usr/bin/gnome-shell
 1108  1133 ?        Sl     0:00 /usr/bin/gnome-shell
 1108  1137 ?        Sl     0:00 /usr/bin/gnome-shell
 1108  1143 ?        Sl     0:00 /usr/bin/gnome-shell
 1108  1144 ?        Sl     0:00 /usr/bin/gnome-shell
 1108  1145 ?        Sl     0:00 /usr/bin/gnome-shell
 1108  1146 ?        Sl     0:00 /usr/bin/gnome-shell
方法三,使用 ps -T
$ ps -e -T |grep 1108
 1108  1108 ?        00:00:03 gnome-shell
 1108  1133 ?        00:00:00 gmain
 1108  1137 ?        00:00:00 gdbus
 1108  1143 ?        00:00:00 dconf worker
 1108  1144 ?        00:00:00 threaded-ml
 1108  1145 ?        00:00:00 JS GC Helper
 1108  1146 ?        00:00:00 JS Sour~ Thread
方法四,查看 /proc/pid/task 目录下的内容。如:
$ ls /proc/1108/task/
1108  1133  1137  1143  1144  1145  1146
52.5.1. 各系统下查看进程的子线程
前面介绍了很多查看进程子线程的方法,但它们仅在 Linux 中有效。下面介绍其它系统中也能使用的命令。
ps M <pid> 命令可查看子线程,它可用于 OSX 和 Linux 中。
ps -L -p <pid> 命令可查看子线程,它可用于 Solaris 和 Linux 中。
ps -mo THREAD -p <pid> 命令可查看子线程,它可用于 AIX 和 Linux 中。
OSX 10.10 中测试如下:
cig01@MacBook-Pro ~$ ps M 1
USER   PID   TT   %CPU STAT PRI     STIME     UTIME COMMAND
root     1   ??    0.0 S    31T   0:00.00   0:00.00 /sbin/launchd
         1         0.0 S    31T   0:00.58   0:00.16
         1         0.0 S    31T   0:00.00   0:00.00
         1         0.0 S    31T   0:00.00   0:00.00
         1         0.0 S    31T   0:00.00   0:00.00
Debian8 中测试如下:
cig01@debian8:~$ ps M 1090
  PID TTY      STAT   TIME COMMAND
 1108 ?        -      0:02 /usr/bin/gnome-shell
    - -        Sl     0:02 -
    - -        Sl     0:00 -
    - -        Sl     0:00 -
    - -        Sl     0:00 -
    - -        Sl     0:00 -
    - -        Sl     0:00 -
    - -        Sl     0:00 -
说明:如果要在 Linux 中要统计线程数,不要统计这一行"1108 ? - 0:02 /usr/bin/gnome-shell",它和它的下一行是同一线程,不要重复统计。
Solaris 中测试如下:
sunos ~$ ps -L -p 13916
  PID   LWP TTY        LTIME CMD
13916     1 ?           0:03 test
13916     2 ?           6:52 test
13916     3 ?           4:41 test
AIX 中测试如下:
aix ~$ ps -mo THREAD -p 6488112
    USER      PID     PPID        TID ST  CP PRI SC    WCHAN        F     TT BND COMMAND
   user1  6488112  7012594          - A    0  60 50        *   242001      -   - java
       -        -        -   12255369 S    0  82  1 f1000f0a1000bb40  8410400      -   - -
       -        -        -   17432667 S    0  82  1 f1000f0a10010a40  8410400      -   - -
       -        -        -   17694765 Z    0  71  1        -   c00001      -   - -
       -        -        -   19071195 S    0  82  1 f1000f0a10012340  8410400      -   - -
       -        -        -   19333209 S    0  82  1 f1000f0a10012740  8410400      -   - -
       -        -        -   19988599 S    0  82  1 f1000f0a10013140  8410400      -   - -
52.6. Tips:显示完整的 COMMAND
ps 输出信息太长时,默认不会换行,要完整显示出信息,可以加上 ww 或 -ww 选项。如:
$ ps 1902
  PID TTY      STAT   TIME COMMAND
 1902 ?        S      0:00 /sbin/dhclient -d -q -sf /usr/lib/NetworkManager/nm-d
$ ps ww 1902
  PID TTY      STAT   TIME COMMAND
 1902 ?        S      0:00 /sbin/dhclient -d -q -sf /usr/lib/NetworkManager/nm-dhcp-helper -pf /var/run/dhclient-eth0.pid -lf /var/lib/NetworkManager/dhclient-423ff229-072a-42a8-9ee8-6169c5ac7a3a-eth0.lease -cf /var/lib/NetworkManager/dhclient-eth0.conf eth0
$ ps -ww 1902
  PID TTY      STAT   TIME COMMAND
 1902 ?        S      0:00 /sbin/dhclient -d -q -sf /usr/lib/NetworkManager/nm-dhcp-helper -pf /var/run/dhclient-eth0.pid -lf /var/lib/NetworkManager/dhclient-423ff229-072a-42a8-9ee8-6169c5ac7a3a-eth0.lease -cf /var/lib/NetworkManager/dhclient-eth0.conf eth0
52.7. Tips:按 CPU 排序
下面例子可以显示占用 CPU 最多的 5 个进程:
$ ps aux | sort -nrk 3,3 | head -n 5                 # 显示占用CPU最多的5个进程(CPU使用在ps aux输出中是第3列)
root         5  0.1  1.5 977120 32180 pts/0    Sl+  04:04   0:00 node app.js
root        67  0.0  0.0   4336   720 pts/1    S+   04:12   0:00 head -n 5
root        66  0.0  0.0  14896  1588 pts/1    S+   04:12   0:00 sort -nrk 3,3
root        65  0.0  0.1  47460  3276 pts/1    R+   04:12   0:00 ps aux
root        11  0.0  0.1  11784  2860 pts/1    Ss   04:04   0:00 bash
说明:“ps aux”的输出有一个 header,即第一行“USER PID %CPU %MEM VSZ RSS TTY STAT START TIME COMMAND”,在用下一个 sort 命令排序时它会被放到最后一行,如果系统中的进程数少于 5 个(很可能出现在 docker 环境下),则上面输出的最后一行会是这个无用的 header。为了避免这种情况,可以使用下面命令:
$ ps aux | sed 1d | sort -nrk 3,3 | head -n 5 # 显示占用CPU最多的5个进程,更加严谨(当系统进程少于5个时可过滤ps的header)
52.8. Tips:按内存排序
下面例子可以显示占用内存最多的 5 个进程:
# ps aux | sort -nrk 4,4 | head -n 5                 # 显示占用内存最多的5个进程(内存使用在ps aux输出中是第4列)
root         5  0.1  1.7 979604 36012 pts/0    Sl+  04:04   0:00 node app.js
root       173  0.0  0.1  47460  3260 pts/1    R+   04:13   0:00 ps aux
root        11  0.0  0.1  11784  2860 pts/1    Ss   04:04   0:00 bash
root         1  0.0  0.1  11648  2440 pts/0    Ss+  04:04   0:00 /bin/bash /root/app.sh
root       175  0.0  0.0   4336   624 pts/1    S+   04:13   0:00 head -n 5
下面是更加严谨的形式:
$ ps aux | sed 1d | sort -nrk 4,4 | head -n 5 # 显示占用内存最多的5个进程,更加严谨(当系统进程少于5个时可过滤ps的header)
53. pstack(进程当前 stack 信息)
工具 pstack 可查看进程的当前 stack 信息,效果类似于 gdb 中的 bt 命令。
注 1:当程序包含调试信息时,gdb 的 bt 命令能直接显示行号信息,而 pstack 不能。如:
$ pstack 1
#0  0x000000323f2da073 in __select_nocancel () from /lib64/libc.so.6
#1  0x000000323ee0d9dc in nih_main_loop () from /lib64/libnih.so.1
#2  0x000000000040466d in ?? ()
#3  0x000000323f21ec5d in __libc_start_main () from /lib64/libc.so.6
#4  0x00000000004040b9 in ?? ()
#5  0x00007fff36a365e8 in ?? ()
#6  0x000000000000001c in ?? ()
#7  0x0000000000000001 in ?? ()
#8  0x00007fff36a36fad in ?? ()
#9  0x0000000000000000 in ?? ()
注 2:pstack 在 redhat 系统中工作良好,但在 64 位 debian 中系统中无法正常工作。
注 3:文件 /proc/<pid>/stack 的内容仅仅是显示进程的内核栈信息。如
$ cat /proc/self/stack
[<ffffffff81021bce>] save_stack_trace_tsk+0x1e/0x40
[<ffffffff8120817d>] proc_pid_stack+0x8d/0xe0
[<ffffffff81208d87>] proc_single_show+0x47/0x80
[<ffffffff811c9612>] seq_read+0xe2/0x360
[<ffffffff811a7ef3>] vfs_read+0x93/0x170
[<ffffffff811a8b22>] SyS_read+0x42/0xa0
[<ffffffff81512e68>] page_fault+0x28/0x30
[<ffffffff81510e4d>] system_call_fast_compare_end+0x10/0x15
[<ffffffffffffffff>] 0xffffffffffffffff
54. rsync
rsync 是用于替代 rcp 的一个工具。
rsync(remote synchronize)是一个远程数据同步工具(仅传送两个文件的不同部分,而不是每次都整份传送,因此速度非常快),可通过 LAN/WAN 快速同步多台主机之间的文件。也可以使用 rsync 同步本地硬盘中的不同目录。
基本使用:
1)本地使用:
rsync [OPTION...] SRC... [DEST]
2)通过远程 shell 使用:
拉: rsync [OPTION...] [USER@]HOST:SRC... [DEST]
推: rsync [OPTION...] SRC... [USER@]HOST:DEST
3)访问 rsync 服务器:
拉: rsync [OPTION...] [USER@]HOST::SRC... [DEST]
推: rsync [OPTION...] SRC... [USER@]HOST::DEST
拉: rsync [OPTION...] rsync://[USER@]HOST[:PORT]/SRC... [DEST]
推: rsync [OPTION...] SRC... rsync://[USER@]HOST[:PORT]/DEST
参考:http://www.zzbaike.com/wiki/CentOS/%E4%BD%BF%E7%94%A8rsync%E5%90%8C%E6%AD%A5
54.1. 实例:本地目录同步
下面是本地目录同步的例子:
$ rsync -a --delete /home/user1   /backups/dir1/     # 把目录/home/user1同步到/backups/dir1/中
$ rsync -a --delete /home/user1/  /backups/dir1/     # 把目录/home/user1中的所有内容同步到/backups/dir1/中
-a:归档模式,表示以递归方式传输文件,并保持所有文件属性。
--delete:删除那些接收端还有而发送端已经不存在的文件。
说明:在指定复制源时,路径最后是否有“/”的含义是不同的。上面例子中:
/home/user1: 表示将整个/home/user1 目录复制到目标目录;
/home/user1/:表示将/home/user1/目录中的所有内容复制到目标目录。
54.2. 使用不同的 ssh 端口
默认 rsync 会连接远程的 ssh 22 端口,如果远程服务器的 ssh 工作在其它端口(如 2222),则可以通过选项 -e 'ssh -p 2222' 进行修改,如:
$ rsync -rvz -e 'ssh -p 2222' ./dir user@host:/path
55. samba
Samba is a free software re-implementation of the SMB/CIFS networking protocol.
注:Samba 只能在内网使用,类似于 windows 的网络邻居(文件共享服务)服务器端支持。
下面是 samba 的一些基本操作实例。
1、查看机器中 samba 服务是否在运行:
$ service smb status              # 如果不行,试试 service smbd status
smbd (pid  4144) is running...
2、启动 samba 服务
$ service smb start # 如果不行,试试 service smbd start
3、增加 samba 用户(操作系统用户不会自动成为 samba 用户):
$ sudo smbpasswd -a YourUserName # 回车后会提示你输入密码
4、重置 samba 用户密码(可通过增加用户实现,用户存在的话会直接更新密码):
$ sudo smbpasswd -a YourUserName # 回车后会提示你输入密码
55.1. 增加共享目录
默认用户的 HOME 目录是共享目录,如何增加其他的共享目录呢?打开配置文件“/etc/samba/smb.conf”,在后面增加类似下面的内容即可:
[my_new_share]
    comment = This is my new share
    path = /path/to/my/share
    public = yes
    writable = yes
其中,my_new_share 将作为共享目录的别名。
56. screen
Screen 是一个终端窗口管理器。如果和服务器的连接突然断开,Screen 中的 session 也不会死掉,还可以再进入。
安装 Screen:
$ apt install screen    # Ubuntu, Debian
$ yum install screen    # Redhat, Centos
Screen 常用操作如表 8 所示。
| 命令 | 说明 |
|---|---|
| screen | 启动新 session |
| screen -S screen_name | 使用指定的名字启动新 session |
| Ctrl+a d | Detach 当前 session (还可以再进来) |
| Ctrl+d | 关闭当前 session |
| exit | 同上。关闭当前 session |
| screen -ls | 列出所有的 session |
| screen -r id | 进入到指定的 session(列出 session 时会输出 id) |
下面是操作实例:
$ screen -ls                      # 列出 session,目前有两个
There are screens on:
	5968.pts-0.vm1216760	(07/27/2019 08:14:31 PM)	(Detached)
	5930.pts-0.vm1216760	(07/27/2019 08:13:51 PM)	(Detached)
2 Sockets in /run/screen/S-user1.

$ screen -r 5968                  # 进入 id 为 5968 的 session
$ screen -r 5968.pts-0.vm1216760  # 同上。只是指定了完整的 session 名
56.1. Tips
56.1.1. 恢复鼠标滚动翻屏
在 Screen session 中,鼠标的滚动操作无法正常翻屏,把下面内容加入到文件“~/.screenrc”中可解决这问题:
termcapinfo xterm* ti@:te@
参考:https://stackoverflow.com/questions/359109/using-the-scrollwheel-in-gnu-screen
56.1.2. 取消快捷键 Ctrl+a
Screen session 环境中,默认 Ctrl+a 为 Screen 相关快捷键,把下面内容加入到文件“~/.screenrc”中就可以修改快捷键为 Ctrl+t:
escape ^Tt
56.1.3. 定制移动光标到行首快捷链
在非 Screen session 环境中,使用快捷键 Ctrl+a 可以把光标移动到行首;进入到 Screen session 环境中后,使用快捷键 Ctrl+a a 才能把光标移动到行首。
56.1.4. 重命名当前 Session
进入某 session 后,输入 Ctrl+a ,再输入 :sessionname myNewSessionName 后按回车,即可把当前 session 命名为 myNewSessionName。
56.1.5. 强制 Reattach Session
不正常退出时,Screen 可能显示不准确的 Attach 状态,这时使用 -D -r 可以强制 Reattach Session,如:
$ screen -D -r 5968.pts-0.vm1216760
56.1.6. 强制退出 Session
如果某个 Session 无法 Attach,需要强制退出它。可以找到 Session 后执行 -X quit ,如:
$ screen -ls                                # 找到 Session
There are screens on:
	2042761.app_server	(Detached)
$ screen -S 2042761.app_server -X quit      # 强制退出名为 2042761.app_server 的 Session
57. Source Insight
Source Insight is a light-weight and fast project oriented program code editor and code browser, with built-in analysis for C/C++, C#, and Java programs, as well as other languages.
Useful features:
Context Window is a Source Insight innovation that automatically provides relevant information while you are viewing and editing your source code. For example, Context Window will display the declaration of that variable/class or the implementation body of that function.
Relation Window is a Source Insight innovation that shows the relationship between the currently selected symbol and other things (function call graph or class tree diagram).
Reference:
Source Insight 3.5 User Manual: http://www.sourceinsight.com/docs35/ManualTOC.htm
57.1. 常用快捷键
Source Insight 常用快捷键如表 9 所示。
| 快捷键 | 描述 |
|---|---|
| F8 | 在当前文件中查找符号 |
| Ctrl + = | Jump to definition. 也可以用 Ctrl + 鼠标左键单击 |
| Ctrl + / | Lookup reference. |
| Shift + F8 | 高亮(或取消高亮)和光标处单词相同的单词 |
| Shift + F4 | 往后搜索光标处单词 |
| Shift + F3 | 往前搜索光标处单词 |
| F12 | Incremental search. 一边输入一边搜索 |
| Alt + , | Jump backword |
| Alt + . | Jump forward |
| F5 或 Ctrl + g | 跳转到某行 |
| Alt + F12 | 切换等宽字体,也可以用[View]->[Draft View] |
58. split 和 csplit
split 和 csplit 这两个命令用来分割文本文件。
split 按大小分割,csplit 按行分割。
把文件 file1 按大小分解,分解后大小为 512byte,文件名前缀为 prefix 后缀为 00、01、02 ......99。若 -b 改为 -k 为 Kbyte,-m 为 Mbyte。
$ split -d -b 512 file prefix
把文件 file1 按行分解,分解后大小为 15000 行,文件名前缀为 prefix 后缀为 00、01、02 ......99,而文件个数不多于 100 个。
$ csplit -k -f prefix file1 15000 {99}
58.1. csplit 实例
1、将文本文件 textfile 以 120 行为分界点切割成 2 份
$ csplit testfile 120
2、将文本文件 textfile 以 120 行为分界点切割成 2 份, 并指定输出文件名的位数为 3
$ csplit -n 3 testfile 120
$ ls
textfile  xx000  xx0001
3、将文本文件 textfile 以 120 行为分界点切割成 2 份, 并指定输出文件名的前缘为 FileName 位数为 3
$ csplit -f FileName testfile 120
$ ls
textfile  FileName00  FileName001
4、将文件 textfile 以 10 行为单位分割 8 次, 并指定输出文件名的格式
$ csplit -b "myfile%o% textfile 10 {8}
$ ls
textfile xxmyfile00  xxmyfile01 xxmyfile02 ...
5、将文本文件 textfile 以每 20 行为单位分割
$ csplit textfile 20 {*}
6、把文件以字符串"Chapter X"为分界符,分成两部分
$ csplit textfile /"Chapter X"/
7、承上例, 但分割文件时以"Chapter X"字符串往下 4 行才是分割点
$ csplit textfile /"Chapter X"/+4
参考:http://find11.blog.163.com/blog/static/68162432010018101237247/
59. ssh
ssh 常用来远程登录服务器。
59.1. ssh 实现自动登录
ssh 可使用密钥验证,实现自动登录。
步骤 1:在本地机器上生成密钥对,如生成 rsa 类型的密钥。
$ ssh-keygen -t rsa
一路回车,直到在当前用户 HOME 目录的 .ssh 子目录生成了 id_rsa 私钥和 id_rsa.pub 公钥。
步骤 2:把生成的公钥 id_rsa.pub(注意:不是私钥文件 id_rsa)复制到远程需要登录的机器的 ~/.ssh/ 目录中,并改名为 authorized_keys。
$ scp ~/.ssh/id_rsa.pub username@hostname:~/.ssh/authorized_keys
注意:上面命令要成功,远程机器的~/.ssh 目录必须已经存在。如果 authorized_keys 已经存在,则可以把公钥文件的内容“追加”到 authorized_keys 文件中。
完成上面两步后,就不再需要输入密码了。
配置正确后,scp 和 sftp 也不再需要输入密码了,且还能支持远程路径的自动补全。
说明:用命令 ssh-copy-id 可以自动完成公钥的复制操作。如:
$ ssh-copy-id username@hostname
但上面的命令很可能不成功。参考:http://superuser.com/questions/189376/ssh-copy-id-does-not-work
59.1.1. .ssh 必须设置正确的权限
远程主机上的 .ssh 目录及其中的 authorized_keys 文件必须设置正确的权限:
$ chown -R username:username /home/username/.ssh
$ chmod 700 /home/username/.ssh
$ chmod 600 /home/username/.ssh/authorized_keys
59.1.2. 为不同的 Host 指定不同私钥文件(配置 IdentityFile)
如果不同 Host 使用不同的密钥对,你可以在~/.ssh/config 中通过为 Host 配置不同 IdentityFile 来定制某个 Host 所要使用的私钥文件。如:
Host *
IdentityFile ~/.ssh/id_rsa

Host *.github.*
IdentityFile ~/.ssh/github_id.rsa

Host *.someother.com
IdentityFile ~/.ssh/someother_id.rsa
参考:https://superuser.com/questions/287651/can-i-have-multiple-ssh-keys-in-my-ssh-folder
59.2. 保存常用的服务器地址
可以把服务器地址提前放入到文件中,~/.ssh/config,连接时只指定名字即可。
如:
$ cat .ssh/config
Host AIX
 Hostname xx1.yy1.com

Host Soloris
 Hostname xx2.yy2.com
连接时使用 ssh AIX 就相当于 ssh xx1.yy1.com
参考:
http://unix.stackexchange.com/questions/61655/multiple-similar-entries-in-ssh-config
配置文件的格式说明,可参考: man ssh_config
59.2.1. 自动补全~/.ssh/config 中配置的机器名
在~/.bashrc 中加入下面的内容即可。
_ssh()
{
    local cur prev opts
    COMPREPLY=()
    cur="${COMP_WORDS[COMP_CWORD]}"
    prev="${COMP_WORDS[COMP_CWORD-1]}"
    opts=$(grep '^Host' ~/.ssh/config | awk '{print $2}')

    COMPREPLY=( $(compgen -W "$opts" -- ${cur}) )
    return 0
}
complete -F _ssh ssh
参考:
http://unix.stackexchange.com/questions/136351/autocomplete-server-names-for-ssh-and-scp
59.3. 多条连接共享
如果你需要在多个窗口中打开到同一个服务器的连接,而不想每次都输入用户名,密码,或是等待连接建立,那么你可以配置 SSH 的连接共享选项,在本地(不是服务器上)打开你的 SSH 配置文件,通常它们位于~/.ssh/config,然后添加下面 2 行:
ControlMaster auto
ControlPath /tmp/ssh_mux_%h_%p_%r
现在试试断开你与服务器的连接,并建立一条新连接,然后打开一个新窗口,再创建另一条连接,你会发现,第二条连接几乎是在瞬间就建立好了。
59.4. 保持连接活跃
当一段时间没有操作时,连接可能被服务器关闭。可以通过下面方法来保持连接。
方法一:
$ ssh -o ServerAliveInterval=10 your.server.com
方法二:
保存设置到文件 ~/.ssh/config 中,如:
# This is ~/.ssh/config
# For all hosts
ServerAliveInterval 10
59.5. 不进行公钥检查(-o StrictHostKeyChecking=no)
ssh 连接远程主机时,会检查主机的公钥。如果是第一次连接该主机,会显示该主机的公钥摘要,弹出公钥确认的提示,提示用户是否信任该主机(Yes/no)。当选择 Yes 接受,就会将该主机的公钥追加到文件“~/.ssh/known_hosts” 中。当再次连接该主机时,就不会再提示该问题了。
在 ssh 或 scp 命令中增加选项 -o StrictHostKeyChecking=no ,可以跳过公钥检查。
60. strace, ltrace, mtrace
61. strings
strings 命令的功能是显示文件中的可打印字符。常用来在二进制文件中查找字符串,比如查找某一个函数或者字符串是否在某一个库中。
默认情况下,strings 只显示文件里包含的所有 4 个或以上连续可打印字符的字符串。这可以通过 -n 选项来修改。
默认情况下,strings 只显示 object file 中的初始化段和装载段的字符串。可以指定选项 -a 或-all 来让 strings 描述整个 object file.
例如:
$ cat test1.c
int main(void) {
  return printf("hello world\n");
}
$ gcc -o a.out test1.c
$ strings ./a.out
/lib64/ld-linux-x86-64.so.2
__gmon_start__
libc.so.6
printf
__libc_start_main
GLIBC_2.2.5
fff.
=p
l$ L
t$(L
|$0H
hello world
;*3$"
说明:不同环境下输出可能不一样。
62. stty
stty - change and print terminal line settings
显示当前所有设置:
$ stty -a
speed 38400 baud; rows 45; columns 159; line = 0;
intr = ^C; quit = ^\; erase = ^?; kill = ^U; eof = ^D; eol = M-^?; eol2 = M-^?; swtch = M-^?; start = ^Q; stop = ^S; susp = ^Z; rprnt = ^R; werase = ^W;
lnext = ^V; flush = ^O; min = 1; time = 0;
-parenb -parodd cs8 hupcl -cstopb cread -clocal -crtscts
-ignbrk brkint -ignpar -parmrk -inpck -istrip -inlcr -igncr icrnl ixon -ixoff -iuclc ixany imaxbel iutf8
opost -olcuc -ocrnl onlcr -onocr -onlret -ofill -ofdel nl0 cr0 tab0 bs0 vt0 ff0
isig icanon iexten echo echoe echok -echonl -noflsh -xcase -tostop -echoprt echoctl echoke
从上面输出可以看到:
Ctrl-c,向当前 job 发送 INT (interrupt)信号;
Ctrl-\,向当前 job 发送 QUIT 信号。
一般情况下,Ctrl-c 就能正常中止当前 job,只有当 Ctrl-c 无效时,才使用 Ctrl-\。因为 Ctrl-c 使 job 有机会 clean up。
63. sudo
sudo - execute a command as another user
63.1. 切换到 root 用户
可用下面命令切换到 root 用户(不一定成功,取决于当前系统的配置):
$ sudo su
非交互模式(不会提示输入密码):
$ sudo -n su
注:如果需要输入密码,会直接报错。
63.2. 查看 sudo 的配置文件等信息
先切换到 root 用户(这样可以显示更多信息),再运行:
root@debian8:~# sudo -V
Sudo version 1.8.10p3
Configure options: --prefix=/usr -v --with-all-insults --with-pam --with-fqdn --with-logging=syslog --with-logfac=authpriv --with-env-editor --with-editor=/usr/bin/editor --with-timeout=15 --with-password-timeout=0 --with-passprompt=[sudo] password for %p:  --disable-root-mailer --with-sendmail=/usr/sbin/sendmail --with-rundir=/var/lib/sudo --mandir=/usr/share/man --libexecdir=/usr/lib/sudo --with-sssd --with-sssd-lib=/usr/lib/x86_64-linux-gnu --with-selinux --with-linux-audit
Sudoers policy plugin version 1.8.10p3
Sudoers file grammar version 43

Sudoers path: /etc/sudoers
Authentication methods: 'pam'
Syslog facility if syslog is being used for logging: authpriv
Syslog priority to use when user authenticates successfully: notice
Syslog priority to use when user authenticates unsuccessfully: alert
Send mail if user authentication fails
Send mail if the user is not in sudoers
Use a separate timestamp for each user/tty combo
Lecture user the first time they run sudo
Require users to authenticate by default
Root may run sudo
Allow some information gathering to give useful error messages
Require fully-qualified hostnames in the sudoers file
Visudo will honor the EDITOR environment variable
Set the LOGNAME and USER environment variables
Length at which to wrap log file lines (0 for no wrap): 80
Authentication timestamp timeout: 15.0 minutes
Password prompt timeout: 0.0 minutes
Number of tries to enter a password: 3
Umask to use or 0777 to use user's: 022
Path to mail program: /usr/sbin/sendmail
Flags for mail program: -t
Address to send mail to: root
Subject line for mail messages: *** SECURITY information for %h ***
Incorrect password message: Sorry, try again.
Path to lecture status dir: /var/lib/sudo/lectured
Path to authentication timestamp dir: /var/lib/sudo/ts
Default password prompt: [sudo] password for %p:
Default user to run commands as: root
Value to override user's $PATH with: /usr/local/sbin:/usr/local/bin:/usr/sbin:/usr/bin:/sbin:/bin
Path to the editor for use by visudo: /usr/bin/editor
When to require a password for 'list' pseudocommand: any
When to require a password for 'verify' pseudocommand: all
File descriptors >= 3 will be closed before executing a command
Reset the environment to a default set of variables
Environment variables to check for sanity:
	TZ
	TERM
	LINGUAS
	LC_*
	LANGUAGE
	LANG
	COLORTERM
Environment variables to remove:
	RUBYOPT
	RUBYLIB
	PYTHONUSERBASE
	PYTHONINSPECT
	PYTHONPATH
	PYTHONHOME
	TMPPREFIX
	ZDOTDIR
	READNULLCMD
	NULLCMD
	FPATH
	PERL5DB
	PERL5OPT
	PERL5LIB
	PERLLIB
	PERLIO_DEBUG
	JAVA_TOOL_OPTIONS
	SHELLOPTS
	GLOBIGNORE
	PS4
	BASH_ENV
	ENV
	TERMCAP
	TERMPATH
	TERMINFO_DIRS
	TERMINFO
	_RLD*
	LD_*
	PATH_LOCALE
	NLSPATH
	HOSTALIASES
	RES_OPTIONS
	LOCALDOMAIN
	CDPATH
	IFS
Environment variables to preserve:
	XAUTHORIZATION
	XAUTHORITY
	PS2
	PS1
	PATH
	LS_COLORS
	KRB5CCNAME
	HOSTNAME
	DISPLAY
	COLORS
Locale to use while parsing sudoers: C
Directory in which to store input/output logs: /var/log/sudo-io
File in which to store the input/output log: %{seq}
Add an entry to the utmp/utmpx file when allocating a pty
PAM service name to use
PAM service name to use for login shells
Attempt to establish PAM credentials for the target user
Create a new PAM session for the command to run in
Maximum I/O log sequence number: 0
Enable sudoers netgroup support

Local IP address and netmask pairs:
	192.168.1.105/255.255.255.0
	fe80::a00:27ff:fe9c:e5f4/ffff:ffff:ffff:ffff::

Sudoers I/O plugin version 1.8.10p3
63.3. 传递环境变量(-E)
默认地,当前用户的环境变量不会应用到 sudo 启动的程序,除非使用 -E 选项。
64. SystemTap(stap, 内核调试工具)
SystemTap 是一个内核调试工具。
安装 SystemTap 的过程(Ubuntu 14.04):
第 1 步:安装 stap
$ sudo apt-get install systemtap
第 2 步:安装匹配的内核调试文件(如果只是监视用户代码,则不需要内核调试文件)
To use systemtap you need to manually install the linux-image-X-dbg and linux-header-X packages that match your running kernel. To simplify this task you can use the stap-prep command.
运行 stap-prep 工具会提示需要安装哪个内核调试文件。
第 3 步:加入当前用户(如 jack)到组 stapusr 和 stapdev
$ sudo adduser jack stapusr
$ sudo adduser jack stapdev
参考:
http://blog.jeffli.me/blog/2014/10/10/install-systemtap-in-ubuntu-14-dot-04/
https://wiki.ubuntu.com/Kernel/Systemtap#Where_to_get_debug_symbols_for_kernel_X.3F
64.1. Tips
问题:待分析的程序需要环境变量才能运行,无法直接启动。
如 prog 需要设置一些环境变量,无法在 stap 中直接用-c 参数启动。
$ stap -v -e 'probe process("./prog").function("main") {printf("%s\n", $$parms$$); }' -c "./prog"
出现错误:
error while loading shared libraries.....
注: $$parms$$ 是 stap 内置的用来显示函数参数的记号。
解决办法:写一个类似下面 wrapper
$ cat 1.sh
. ./setenv
./prog
再用-c 启动上面的 wrapper 程序:
$ stap -v -e 'probe process("./prog").function("main") {printf("%s\n", $$parms$$); }' -c "sh ./1.sh"
65. testdisk(数据恢复软件)
testdisk 是一个开源的数据恢复软件。
Debian 系统中可用如下方法安装:
$ sudo apt-get install testdisk
注:亲自测试,testdisk 恢复数据非常有效!
66. top
top 可动态地显示进程的信息。
备注:不同系统中 top 命令选项的差异很大。这里仅介绍 Linux 中的 top 命令。
常用的排序命令:
F 或者 O 指定对哪列进行排序。
R 反向排序。
M 按内存排序。
P 按 CPU 排序。
T 按使用时间排序。
top 第二列是 CPU 相关信息,如:
%Cpu(s): 1.3 us, 0.5 sy, 0.0 ni, 98.1 id, 0.1 wa, 0.0 hi, 0.1 si, 0.0 st
每个字段含义如下:
us, user    : time running un-niced user processes
sy, system  : time running kernel processes
ni, nice    : time running niced user processes
id, idle    : time spent in the kernel idle handler
wa, IO-wait : time waiting for I/O completion
hi : time spent servicing hardware interrupts
si : time spent servicing software interrupts
st : time stolen from this vm by the hypervisor
66.1. 非交互模式(-b 选项)
进入非交互模式,不接受用户交互,仅输出信息。常用来保存某时刻的状态。
$ top -b -n1 > top.log
$ top -b -n2 > top.log2
不加 -b 选项,无法得到所有进程的信息,且输出信息中含很多特殊字符。
66.2. 显示线程(-H 选项)
top 默认只显示进程信息,使用 -H 选项可以让其显示线程信息。
66.3. top 原理(如何隐藏进程)
Linux 中 top 显示的进程相关信息是从哪里来的?其实是遍历目录 /proc/ 而来的。
这给我们隐藏进程提供了思路,遍历目录会使用 readdir ,如果我们让 readdir 跳过 /proc/PID/ 目录(通过 LD_PRELOAD 可以修改 readdir 的行为),就可以使指定进程在 top 中不显示了。
按照这个思路实现隐藏进程,已经有别人实践过了,参考:https://github.com/gianlucaborello/libprocesshider
注:Linux 中使用 ps 查看进程信息也是遍历目录 /proc/ ,所以这个方案也可以使指定进程在 ps 中不显示。
67. troff(tbl, pic, eqn)
troff 是一个由 AT&T 为 Unix 开发的文字处理软件。
pic 也是 troff 的预处理器,Linux 都会自带这个小工具。它的作用仅仅是把一段文本中标识符.PS 和.PE 之间的指令,即 pic 语言,解释成 troff 语言,最终实际是由 troff 绘图。
另外还有两个类似 pic 的预处理工具是 eqn 和 tbl,顾名思义分别是用作绘制公式和表格的。
参考:
http://www.troff.org/prog.html
http://blog.jqian.net/post/pic.html
68. tsort
tsort 是进行拓扑排序的工具。
拓扑排序是对有向无环图的一种排序。表示了顶点按边的方向出现的先后顺序。如果有环,则无法表示两个顶点的先后顺序了。
在生活中,也有拓扑排序的应用,如课程表设计,要先完成一些基础课后才可以继续修专业课;
在软件开发中,如多个模块之间的依赖关系,编译顺序;
在项目管理中,各个任务的先后次序,某些任务完成之后才能进行其它的任务等。
68.1. 简单的拓扑排序算法
简单的拓扑排序算法:找到任意入度为 0 的一个顶点,删除它及所有相邻的边,再找入度为 0 的顶点,以此类推,直到删除所有顶点。顶点的删除顺序即为拓扑排序顺序。
68.2. 实例:输出函数调用前后顺序
下面例子来自 info tsort。
文件 call-graph 中保存了 C 程序中函数之前的调用关系(看起来像 tail 命令的实现),文件第一行表明 main 调用了 parse_options,第二行表明 main 调用了 tail_file,以此类推。
$ cat call-graph
main parse_options
main tail_file
main tail_forever
tail_file pretty_name
tail_file write_header
tail_file tail
tail_forever recheck
tail_forever pretty_name
tail_forever write_header
tail_forever dump_remainder
tail tail_lines
tail tail_bytes
tail_lines start_lines
tail_lines dump_remainder
tail_lines file_lines
tail_lines pipe_lines
tail_bytes xlseek
tail_bytes start_bytes
tail_bytes dump_remainder
tail_bytes pipe_bytes
file_lines dump_remainder
recheck pretty_name
执行下面命令:
$ tsort call-graph | tac
dump_remainder
start_lines
file_lines
pipe_lines
xlseek
start_bytes
pipe_bytes
tail_lines
tail_bytes
pretty_name
write_header
tail
recheck
parse_options
tail_file
tail_forever
main
上面的输出,排在前面的函数可能被排在后面的函数调用;而排在后面的不可能被排在前面的调用。
69. useradd 和 gpasswd 等用户管理命令
| 命令 | 说明 |
|---|---|
| useradd | 增加用户 |
| passwd | 给用户设置密码 |
| userdel | 删除用户 |
| groups | 查看用户在哪些组中 |
| gpasswd | 管理用户组 |
69.1. gpasswd
gpasswd 把用户加入组:
$ sudo gpasswd -a jack vboxusers # 把用户jack加入到vboxusers用户组里:
gpasswd 把用户从组中删除:
$ sudo gpasswd -d userName groupName
说明:
usermod 也能把用户加入到组中,但不要这样使用!为什么?请参考: don't use usermod -- use gpasswd
69.2. useradd 和 adduser 的区别
useradd is native binary compiled with the system.
In Debain systems, adduser is a perl script which uses useradd binary in back-end.
In Redhat systems, adduser is present as a symbolic link to useradd command.
69.3. 查看系统中所有的用户组
查看系统中所有的用户组没有单独的命令,可用下面的方法:
$ cut -d: -f1 /etc/group
69.4. Tips
69.4.1. useradd 在 NIS+环境下反应很慢(使用 luseradd)
问题描述:当 redhat 中集成了 NIS+做用户管理后,运行 useradd 增加一个本地账户时可以会花费很长时间(如超过 1 个小时),原因可能是 useradd 需要查询 NIS+服务器。
解决办法:不使用 useradd 增加本地账户,而是使用 luseradd/luserdel/lgroupadd/lgroupdel 等工具。
69.4.2. NIS+环境下新本地用户无法登录
创建本地的新用户(db2inst1,db2fenc1,db2das1)后,发现无法登录。
解决办法:修改/etc/passwd,把新增加的用户对应的记录从文件的最后位置移动到 NIS+用户的相关配置之前。
$ tail -n 12 /etc/passwd
ldap:x:55:55:LDAP User:/var/lib/ldap:/bin/false
nslcd:x:65:55:LDAP Client User:/:/sbin/nologin
usbmuxd:x:113:113:usbmuxd user:/:/sbin/nologin
+@nis1_access
+@nis2_access
+
db2inst1:x:506:732:db2inst1:/local/home/db2inst1:/bin/bash
db2fenc1:x:507:1004:db2fenc1:/local/home/db2fenc1:/bin/bash
db2das1:x:507:675:db2das1:/local/home/db2das1:/bin/bash
修改完成后,变成:
$ tail -n 12 /etc/passwd
ldap:x:55:55:LDAP User:/var/lib/ldap:/bin/false
nslcd:x:65:55:LDAP Client User:/:/sbin/nologin
usbmuxd:x:113:113:usbmuxd user:/:/sbin/nologin
db2inst1:x:506:732:db2inst1:/local/home/db2inst1:/bin/bash
db2fenc1:x:507:1004:db2fenc1:/local/home/db2fenc1:/bin/bash
db2das1:x:507:675:db2das1:/local/home/db2das1:/bin/bash
+@nis1_access
+@nis2_access
+
69.4.3. NIS+环境下无法用 su 切换本地账号
在 root 下修改了某个本地账号的密码,但其它普通用户无法用 su 切换到该用户(输入了正确的密码),总提示密码错误!
解决办法:编辑文件/etc/nsswitch.conf
做下面的修改:
passwd: compat
shadow: compat
--->
passwd: files ldap
shadow: files ldap
70. VNC(Virtual Network Computing)
Ubuntu 系统中,vnc 服务器(realvnc 是收费的,而 tightvnc 是免费的)的安装命令如下:
$ sudo apt install tightvncserver # 端口从 5901 开始
注:如果服务器上没有任何 X 环境,则 vnc 客户端连接时,无法启动 X,可能提示下面错误:
Xsession: unable to start X session --- no "/home/user1/.xsession" file, no
"/home/user1/.Xsession" file, no session managers, no window managers, and no
terminal emulators found; aborting.
Ubuntu 下安装 X 环境的命令如下:
$ sudo apt install xfce4    # 安装 xfce 环境
$ sudo apt install lxde     # 或者,安装 lxde 环境(更推荐),/etc/X11/Xsession
启动 vnc 服务器:
$ vncserver
启动正常后,会在输出中显示 session 号。
修改密码:
$ vncpasswd
删除自己的 session(假设 session 号为 1):
$ vncserver -kill :1
共享剪贴板:
在 VNC View 中打开一个 Terminal,输入 vncconfig 会启动一个配置窗口(默认共享剪贴板相关选项都已经被选上),这时就可以共享剪贴板了。
说明:vncconfig 的窗口不能关闭,一旦关闭将不能再共享剪贴板。如果觉得窗口碍事,可以运行:
$ vncconfig -nowin &
70.1. Tips:设置分辨率
如果 vncserver 还没有启动,则可以通过 vncserver 的参数 -geometry XXXxYYY 来设置分辨率,如:
$ vncserver -geometry 1920x1024
下面介绍已经通过 VNC 连接服务器后,如何通过 xrandr 调整分辨率。
在远程机器(VNC 窗口中的机器)上,执行 xrandr 命令,会显示当前的分辨率和可以设置的分辨率列表。下面是它运行输出的一个例子:
$ xrandr
Screen 0: minimum 640 x 480, current 1024 x 768, maximum 1920 x 1200
default connected 1024x768+0+0 0mm x 0mm
   1920x1200      60.0
   1920x1080      60.0
   1600x1200      60.0
   1680x1050      60.0
   1400x1050      60.0
   1360x768       60.0
   1280x1024      60.0
   1280x960       60.0
   1280x800       60.0
   1280x720       60.0
   1024x768       60.0*
   800x600        60.0
   640x480        60.0
上面输出中,行末尾有星号标记的那行是正在使用的分辨率。
要改为其它的分辨率,可以使用 xrandr -s 命令。 例如:
$ xrandr -s "1280x720"
$ xrandr -s 9                 # 同上。数字9为1280x720在上面分辨率列表中的标号(第一个的标号为零)
上面命令执行完后,分辨率会马上更改为“1280x720”。
70.1.1. 增加新分辨率
用 xrandr -s 命令只能设置 xrandr 命令列出的已经存在的分辨率。如何增加一个新的分辨率呢?
第一步,用 cvt 命令生成一个分辨率的 modeline。
假设我们要增加的新分辨率为“1024x1600”(这个分辨率适合于竖立的显示器),则用 cvt 生成 modeline 的方法如下:
$ cvt 1024 1600 60
# 1024x1600 59.90 Hz (CVT) hsync: 99.32 kHz; pclk: 138.25 MHz
Modeline "1024x1600_60.00"  138.25  1024 1104 1208 1392  1600 1603 1613 1658 -hsync +vsync
第二步,复制上面的输出,通过 xrandr --newmode 命令告诉 xrandr。
$ xrandr --newmode "1024x1600_60.00" 138.25 1024 1104 1208 1392 1600 1603 1613 1658 -hsync +vsync
第三步,通过 xrandr --addmode 命令增加这个分辨率。
$ xrandr --addmode OUTPUT 1024x1600_60.00 # you need change OUTPUT to VGA-0/default/etc.
说明:上面命令中的 OUTPUT 需要修改为 xrandr 输出中的对应值,如运行 xrandr 后其输出像下面这样:
$ xrandr
Screen 0: minimum 640 x 480, current 1024 x 768, maximum 1920 x 1200
default connected 1024x768+0+0 0mm x 0mm
......
则 OUTPUT 就是“default”,即把前面的命令改为:
$ xrandr --addmode default 1024x1600_60.00
第四步,通过 xrandr -s 设置分辨率为新增加的分辨率。
$ xrandr -s 1024x1600
70.2. Tips:修改端口
默认,vnc 服务器会监听在 5901, 5902 等端口。通过选项 -rfbport 可以修改端口,如:
$ vncserver -rfbport 8000 # 让 vnc 服务器会监听在 8000 端口
vncserver is a wrapper for Xvnc. -rfbport 属于 Xvnc 的选项,参考 man Xvnc
70.3. Tips:成功连接后只有灰色背景
vnc client 成功连接后,只看到一个灰色的背景。为了启动桌面,编辑文件 ${HOME}/.vnc/xstartup 把最后一行 /etc/X11/Xsession 换为 /usr/bin/startlxde(假设你安装的是 lxde)。如:
#!/bin/sh

xrdb $HOME/.Xresources
xsetroot -solid grey
# x-terminal-emulator -geometry 80x24+10+10 -ls -title "$VNCDESKTOP Desktop" &
# x-window-manager &

# Fix to make GNOME work
export XKL_XMODMAP_DISABLE=1
/etc/X11/Xsession
修改为:
#+begin_example
#!/bin/sh

xrdb $HOME/.Xresources
xsetroot -solid grey
x-terminal-emulator -geometry 80x24+10+10 -ls -title "$VNCDESKTOP Desktop" &
x-window-manager &

# Fix to make GNOME work
export XKL_XMODMAP_DISABLE=1
# /etc/X11/Xsession
/usr/bin/startlxde
71. wget
wget 是常用的一个非交互式下载工具。
实例:断点续传(-c)
$ wget -c http://example.com/really-big-file.iso
其中 -c 选项的作用为断点续传。
实例:批量下载(-i)
$ wget -i filename.txt
把所有需要下载文件的地址放到 filename.txt 中,然后 wget 就会自动为你下载所有文件了。
实例:镜像备份
$ wget -mk -w 20 http://www.example.com/
说明:
-m 表示镜像下载。
-k(或者--convert-links) 表示转换连接,HTML 文件存盘时,将其中的非相对连接转换成为相对连接。
-w 20 表示间隔 20 秒下载一个文件,这样可以避免网站的访问过于频繁。
注:如果网站中的图像是放在另外的站点上,那么还应该再加上 -H 选项(表示当递归时转到外部主机)。
实例:下载时不发送 User-Agent
有时会现在用浏览器能正常访问,但用 wget 却不能下载的情况,出现下面类似的错误,这很可能是服务器对 wget 做下载限制。
HTTP request sent, awaiting response... 403 Forbidden
解决办法:清除 wget 发送的 User-Agent,即设置--user-agent 为空:
$ wget -k --user-agent="" http://www.xxx.com/index.html
实例:忽略 robots.txt 协议进行下载(-e robots=off)
默认地,wget 会尊重网站的 robots.txt,如果 robots.txt 里有“User-agent: * Disallow: /”,那么 wget 无法镜像网站或者下载目录。增加“-e robots=off”选项可去除这个限制。
参考:https://www.gnu.org/software/wget/manual/html_node/Wgetrc-Commands.html
72. whatis
如果只想知道某个命令或函数的简单介绍,可以用 whatis 命令。如:
$ whatis scp
scp (1)              - secure copy (remote file copy program)
如果命令或函数存在于多个章节中,会全部显示出来。如:
$ whatis sleep
sleep (1)            - delay for a specified amount of time
sleep (3)            - sleep for the specified number of seconds
注:whatis command 的输出其实就是 man command 输出的 NAME 节部分的内容。
73. wine
Wine (recursive acronym for Wine Is Not an Emulator) is a free and open source compatibility layer software application that aims to allow applications designed for Microsoft Windows to run on Unix-like operating systems.
Tips:64 位 Linux 系统下,最好设置环境变量 WINEARCH 为 win32,这样更加运行稳定!
73.1. wine 安装 office2007
测试环境:
Ubuntu 14.04
安装过程比较顺利,有两点要特别注意:
- 启动 wine 前必须设置环境变量 WINEARCH 为 win32(只有在纯 32 位环境下 office 2007 才稳定,否则会出现各种问题)
- 运行 winecfg 时,在 libraries 中必须设置 riched20 为 native(如果不设置的话 PowerPoint 无法启动!)
问题:英文系统中无法输入中文
思路:在用 wine 启动程序前先设置 LC_ALL=zh_CN.UTF8
具体办法:修改文件夹~/.local/share/applications/中的 desktop 文件。
$ find . -name "wine-extension*" -print0 | xargs -0 sed -i 's/ wine / LC_ALL=zh_CN.UTF8 wine /g'
参考:
Ubuntu 12.04 的 wine1.6 里安装 Microsoft Office 2010: http://linzhibin824.blog.163.com/blog/static/73557710201362743945309/
73.1.1. 安装插件 SaveAsPDFandXPS
微软官方有 SaveAsPDFandXPS.exe 的下载,下载后用 wine 直接安装即可!
73.2. wine 中文乱码
wine 乱码问题的原因很简单:一些 windows 有的字体,在 Linux 下却不存在,因此就产生了乱码。最常见的乱码现象是大部分中文对话框里的“确定”、“放弃”等功能钮变成了“口”或者是“<<"等字符。
方法 1:通过修改注册表,把默认字体设置为系统中存在的字体。
方法 2:安装缺失的字体。
注:如果是英文系统,试试在启动 wine 时,输入如下命令:
$ env LANG="zh_CN.UTF-8" wine program.exe
74. wkhtmltopdf
wkhtmltopdf and wkhtmltoimage are open source (LGPLv3) command line tools to render HTML into PDF and various image formats using the Qt WebKit rendering engine.
wkhtmltopdf 默认生成的 pdf 大小为 A4、会按照网页结构生成书签。
实例 1:把 google 主页保存为 google.pdf
$ wkhtmltopdf http://google.com google.pdf
实例 2:把http://www.xx.com/1.html 保存为 1.pdf,且设置页面大小为 A3,不要生成书签。
$ wkhtmltopdf -L 5mm -R 5mm -T 5mm -B 0mm -s A3 --no-outline http://www.xx.com/1.html 1.pdf
说明:
-L 5mm -R 5mm -T 5mm -B 0mm 的作用为设置左右上下的页边距。
-s A3 的作用是设置页面大小。
--no-outline 的作用是不生成书签。
如果发现背景太深,则可使用这个选项去掉背景: --no-background
乱码问题及其解决:
如果网页的编码格式不为 utf-8,比如编码格式为 gb2312 或 GBK,则中文网页可能会出现乱码的现象。(在 Windows 下发现的这个问题,在 Linux 下好像没有!)
仔细阅读 wkhtmltopdf 的帮助信息,发现有个选项--encoding,但是加入参数--encoding GBK 或--encoding GB2312 也没有解决乱码的问题。
解决办法:先把页面用浏览器保存到本地,用记事本打开,选择另存为,把编码 ANSI 改为 UTF-8,把本地路径的 URL 用 wkhtmltopdf 转换一下即可生成对应的 pdf。
75. write 和 wall 和 mesg
write
向某个用户发送消息。用法:write user [tty]
wall
发消息给所有用户。
mesg
用来控制是否接收消息。
76. xargs
xargs reads items from the standard input, delimited by blanks (which can be protected with double or single quotes or a backslash) or newlines, and executes the command (default is /bin/echo) one or more times with any initial-arguments followed by items read from standard input. Blank lines on the standard input are ignored.
从标准输入获取参数(称为 items,以 blank 或 newline 分隔),并执行命令。
基本格式为:xargs [command [initial-arguments]]
76.1. 实例:xargs 行为的说明
$ cat 1.txt
123 456 789
   abc   def
$ xargs <1.txt cat -n
cat: 123: No such file or directory
cat: 456: No such file or directory
cat: 789: No such file or directory
cat: abc: No such file or directory
cat: def: No such file or directory
如果当前文件夹中不存在名为 123,456,789, abc,def 的文件,则执行 xargs <1.txt cat -n 会提示上面的错误。如何理解?
xargs <1.txt cat -n 相当于把 1.txt 中的内容按空格和空行分隔,作为后面命令的参数。即相当于执行 cat -n 123 456 789 abc def
76.2. xargs 和 find 连用
find 是个很强大的命令,它自己也有-exec 这样的参数可以用来执行命令。但它不够直观,我们可以用 xargs 来实现相同的功能。
在当前目录下查找“*.bak”文件,然后将查找出的内容传给后面的“rm”命令
$ find . -name "*.bak" -exec rm {} \;
下面的命令实现了相同的功能,且更容易理解:
$ find . -name "*.bak" | xargs rm
但有个问题:我们知道在 Linux 下空格和换行都可以用来文件名。而 xargs 以空格和换行做分隔,这样就有麻烦了,xargs 会把一个中间有一空格的文件名处理为两个文件。
这个问题可通过改变 xargs 的默认分隔符来解决。
$ find . -name "*.bak" -print0 | xargs -null rm
$ find . -name "*.bak" -print0 | xargs -0 rm      # 和前面相同
xargs 指定-null 或-0,将以 null 字符做分隔符读取 items。find 指定-print0,输出以 null 字符分隔的列表。(特别注意:-print0 必须放最后面,千万不能这么写 find . -print0 -name "*.bak" | xargs -0 rm,否则当前文件夹的内容会被清空!)
76.3. 指定一次提交多少个 items(选项 -n)
每次向后面的命令提交多少个 item?可以通过 -n 选项指定。
考虑前面的例子,如 xargs -n 2 <1.txt cat -n ,指定每次提交 2 个 items,这相当于执行如下三次 cat 命令:
cat -n 123 456
cat -n 789 abc
cat -n def
我们知道,在删除大量文件时,容易出现“参数列太长”或“参数列溢出”的错误。这时 -n 选项非常有用!
$ ls | xargs -n 20 rm -fr
ls 输出所有的文件名(用换行分割),xargs 将 ls 的输出,每 20 个为一组,传递为 rm -rf 的参数。
也就是说将所有文件名 20 个为一组,由 rm -rf 删除,这样就不会超过命令行的长度了。
76.4. 指定一次提交多少行 items(选项 -L)
选项 -L 和 -n 类似,但是它指定每次提交多少行 item。
接前面例子, xargs -L 1 <1.txt cat -n 相当于执行:
$ cat -n 123 456 789
$ cat -n abc def
76.5. 指定 item 的占位符(选项 -I)
指定一个替换 item 的字符(如 {} ),command 后的 {} 都会替换成 item。
如,把当前文件夹下的所有文件都复制一份:
$ ls |xargs -I{} cp {} {}.bak
$ ls |xargs -Iabc cp abc abc.bak   # 和上面功能一样。但不推荐这样写。
注:指定 -I 后,隐含着指定 -L 1 。
76.6. 显示 xargs 执行的命令(选项 -t)
指定 -t 后,在执行具体命令前,先会打印出命令!
$ seq 2 |xargs -t -I{} echo {}
echo 1                      # 执行命令前打印出命令
1
echo 2                      # 执行命令前打印出命令
2
77. xhost
xhost is a program that controls access for X server.
问题:在 VNC Viewer 中可以在终端中正常启动 xclock,但如果在终端中切换为另一用户后,却无法启动 xclock,提示下面错误:
No protocal specified
Error: Can't open display: :1.0
解决办法:在切换用户之前,先在终端中运行下面命令:
$ xhost +
access control disabled, clients can connect from any host
再切换用户,可正常启动 xclock。
78. xmodmap
xmodmap is a simple tool that lets you remap/swap keys for apps running under X11.
Example:Swap {Return, End}
Creat a file at ~/.Xmodmap with this content:
! -*- coding: utf-8 -*-
! swap keys {return, end}

! keycode  36 = Return NoSymbol Return
! keycode 115 = End NoSymbol End
keycode 36 = End NoSymbol End
keycode 115 = Return NoSymbol Return
Then run xmodmap ~/.Xmodmap.
79. xsel
xsel 是对 X selection 操作的程序。The X server maintains three selections, called PRIMARY, SECONDARY and CLIPBOARD.
| selection 类型 | 显示其内容的方法 | 说明 |
|---|---|---|
| primary | xsel -p -o | 鼠标中键操作的是这个 selection |
| secondary | xsel -s -o | 很少使用 |
| clipboard | xsel -b -o | Ctrl+C, Ctrl+V 使用这个 selection |
80. yacc
BtYacc: BackTracking Yacc
a BtYacc patch page: http://www.vendian.org/mncharity/dir3/btyacc/
80.1. BtYacc 应用
Q. Tell me more about the CobolTransformer Cobol parser.
A. It is written in BackTracking Yacc and C++. Lex is not used, lexer is written in C++. BackTracking Yacc is freely available from https://www.siber.com/btyacc. It is a regular Berkeley Yacc with modifications by Chris Dodd and by Vadim Maslov of Siber Systems. The most important improvement for us is that BtYacc may backtrack and thus parse languages that require lookahead of more than 1. Cobol is one of these languages.
81. yes
yes 命令重复的输出给定的字符串直到终止它,字符串后接行号符。 如果没有指定字符串,它重复的输出“y”直到终止它。有些脚本可能需要用户回答“y”或者“n”(例如:你确认要删除这个文件吗,[y/N])。
例如:
$ yes | apt-get install packagename # 这仅是演示yes的例子,使用apt-get -y install packagename更好
当然,你也可以让 yes 自动回复字符串“no”,如:
$ yes no | apt-get install packagename