ZooKeeper
Table of Contents
1. ZooKeeper 简介
ZooKeeper is a distributed, open-source coordination service for distributed applications. It exposes a simple set of primitives that distributed applications can build upon to implement higher level services for synchronization, configuration maintenance, and groups and naming.
主要摘自官方文档:https://zookeeper.apache.org/doc/trunk/zookeeperOver.html
1.1. ZooKeeper is replicated
Like the distributed processes it coordinates, ZooKeeper itself is intended to be replicated over a sets of hosts.
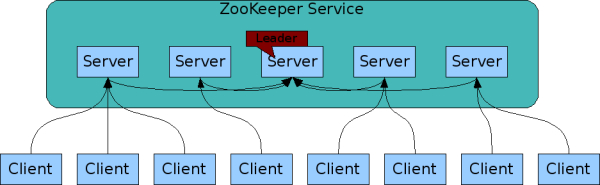
Figure 1: ZooKeeper Service
The servers that make up the ZooKeeper service must all know about each other. They maintain an in-memory image of state, along with a transaction logs and snapshots in a persistent store. As long as a majority of the servers are available, the ZooKeeper service will be available.
As part of the agreement protocol all write requests from clients are forwarded to a single server, called the leader. The rest of the ZooKeeper servers, called followers, receive message proposals from the leader and agree upon message delivery. The messaging layer takes care of replacing leaders on failures and syncing followers with leaders.
Clients connect to a single ZooKeeper server. The client maintains a TCP connection through which it sends requests, gets responses, gets watch events, and sends heart beats. If the TCP connection to the server breaks, the client will connect to a different server.
1.2. Data model and the hierarchical namespace
The name space provided by ZooKeeper is much like that of a standard file system. A name is a sequence of path elements separated by a slash (/). Every node in ZooKeeper's name space is identified by a path.
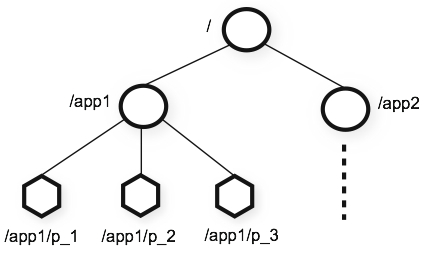
Figure 2: ZooKeeper's Hierarchical Namespace
Unlike standard file systems, each node in a ZooKeeper namespace can have data associated with it as well as children. It is like having a file-system that allows a file to also be a directory. We use the term znode to make it clear that we are talking about ZooKeeper data nodes.
1.3. Simple API
ZooKeeper provides a very simple programming interface.
| API | Meaning |
|---|---|
| create | creates a node at a location in the tree |
| delete | deletes a node |
| exists | tests if a node exists at a location |
| get data | reads the data from a node |
| set data | writes data to a node |
| get children | retrieves a list of children of a node |
| sync | waits for data to be propagated |
2. ZooKeeper 基本使用
2.1. Standalone Mode
为了简单起见,这里先介绍 standalone mode(即只有一个 server,如果这个 server 挂掉了就无法提供服务了,不要在生产系统中使用 standalone mode)下 ZooKeeper 的配置和使用。
下载 zookeeper-3.3.6.tar.gz (https://archive.apache.org/dist/zookeeper/zookeeper-3.3.6/ ),解压后结构如下:
cig01@MacBook-Pro ~/Downloads/zookeeper-3.3.6$ ls
CHANGES.txt              contrib                  src
LICENSE.txt              dist-maven               zookeeper-3.3.6.jar
NOTICE.txt               docs                     zookeeper-3.3.6.jar.asc
README.txt               ivy.xml                  zookeeper-3.3.6.jar.md5
bin                      ivysettings.xml          zookeeper-3.3.6.jar.sha1
build.xml                lib
conf                     recipes
2.1.1. 准备配置文件
准备配置文件 conf/zoo.cfg(会默认读取这个位置),其内容如下:
tickTime=2000
dataDir=/tmp/zookeeper
clientPort=2181
上面这三个配置参数的含义如表 2 所示。
| 配置参数 | 含义 |
|---|---|
| tickTime | the basic time unit in milliseconds used by ZooKeeper. It is used to do heartbeats and the minimum session timeout will be twice the tickTime. |
| dataDir | the location to store the in-memory database snapshots and, unless specified otherwise, the transaction log of updates to the database. |
| clientPort | the port to listen for client connections |
2.1.2. 启动 ZooKeeper server
启动 ZooKeeper server:
$ ./bin/zkServer.sh start
2.1.3. 启动 ZooKeeper client
启动 ZooKeeper client,连接到刚启动的 Server,如:
$ ./bin/zkCli.sh -server localhost:2181           # 端口2181来自配置文件conf/zoo.cfg中的clientPort设置
[zk: localhost:2181(CONNECTED) 0]
2.1.4. 测试基本命令
下面在 client 中测试几个基本命令,如 ls, create, get, set, delete:
[zk: localhost:2181(CONNECTED) 0] ls /
[zookeeper]
[zk: localhost:2181(CONNECTED) 1] create /zk_test my_data
Created /zk_test
[zk: localhost:2181(CONNECTED) 2] ls /
[zookeeper, zk_test]
[zk: localhost:2181(CONNECTED) 3] get /zk_test
my_data
cZxid = 0x2
ctime = Sat Jun 17 09:49:42 CST 2017
mZxid = 0x2
mtime = Sat Jun 17 09:49:42 CST 2017
pZxid = 0x2
cversion = 0
dataVersion = 0
aclVersion = 0
ephemeralOwner = 0x0
dataLength = 7
numChildren = 0
[zk: localhost:2181(CONNECTED) 4] set /zk_test my_new_data
cZxid = 0x2
ctime = Sat Jun 17 09:49:42 CST 2017
mZxid = 0x3
mtime = Sat Jun 17 09:50:05 CST 2017
pZxid = 0x2
cversion = 0
dataVersion = 1
aclVersion = 0
ephemeralOwner = 0x0
dataLength = 11
numChildren = 0
[zk: localhost:2181(CONNECTED) 5] get /zk_test
my_new_data
cZxid = 0x2
ctime = Sat Jun 17 09:49:42 CST 2017
mZxid = 0x3
mtime = Sat Jun 17 09:50:05 CST 2017
pZxid = 0x2
cversion = 0
dataVersion = 1
aclVersion = 0
ephemeralOwner = 0x0
dataLength = 11
numChildren = 0
[zk: localhost:2181(CONNECTED) 6] delete /zk_test
[zk: localhost:2181(CONNECTED) 7] ls /
[zookeeper]
2.2. Replicated Mode
前面介绍的是 ZooKeeper 单机模式,这是介绍一下 ZooKeeper 集群的部署。
由于手头没有多余机器,这里在一台机器上部署 3 个 ZooKeeper Server。
首先,创建 3 个文件夹(server1,server2,server3),并在每个文件夹中解压 ZooKeeper 的安装包。
~/Downloads/server1/zookeeper-3.3.6
~/Downloads/server2/zookeeper-3.3.6
~/Downloads/server3/zookeeper-3.3.6
然后,在每个文件夹中创建一个 data 目录,并在 data 目录中创建一个名为 myid 的文件,里面写入一个数字,比如 server1 对应 myid 文件就写入数字 1,server2 对应 myid 文件写入 2,server3 对应 myid 文件写入 3。
$ cat ~/Downloads/server1/data/myid
1
$ cat ~/Downloads/server2/data/myid
2
$ cat ~/Downloads/server3/data/myid
3
2.2.1. 配置 conf/zoo.cfg
进入到每个 server 的 ZooKeeper 安装目录下,创建 conf/zoo.cfg 文件,内容如下:
tickTime=2000
initLimit=10
syncLimit=5
dataDir=/Users/cig01/Downloads/server1/data/
clientPort=2181
server.1=127.0.0.1:2888:3888
server.2=127.0.0.1:2889:3889
server.3=127.0.0.1:2890:3890
注 1:由于 3 个 server 都运行在同一台机器上,所以 clientPort 应配置不同以避免端口冲突。
注 2: server.X=serverhost:port1:port2 中的 X 就是对应 data/myid 中的数字。每个 server 名字后面有两个端口,第一个端口 port1 用作集群成员的信息交换,第二个端口 port2 是在 leader 挂掉时用来进行重新选举 leader 所用。 由于 3 个 server 都运行在同一台机器上,这些端口都应该配置不同以避免端口冲突。
在我们例子中,3个 server 对应的配置文件分别为:
$ cat ~/Downloads/server1/zookeeper-3.3.6/conf/zoo.cfg
tickTime=2000
initLimit=10
syncLimit=5
dataDir=/Users/cig01/Downloads/server1/data/
clientPort=2181
server.1=127.0.0.1:2888:3888
server.2=127.0.0.1:2889:3889
server.3=127.0.0.1:2890:3890
$ cat ~/Downloads/server2/zookeeper-3.3.6/conf/zoo.cfg
tickTime=2000
initLimit=10
syncLimit=5
dataDir=/Users/cig01/Downloads/server2/data/
clientPort=2182
server.1=127.0.0.1:2888:3888
server.2=127.0.0.1:2889:3889
server.3=127.0.0.1:2890:3890
$ cat ~/Downloads/server3/zookeeper-3.3.6/conf/zoo.cfg
tickTime=2000
initLimit=10
syncLimit=5
dataDir=/Users/cig01/Downloads/server3/data/
clientPort=2183
server.1=127.0.0.1:2888:3888
server.2=127.0.0.1:2889:3889
server.3=127.0.0.1:2890:3890
2.2.2. 启动 ZooKeeper server
启动每一个 ZooKeeper server:
$ cd ~/Downloads/server1/zookeeper-3.3.6/
$ ./bin/zkServer.sh start
$ cd ~/Downloads/server2/zookeeper-3.3.6/
$ ./bin/zkServer.sh start
$ cd ~/Downloads/server3/zookeeper-3.3.6/
$ ./bin/zkServer.sh start
2.2.3. 启动 ZooKeeper client
可以指定连接到某一台 ZooKeeper server,如:
$ ./bin/zkCli.sh -server 127.0.0.1:2181
也可以指定多个 ZooKeeper server,用逗号分开即可,如:
$ ./bin/zkCli.sh -server 127.0.0.1:2182,127.0.0.1:2183
这时,ZooKeeper client 会从 server list 中随机选择一台 server 进行连接,连接不上时,会换一台 server。如果连接上的 server 突然挂掉,也会换一台 server 重新连接。
3. ZooKeeper 应用实例
利用 ZooKeeper 可以实现分布式 Queue,分布式 Barrier,分布式 Lock 等设施。
参考:
http://zookeeper.apache.org/doc/current/recipes.html
https://zookeeper.apache.org/doc/trunk/zookeeperTutorial.html
3.1. 实现分布式 Lock
利用 ZooKeeper 可以实现分布式 Lock。
3.1.1. 思路一(存在“惊群”现象)
思路一:加锁时,所有客户端尝试创建/lock 节点(EPHEMERAL 类型,即临时节点),只会有一个客户端创建成功,成功者获得锁,失败者利用 ZooKeeper 提供的 watch 机制等待/lock 节点变化的通知(当发现/lock 节点被删除后,失败者可以再次尝试创建/lock 节点)。解锁时,只要删除/lock 节点即可。
说明 1:/lock 节点必须是 EPHEMERAL 类型,如果获得锁的客户端发生 crash,/lock 节点会自动被删除,从而可以避免死锁。
说明 2:失败者也可以不利用 watch 机制来知道/lock 节点是否被删除,而是过一段时间后再测试。不过,很难知道要过“多久”重新测试才比较合适。
说明 3:这种方法的不足在于:如果很多客户端都在竞争锁,会产生“惊群”现象。
3.1.2. 思路二
思路二:加锁时,所有客户端创建“/lock-node/child-”(把节点类型设置为 EPHEMERAL_SEQUENTIAL)。如果客户端发现自身创建节点序列号(即 child-X 中的 X)是/lock-node/目录下序列号最小的节点,则获得锁。否则,监视比自己创建节点的序列号小的节点中那个具有最大序号的节点,进入等待。解锁时,将自身创建的节点删除即可。
说明:利用临时顺序节点(EPHEMERAL_SEQUENTIAL)来实现分布式锁相当于创建顺序排队。它能避免了“惊群”效应,多个客户端共同等待锁时,当锁释放时只有一个客户端会被唤醒。
在图 3 (图片摘自:https://nofluffjuststuff.com/blog/scott_leberknight/2013/07/distributed_coordination_with_zookeeper_part_5_building_a_distributed_lock) 的例子中,创建 child-1 的客户端会先获得锁,然后是创建 child-2 的客户端获得锁,依次类推。
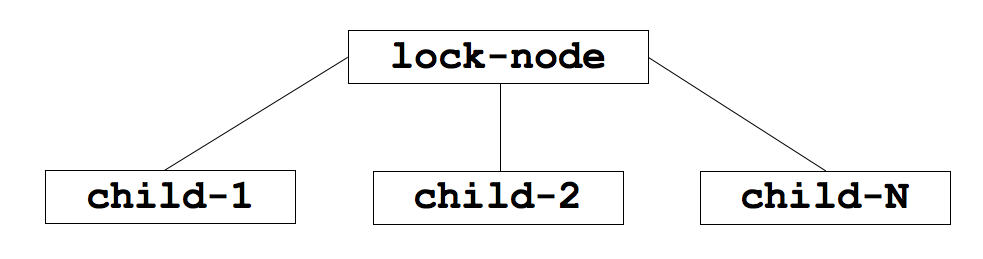
Figure 3: Parent lock znode and child znodes
3.1.2.1. 实现
ZooKeeper 自带的 recipes(https://github.com/apache/zookeeper/tree/master/src/recipes/lock) 中实现了思路二的算法。
参考:http://zookeeper.apache.org/doc/current/recipes.html#sc_recipes_Locks
3.1.3. 不足之处
思路一和思路二的算法都存在潜在的 timeout 问题。
对于思路一,下面情况(摘自:https://fpj.me/2016/02/10/note-on-fencing-and-distributed-locks/) 会出现问题:
- Client C1 creates /lock
- Client C1 goes into a long GC pause
- The session of C1 expires
- Client C2 creates /lock and becomes the new lock holder
- Client C1 comes back from the GC pause and it still thinks it holds the lock
At step 5, we have both clients C1 and C2 thinking they hold the lock… Trouble ahead!
对于思路二,也有类似的 timeout 问题,参考:https://stackoverflow.com/questions/14275613/concerns-about-zookeepers-lock-recipe
4. ZooKeeper 客户端框架:Curator
Curator 是开源的 Zookeeper 客户端(源自 Netflix 公司),它实现了分布式 Queue,分布式 Barrier,分布式 Lock 等等设施,这大大简化了 Zookeeper 客户端的开发工作量。
参考:
Apache Curator 入门实战:http://blog.csdn.net/dc_726/article/details/46475633
4.1. 实现分布式 Lock
InterProcessMutex 实现了分布式 Lock,使用很方便:
InterProcessMutex lock = new InterProcessMutex(client, lockPath);
if ( lock.acquire(maxWait, waitUnit) )
{
    try
    {
        // do some work inside of the critical section here
    }
    finally
    {
        lock.release();
    }
}